2020 DODGE GRAND CARAVAN door lock
[x] Cancel search: door lockPage 19 of 380

GETTING TO KNOW YOUR VEHICLE17
(Continued)
Power Door Locks — If Equipped
Power door lock switches are located on each
front door trim panel. Use these switches to lock
or unlock the doors.
Driver Power Door Lock Switches
If you push the power door lock switch while the
key fob is in the ignition, and any front door is
open, the power locks will not operate. This
prevents you from accidentally locking your
keys in the vehicle. Removing the key fob or
closing the door will allow the locks to operate.
A chime will sound if the key fob is in the ignition
switch and a door is open, as a reminder to
remove the key fob.
NOTE:
If you push the power door lock switch while the
sliding door is open, the sliding door will lock.
Automatic Door Locks — If Equipped
The auto door lock feature default condition is
enabled. When enabled, the door locks will lock
automatically when the vehicle's speed exceeds
15 mph (24 km/h). The auto door lock feature
can be enabled or disabled by your authorized
dealer per written request of the customer.
Please see an authorized dealer for service.
Before exiting a vehicle, always shift the
automatic transmission into PARK or the
manual transmission into FIRST gear or
REVERSE, apply the parking brake, turn the
vehicle OFF, remove the key fobs from
vehicle, and lock all doors. and lock your
vehicle.
Never leave children alone in a vehicle, or
with access to an unlocked vehicle. Leaving
children in a vehicle unattended is
dangerous for a number of reasons. A child
or others could be seriously or fatally
injured. Children should be warned not to
touch the parking brake, brake pedal or the
gear selector.
Allowing children to be in a vehicle unat
-
tended is dangerous for a number of
reasons. A child or others could be seriously
or fatally injured. Children should be
warned not to touch the parking brake,
brake pedal or the gear selector.
WARNING! (Continued)
Do not leave the key fob in or near the
vehicle, or in a location accessible to chil-
dren. A child could operate power windows,
other controls, or move the vehicle.
WARNING! (Continued)
2
20_RT_OM_EN_USC_t.book Page 17
Page 20 of 380

18GETTING TO KNOW YOUR VEHICLE
Unlock Doors Automatically On Exit — If
Equipped
The Unlock Doors Automatically On Exit feature
unlocks all of the vehicle doors when any door
is opened. This will occur only after the gear
selector has been placed into the PARK
position, after the vehicle has been driven (the
gear selector has been placed out of the PARK
position and all doors closed).
The Unlock Doors Automatically On Exit feature
will not operate if there is any manual operation
of the power door locks (lock or unlock).
On vehicles equipped with the optional
instrument cluster display, refer to “Instrument
Cluster Display” in “Getting To Know Your
Instrument Panel” for further information.
NOTE:
Use the Automatic Door Locks at 15 mph
(24 km/h) and Unlock Doors Automatically On
Exit features in accordance with local laws.
Power Sliding Side Door — If Equipped
Push the button on the key fob twice
within five seconds to open, close, or
reverse a power sliding door. The power sliding door may be power opened or
closed in several ways:
Key fob
Inside or outside handles
Buttons located:
In the overhead console
Just inside the sliding door
On the outside handle
Push the button on the key fob twice within five
seconds to open a power sliding door. When the
door is fully open, pushing the button twice
within five seconds a second time will close the
door.
There are power sliding side door switches
located on the B-pillar trim panel, just in front of
the power sliding door for the rear seat
passengers and in the overhead console for the
driver and passengers. Pushing the switch once
will open the power sliding door. If the switch is
pushed while the door is under a power cycle,
the door will reverse direction. NOTE:
The power sliding side door must be unlocked
before the power sliding door switches will
operate.
Power Sliding Door Switch
If the inside or outside door handles are used
while the power sliding side door is activated,
the power sliding door feature will be canceled
and will go into manual mode.
To avoid unintentional operation of the power
sliding doors from the rear seats, push the
power sliding door master lock button, located
in the overhead console, to disable the switches
and handles for the rear seat passengers.
20_RT_OM_EN_USC_t.book Page 18
Page 21 of 380

GETTING TO KNOW YOUR VEHICLE19
NOTE:
The power sliding side door switches will not
open the power sliding door if the gear
selector is in gear or the vehicle speed is
above 0 mph (0 km/h). To close the power
sliding door with the gear selector in gear and
vehicle speed at 0 mph (0 km/h), the brake
must be pushed.
If anything obstructs the power sliding side
door while it is closing or opening, the door
will automatically reverse to the closed or
open position, provided it meets sufficient
resistance.
If the power sliding side door is not in the full
open or close position, it will fully open when
a power sliding door switch is pushed. To
close the door, wait until it is fully open and
then push the switch again.
If the power sliding door encounters multiple
obstructions within the same cycle, the
system will automatically stop, the power
sliding door motor will make a clicking sound
until the door has no further movement. This
clicking sound can be stopped by pulling the inside or outside handle. If this condition
occurs, no damage is done to the power
sliding door motor. The power sliding door
must be opened or closed manually.
Overhead Console Control Buttons
Child Locks
To provide a safer environment for small
children riding in the rear seats, the sliding
doors are equipped with a Child Protection Door
Lock system.
NOTE:
When the Child Protection Door Lock System is
engaged, the door can only be opened by using
the outside door handle even though the inside
lock is in the unlocked position.
Child Protection Door Locks
WARNING!
You, or others, could be injured if caught in
the path of the sliding door. Make sure the
door path is clear before closing the door.
1 — Left Sliding Door
2 — Liftgate
3 — Right Sliding Door
4 — Sliding Door Power Off
2
20_RT_OM_EN_USC_t.book Page 19
Page 42 of 380

40GETTING TO KNOW YOUR VEHICLE
The interior lights will automatically turn off in
approximately 10 minutes for the first
activation and 90 seconds every activation
thereafter until the engine is started, if one of
the following occur:
A door, sliding door or the liftgate is left open.
Any overhead reading light is left on.
NOTE:
The ignition must be placed in the OFF position
for this feature to operate.
The courtesy lights also function as reading
lights. Push in on each lens to turn these lights
on while inside the vehicle. Push a second time
to turn each light off. You may adjust the
direction of these lights by pushing the outside
ring, which is identified with four directional
arrows (LED lamps only).
Rear Courtesy/Reading Lights — If Equipped
The overhead console has two sets of courtesy
lights. The lights turn on when a front door, a
sliding door or the liftgate is opened. If your
vehicle is equipped with Remote Keyless Entry,
the lights will also turn on when the unlock
button on the key fob is pushed.
The courtesy lights also function as reading
lights. Push in on each lens to turn these lights
on while inside the vehicle. Push the lens a
second time to turn each light off. You may
adjust the direction of these lights by pushing
the outside ring, which is identified with four
directional arrows.
Reading Lights
Rear Console Halo Lighting
Halo lights are strategically placed soft lighting
that help to illuminate specific areas to aid the
occupants in locating specific features while
driving at night.
The rear overhead console has recessed halo
lighting around the perimeter of the console
base. This feature provides additional lighting
options while traveling and is controlled by the
ambient light dimmer control of the headlight
switch.
Ambient Light Dimmer Control
20_RT_OM_EN_USC_t.book Page 40
Page 61 of 380

GETTING TO KNOW YOUR VEHICLE59
WINDOWS
Power Vent Windows — If Equipped
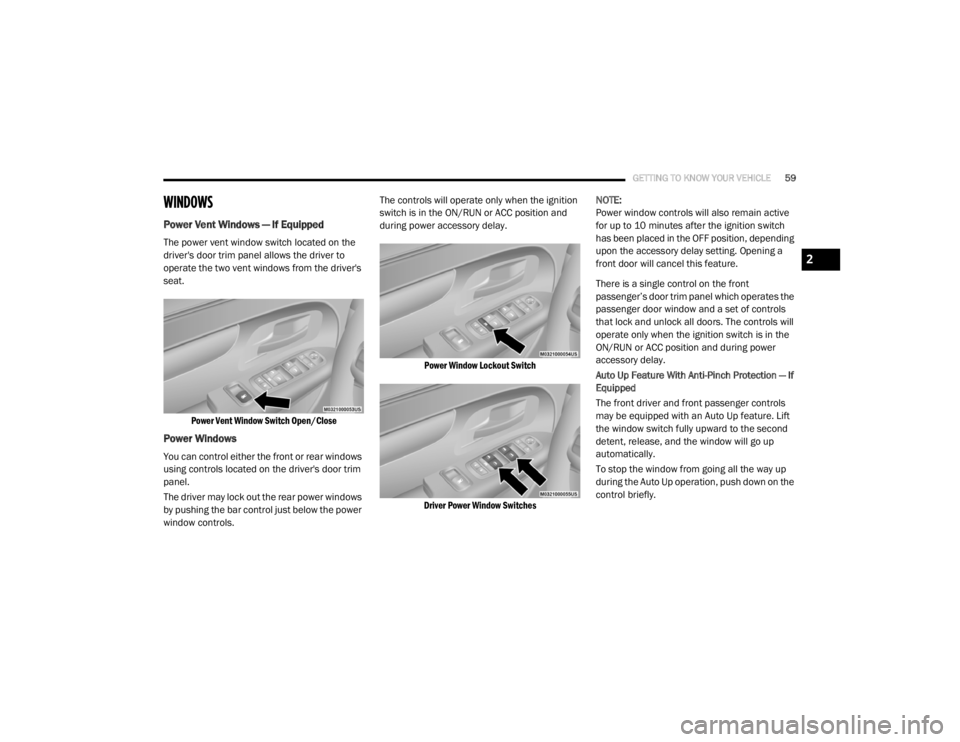
The power vent window switch located on the
driver's door trim panel allows the driver to
operate the two vent windows from the driver's
seat.
Power Vent Window Switch Open/Close
Power Windows
You can control either the front or rear windows
using controls located on the driver's door trim
panel.
The driver may lock out the rear power windows
by pushing the bar control just below the power
window controls. The controls will operate only when the ignition
switch is in the ON/RUN or ACC position and
during power accessory delay.
Power Window Lockout Switch
Driver Power Window Switches
NOTE:
Power window controls will also remain active
for up to 10 minutes after the ignition switch
has been placed in the OFF position, depending
upon the accessory delay setting. Opening a
front door will cancel this feature.
There is a single control on the front
passenger’s door trim panel which operates the
passenger door window and a set of controls
that lock and unlock all doors. The controls will
operate only when the ignition switch is in the
ON/RUN or ACC position and during power
accessory delay.
Auto Up Feature With Anti-Pinch Protection — If
Equipped
The front driver and front passenger controls
may be equipped with an Auto Up feature. Lift
the window switch fully upward to the second
detent, release, and the window will go up
automatically.
To stop the window from going all the way up
during the Auto Up operation, push down on the
control briefly.
2
20_RT_OM_EN_USC_t.book Page 59
Page 62 of 380

60GETTING TO KNOW YOUR VEHICLE
To close the window part way, lift the window
control to the first detent and release when you
want the window to stop.
NOTE:
If the window runs into any obstacle during
auto-closure, it will reverse direction and
then go back down. Remove the obstacle and
use the window control again to close the
window.
Any impact due to rough road conditions may
trigger the auto reverse function unexpect -
edly during auto-closure. If this happens, pull
the control lightly to the first detent and hold
to close window manually. Auto Up Reset — If Equipped
To reactivate the Auto Up feature, perform the
following steps after vehicle power is restored:
1. Pull the window control up to close the
window completely and continue to hold
the control up for an additional two
seconds after the window is closed.
2. Push the window control down firmly to the second detent to open the window
completely and continue to hold the control
down for an additional two seconds after
the window is fully open.
Sliding Side Door Power Window Control — If
Equipped
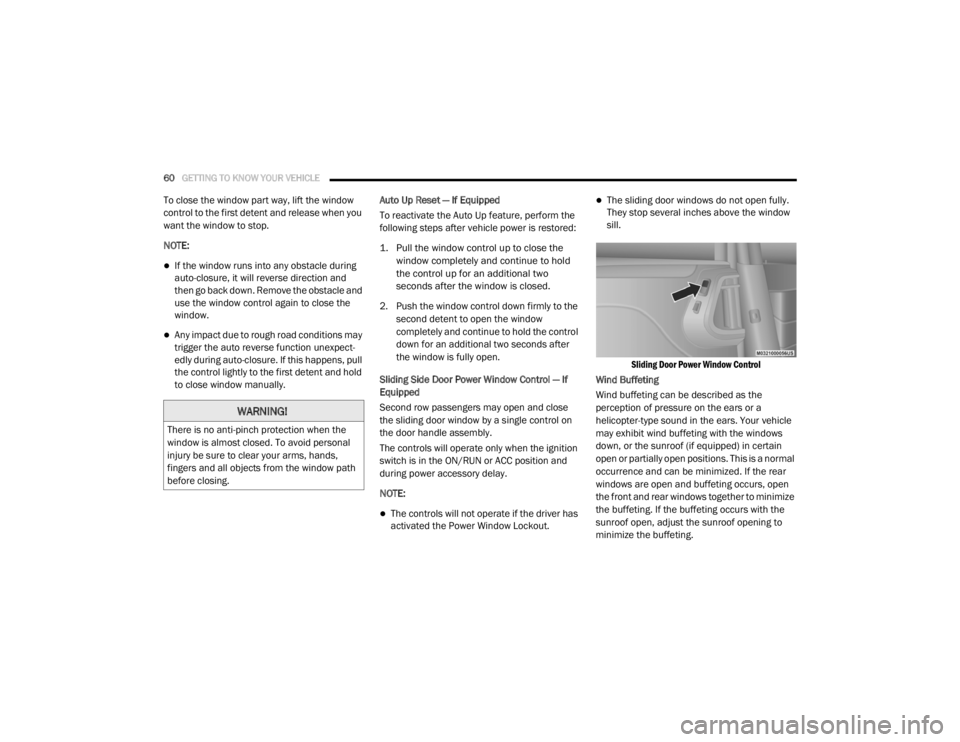
Second row passengers may open and close
the sliding door window by a single control on
the door handle assembly.
The controls will operate only when the ignition
switch is in the ON/RUN or ACC position and
during power accessory delay.
NOTE:
The controls will not operate if the driver has
activated the Power Window Lockout.
The sliding door windows do not open fully.
They stop several inches above the window
sill.
Sliding Door Power Window Control
Wind Buffeting
Wind buffeting can be described as the
perception of pressure on the ears or a
helicopter-type sound in the ears. Your vehicle
may exhibit wind buffeting with the windows
down, or the sunroof (if equipped) in certain
open or partially open positions. This is a normal
occurrence and can be minimized. If the rear
windows are open and buffeting occurs, open
the front and rear windows together to minimize
the buffeting. If the buffeting occurs with the
sunroof open, adjust the sunroof opening to
minimize the buffeting.
WARNING!
There is no anti-pinch protection when the
window is almost closed. To avoid personal
injury be sure to clear your arms, hands,
fingers and all objects from the window path
before closing.
20_RT_OM_EN_USC_t.book Page 60
Page 69 of 380

GETTING TO KNOW YOUR VEHICLE67
5. Push and hold the programmed
HomeLink® button and observe the
indicator light.
NOTE:
If the indicator light stays on constantly,
programming is complete and the garage
door/device should activate when the
HomeLink® button is pushed.
To program the two remaining
HomeLink® buttons, repeat each step
for each remaining button. DO NOT erase
the channels.
If you unplugged the garage door
opener/device for programming, plug it back in
at this time.
Using HomeLink®
To operate, push and release the programmed
HomeLink® button. Activation will now occur for
the programmed device (i.e. garage door
opener, gate operator, security system, entry
door lock, home/office lighting, etc.) The
hand-held transmitter of the device may also be
used at any time.
Security
It is advised to erase all channels before you sell
or turn in your vehicle.
To do this, push and hold the two outside
buttons for 20 seconds until the red indicator
flashes.
NOTE:
All channels will be erased. Individual channels
cannot be erased.
The HomeLink® Universal Transceiver is
disabled when the vehicle security alarm is
active.
Troubleshooting Tips
If you are having trouble programming
HomeLink®, here are some of the most
common solutions:
Replace the battery in the garage door
opener hand-held transmitter.
Push the LEARN button on the garage door
opener to complete the training for a Rolling
Code.
Did you unplug the device for programming
and remember to plug it back in?
If you have any problems, or require assistance,
please call toll-free 1-800-355-3515 or, on the
Internet at HomeLink.com for information or
assistance.
WARNING!
Vehicle exhaust contains carbon monoxide,
a dangerous gas. Do not run your vehicle in
the garage while programming the trans -
ceiver. Exhaust gas can cause serious
injury or death.
Your motorized door or gate will open and
close while you are programming the
universal transceiver. Do not program the
transceiver if people, pets or other objects
are in the path of the door or gate. Only use
this transceiver with a garage door opener
that has a “stop and reverse” feature as
required by Federal safety standards. This
includes most garage door opener models
manufactured after 1982. Do not use a
garage door opener without these safety
features.
2
20_RT_OM_EN_USC_t.book Page 67
Page 74 of 380

72GETTING TO KNOW YOUR VEHICLE
(Continued)
Umbrella Holder
An umbrella holder has been conveniently
molded into the left front door entry scuff
molding.
Umbrella Holder
Second Row Seat Storage Bins — If Equipped
The seat storage bins are located on the floor in
front of the second row seats. The area below
the covers can be used for storage when the
second row seat is in the upright position.
Pull up on the storage bin latch to open the
cover. Slide the storage bin locking mechanism
to the "lock" position to allow greater access to
the storage bin.
Storage Bin
Storage Bin Safety Warning
Carefully follow these warnings to help prevent
personal injury or damage to your vehicle:
WARNING!
In a collision, serious injury could result if the
seat storage bin covers are not properly
latched.
Do not drive the vehicle with the storage bin
covers open.
Keep the storage bin covers closed and
latched while the vehicle is in motion.
Do not operate the storage bin covers while
the vehicle is in motion.
Do not use a storage bin latch as a tie
down.
CAUTION!
The storage bin cover must lay flat and be
locked to avoid damage from contact with the
front seat tracks, which have minimal
clearance to the cover. If the storage bin
cover is left in the open position, front seat
adjustment may damage the cover.
WARNING!
Always close the storage bin covers when
your vehicle is unattended.
Do not allow children to have access to the
second row seat storage bins. Once in the
storage bin, young children may not be able
to escape. If trapped in the storage bin, chil
-
dren can die from suffocation or heat
stroke.
In a collision, serious injury could result if
the seat storage bin covers are not properly
latched.
20_RT_OM_EN_USC_t.book Page 72