2020 DODGE CHARGER radio
[x] Cancel search: radioPage 229 of 412
IN CASE OF EMERGENCY227
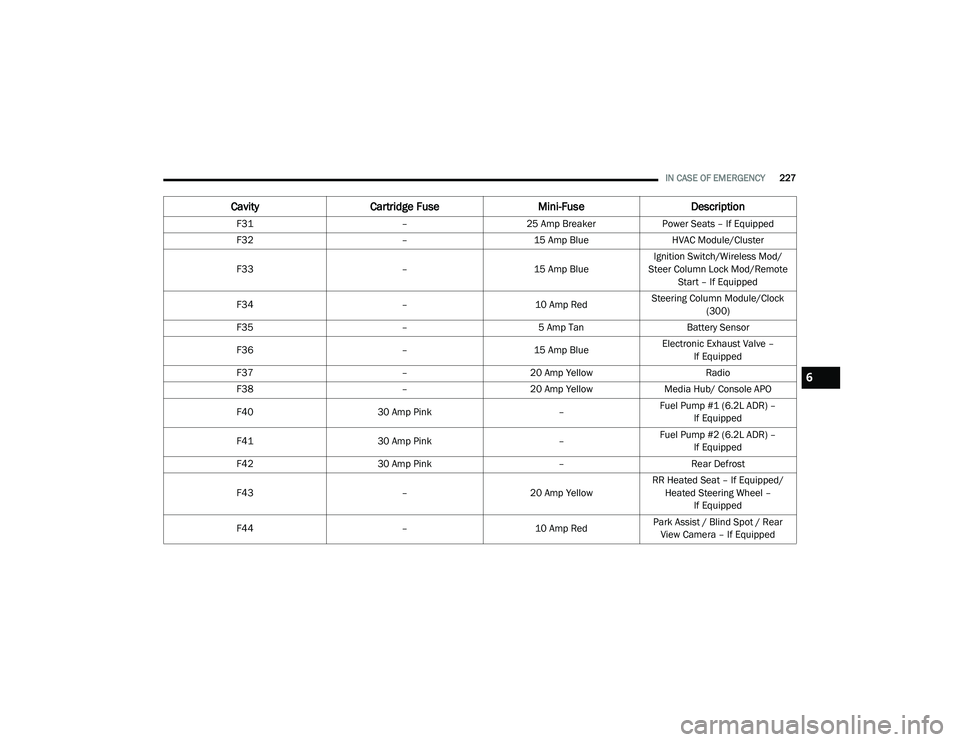
F31 –25 Amp Breaker Power Seats – If Equipped
F32 –15 Amp Blue HVAC Module/Cluster
F33 –15 Amp BlueIgnition Switch/Wireless Mod/
Steer Column Lock Mod/Remote Start – If Equipped
F34 –10 Amp RedSteering Column Module/Clock
(300)
F35 –5 Amp Tan Battery Sensor
F36 –15 Amp BlueElectronic Exhaust Valve –
If Equipped
F37 –20 Amp Yellow Radio
F38 –20 Amp Yellow Media Hub/ Console APO
F40 30 Amp Pink –Fuel Pump #1 (6.2L ADR) –
If Equipped
F41 30 Amp Pink –Fuel Pump #2 (6.2L ADR) –
If Equipped
F42 30 Amp Pink –Rear Defrost
F43 –20 Amp YellowRR Heated Seat – If Equipped/
Heated Steering Wheel – If Equipped
F44 –10 Amp RedPark Assist / Blind Spot / Rear
View Camera – If Equipped
Cavity Cartridge Fuse Mini-FuseDescription
6
20_LD_OM_EN_USC_t.book Page 227
Page 243 of 412

IN CASE OF EMERGENCY241
1. Apply the parking brake, shift the
automatic transmission into PARK and
place the ignition in the OFF position.
2. Turn off the heater, radio, and all unnecessary electrical accessories.
3. If using another vehicle to jump start the battery, park the vehicle within the jumper
cable’s reach, apply the parking brake and
make sure the ignition is OFF.
JUMP STARTING PROCEDURE
1. Connect the positive
(+) end of the jumper
cable to the remote positive (+)
post of the
vehicle with the discharged battery.
2. Connect the opposite end of the positive (+)
jumper cable to the positive (+) post of the
booster battery.
3. Connect the negative (-) end of the jumper
cable to the negative (-) post of the booster
battery.
4. Connect the opposite end of the negative (-)
jumper cable to the remote negative (-) post
of the vehicle with the discharged battery. 5. Start the engine in the vehicle that has the
booster battery, let the engine idle a few
minutes, and then start the engine in the
vehicle with the discharged battery.
6. Once the engine is started, remove the jumper cables in the reverse sequence.
Disconnecting The Jumper Cables
1. Disconnect the negative
(-) end of the
jumper cable from the remote negative (-)
post of the vehicle with the discharged
battery.
2. Disconnect the opposite end of the negative (-) jumper cable from the negative (-) post of
the booster battery.
Batteries contain sulfuric acid that can
burn your skin or eyes and generate
hydrogen gas which is flammable and
explosive. Keep open flames or sparks
away from the battery.
WARNING!
Do not allow vehicles to touch each other as
this could establish a ground connection and
personal injury could result.
WARNING! (Continued)
WARNING!
Failure to follow this jump starting procedure
could result in personal injury or property
damage due to battery explosion.
CAUTION!
Failure to follow these procedures could
result in damage to the charging system of
the booster vehicle or the discharged vehicle.
WARNING!
Do not connect the jumper cable to the
negative (-) post of the discharged battery. The
resulting electrical spark could cause the
battery to explode and could result in personal
injury. Only use the specific ground point, do
not use any other exposed metal parts.
6
20_LD_OM_EN_USC_t.book Page 241
Page 309 of 412
SERVICING AND MAINTENANCE307
LEATHER PARTS
Mopar Total Clean is specifically recommended
for leather upholstery.
Your leather upholstery can be best preserved by
regular cleaning with a damp soft cloth. Small
particles of dirt can act as an abrasive and
damage the leather upholstery and should be
removed promptly with a damp cloth. Stubborn
soils can be removed easily with a soft cloth and
Mopar Total Clean. Care should be taken to avoid
soaking your leather upholstery with any liquid.
Please do not use polishes, oils, cleaning fluids,
solvents, detergents, or ammonia-based
cleaners to clean your leather upholstery.
Application of a leather conditioner is not
required to maintain the original condition.
NOTE:
If equipped with light colored leather, it tends to
show any foreign material, dirt, and fabric dye
transfer more so than darker colors. The leather
is designed for easy cleaning, and FCA recom
-
mends Mopar total care leather cleaner applied
on a cloth to clean the leather seats as needed.
GLASS SURFACES
All glass surfaces should be cleaned on a
regular basis with Mopar Glass Cleaner, or any
commercial household-type glass cleaner.
Never use an abrasive type cleaner. Use caution
when cleaning the inside rear window equipped
with electric defrosters or windows equipped
with radio antennas. Do not use scrapers or
other sharp instruments that may scratch the
elements.
When cleaning the rear view mirror, spray
cleaner on the towel or cloth that you are using.
Do not spray cleaner directly on the mirror.
CAUTION!
Do not use Alcohol and Alcohol-based and/or
Ketone based cleaning products to clean
leather upholstery, as damage to the
upholstery may result.
7
20_LD_OM_EN_USC_t.book Page 307
Page 325 of 412

MULTIMEDIA323
When making a selection, press the button on
the touchscreen to enter the desired menu.
Once in the desired menu, press and release
the preferred setting “option” until a check
mark appears next to the setting, showing that
setting has been selected. Once the setting is complete, press the X button on the
touchscreen to close out of the settings screen.
Pressing the Up or Down Arrow button on the
right side of the screen will allow you to toggle
up or down through the available settings.
The following tables list the settings that may be
found within the Uconnect 4 with 7-inch display
radio, along with the selectable options
pertaining to each setting.
Language
After pressing the Language button on the touchscreen, the following setting will be available:
Display
After pressing the Display button on the touchscreen, the following settings will be available:
Setting Name
Selectable Options
LanguageEnglishFrançais Español
Setting Name Selectable Options
Display ModeManual Auto
Display Brightness With Headlights ON +
–
NOTE:
When in the “Display Brightness With Headlights ON” display, you may select the brightness with the headlights on. Adjust the brightness from
(1–10) with the + and – buttons on the touchscreen.
To make changes to the "Display Brightness With Headlights ON" setting, the headlights must be on and the interior dimmer switch must not be in
the "party" or "parade" position.
9
20_LD_OM_EN_USC_t.book Page 323
Page 328 of 412

326MULTIMEDIA
Clock
After pressing the Clock button on the touchscreen, the following settings will be available:
Camera
After pressing the Camera button on the touchscreen, the following settings will be available:
Setting Name Selectable Options
Sync Time With GPS — If Equipped OnOff
NOTE:
The “Sync Time With GPS” feature will allow you to automatically have the radio set the time. Set Time +–
Set Time Minutes +–
Time Format 12 hrs24 hrs
Show Time In Status Bar — If Equipped OnOff
NOTE:
The “Show Time In Status Bar” feature will allow you to turn on or shut off the digital clock in the status bar.
Setting Name Selectable Options
ParkView Backup Camera Delay OnOff
NOTE:
The “ParkView Backup Camera Delay” setting determines whether or not the screen will display the rear view image with dynamic grid lines for up to
10 seconds after the vehicle is shifted out of REVERSE. This delay will be canceled if the vehicle’s speed exceeds 8 mph (13 km/h), the transmission
is shifted into PARK, or the ignition is switched to the OFF position.
20_LD_OM_EN_USC_t.book Page 326
Page 331 of 412
MULTIMEDIA329
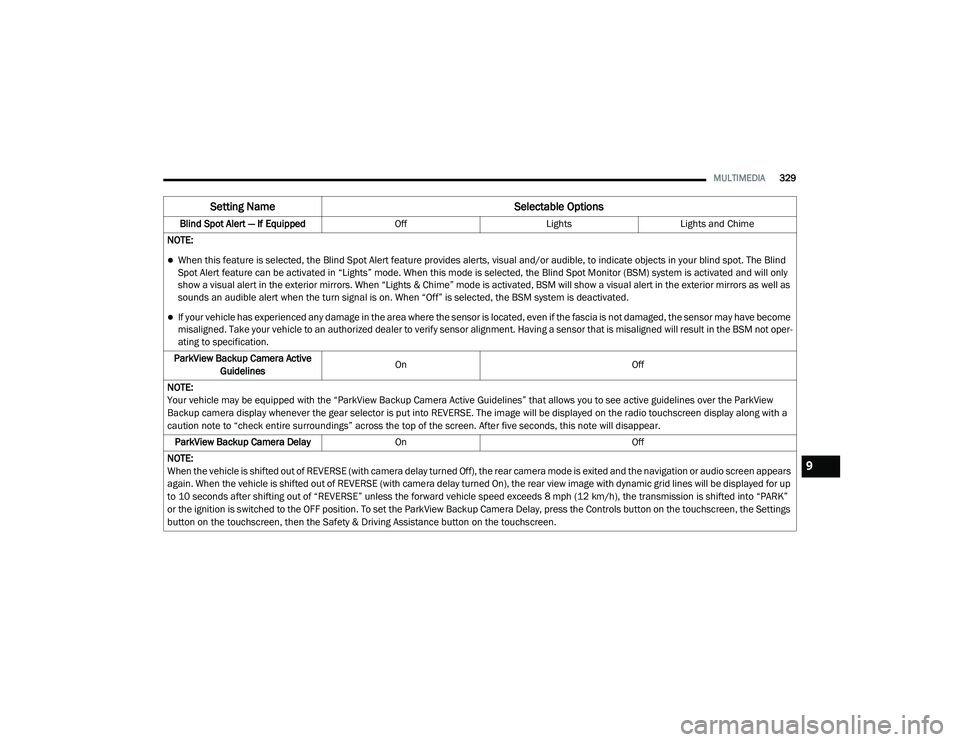
Blind Spot Alert — If Equipped OffLightsLights and Chime
NOTE:
When this feature is selected, the Blind Spot Alert feature provides alerts, visual and/or audible, to indicate objects in your blind spot. The Blind
Spot Alert feature can be activated in “Lights” mode. When this mode is selected, the Blind Spot Monitor (BSM) system is activated and will only
show a visual alert in the exterior mirrors. When “Lights & Chime” mode is activated, BSM will show a visual alert in the exterior mirrors as well as
sounds an audible alert when the turn signal is on. When “Off” is selected, the BSM system is deactivated.
If your vehicle has experienced any damage in the area where the sensor is located, even if the fascia is not damaged, the sensor may have become
misaligned. Take your vehicle to an authorized dealer to verify sensor alignment. Having a sensor that is misaligned will result in the BSM not oper -
ating to specification.
ParkView Backup Camera Active Guidelines On
Off
NOTE:
Your vehicle may be equipped with the “ParkView Backup Camera Active Guidelines” that allows you to see active guidelines over the ParkView
Backup camera display whenever the gear selector is put into REVERSE. The image will be displayed on the radio touchscreen display along with a
caution note to “check entire surroundings” across the top of the screen. After five seconds, this note will disappear. ParkView Backup Camera Delay On Off
NOTE:
When the vehicle is shifted out of REVERSE (with camera delay turned Off), the rear camera mode is exited and the navigation or audio screen appears
again. When the vehicle is shifted out of REVERSE (with camera delay turned On), the rear view image with dynamic grid lines will be displayed for up
to 10 seconds after shifting out of “REVERSE” unless the forward vehicle speed exceeds 8 mph (12 km/h), the transmission is shifted into “PARK”
or the ignition is switched to the OFF position. To set the ParkView Backup Camera Delay, press the Controls button on the touchscreen, the Settings
button on the touchscreen, then the Safety & Driving Assistance button on the touchscreen.
Setting Name Selectable Options
9
20_LD_OM_EN_USC_t.book Page 329
Page 334 of 412
332MULTIMEDIA
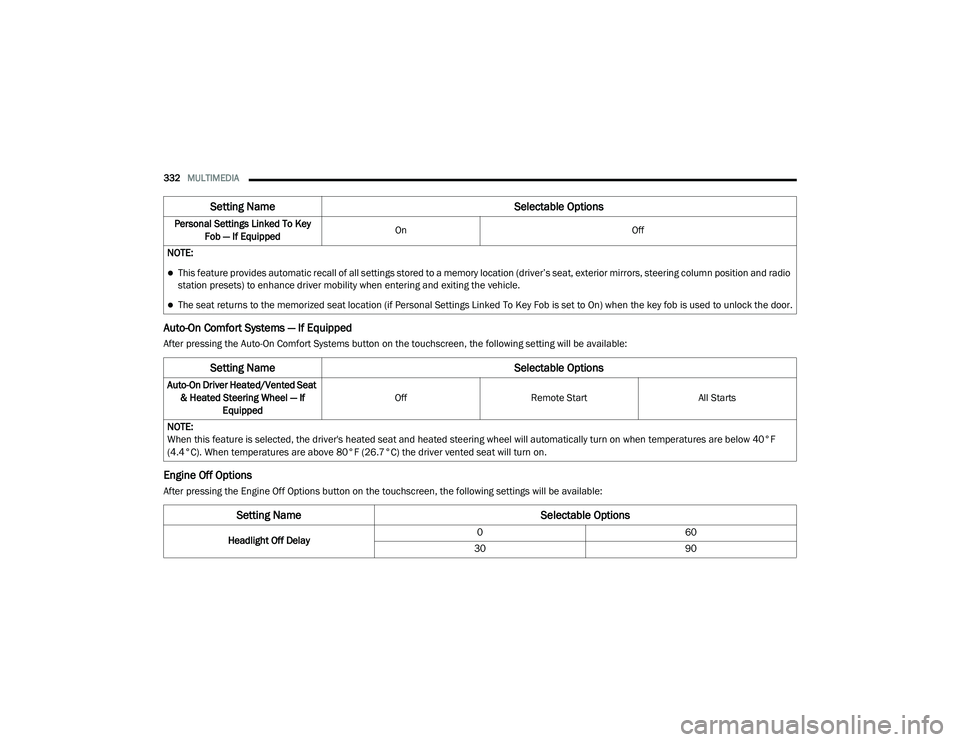
Auto-On Comfort Systems — If Equipped
After pressing the Auto-On Comfort Systems button on the touchscreen, the following setting will be available:
Engine Off Options
After pressing the Engine Off Options button on the touchscreen, the following settings will be available:Personal Settings Linked To Key
Fob — If Equipped On
Off
NOTE:
This feature provides automatic recall of all settings stored to a memory location (driver’s seat, exterior mirrors, steering column position and radio
station presets) to enhance driver mobility when entering and exiting the vehicle.
The seat returns to the memorized seat location (if Personal Settings Linked To Key Fob is set to On) when the key fob is used to unlock the door.
Setting Name Selectable Options
Setting NameSelectable Options
Auto-On Driver Heated/Vented Seat
& Heated Steering Wheel — If Equipped Off
Remote Start All Starts
NOTE:
When this feature is selected, the driver's heated seat and heated steering wheel will automatically turn on when temperatures are below 40°F
(4.4°C). When temperatures are above 80°F (26.7°C) the driver vented seat will turn on.
Setting Name Selectable Options
Headlight Off Delay0
60
30 90
20_LD_OM_EN_USC_t.book Page 332
Page 335 of 412
MULTIMEDIA333
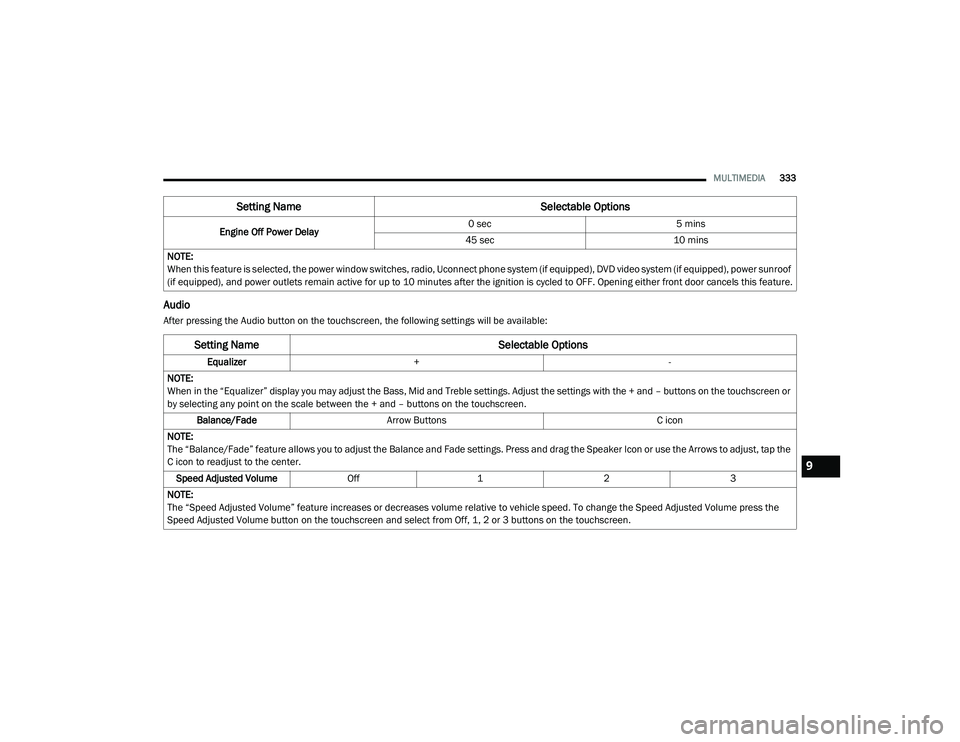
Audio
After pressing the Audio button on the touchscreen, the following settings will be available:Engine Off Power Delay
0 sec
5 mins
45 sec 10 mins
NOTE:
When this feature is selected, the power window switches, radio, Uconnect phone system (if equipped), DVD video system (if equipped), power sunroof
(if equipped), and power outlets remain active for up to 10 minutes after the ignition is cycled to OFF. Opening either front door cancels this feature.
Setting Name Selectable Options
Setting NameSelectable Options
Equalizer+ -
NOTE:
When in the “Equalizer” display you may adjust the Bass, Mid and Treble settings. Adjust the settings with the + and – buttons on the touchscreen or
by selecting any point on the scale between the + and – buttons on the touchscreen. Balance/Fade Arrow Buttons C icon
NOTE:
The “Balance/Fade” feature allows you to adjust the Balance and Fade settings. Press and drag the Speaker Icon or use the Arrows to adjust, tap the
C icon to readjust to the center. Speed Adjusted Volume Off123
NOTE:
The “Speed Adjusted Volume” feature increases or decreases volume relative to vehicle speed. To change the Speed Adjusted Volume press the
Speed Adjusted Volume button on the touchscreen and select from Off, 1, 2 or 3 buttons on the touchscreen.
9
20_LD_OM_EN_USC_t.book Page 333