2020 DODGE CHARGER start stop button
[x] Cancel search: start stop buttonPage 198 of 412

196STARTING AND OPERATING
(Continued)
object as a sensor problem, causing the
“PARKSENSE UNAVAILABLE SERVICE
REQUIRED” message to be shown in the
instrument cluster display.
LANESENSE — IF EQUIPPED
LANESENSE OPERATION
The LaneSense system is operational at speeds
above 37 mph (60 km/h) and below 112 mph
(180 km/h). The LaneSense system uses a
forward looking camera to detect lane markings
and measure vehicle position within the lane
boundaries.
When both lane markings are detected and the
driver unintentionally drifts out of the lane (no
turn signal applied), the LaneSense system
provides a haptic warning in the form of torque
applied to the steering wheel to prompt the
driver to remain within the lane boundaries. If
the driver continues to unintentionally drift out
of the lane, the LaneSense system provides a
visual warning through the instrument cluster
display to prompt the driver to remain within the
lane boundaries. The driver may manually override the haptic
warning by applying torque into the steering
wheel at any time.
When only a single lane marking is detected
and the driver unintentionally drifts across the
lane marking (no turn signal applied), the
LaneSense system provides visual warnings
through the instrument cluster display to
prompt the driver to remain within the lane.
When only a single lane marking is detected, a
haptic (torque) warning will not be provided.
NOTE:
When operating conditions have been met, the
LaneSense system will monitor if the driver’s
hands are on the steering wheel and provides
an audible warning to the driver when the
driver’s hands are not detected on the steering
wheel. The system will cancel if the driver does
not return their hands to the wheel.
TURNING LANESENSE ON OR OFF
The default status of LaneSense is off.
The LaneSense button is located on the center
stack below the Uconnect display.
WARNING!
Drivers must be careful when backing up
even when using the Rear Park Assist system.
Always check carefully behind your vehicle,
and be sure to check for pedestrians,
animals, other vehicles, obstructions, or blind
spots before backing up. You are responsible
for the safety of your surroundings and must
continue to pay attention while backing up.
Failure to do so can result in serious injury or
death.
CAUTION!
ParkSense is only a parking aid and it is
unable to recognize every obstacle,
including small obstacles. Parking curbs
might be temporarily detected or not
detected at all. Obstacles located above or
below the sensors will not be detected
when they are in close proximity.
The vehicle must be driven slowly when
using ParkSense in order to be able to stop
in time when an obstacle is detected. It is
recommended that the driver looks over
his/her shoulder when using ParkSense.
CAUTION!
(Continued)
20_LD_OM_EN_USC_t.book Page 196
Page 202 of 412

200STARTING AND OPERATING
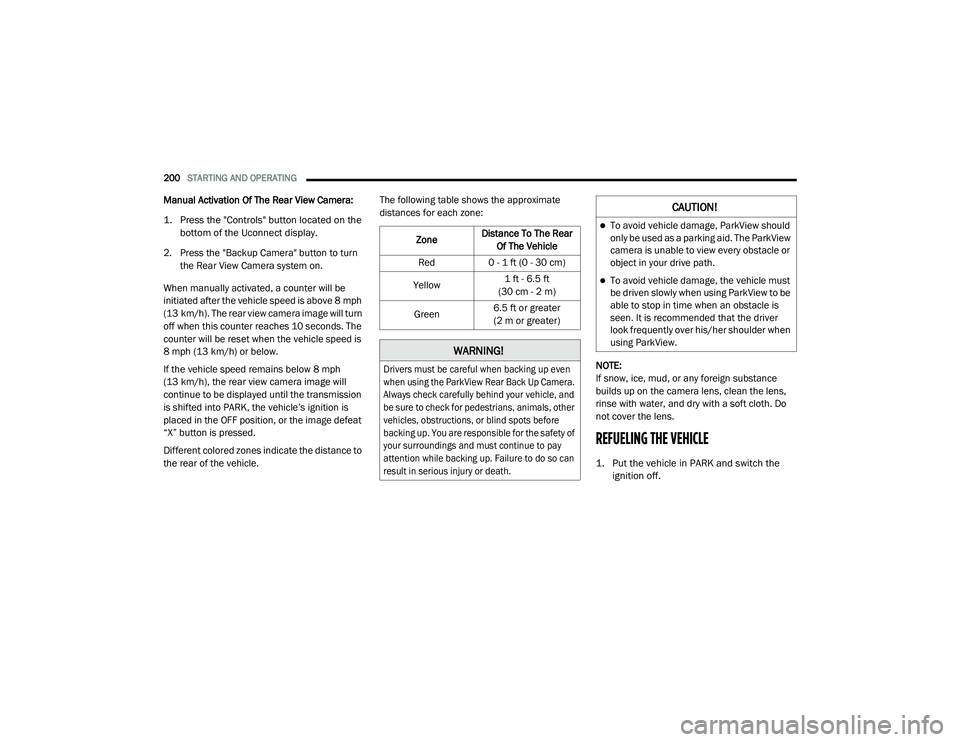
Manual Activation Of The Rear View Camera:
1. Press the "Controls" button located on the
bottom of the Uconnect display.
2. Press the "Backup Camera" button to turn the Rear View Camera system on.
When manually activated, a counter will be
initiated after the vehicle speed is above 8 mph
(13 km/h). The rear view camera image will turn
off when this counter reaches 10 seconds. The
counter will be reset when the vehicle speed is
8 mph (13 km/h) or below.
If the vehicle speed remains below 8 mph
(13 km/h), the rear view camera image will
continue to be displayed until the transmission
is shifted into PARK, the vehicle’s ignition is
placed in the OFF position, or the image defeat
“X” button is pressed.
Different colored zones indicate the distance to
the rear of the vehicle. The following table shows the approximate
distances for each zone:
NOTE:
If snow, ice, mud, or any foreign substance
builds up on the camera lens, clean the lens,
rinse with water, and dry with a soft cloth. Do
not cover the lens.
REFUELING THE VEHICLE
1. Put the vehicle in PARK and switch the ignition off.
Zone
Distance To The Rear
Of The Vehicle
Red 0 - 1 ft (0 - 30 cm)
Yellow 1 ft - 6.5 ft
(30 cm - 2 m)
Green 6.5 ft or greater
(2 m or greater)
WARNING!
Drivers must be careful when backing up even
when using the ParkView Rear Back Up Camera.
Always check carefully behind your vehicle, and
be sure to check for pedestrians, animals, other
vehicles, obstructions, or blind spots before
backing up. You are responsible for the safety of
your surroundings and must continue to pay
attention while backing up. Failure to do so can
result in serious injury or death.
CAUTION!
To avoid vehicle damage, ParkView should
only be used as a parking aid. The ParkView
camera is unable to view every obstacle or
object in your drive path.
To avoid vehicle damage, the vehicle must
be driven slowly when using ParkView to be
able to stop in time when an obstacle is
seen. It is recommended that the driver
look frequently over his/her shoulder when
using ParkView.
20_LD_OM_EN_USC_t.book Page 200
Page 239 of 412

IN CASE OF EMERGENCY237
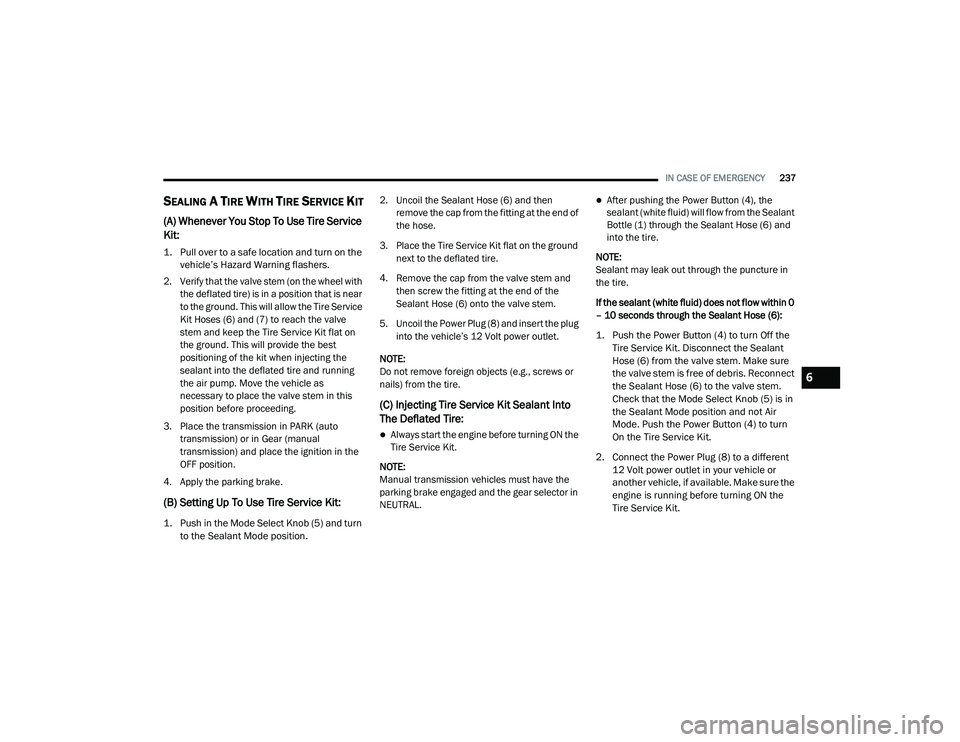
SEALING A TIRE WITH TIRE SERVICE KIT
(A) Whenever You Stop To Use Tire Service
Kit:
1. Pull over to a safe location and turn on the
vehicle’s Hazard Warning flashers.
2. Verify that the valve stem (on the wheel with the deflated tire) is in a position that is near
to the ground. This will allow the Tire Service
Kit Hoses (6) and (7) to reach the valve
stem and keep the Tire Service Kit flat on
the ground. This will provide the best
positioning of the kit when injecting the
sealant into the deflated tire and running
the air pump. Move the vehicle as
necessary to place the valve stem in this
position before proceeding.
3. Place the transmission in PARK (auto transmission) or in Gear (manual
transmission) and place the ignition in the
OFF position.
4. Apply the parking brake.
(B) Setting Up To Use Tire Service Kit:
1. Push in the Mode Select Knob (5) and turn to the Sealant Mode position.
2. Uncoil the Sealant Hose (6) and then
remove the cap from the fitting at the end of
the hose.
3. Place the Tire Service Kit flat on the ground next to the deflated tire.
4. Remove the cap from the valve stem and then screw the fitting at the end of the
Sealant Hose (6) onto the valve stem.
5. Uncoil the Power Plug (8) and insert the plug into the vehicle’s 12 Volt power outlet.
NOTE:
Do not remove foreign objects (e.g., screws or
nails) from the tire.
(C) Injecting Tire Service Kit Sealant Into
The Deflated Tire:
Always start the engine before turning ON the
Tire Service Kit.
NOTE:
Manual transmission vehicles must have the
parking brake engaged and the gear selector in
NEUTRAL.
After pushing the Power Button (4), the
sealant (white fluid) will flow from the Sealant
Bottle (1) through the Sealant Hose (6) and
into the tire.
NOTE:
Sealant may leak out through the puncture in
the tire.
If the sealant (white fluid) does not flow within 0
– 10 seconds through the Sealant Hose (6):
1. Push the Power Button (4) to turn Off the Tire Service Kit. Disconnect the Sealant
Hose (6) from the valve stem. Make sure
the valve stem is free of debris. Reconnect
the Sealant Hose (6) to the valve stem.
Check that the Mode Select Knob (5) is in
the Sealant Mode position and not Air
Mode. Push the Power Button (4) to turn
On the Tire Service Kit.
2. Connect the Power Plug (8) to a different 12 Volt power outlet in your vehicle or
another vehicle, if available. Make sure the
engine is running before turning ON the
Tire Service Kit.
6
20_LD_OM_EN_USC_t.book Page 237
Page 348 of 412

346MULTIMEDIA
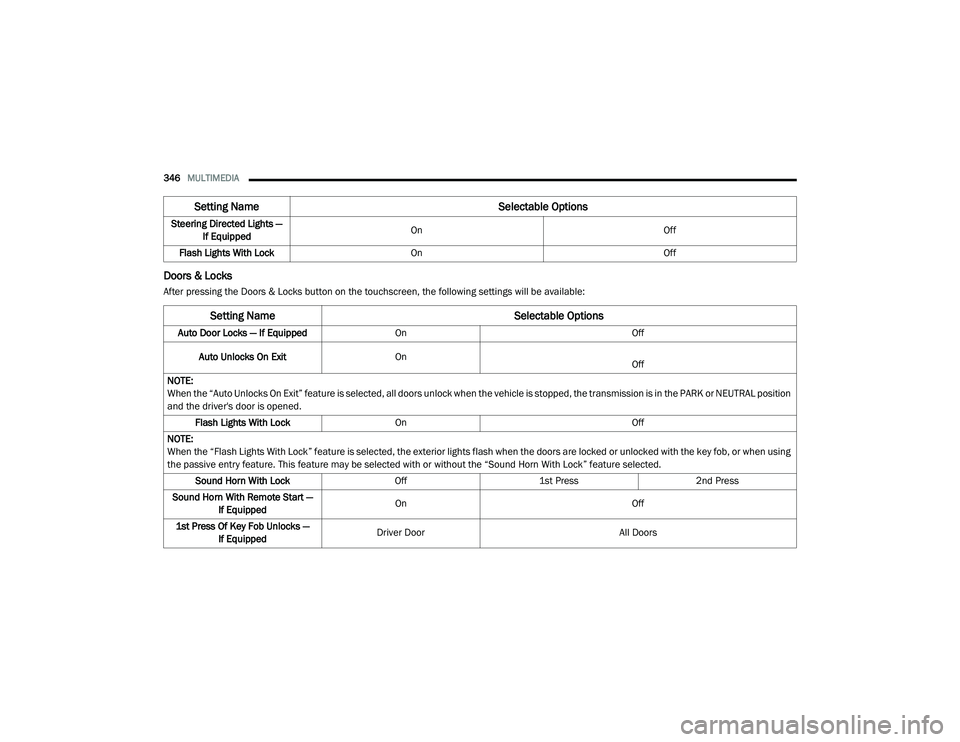
Doors & Locks
After pressing the Doors & Locks button on the touchscreen, the following settings will be available:Steering Directed Lights —
If Equipped On
Off
Flash Lights With Lock On Off
Setting Name Selectable Options
Setting NameSelectable Options
Auto Door Locks — If EquippedOn Off
Auto Unlocks On Exit On
Off
NOTE:
When the “Auto Unlocks On Exit” feature is selected, all doors unlock when the vehicle is stopped, the transmission is in the PARK or NEUTRAL position
and the driver's door is opened. Flash Lights With Lock On Off
NOTE:
When the “Flash Lights With Lock” feature is selected, the exterior lights flash when the doors are locked or unlocked with the key fob, or when using
the passive entry feature. This feature may be selected with or without the “Sound Horn With Lock” feature selected. Sound Horn With Lock Off1st Press 2nd Press
Sound Horn With Remote Start — If Equipped On
Off
1st Press Of Key Fob Unlocks — If Equipped Driver Door
All Doors
20_LD_OM_EN_USC_t.book Page 346
Page 358 of 412

356MULTIMEDIA
Drag & Drop Menu Bar
The Uconnect features and services in the main
menu bar are easily changed for your
convenience. Simply follow these steps:
Uconnect 4 Main Menu
1. Press the Apps button to open the App screen.
2. Press and hold, then drag the selected App to replace an existing shortcut in the main
menu bar.
The new app shortcut, that was dragged down
onto the main menu bar, will now be an active
App/shortcut.
NOTE:
This feature is only available if the vehicle is in
PARK.
RADIO MODE
Radio Controls
The radio is equipped with the following modes:
AM
FM
SiriusXM® Satellite Radio – If Equipped
Press the Radio button on the touchscreen,
bottom left corner, to enter the Radio Mode. The
different tuner modes, AM, FM, and SXM, can
then be selected by pressing the corresponding
buttons in the Radio mode.
Volume/Power Control
Push the Volume/Power control knob to turn off
the screen and mute the radio. Push the
Volume/Power control knob a second time to
turn the screen back on and unmute the radio.
The electronic volume control turns
continuously (360 degrees) in either direction,
without stopping. Turning the Volume/Power
control knob clockwise increases the volume,
and counterclockwise decreases it. Tune/Scroll Control
When the audio system is turned on, the sound
will be set at the same volume level as last played.
Turn the rotary Tune/Scroll control knob
clockwise to increase or counterclockwise to
decrease the radio station frequency. Push the
Enter/Browse button to choose a selection.
Screen Close
The X button on the touchscreen at the top right,
provides a means to close the Direct Tune
Screen. The Direct Tune Screen also auto
closes if no activity occurs within a few seconds.
Seek And Direct Tune Functions
The Seek Up and Down functions are activated
by pressing the double arrow buttons on the
touchscreen to the right and left of the radio
station display or by pressing the left Steering
Wheel Audio Control up or down.
Seek Up
Press and release the Seek Up button on the
touchscreen to tune the radio to the next
listenable station or channel. During a Seek Up
function, if the radio reaches the starting station
after passing through the entire band two times,
the radio will stop at the station where it began.
20_LD_OM_EN_USC_t.book Page 356
Page 359 of 412

MULTIMEDIA357
Fast Seek Up
Press and hold the Seek Up button on the
touchscreen to advance the radio through the
available stations or channels at a faster rate. The
radio stops at the next available station or channel
when the button on the touchscreen is released.
Seek Down
Press and release the Seek Down button on the
touchscreen to tune the radio to the next
listenable station or channel. During a Seek
Down function, if the radio reaches the starting
station after passing through the entire band
two times, the radio will stop at the station
where it began.
Fast Seek Down
Press and hold the Seek Down button on the
touchscreen to advance the radio through the
available stations or channel at a faster rate. The
radio stops at the next available station or channel
when the button on the touchscreen is released.
Direct Tune
Press the Tune button on the touchscreen
located at the bottom of the radio screen. The
Direct Tune button on the touchscreen is
available in AM, FM, and SXM radio modes and can be used to direct tune the radio to a desired
station or channel.
Press the available number button on the
touchscreen to begin selecting a desired
station. Once a number has been entered, any
numbers that are no longer possible (stations
that cannot be reached) will become
deactivated/grayed out.
Undo
You can backspace an entry by pressing the
bottom left on the touchscreen.
OK
Once the last digit of a station has been
entered, press the OK button, and the Direct
Tune screen will close. The system will
automatically tune to that station.
The selected Station or Channel number is
displayed in the Direct Tune text box.
Setting Presets
The Presets are available for all Radio Modes,
and are activated by pressing any of the six
Preset buttons on the touchscreen, located at
the top of the screen.
When you are receiving a station that you wish
to commit into memory, press and hold the
desired numbered button on the touchscreen
for more than two seconds or until you hear a
confirmation beep.
The Radio stores up to 12 presets in each of the
Radio modes. A set of six presets are visible at
the top of the radio screen.
You can switch between the two radio presets
by pressing the Arrow button located in the
upper right of the radio touchscreen.
Browse In AM/FM
When in either AM or FM, the Browse Screen
provides a means to edit the Presets List and is
entered by pushing the ENTER/BROWSE
button.
Scrolling Preset List
Once in the Browse Presets screen, you can
scroll the preset list by rotation of the TUNE/
SCROLL knob, or by pressing the Up and Down
arrow keys, located on the right of the screen.
9
20_LD_OM_EN_USC_t.book Page 357