2020 DODGE CHARGER reset
[x] Cancel search: resetPage 93 of 412

GETTING TO KNOW YOUR INSTRUMENT PANEL91
Trip Info
Push and release the up or down arrow
button until the Trip Menu item is displayed in
the instrument cluster display. Toggle the left
or right arrow button to select Trip A or Trip B.
The Trip information will display the following:
Distance – Shows the total distance (mi or
km) traveled for Trip A or Trip B since the last
reset.
Average Fuel Economy – Shows the average
fuel economy (MPG, L/100km or km/L) of
Trip A or Trip B since the last reset.
Elapsed Time – Shows the total elapsed time
of travel since the last reset.
Hold the OK button to reset feature information.
Audio
This menu displays the Audio information of the
currently playing audio source (e.g. FM radio).
Messages
This feature shows the number of stored
warning messages, if any. Pushing the right or
left arrow button will allow you to scroll
through the stored messages.
Screen Setup
Push and release the up or down arrow
button until the Screen Setup Menu displays in
the instrument cluster display. Push and
release the OK button to enter the submenus.
The Screen Setup feature allows you to change
what information is displayed in the instrument
cluster as well as the location that information
is displayed.
1. Upper Left
Compass (default)
Outside Temp
Time
Range
Average (MPG, L/100 km, or km/L)
Current (MPG, L/100 km, or km/L)
Trip A
Trip B
None 2. Upper Right
Compass
Outside Temp (default)
Time
Range
Average (MPG, L/100 km, or km/L)
Current (MPG, L/100 km, or km/L)
Trip A
Trip B
None
3. Center
Menu Title (default)
Digital Speed
None
Compass
Outside Temp
Time
Range
3
20_LD_OM_EN_USC_t.book Page 91
Page 143 of 412

SAFETY141
NOTE:
Air bag covers may not be obvious in the inte -
rior trim, but they will open during air bag
deployment.
After any collision, the vehicle should be
taken to an authorized dealer immediately.
Enhanced Accident Response System
In the event of an impact, if the communication
network remains intact, and the power remains
intact, depending on the nature of the event,
the ORC will determine whether to have the
Enhanced Accident Response System perform
the following functions:
Cut off fuel to the engine (if equipped)
Cut off battery power to the electric motor
(if equipped)
Flash hazard lights as long as the battery has
power
Turn on the interior lights, which remain on
as long as the battery has power or for
15 minutes from the intervention of the
Enhanced Accident Response System
Unlock the power door locks
Your vehicle may also be designed to perform
any of these other functions in response to the
Enhanced Accident Response System:
Turn off the Fuel Filter Heater, Turn off the
HVAC Blower Motor, Close the HVAC Circula -
tion Door
Cut off battery power to the:
Engine
Electric Motor (If equipped)
Electric power steering
Brake booster
Electric park brake
Automatic transmission gear selector
Horn
Front wiper
Headlamp washer pump
NOTE:
After an accident, remember to cycle the igni -
tion to the STOP (OFF/LOCK) position and
remove the key from the ignition switch to avoid
draining the battery. Carefully check the vehicle
for fuel leaks in the engine compartment and on
the ground near the engine compartment and
fuel tank before resetting the system and
starting the engine. If there are no fuel leaks or
damage to the vehicle electrical devices (e.g.
headlights) after an accident, reset the system
by following the procedure described below. If
you have any doubt, contact an authorized
dealer.
Enhanced Accident Response System
Reset Procedure
In order to reset the Enhanced Accident
Response System functions after an event, the
ignition switch must be changed from ignition
START or ON/RUN to ignition OFF. Carefully
check the vehicle for fuel leaks in the engine
compartment and on the ground near the
engine compartment and fuel tank before
resetting the system and starting the engine.
WARNING!
Deployed air bags and seat belt
pretensioners cannot protect you in another
collision. Have the air bags, seat belt
pretensioners, and the seat belt retractor
assemblies replaced by an authorized dealer
immediately. Also, have the Occupant
Restraint Controller System serviced as well.
4
20_LD_OM_EN_USC_t.book Page 141
Page 173 of 412

STARTING AND OPERATING171
DRIVE (D)
This range should be used for most city and
highway driving. It provides the smoothest
upshifts and downshifts, and the best fuel
economy. The transmission automatically
upshifts through all forward gears. The DRIVE
position provides optimum driving
characteristics under all normal operating
conditions.
When frequent transmission shifting occurs
(such as when operating the vehicle under
heavy loading conditions, in hilly terrain,
traveling into strong head winds, or while towing
a heavy trailer), use the AutoStick shift control
(if equipped, refer to “AutoStick” in this section
for further information) to select a lower gear. Under these conditions, using a lower gear will
improve performance and extend transmission
life by reducing excessive shifting and heat
buildup.
During extremely cold temperatures (-22°F
[-30°C] or below), transmission operation may
be modified depending on engine and
transmission temperature as well as vehicle
speed. Normal operation will resume once the
transmission temperature has risen to a
suitable level.
MANUAL (M)
The MANUAL (M, +/-) position (beside the DRIVE
position) enables full manual control of
transmission shifting (also known as AutoStick
mode; refer to “AutoStick” in this section for
further information). Toggling the gear selector
forward (-) or rearward (+) while in the MANUAL
(AutoStick) position will manually select the
transmission gear, and will display the current
gear in the instrument cluster as M1, M2, M3, etc.
Transmission Limp Home Mode
Transmission function is monitored
electronically for abnormal conditions. If a
condition is detected that could result in
transmission damage, Transmission Limp Home Mode is activated. In this mode, the
transmission may operate only in certain gears,
or may not shift at all. Vehicle performance may
be severely degraded and the engine may stall.
In some situations, the transmission may not
re-engage if the engine is turned off and
restarted. The Malfunction Indicator Light (MIL)
may be illuminated. A message in the
instrument cluster will inform the driver of the
more serious conditions, and indicate what
actions may be necessary.
In the event of a momentary problem, the
transmission can be reset to regain all forward
gears by performing the following steps:
NOTE:
In cases where the instrument cluster message
indicates the transmission may not re-engage
after engine shutdown, perform this procedure
only in a desired location (preferably, at an
authorized dealer).
1. Stop the vehicle.
2. Shift the transmission into PARK, if
possible. If not, shift the transmission to
NEUTRAL.
CAUTION!
Towing the vehicle, coasting, or driving for any
other reason with the transmission in
NEUTRAL can cause severe transmission
damage.
Refer to “Recreational Towing” in “Starting
And Operating” and “Towing A Disabled
Vehicle” in “In Case Of Emergency” for further
information.
5
20_LD_OM_EN_USC_t.book Page 171
Page 174 of 412

172STARTING AND OPERATING
3. Push and hold the ignition switch until the
engine turns off.
4. Wait approximately 30 seconds.
5. Restart the engine.
6. Shift into the desired gear range. If the problem is no longer detected, the
transmission will return to normal
operation.
NOTE:
Even if the transmission can be reset, we
recommend that you visit an authorized dealer
at your earliest possible convenience. An autho -
rized dealer has diagnostic equipment to
assess the condition of your transmission.
If the transmission cannot be reset, authorized
dealer service is required.
AutoStick — If Equipped
AutoStick is a driver-interactive transmission
feature providing manual shift control, giving
you more control of the vehicle. AutoStick
allows you to maximize engine braking,
eliminate undesirable upshifts and downshifts,
and improve overall vehicle performance. This system can also provide you with more
control during passing, city driving, cold slippery
conditions, mountain driving, trailer towing, and
many other situations.
Operation
When the gear selector is in the DRIVE (D)
position, the transmission will operate
automatically, shifting between the eight
available gears. To activate AutoStick, move the
gear selector into the MANUAL (M) position
(beside the DRIVE position). The current
transmission gear will be displayed in the
instrument cluster, along with a highlighted "M"
(Manual) indication. When the gear selector is
in the MANUAL (M) position, tap the gear
selector forward (-) or tap the (-) shift paddle on
the steering wheel (if equipped) to downshift
the transmission to the next lower gear, or tap
the lever rearward (+) or tap the (+) shift paddle
(if equipped) to command an upshift.
Paddle Shifters
NOTE:
Tapping one of the steering wheel-mounted
shift paddles (+/-) (if equipped) while the gear
selector is in DRIVE, will activate a temporary
AutoStick mode. Tapping (-) to enter AutoStick
mode will downshift the transmission to the
next lower gear, while tapping (+) to enter
AutoStick mode will retain the current gear.
The current gear will be displayed in the instru -
ment cluster, but the "M" will not be high -
lighted. The transmission will revert back to
normal operation (if the gear selector remains
in DRIVE) after a period of time, depending on
accelerator pedal activity.
1 — Shift Paddle Downshift
2 — Shift Paddle Upshift
20_LD_OM_EN_USC_t.book Page 172
Page 177 of 412

STARTING AND OPERATING175
If the Electric Power Steering Fault Warning
Light is displayed and the “POWER STEERING
SYSTEM OVER TEMP” message is displayed on
the instrument cluster screen, they indicate that
extreme steering maneuvers may have
occurred which caused an over temperature
condition in the power steering system. Once
driving conditions are safe, pull over and let the
vehicle idle for a few moments until the Electric
Power Steering Fault Warning Light and
message turn off.
SPEED CONTROL — IF EQUIPPED
When engaged, the Speed Control takes over
accelerator operations at speeds greater than
25 mph (40 km/h) or 20 mph (32 km/h),
depending on engine size and axle ratio.
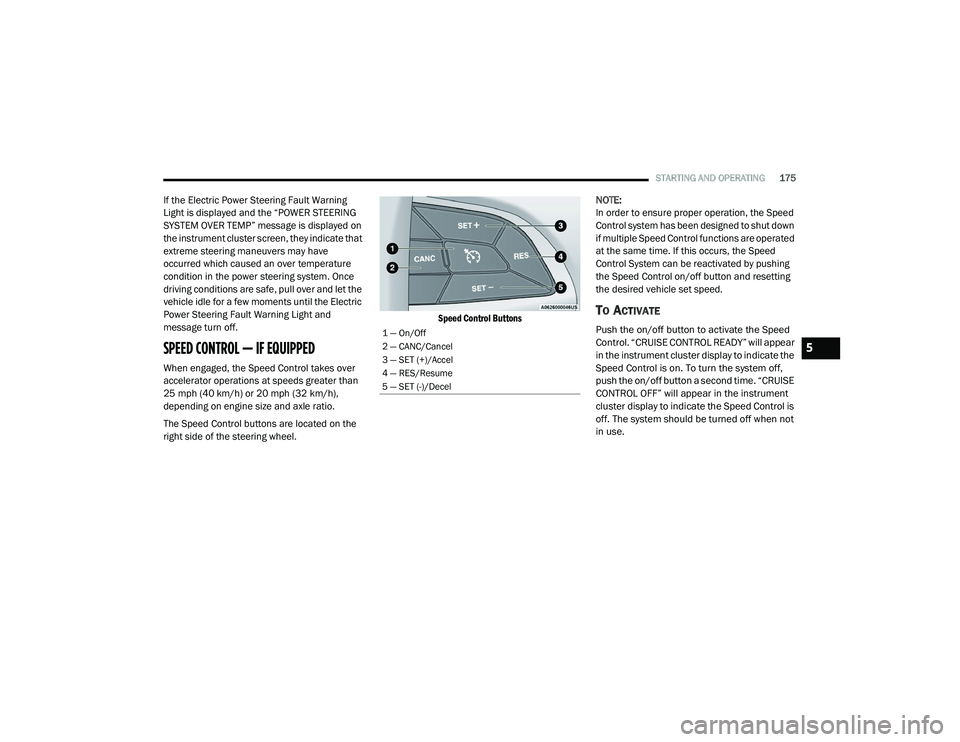
The Speed Control buttons are located on the
right side of the steering wheel.
Speed Control Buttons
NOTE:
In order to ensure proper operation, the Speed
Control system has been designed to shut down
if multiple Speed Control functions are operated
at the same time. If this occurs, the Speed
Control System can be reactivated by pushing
the Speed Control on/off button and resetting
the desired vehicle set speed.
TO ACTIVATE
Push the on/off button to activate the Speed
Control. “CRUISE CONTROL READY” will appear
in the instrument cluster display to indicate the
Speed Control is on. To turn the system off,
push the on/off button a second time. “CRUISE
CONTROL OFF” will appear in the instrument
cluster display to indicate the Speed Control is
off. The system should be turned off when not
in use.
1 — On/Off
2 — CANC/Cancel
3 — SET (+)/Accel
4 — RES/Resume
5 — SET (-)/Decel
5
20_LD_OM_EN_USC_t.book Page 175
Page 179 of 412

STARTING AND OPERATING177
TO ACCELERATE FOR PASSING
Press the accelerator as you would normally.
When the pedal is released, the vehicle will
return to the set speed.
Using Speed Control On Hills
The transmission may downshift on hills to
maintain the vehicle set speed.
NOTE:
The Speed Control system maintains speed up
and down hills. A slight speed change on
moderate hills is normal.
On steep hills, a greater speed loss or gain may
occur so it may be preferable to drive without
Speed Control.
TO RESUME SPEED
To resume a previously set speed, push the RES
button and release. Resume can be used at any
speed above 20 mph (32 km/h).
TO DEACTIVATE
A soft tap on the brake pedal, pushing the CANC
button, or normal brake pressure while slowing
the vehicle will deactivate the Speed Control
without erasing the set speed from memory.
Pushing the on/off button or placing the ignition
in the OFF position erases the set speed from
memory.
The following conditions will also deactivate the
Speed Control without erasing the set speed
from memory:
Vehicle parking brake is applied
Stability event occurs
Gear selector is moved out of DRIVE
Engine overspeed occurs
ADAPTIVE CRUISE CONTROL (ACC) —
IF EQUIPPED
Adaptive Cruise Control (ACC) increases the
driving convenience provided by cruise control
while traveling on highways and major
roadways. However, it is not a safety system
and not designed to prevent collisions. Speed
Control function performs differently. Please
refer to the proper section within this chapter.
ACC will allow you to keep cruise control
engaged in light to moderate traffic conditions
without the constant need to reset your cruise
control. ACC utilizes a radar sensor and a
forward facing camera designed to detect a
vehicle directly ahead of you.
NOTE:
If the sensor does not detect a vehicle ahead
of you, ACC will maintain a fixed set speed.
If the ACC sensor detects a vehicle ahead,
ACC will apply limited braking or accelerate
(not to exceed the original set speed) auto -
matically to maintain a preset following
distance, while matching the speed of the
vehicle ahead.
WARNING!
Speed Control can be dangerous where the
system cannot maintain a constant speed.
Your vehicle could go too fast for the
conditions, and you could lose control and
have an accident. Do not use Speed Control
in heavy traffic or on roads that are winding,
icy, snow-covered or slippery.
5
20_LD_OM_EN_USC_t.book Page 177
Page 180 of 412

178STARTING AND OPERATING
(Continued)
(Continued)
The Cruise Control system has two control
modes:
Adaptive Cruise Control mode for main
-
taining an appropriate distance between
vehicles.
Normal (Fixed Speed) Cruise Control mode
for cruising at a constant preset speed. For
additional information, refer to “Normal
(Fixed Speed) Cruise Control Mode” in this
section.
NOTE:
Normal (Fixed Speed) Cruise Control will not
react to preceding vehicles. Always be aware of
the mode selected.
You can change the mode by using the Cruise
Control buttons. The two control modes
function differently. Always confirm which mode
is selected.
WARNING!
Adaptive Cruise Control (ACC) is a conve -
nience system. It is not a substitute for active
driver involvement. It is always the driver’s
responsibility to be attentive of road, traffic,
and weather conditions, vehicle speed,
distance to the vehicle ahead; and, most
importantly, brake operation to ensure safe
operation of the vehicle under all road condi -
tions. Your complete attention is always
required while driving to maintain safe
control of your vehicle. Failure to follow these
warnings can result in a collision and death
or serious personal injury.
The ACC system:
Does not react to pedestrians,
oncoming vehicles, and stationary
objects (e.g., a stopped vehicle in a
traffic jam or a disabled vehicle).
Cannot take street, traffic, and weather
conditions into account, and may be
limited upon adverse sight distance
conditions.
Does not always fully recognize
complex driving conditions, which can
result in wrong or missing distance
warnings.
Will bring the vehicle to a complete stop
while following a target vehicle and hold
the vehicle for two seconds in the stop
position. If the target vehicle does not
start moving within two seconds the
ACC system will display a message that
the system will release the brakes and
that the brakes must be applied manu -
ally. An audible chime will sound when
the brakes are released.
You should switch off the ACC system:
When driving in fog, heavy rain, heavy
snow, sleet, heavy traffic, and complex
driving situations (i.e., in highway construc -
tion zones).
When entering a turn lane or highway off
ramp; when driving on roads that are
winding, icy, snow-covered, slippery, or
have steep uphill or downhill slopes.
WARNING! (Continued)
20_LD_OM_EN_USC_t.book Page 178
Page 202 of 412

200STARTING AND OPERATING
Manual Activation Of The Rear View Camera:
1. Press the "Controls" button located on the
bottom of the Uconnect display.
2. Press the "Backup Camera" button to turn the Rear View Camera system on.
When manually activated, a counter will be
initiated after the vehicle speed is above 8 mph
(13 km/h). The rear view camera image will turn
off when this counter reaches 10 seconds. The
counter will be reset when the vehicle speed is
8 mph (13 km/h) or below.
If the vehicle speed remains below 8 mph
(13 km/h), the rear view camera image will
continue to be displayed until the transmission
is shifted into PARK, the vehicle’s ignition is
placed in the OFF position, or the image defeat
“X” button is pressed.
Different colored zones indicate the distance to
the rear of the vehicle. The following table shows the approximate
distances for each zone:
NOTE:
If snow, ice, mud, or any foreign substance
builds up on the camera lens, clean the lens,
rinse with water, and dry with a soft cloth. Do
not cover the lens.
REFUELING THE VEHICLE
1. Put the vehicle in PARK and switch the ignition off.
Zone
Distance To The Rear
Of The Vehicle
Red 0 - 1 ft (0 - 30 cm)
Yellow 1 ft - 6.5 ft
(30 cm - 2 m)
Green 6.5 ft or greater
(2 m or greater)
WARNING!
Drivers must be careful when backing up even
when using the ParkView Rear Back Up Camera.
Always check carefully behind your vehicle, and
be sure to check for pedestrians, animals, other
vehicles, obstructions, or blind spots before
backing up. You are responsible for the safety of
your surroundings and must continue to pay
attention while backing up. Failure to do so can
result in serious injury or death.
CAUTION!
To avoid vehicle damage, ParkView should
only be used as a parking aid. The ParkView
camera is unable to view every obstacle or
object in your drive path.
To avoid vehicle damage, the vehicle must
be driven slowly when using ParkView to be
able to stop in time when an obstacle is
seen. It is recommended that the driver
look frequently over his/her shoulder when
using ParkView.
20_LD_OM_EN_USC_t.book Page 200