Page 228 of 412
226IN CASE OF EMERGENCY
F8 30 Amp Pink –Interior Lighting
F9 40 Amp Green –Power Locks
F10 30 Amp Pink –Driver Door Control Module
F11 30 Amp Pink –Passenger Door Control Module
F12 –20 Amp YellowCigar Lighter/IP APO/RR USB
(Selectable Fuse)– If Equipped
F15 40 Amp Green –HVAC Blower
F16 20 Amp Blue –Left Spot Lamp – Police
F17 20 Amp Blue –Right Spot Lamp – Police
F18 30 Amp Pink –VISM Mod (Police)
F19 ––Fuse – Spare
F20 ––Fuse – Spare
F21 30 Amp Pink –Fuel Pump (Non 6.2L ADR)
F22 –5 Amp Tan Cyber Gateway Mod
F23 –10 Amp RedFuel Door – If Equipped/Diagnostic
Port
F24 –10 Amp RedIntegrated Center Stack
F25 –10 Amp Red Tire Pressure Monitor
F26 –15 Amp BlueTrans Mod (Charger Non- Police/
300)
F27 –25 Amp Clear Amplifier – If Equipped
CavityCartridge Fuse Mini-FuseDescription
20_LD_OM_EN_USC_t.book Page 226
Page 229 of 412
IN CASE OF EMERGENCY227
F31 –25 Amp Breaker Power Seats – If Equipped
F32 –15 Amp Blue HVAC Module/Cluster
F33 –15 Amp BlueIgnition Switch/Wireless Mod/
Steer Column Lock Mod/Remote Start – If Equipped
F34 –10 Amp RedSteering Column Module/Clock
(300)
F35 –5 Amp Tan Battery Sensor
F36 –15 Amp BlueElectronic Exhaust Valve –
If Equipped
F37 –20 Amp Yellow Radio
F38 –20 Amp Yellow Media Hub/ Console APO
F40 30 Amp Pink –Fuel Pump #1 (6.2L ADR) –
If Equipped
F41 30 Amp Pink –Fuel Pump #2 (6.2L ADR) –
If Equipped
F42 30 Amp Pink –Rear Defrost
F43 –20 Amp YellowRR Heated Seat – If Equipped/
Heated Steering Wheel – If Equipped
F44 –10 Amp RedPark Assist / Blind Spot / Rear
View Camera – If Equipped
Cavity Cartridge Fuse Mini-FuseDescription
6
20_LD_OM_EN_USC_t.book Page 227
Page 230 of 412
228IN CASE OF EMERGENCY
F45 –15 Amp BlueCluster / Rearview Mirror / Lane
Departure
F46 ––Fuse – Spare
F47 –10 Amp RedAdaptive Front Lighting / Day Time
Running Lamps – If Equipped
F48 –20 Amp YellowActive Suspension – (6.4L / 6.2L)
F49 ––Fuse – Spare
F50 ––Fuse – Spare
F51 –20 Amp YellowFront Heated / Vented Seats –
If Equipped
F52 –10 Amp RedHeated Cupholders/Rear Heated
Seat Switches – If Equipped
F53 –10 Amp RedHVAC Module/In Vehicle
Temperature Sensor
F54 ––Fuse – Spare
F55 ––Fuse – Spare
F56 ––Fuse – Spare
F57 ––Fuse – Spare
F58 –10 Amp Red Airbag Module
F59 –20 Amp Yellow Adjustable Pedals – Police
F60 ––Fuse – Spare
F61 ––Fuse – Spare
CavityCartridge Fuse Mini-FuseDescription
20_LD_OM_EN_USC_t.book Page 228
Page 336 of 412

334MULTIMEDIA
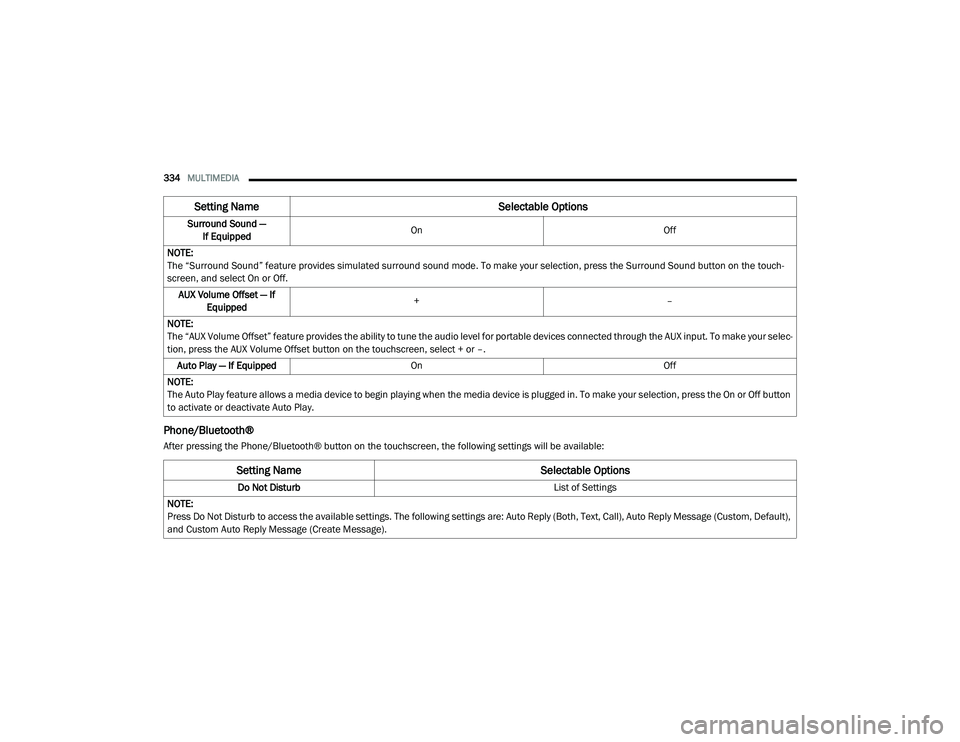
Phone/Bluetooth®
After pressing the Phone/Bluetooth® button on the touchscreen, the following settings will be available:Surround Sound —
If Equipped On
Off
NOTE:
The “Surround Sound” feature provides simulated surround sound mode. To make your selection, press the Surround Sound button on the touch -
screen, and select On or Off.
AUX Volume Offset — If Equipped +
–
NOTE:
The “AUX Volume Offset” feature provides the ability to tune the audio level for portable devices connected through the AUX input. To make your selec -
tion, press the AUX Volume Offset button on the touchscreen, select + or –.
Auto Play — If Equipped On Off
NOTE:
The Auto Play feature allows a media device to begin playing when the media device is plugged in. To make your selection, press the On or Off button
to activate or deactivate Auto Play.
Setting Name Selectable Options
Setting NameSelectable Options
Do Not Disturb List of Settings
NOTE:
Press Do Not Disturb to access the available settings. The following settings are: Auto Reply (Both, Text, Call), Auto Reply Message (Custom, Default),
and Custom Auto Reply Message (Create Message).
20_LD_OM_EN_USC_t.book Page 334
Page 337 of 412

MULTIMEDIA335
SiriusXM® Setup — If Equipped
After pressing the SiriusXM® Setup button on the touchscreen, the following settings will be available:Paired Phones/Devices
List of Paired Phones/Devices
NOTE:
This feature shows which phones are paired to the Phone/Bluetooth® system. For further information, refer to “Phone Mode” in the “Uconnect 4 with
7-inch Display” section.
Setting Name Selectable Options
Setting NameSelectable Options
Tune StartOnOff
Channel Skip Name of Channel
NOTE:
SiriusXM® can be programmed to skip channels. To make your selection, press the Channel Skip button on the touchscreen, select the channels you
would like to skip. Subscription Information Subscription Info
NOTE:
New vehicle purchasers or lessees will receive a free limited time subscription to SiriusXM® Satellite Radio with your radio. Following the expiration
of the free services, it will be necessary to access the information on the Subscription Information screen to re-subscribe.
1. Press the Subscription Info button on the touchscreen to access the Subscription Information screen.
2. Write down the SIRIUS ID numbers for your receiver. To reactivate your service, either call the number listed on the screen or visit the provider online.
9
20_LD_OM_EN_USC_t.book Page 335
Page 338 of 412

336MULTIMEDIA
Restore Settings
After pressing the Restore Settings button on the touchscreen, the following settings will be available:
Setting Name Selectable Options
Restore SettingsYesCancel
NOTE:
When the “Restore Settings” feature is selected it will reset the Display, Clock, Audio, and Radio Settings to their default settings. If “Yes” is selected,
a pop-up will appear asking "Are you sure you want to reset your settings to default?” Select “Yes” to restore, or “Cancel” to exit. Reset App Drawer to Default Order OkCancel
NOTE:
When this feature is selected, it will reset all settings to their default settings. To restore the settings to their default setting, press the Restore Settings
button on the touchscreen. A pop-up will appear asking "Are you sure you want to reset your settings to default?” Restore Apps OkCancel
Clear Personal Data YesCancel
NOTE:
When the “Clear Personal Data” feature is selected it will remove all personal data including Clock, Audio, Radio, Bluetooth® devices, Apps, and Favor-
ites. Modem Reset OkCancel
20_LD_OM_EN_USC_t.book Page 336
Page 339 of 412

MULTIMEDIA337
Clear Personal Data
After pressing the Clear Personal Data button on the touchscreen, the following setting will be available:
CUSTOMER PROGRAMMABLE FEATURES
— U
CONNECT 4C/4C NAV SETTINGS
Uconnect 4C/4C NAV With 8.4-inch Display Buttons
On The Touchscreen And Buttons On The Faceplate
Press the Apps button, then press the
Settings button on the touchscreen to
display the menu setting screen. In this mode,
the Uconnect system allows you to access
programmable features that may be equipped
such as Language, Display, Units, Voice, Clock
& Date , Camera, Safety & Driving Assistance,
Mirrors & Wipers (if equipped), Lights, Doors &
Locks, Seats & Comfort (if equipped), Key Off
Options, Audio, Phone/Bluetooth® Settings,
SiriusXM® Setup (if equipped), Reset, and
System Information (if equipped).
NOTE:
Depending on the vehicle’s options, feature
settings may vary. When making a selection, press the button on
the touchscreen to enter the desired menu.
Once in the desired menu, press and release
the preferred setting “option” until a check
mark appears next to the setting, showing that
setting has been selected. Once the setting is
complete, press the X button on the
touchscreen to close out of the settings screen.
Pressing the Up or Down Arrow button on the
right side of the screen will allow you to toggle
up or down through the available settings.
The following tables list the settings that may be
found within the Uconnect 4C/4C NAV radio,
along with the selectable options pertaining to
each setting.
Setting Name
Selectable Options
Clear Personal DataYesCancel
NOTE:
When this feature is selected it will remove all personal data including Bluetooth® devices and presets. If “Yes” is selected a pop-up will appear asking
"Are you sure you want to clear all personal data?” select “Yes” to Clear, or “Cancel” to exit.
1 — Uconnect Buttons On The Touchscreen
2 — Uconnect Buttons On The Faceplate
9
20_LD_OM_EN_USC_t.book Page 337
Page 352 of 412

350MULTIMEDIA
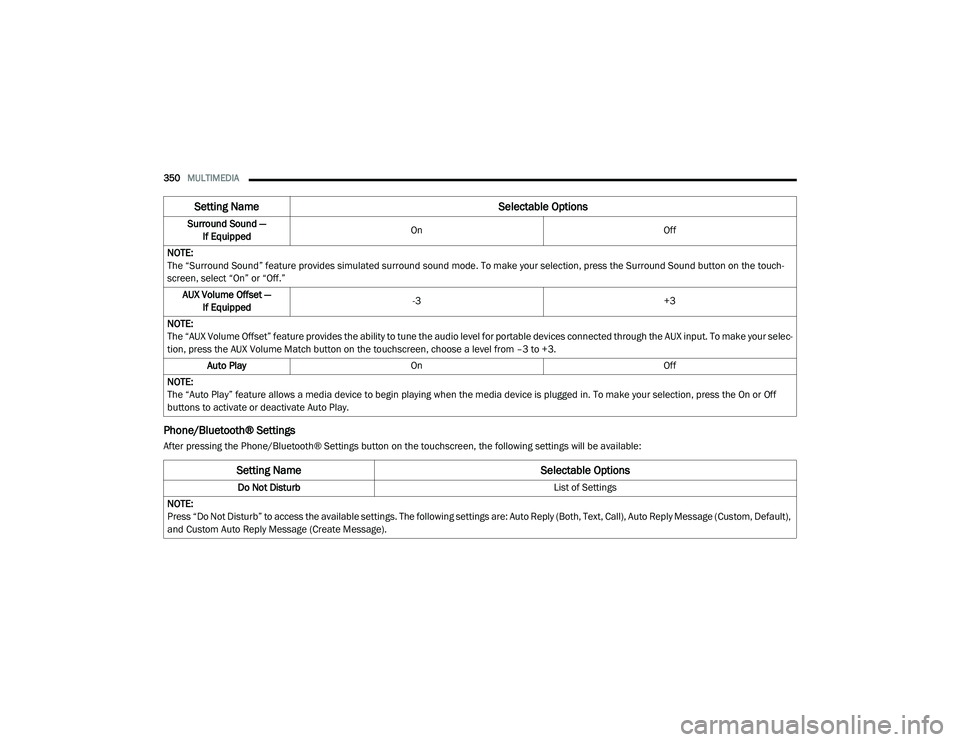
Phone/Bluetooth® Settings
After pressing the Phone/Bluetooth® Settings button on the touchscreen, the following settings will be available:Surround Sound —
If Equipped On
Off
NOTE:
The “Surround Sound” feature provides simulated surround sound mode. To make your selection, press the Surround Sound button on the touch -
screen, select “On” or “Off.”
AUX Volume Offset — If Equipped -3
+3
NOTE:
The “AUX Volume Offset” feature provides the ability to tune the audio level for portable devices connected through the AUX input. To make your selec -
tion, press the AUX Volume Match button on the touchscreen, choose a level from –3 to +3.
Auto Play On Off
NOTE:
The “Auto Play” feature allows a media device to begin playing when the media device is plugged in. To make your selection, press the On or Off
buttons to activate or deactivate Auto Play.
Setting Name Selectable Options
Setting NameSelectable Options
Do Not Disturb List of Settings
NOTE:
Press “Do Not Disturb” to access the available settings. The following settings are: Auto Reply (Both, Text, Call), Auto Reply Message (Custom, Default),
and Custom Auto Reply Message (Create Message).
20_LD_OM_EN_USC_t.book Page 350