2020 DODGE CHARGER ABS
[x] Cancel search: ABSPage 139 of 412

SAFETY137
produce substantial vehicle damage — for
example, some pole collisions, truck
underrides, and angle offset collisions.
On the other hand, depending on the type and
location of impact, front air bags may deploy in
crashes with little vehicle front-end damage but
that produce a severe initial deceleration.
Because air bag sensors measure vehicle
deceleration over time, vehicle speed and
damage by themselves are not good indicators
of whether or not an air bag should have
deployed.
Seat belts are necessary for your protection in
all collisions, and also are needed to help keep
you in position, away from an inflating air bag.
When the ORC detects a collision requiring the
front air bags, it signals the inflator units. A large
quantity of non-toxic gas is generated to inflate
the front air bags.
The steering wheel hub trim cover and the
upper passenger side of the instrument panel
separate and fold out of the way as the air bags
inflate to their full size. The front air bags fully
inflate in less time than it takes to blink your eyes. The front air bags then quickly deflate
while helping to restrain the driver and front
passenger.
Knee Impact Bolsters
The Knee Impact Bolsters help protect the
knees of the driver and front passenger, and
position the front occupants for improved
interaction with the front air bags.
Supplemental Driver Knee Air Bag
This vehicle is equipped with a Supplemental
Driver Knee Air Bag mounted in the instrument
panel below the steering column. The
Supplemental Driver Knee Air Bag provides
enhanced protection during a frontal impact by
working together with the seat belts,
pretensioners, and front air bags.
Supplemental Side Air Bags
Supplemental Seat-Mounted Side Air Bags
(SABs)
This vehicle is equipped with Supplemental
Seat-Mounted Side Air Bags (SABs).
Supplemental Seat-Mounted Side Air Bags
(SABs) are located in the outboard side of the
front seats. The SABs are marked with “SRS
AIRBAG” or “AIRBAG” on a label or on the seat
trim on the outboard side of the seats.
The SABs may help to reduce the risk of
occupant injury during certain side impacts, in
addition to the injury reduction potential
provided by the seat belts and body structure.
Front Supplemental Seat-Mounted Side Air Bag Label
WARNING!
Do not drill, cut, or tamper with the knee
impact bolsters in any way.
Do not mount any accessories to the knee
impact bolsters such as alarm lights,
stereos, citizen band radios, etc.
4
20_LD_OM_EN_USC_t.book Page 137
Page 183 of 412
STARTING AND OPERATING181
Remove your foot from the accelerator pedal. If
you do not, the vehicle may continue to
accelerate beyond the set speed. If this occurs:
The message “DRIVER OVERRIDE” will
display in the instrument cluster display.
The system will not be controlling the
distance between your vehicle and the
vehicle ahead. The vehicle speed will only be
determined by the position of the accelerator
pedal.
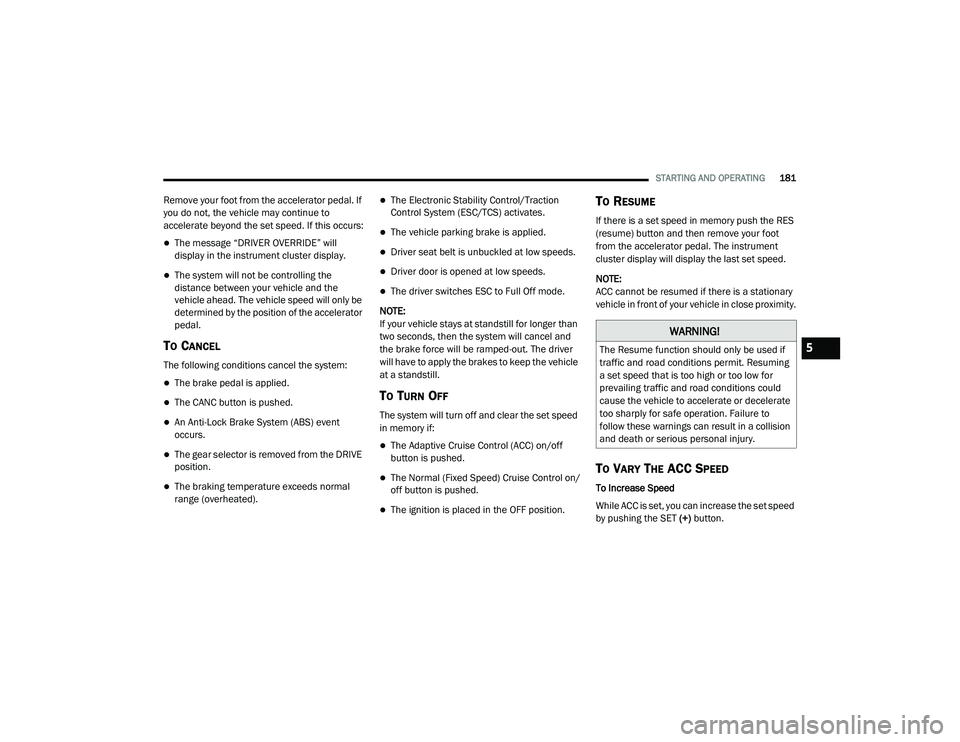
TO CANCEL
The following conditions cancel the system:
The brake pedal is applied.
The CANC button is pushed.
An Anti-Lock Brake System (ABS) event
occurs.
The gear selector is removed from the DRIVE
position.
The braking temperature exceeds normal
range (overheated).
The Electronic Stability Control/Traction
Control System (ESC/TCS) activates.
The vehicle parking brake is applied.
Driver seat belt is unbuckled at low speeds.
Driver door is opened at low speeds.
The driver switches ESC to Full Off mode.
NOTE:
If your vehicle stays at standstill for longer than
two seconds, then the system will cancel and
the brake force will be ramped-out. The driver
will have to apply the brakes to keep the vehicle
at a standstill.
TO TURN OFF
The system will turn off and clear the set speed
in memory if:
The Adaptive Cruise Control (ACC) on/off
button is pushed.
The Normal (Fixed Speed) Cruise Control on/
off button is pushed.
The ignition is placed in the OFF position.
TO RESUME
If there is a set speed in memory push the RES
(resume) button and then remove your foot
from the accelerator pedal. The instrument
cluster display will display the last set speed.
NOTE:
ACC cannot be resumed if there is a stationary
vehicle in front of your vehicle in close proximity.
TO VARY THE ACC SPEED
To Increase Speed
While ACC is set, you can increase the set speed
by pushing the SET (+) button.
WARNING!
The Resume function should only be used if
traffic and road conditions permit. Resuming
a set speed that is too high or too low for
prevailing traffic and road conditions could
cause the vehicle to accelerate or decelerate
too sharply for safe operation. Failure to
follow these warnings can result in a collision
and death or serious personal injury.5
20_LD_OM_EN_USC_t.book Page 181
Page 238 of 412
236IN CASE OF EMERGENCY
(Continued)
When the Tire Service Kit sealant is in a liquid
form, clean water and a damp cloth will
remove the material from the vehicle or tire
and wheel components. Once the sealant
dries, it can easily be peeled off and properly
discarded.
For optimum performance, make sure the
valve stem on the wheel is free of debris
before connecting the Tire Service Kit.
You can use the Tire Service Kit air pump to
inflate bicycle tires. The kit also comes with
two needles, located in the Accessory
Storage Compartment (on the bottom of the
air pump) for inflating sport balls, rafts, or
similar inflatable items. However, use only
the Air Pump Hose (7) and make sure the
Mode Select Knob (5) is in the Air Mode
when inflating such items to avoid injecting
sealant into them. The Tire Service Kit
Sealant is only intended to seal punctures
less than 1/4 inch (6 mm) diameter in the
tread of your tire.
Do not lift or carry the Tire Service Kit by the
hoses.
WARNING!
Do not attempt to seal a tire on the side of
the vehicle closest to traffic. Pull far enough
off the road to avoid the danger of being hit
when using the Tire Service Kit.
Do not use Tire Service Kit or drive the
vehicle under the following circumstances:
If the puncture in the tire tread is
approximately 1/4 inch (6 mm) or
larger.
If the tire has any sidewall damage.
If the tire has any damage from driving
with extremely low tire pressure.
If the tire has any damage from driving
on a flat tire.
If the wheel has any damage.
If you are unsure of the condition of the
tire or the wheel.
Keep Tire Service Kit away from open
flames or heat source.
A loose Tire Service Kit thrown forward in a
collision or hard stop could endanger the
occupants of the vehicle. Always stow the
Tire Service Kit in the place provided.
Failure to follow these warnings can result
in injuries that are serious or fatal to you,
your passengers, and others around you.
Take care not to allow the contents of Tire
Service Kit to come in contact with hair, eyes,
or clothing. Tire Service Kit sealant is
harmful if inhaled, swallowed, or absorbed
through the skin. It causes skin, eye, and
respiratory irritation. Flush immediately with
plenty of water if there is any contact with
eyes or skin. Change clothing as soon as
possible, if there is any contact with clothing.
Tire Service Kit Sealant solution contains
latex. In case of an allergic reaction or rash,
consult a physician immediately. Keep Tire
Service Kit out of reach of children. If swal-
lowed, rinse mouth immediately with plenty of
water and drink plenty of water. Do not induce
vomiting! Consult a physician immediately.
WARNING! (Continued)
20_LD_OM_EN_USC_t.book Page 236
Page 286 of 412

284SERVICING AND MAINTENANCE
(Continued)
Keep the front of the radiator clean. If your
vehicle is equipped with air conditioning,
keep the front of the condenser clean.
Do not change the thermostat for Summer or
Winter operation. If replacement is ever
necessary, install ONLY the correct type ther-
mostat. Other designs may result in unsatis -
factory engine coolant (antifreeze)
performance, poor gas mileage, and
increased emissions.
BRAKE SYSTEM
In order to ensure brake system performance,
all brake system components should be
inspected periodically. Refer to the
“Maintenance Plan” in this section for the
proper maintenance intervals.
Fluid Level Check — Brake Master Cylinder
Check the fluid level in the master cylinder
immediately if the brake system warning light
indicates system failure.
Check the fluid level in the master cylinder
when performing underhood services.
Clean the top of the master cylinder area before
removing the cap. Add fluid to bring the level up
to the top of the “FULL” mark on the side of the
master cylinder reservoir.
Overfilling of fluid is not recommended because
it may cause leaking in the system.
Add enough fluid to bring the level up to the
requirements described on the brake fluid
reservoir. With disc brakes, fluid level can be
expected to fall as the brake pads wear.
However, low fluid level may be caused by a
leak and a checkup may be needed.
Use only brake fluid that has been
recommended by the manufacturer, and has
been kept in a tightly closed container to avoid
contamination from foreign matter or moisture.
Refer to “Fluids And Lubricants” in “Technical
Specifications” for further information.
WARNING!
Riding the brakes can lead to brake failure
and possibly a collision. Driving with your foot
resting or riding on the brake pedal can result
in abnormally high brake temperatures,
excessive lining wear, and possible brake
damage. You would not have your full braking
capacity in an emergency.
WARNING!
Use only manufacturer's recommended
brake fluid. Refer to “Fluids And Lubri -
cants” in “Technical Specifications” for
further information. Using the wrong type
of brake fluid can severely damage your
brake system and/or impair its perfor -
mance. The proper type of brake fluid for
your vehicle is also identified on the orig -
inal factory installed hydraulic master
cylinder reservoir.
To avoid contamination from foreign
matter or moisture, use only new brake
fluid or fluid that has been in a tightly
closed container. Keep the master
cylinder reservoir cap secured at all times.
Brake fluid in a open container absorbs
moisture from the air resulting in a lower
boiling point. This may cause it to boil
unexpectedly during hard or prolonged
braking, resulting in sudden brake failure.
This could result in a collision.
20_LD_OM_EN_USC_t.book Page 284
Page 289 of 412
SERVICING AND MAINTENANCE287
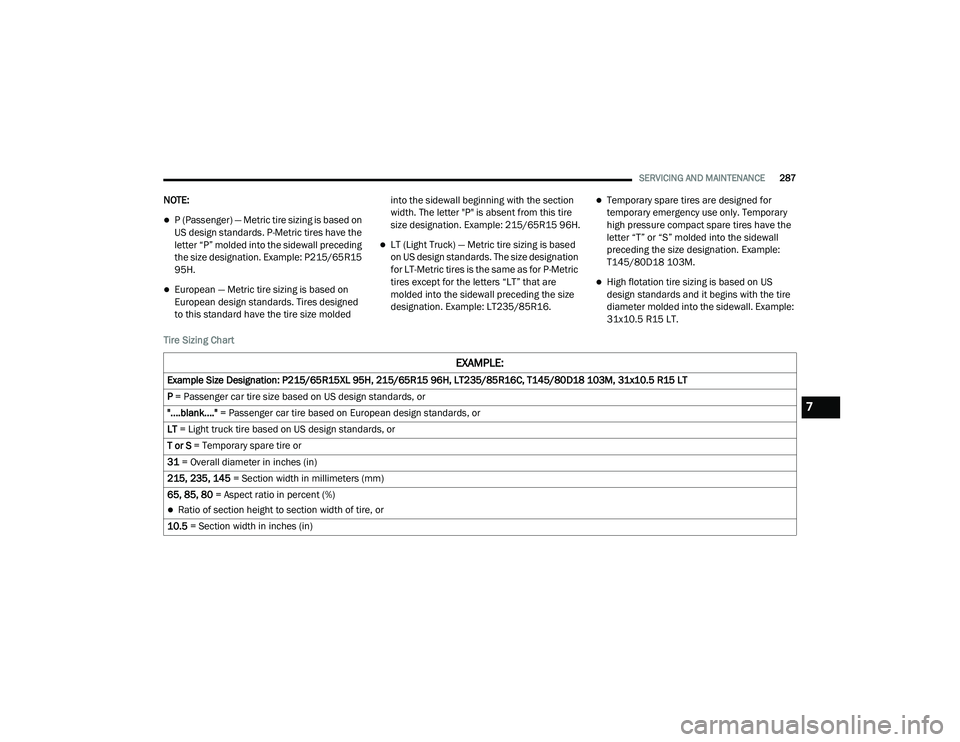
NOTE:
P (Passenger) — Metric tire sizing is based on
US design standards. P-Metric tires have the
letter “P” molded into the sidewall preceding
the size designation. Example: P215/65R15
95H.
European — Metric tire sizing is based on
European design standards. Tires designed
to this standard have the tire size molded into the sidewall beginning with the section
width. The letter "P" is absent from this tire
size designation. Example: 215/65R15 96H.
LT (Light Truck) — Metric tire sizing is based
on US design standards. The size designation
for LT-Metric tires is the same as for P-Metric
tires except for the letters “LT” that are
molded into the sidewall preceding the size
designation. Example: LT235/85R16.
Temporary spare tires are designed for
temporary emergency use only. Temporary
high pressure compact spare tires have the
letter “T” or “S” molded into the sidewall
preceding the size designation. Example:
T145/80D18 103M.
High flotation tire sizing is based on US
design standards and it begins with the tire
diameter molded into the sidewall. Example:
31x10.5 R15 LT.
Tire Sizing Chart
EXAMPLE:
Example Size Designation: P215/65R15XL 95H, 215/65R15 96H, LT235/85R16C, T145/80D18 103M, 31x10.5 R15 LT
P = Passenger car tire size based on US design standards, or
"....blank...." = Passenger car tire based on European design standards, or
LT = Light truck tire based on US design standards, or
T or S = Temporary spare tire or
31 = Overall diameter in inches (in)
215, 235, 145 = Section width in millimeters (mm)
65, 85, 80 = Aspect ratio in percent (%)
Ratio of section height to section width of tire, or
10.5 = Section width in inches (in)
7
20_LD_OM_EN_USC_t.book Page 287
Page 290 of 412
288SERVICING AND MAINTENANCE
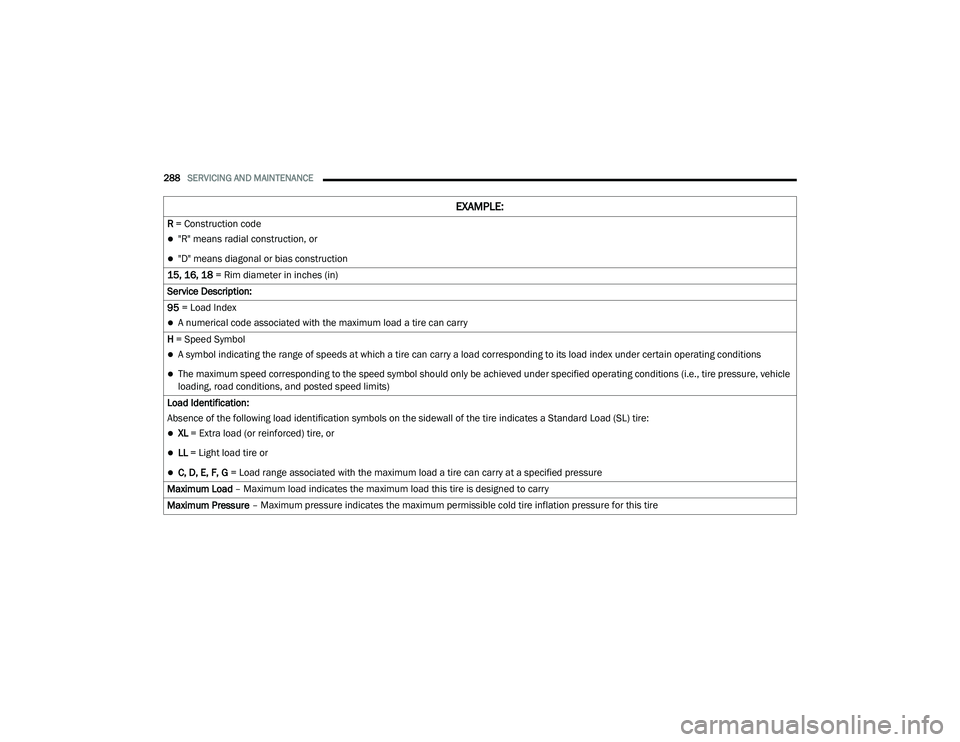
R = Construction code
"R" means radial construction, or
"D" means diagonal or bias construction
15, 16, 18 = Rim diameter in inches (in)
Service Description:
95 = Load Index
A numerical code associated with the maximum load a tire can carry
H = Speed Symbol
A symbol indicating the range of speeds at which a tire can carry a load corresponding to its load index under certain operating conditions
The maximum speed corresponding to the speed symbol should only be achieved under specified operating conditions (i.e., tire pressure, vehicle
loading, road conditions, and posted speed limits)
Load Identification:
Absence of the following load identification symbols on the sidewall of the tire indicates a Standard Load (SL) tire:
XL = Extra load (or reinforced) tire, or
LL = Light load tire or
C, D, E, F, G = Load range associated with the maximum load a tire can carry at a specified pressure
Maximum Load – Maximum load indicates the maximum load this tire is designed to carry
Maximum Pressure – Maximum pressure indicates the maximum permissible cold tire inflation pressure for this tire
EXAMPLE:
20_LD_OM_EN_USC_t.book Page 288
Page 362 of 412
360MULTIMEDIA
Live
Press the Live button on the touchscreen to
resume playing of Live content.
Favorites
Press the Fav button on the touchscreen to
activate the favorites menu, which will time out
in five seconds in absence of user interaction.
You can exit the Favorites Menu by a press of
the X in the top right corner.
The favorites feature enables you to set a
favorite artist, or song that is currently playing.
The Radio then uses this information to alert
you when either the favorite song, or favorite
artist are being played at any time by any of the
SiriusXM® Channels.
The maximum number of favorites that can be
stored in the Radio is 50.
Fav. Artist: While the song is playing to set a
Favorite Artist, press the Fav button on the
touchscreen and then the Fav. Artist button on
the touchscreen. Fav. Song:
While the song is playing to set a
Favorite Song, press the Fav button on the
touchscreen and then the Fav Song button on
the touchscreen.
Browse In SXM
Press the Browse button on the touchscreen to
edit Presets, Favorites, Game Zone, and Jump
settings, along with providing the SiriusXM®
Channel List.
This Screen contains many submenus. You can
exit a sub menu to return to a parent menu by
pressing the Back Arrow.
All
Press the All button at the left of the Browse
Screen.
Channel List
Press the Channel List, or Genre, to display all
the SiriusXM® Channel Numbers. You can
scroll the Channel list by pressing the Up and
Down arrows, located on the right side of the
screen. Scrolling can also be done by operating
the TUNE/SCROLL knob. Genre
Press the Genre button on the touchscreen to
display a list of Genres. You can select any
desired Genre by pressing the Genre list, the
Radio tunes to a channel with the content in the
selected Genre.
Presets
Press the Presets button located at the left of
the Browse screen.
You can scroll the Presets list pressing the up
and down arrows located at the right side of the
screen. Scrolling can also be done by operating
the TUNE/SCROLL knob as well.
Preset Selection
A Preset can be selected by pressing any of the
listed Presets, or by pushing the ENTER/
BROWSE button on the TUNE/SCROLL knob to
select the currently highlighted Preset. When
selected, the Radio tunes to the station stored
in the Preset, and returns to the main Radio
screen.
20_LD_OM_EN_USC_t.book Page 360
Page 395 of 412

CUSTOMER ASSISTANCE393
The manufacturer will not stand behind any
service contract that is not the manufacturer's
service contract. It is not responsible for any
service contract other than the manufacturer's
service contract. If you purchased a service
contract that is not a manufacturer's service
contract, and you require service after the
manufacturer's New Vehicle Limited Warranty
expires, please refer to the contract documents,
and contact the person listed in those
documents.
We appreciate that you have made a major
investment when you purchased the vehicle. An
authorized dealer has also made a major
investment in facilities, tools, and training to
assure that you are absolutely delighted with
the ownership experience. You will be pleased
with their sincere efforts to resolve any warranty
issues or related concerns.
WARRANTY INFORMATION
See the Warranty Information for the terms and
provisions of FCA US LLC warranties applicable
to this vehicle and market. Refer to
www.mopar.com/om for further information.
MOPAR PARTS
Mopar original equipment parts & accessories
and factory filled fluids are available from an
authorized dealer. They are recommended for
your vehicle to keep it operating at its best and
maintain its original condition.
REPORTING SAFETY DEFECTS
IN THE 50 UNITED STATES AND
W
ASHINGTON, D.C.
If you believe that your vehicle has a
defect that could cause a crash or cause
injury or death, you should immediately
inform the National Highway Traffic
Safety Administration (NHTSA) in
addition to notifying FCA US LLC.
WARNING!
Engine exhaust (internal combustion engines
only), some of its constituents, and certain
vehicle components contain, or emit,
chemicals known to the State of California to
cause cancer and birth defects, or other
reproductive harm. In addition, certain fluids
contained in vehicles and certain products of
component wear contain, or emit, chemicals
known to the State of California to cause
cancer and birth defects, or other
reproductive harm.
10
20_LD_OM_EN_USC_t.book Page 393