2020 DODGE CHALLENGER ignition
[x] Cancel search: ignitionPage 60 of 396

58GETTING TO KNOW YOUR VEHICLE
TRUNK
OPENING
The trunk can be opened from inside the vehicle
using the power trunk button located on the
instrument panel to the left of the steering
wheel.
The trunk lid can be released from outside the
vehicle by pushing the trunk button on the key
fob twice within five seconds or by using the
external release switch located on the
underside of the decklid overhang. The release
feature will function only when the vehicle is in
the unlock condition.
With the ignition in the ON/RUN position, the
trunk open symbol will display in the instrument
cluster indicating that the trunk is open. The
odometer display will reappear once the trunk is
closed. With the ignition in the OFF position, the trunk
open symbol will display until the trunk is
closed.
NOTE:
Refer to “Keyless Enter-N-Go — Passive Entry” in
”Doors” in this chapter for further information
on trunk operation with the Passive Entry
feature.
Opening From Inside The Vehicle
Interior Power Trunk Release
The trunk can be opened from inside
the vehicle using the power trunk
release button located on the
instrument panel to the left of the
steering wheel.
NOTE:
The automatic transmission must be in PARK
before the button will operate. For manual
transmissions, the vehicle must be in NEUTRAL.
Opening From Outside The Vehicle
To Unlock/Open The Trunk
The trunk may be unlocked/opened using
either of the following methods:
Key Fob Trunk Release Button
Passive Entry Button Key Fob Trunk Release Button
Push the power trunk button on the
key fob twice within five seconds to
release the trunk.
Passive Entry Button
Push the trunk passive entry button which is
located on the back of the trunk lid. With a valid
Passive Entry key fob within 5 ft (1.5 m) of the
trunk, push the passive entry button to open the
trunk.
Trunk Passive Entry Button
CLOSING
With one or more hands placed on the outside
trunk surface push the trunk lid down until you
hear the trunk lock latch into place.
CAUTION!
To prevent possible damage, do not slam the
hood to close it. Lower hood to approximately
12 inches (30 cm) and drop the hood to
close. Make sure hood is fully closed for both
latches. Never drive vehicle unless hood is
fully closed, with both latches engaged.
20_LA_OM_EN_USC_t.book Page 58
Page 62 of 396

60GETTING TO KNOW YOUR VEHICLE
To erase the channels, place the ignition in the
ON/RUN position, and push and hold the two
outside HomeLink® buttons (I and III) for up to
20 seconds or until the orange indicator
flashes.
NOTE:
Erasing all channels should only be
performed when programming HomeLink®
for the first time. Do not erase channels when
programming additional buttons.
If you have any problems, or require assis -
tance, please call toll-free 1-800-355-3515
or, on the Internet at HomeLink.com for infor -
mation or assistance.
Programming A Rolling Code
For programming garage door openers that
were manufactured after 1995. These garage
door openers can be identified by the “LEARN”
or “TRAIN” button located where the hanging
antenna is attached to the garage door opener.
NOTE:
It is NOT the button that is normally used to
open and close the door. The name and color of
the button may vary by manufacturer.
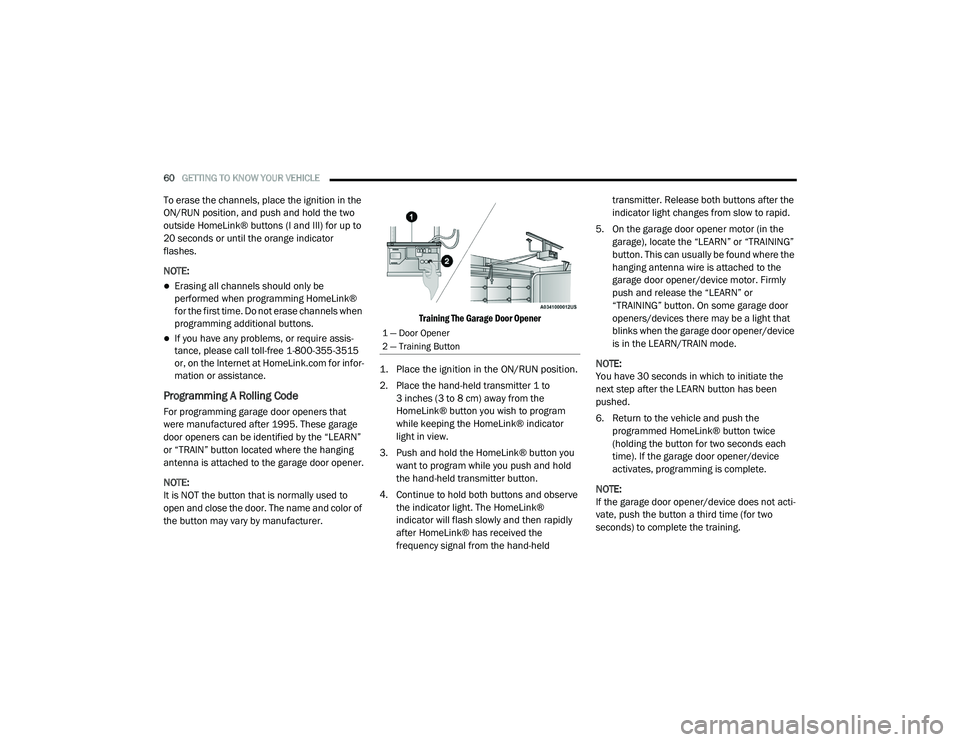
Training The Garage Door Opener
1. Place the ignition in the ON/RUN position.
2. Place the hand-held transmitter 1 to 3 inches (3 to 8 cm) away from the
HomeLink® button you wish to program
while keeping the HomeLink® indicator
light in view.
3. Push and hold the HomeLink® button you want to program while you push and hold
the hand-held transmitter button.
4. Continue to hold both buttons and observe the indicator light. The HomeLink®
indicator will flash slowly and then rapidly
after HomeLink® has received the
frequency signal from the hand-held transmitter. Release both buttons after the
indicator light changes from slow to rapid.
5. On the garage door opener motor (in the garage), locate the “LEARN” or “TRAINING”
button. This can usually be found where the
hanging antenna wire is attached to the
garage door opener/device motor. Firmly
push and release the “LEARN” or
“TRAINING” button. On some garage door
openers/devices there may be a light that
blinks when the garage door opener/device
is in the LEARN/TRAIN mode.
NOTE:
You have 30 seconds in which to initiate the
next step after the LEARN button has been
pushed.
6. Return to the vehicle and push the programmed HomeLink® button twice
(holding the button for two seconds each
time). If the garage door opener/device
activates, programming is complete.
NOTE:
If the garage door opener/device does not acti -
vate, push the button a third time (for two
seconds) to complete the training.
1 — Door Opener
2 — Training Button
20_LA_OM_EN_USC_t.book Page 60
Page 63 of 396

GETTING TO KNOW YOUR VEHICLE61
To program the remaining two HomeLink®
buttons, repeat each step for each remain -
ing button. DO NOT erase the channels.
Reprogramming A Single HomeLink® Button
(Rolling Code)
To reprogram a channel that has been
previously trained, follow these steps:
1. Place the ignition in the ON/RUN position.
2. Push and hold the desired HomeLink® button until the indicator light begins to
flash after 20 seconds. Do not release the
button.
3. Without releasing the button proceed with “Programming A Rolling Code” step 2 and
follow all remaining steps.
Programming A Non-Rolling Code
For programming garage door openers
manufactured before 1995.
1. Place the ignition in the ON/RUN position.
2. Place the hand-held transmitter 1 to 3 inches (3 to 8 cm) away from the
HomeLink® button you wish to program
while keeping the HomeLink® indicator
light in view. 3. Press and hold the HomeLink® button you
want to program while you press and hold
the hand-held transmitter button.
4. Continue to hold both buttons and observe the indicator light. The HomeLink®
indicator will flash slowly and then rapidly
after HomeLink® has received the
frequency signal from the hand-held
transmitter. Release both buttons after the
indicator light changes from slow to rapid.
5. Press and hold the programmed HomeLink® button and observe the
indicator light.
If the indicator light stays on constantly,
programming is complete and the garage
door/device should activate when the
HomeLink® button is pressed.
To program the two remaining
HomeLink® buttons, repeat each step
for each remaining button. DO NOT erase
the channels. Reprogramming A Single HomeLink® Button
(Non-Rolling Code)
To reprogram a channel that has been
previously trained, follow these steps:
1. Place the ignition in the ON/RUN position.
2. Press and hold the desired HomeLink®
button until the indicator light begins to
flash after 20 seconds. Do not release the
button.
3. Without releasing the button, proceed with “Programming A Non-Rolling Code” step 2
and follow all remaining steps.
CANADIAN/GATE OPERATOR
P
ROGRAMMING
For programming transmitters in Canada/
United States that require the transmitter
signals to “time-out” after several seconds of
transmission.
Canadian radio frequency laws require
transmitter signals to time-out (or quit) after
several seconds of transmission – which may
not be long enough for HomeLink® to pick up
the signal during programming. Similar to this
Canadian law, some U.S. gate operators are
designed to time-out in the same manner.
2
20_LA_OM_EN_USC_t.book Page 61
Page 64 of 396

62GETTING TO KNOW YOUR VEHICLE
It may be helpful to unplug the device during the
cycling process to prevent possible overheating
of the garage door or gate motor.
1. Place the ignition in the ON/RUN position.
2. Place the hand-held transmitter
1 to 3 inches (3 to 8 cm) away from the
HomeLink® button you wish to program
while keeping the HomeLink® indicator
light in view.
3. Continue to press and hold the HomeLink® button, while you press and release
(“cycle”) your hand-held transmitter every
two seconds until HomeLink® has
successfully accepted the frequency signal.
The indicator light will flash slowly and then
rapidly when fully trained.
4. Watch for the HomeLink® indicator to change flash rates. When it changes, it is
programmed. It may take up to 30 seconds
or longer in rare cases. The garage door
may open and close while you are
programming.
5. Press and hold the programmed HomeLink® button and observe the
indicator light. NOTE:
If the indicator light stays on constantly,
programming is complete and the garage
door/device should activate when the Home
-
Link® button is pressed.
To program the two remaining HomeLink®
buttons, repeat each step for each remaining
button. DO NOT erase the channels.
If you unplugged the garage door opener/
device for programming, plug it back in at this
time.
Reprogramming A Single HomeLink® Button
(Canadian/Gate Operator)
To reprogram a channel that has been
previously trained, follow these steps:
1. Place the ignition in the ON/RUN position.
2. Press and hold the desired HomeLink® button until the indicator light begins to
flash after 20 seconds. Do not release the
button.
3. Without releasing the button, proceed with “Canadian/Gate Operator Programming”
step 2 and follow all remaining steps.
USING HOMELINK®
To operate, push and release the programmed
HomeLink® button. Activation will now occur for
the programmed device (i.e. garage door
opener, gate operator, security system, entry
door lock, home/office lighting, etc.). The
hand-held transmitter of the device may also be
used at any time.
SECURITY
It is advised to erase all channels before you sell
or turn in your vehicle.
To do this, push and hold the two outside
buttons for 20 seconds until the orange
indicator flashes. Note that all channels will be
erased. Individual channels cannot be erased.
The HomeLink® Universal Transceiver is
disabled when the Vehicle Security Alarm is
active.
20_LA_OM_EN_USC_t.book Page 62
Page 66 of 396

64GETTING TO KNOW YOUR VEHICLE
La operación de este equipo está sujeta a las
siguientes dos condiciones:
1. es posible que este equipo o dispositivo no
cause interferencia perjudicial y
2. este equipo o dispositivo debe aceptar cualquier interferencia, incluyendo la que
pueda causar su operación no deseada.
NOTE:
Changes or modifications not expressly
approved by the party responsible for compli -
ance could void the user’s authority to operate
the equipment.
INTERNAL EQUIPMENT
STORAGE
Glove Compartment
The glove compartment is located on the
passenger side of the instrument panel.
To open the glove compartment, pull the
release handle.
Glove Compartment
Opened Glove Compartment
Console Storage
The center console has a storage compartment
located underneath the armrest. The
compartment contains a 12 Volt power outlet,
and is also equipped with a USB port featuring
active charging, which will continue charging your device up to 60 minutes after the ignition
is turned off. The USB port also may be
equipped with an IPOD®/USB control, or Apple
CarPlay® and Android Auto™. Refer to
“IPOD®/USB/MP3 Control – If Equipped” in
“Multimedia” for further information. If
equipped with Apple CarPlay® and Android
Auto™, refer to the Uconnect Owner’s Manual
Supplement.
Center Console
WARNING!
Do not operate this vehicle with a console
compartment lid in the open position. Driving
with the console compartment lid open may
result in injury in a collision.
20_LA_OM_EN_USC_t.book Page 64
Page 68 of 396

66GETTING TO KNOW YOUR VEHICLE
Power outlets labeled with a “key” can be
powered when the ignition is in the ACC or ON/
RUN position, while the outlets labeled with a
“battery” are connected directly to the battery
and powered at all times.
These power outlets can also operate a
conventional cigar lighter unit.
The front power outlet is located next to the
storage area on the integrated center stack of
the instrument panel.
Power Outlet — Integrated Center Stack Front
NOTE:
The front integrated center stack power
outlet can be changed from “ignition”
powered to “battery” powered by moving the
integrated center stack fuse #12 in the Rear
Power Distribution Center from fuse location
“IGN” to “B+.” Refer to “Fuses” in “In Case Of
Emergency.”
In addition to the front center stack power
outlet, there is also a power outlet located in the
center console to the left of the media hub.
Power Outlet — Center Console
NOTE:
All accessories connected to these powered
outlets should be removed or turned off when
the vehicle is not in use to protect the battery
against discharge.
Power Outlet Fuse Locations
1 — #12 Fuse 20A Yellow Power Outlet Integrated
Center Stack
2 — #38 Fuse 20A Yellow Power Outlet Center
Console
20_LA_OM_EN_USC_t.book Page 66
Page 72 of 396

70GETTING TO KNOW YOUR INSTRUMENT PANEL
INSTRUMENT CLUSTER DESCRIPTIONS
1. Tachometer
Indicates the engine speed in revolutions
per minute (RPM x 1000).
2. Instrument Cluster Display
When the appropriate conditions exist,
this display shows the instrument cluster
display messages. Refer to “Instrument
Cluster Display” in “Getting To Know
Your Instrument Panel” for further
information.
3. Speedometer
Indicates vehicle speed.
4. Temperature Gauge
The temperature gauge shows engine
coolant temperature. Any reading within
the normal range indicates that the
engine cooling system is operating satis -
factorily.
The gauge pointer will likely indicate a
higher temperature when driving in hot
weather, up mountain grades, or when
towing a trailer. It should not be allowed
to exceed the upper limits of the normal
operating range. 5. Fuel Gauge
The pointer shows the level of fuel in the
fuel tank when the Keyless Push Button
Ignition is in the ON/RUN position.
The fuel pump symbol points
to the side of the vehicle where
the fuel door is located.
Refer to “Refueling The Vehicle” in “Starting
And Operating” for further information.
NOTE:
The hard telltales will illuminate for a bulb check
when the ignition is first cycled.
WARNING!
A hot engine cooling system is dangerous.
You or others could be badly burned by steam
or boiling coolant. You may want to call an
authorized dealer for service if your vehicle
overheats. If you decide to look under the
hood yourself, see “Servicing And
Maintenance.” Follow the warnings under the
Cooling System Pressure Cap paragraph.
CAUTION!
Driving with a hot engine cooling system
could damage your vehicle. If the
temperature gauge reads “H,” pull over and
stop the vehicle. Idle the vehicle with the air
conditioner turned off until the pointer drops
back into the normal range. If the pointer
remains on the “H,” turn the engine off
immediately and call an authorized dealer for
service.
20_LA_OM_EN_USC_t.book Page 70
Page 75 of 396

GETTING TO KNOW YOUR INSTRUMENT PANEL73
SRT INSTRUMENT CLUSTER
D
ESCRIPTIONS
1. Tachometer
Indicates the engine speed in revolutions
per minute (RPM x 1000).
2. Instrument Cluster Display
When the appropriate conditions exist,
this display shows the instrument cluster
display messages. Refer to “Instrument
Cluster Display” in “Getting To Know Your
Instrument Panel” for further informa -
tion.
3. Speedometer
Indicates vehicle speed.
4. Temperature Gauge
The temperature gauge shows engine
coolant temperature. Any reading within
the normal range indicates that the
engine cooling system is operating satis -
factorily.
The gauge pointer will likely indicate a
higher temperature when driving in hot
weather, up mountain grades, or when
towing a trailer. It should not be allowed
to exceed the upper limits of the normal
operating range. 5. Fuel Gauge
The pointer shows the level of fuel in the
fuel tank when the Keyless Push Button
Ignition is in the ON/RUN position.
The fuel pump symbol points
to the side of the vehicle where
the fuel door is located.
Refer to “Refueling The Vehicle” in “Starting
And Operating” for further information.
NOTE:
The hard telltales will illuminate for a bulb check
when the ignition is first cycled.
INSTRUMENT CLUSTER DISPLAY
Your vehicle will be equipped with an
instrument cluster display, which offers useful
information to the driver. With the ignition in the
OFF mode, opening/closing of a door will
activate the display for viewing, and display the
total miles, or kilometers, in the odometer. Your
instrument cluster display is designed to display
important information about your vehicle’s
systems and features.
WARNING!
A hot engine cooling system is dangerous.
You or others could be badly burned by steam
or boiling coolant. You may want to call an
authorized dealer for service if your vehicle
overheats.
CAUTION!
Driving with a hot engine cooling system
could damage your vehicle. If the
temperature gauge reads greater than 230°F
(110°C) pull over and stop the vehicle. Idle
the vehicle with the air conditioner turned off
until the pointer drops back into the normal
range. If the pointer remains above 230°F
(110°C), turn the engine off immediately and
call an authorized dealer for service.
3
20_LA_OM_EN_USC_t.book Page 73