2020 DODGE CHALLENGER ECO mode
[x] Cancel search: ECO modePage 54 of 396
52GETTING TO KNOW YOUR VEHICLE
CLIMATE CONTROL FUNCTIONS
A/C (Air Conditioning)
The Air Conditioning (A/C) button allows the
operator to manually activate or deactivate the
air conditioning system. When the air
conditioning system is turned on, cool
dehumidified air will flow through the outlets
into the cabin. For improved fuel economy,
press the A/C button to turn off the air
conditioning and manually adjust the blower
and airflow mode settings. Also, make sure to
select only Panel, Bi-Level, or Floor modes.
NOTE:
For Manual Climate Controls, if the system is
in Mix, Floor or Defrost Mode, the A/C can be
turned off, but the A/C system shall remain
active to prevent fogging of the windows.
If fog or mist appears on the windshield or
side glass, select Defrost mode, and increase
blower speed if needed.
If your air conditioning performance seems
lower than expected, check the front of the
A/C condenser (located in front of the radi -
ator), for an accumulation of dirt or insects.
Clean with a gentle water spray from the front
of the radiator and through the condenser. MAX A/C
MAX A/C sets the control for maximum cooling
performance.
Press and release to toggle between MAX A/C
and the prior settings. The button illuminates
when MAX A/C is on.
In MAX A/C, the blower level and mode position
can be adjusted to desired user settings.
Pressing other settings will cause the MAX A/C
operation to switch to the selected setting and
MAX A/C to exit.
Recirculation
In cold weather, use of Recirculation mode may
lead to excessive window fogging. The
Recirculation feature may be unavailable
(button on the touchscreen greyed out) if
conditions exist that could create fogging on the
inside of the windshield.
AUTOMATIC TEMPERATURE CONTROL
(ATC)
Automatic Operation
1. Push the AUTO button on the faceplate, or
the AUTO button on the touchscreen on the
Automatic Temperature Control (ATC)
Panel.
2. Next, adjust the temperature that you would
like the system to maintain by adjusting the
driver and passenger temperature control
buttons. Once the desired temperature is
displayed, the system will achieve and
automatically maintain that comfort level.
3. When the system is set up for your comfort level, it is not necessary to change the
settings. You will experience the greatest
efficiency by simply allowing the system to
function automatically.
NOTE:
It is not necessary to move the temperature
settings for cold or hot vehicles. The system
automatically adjusts the temperature,
mode, and blower speed to provide comfort
as quickly as possible.
The temperature can be displayed in U.S. or
Metric units by selecting the U.S./Metric
customer-programmable feature. Refer to
the “Uconnect Settings” in “Multimedia” for
further information.
To provide you with maximum comfort in the
Automatic mode during cold start-ups, the
blower fan will remain on low until the engine
warms up. The blower will increase in speed
and transition into Auto mode.
20_LA_OM_EN_USC_t.book Page 52
Page 55 of 396
GETTING TO KNOW YOUR VEHICLE53
Manual Operation Override
This system offers a full complement of manual
override features. The AUTO symbol in the front
ATC display will be turned off when the system
is being used in the manual mode.
OPERATING TIPS
NOTE:
Refer to the chart at the end of this section for
suggested control settings for various weather
conditions.
Summer Operation
The engine cooling system must be protected
with a high-quality antifreeze coolant to provide
proper corrosion protection and to protect
against engine overheating. OAT coolant
(conforming to MS.90032) is recommended.
Winter Operation
To ensure the best possible heater and
defroster performance, make sure the engine
cooling system is functioning properly and the
proper amount, type, and concentration of
coolant is used. Use of the Air Recirculation
mode during Winter months is not
recommended, because it may cause window
fogging.
Vacation/Storage
Before you store your vehicle, or keep it out of
service (i.e., vacation) for two weeks or more,
run the air conditioning system at idle for about
five minutes, in fresh air with the blower setting
on high. This will ensure adequate system
lubrication to minimize the possibility of
compressor damage when the system is started
again.
SRT Storage
SRT models include a Storage Mode feature to
prevent battery drain while parked for long
durations. The vehicle can be put into Storage
Mode through the info menu in the instrument
cluster display by selecting “Enter Storage
Mode”.
Window Fogging
Vehicle windows tend to fog on the inside in
mild, rainy, and/or humid weather. To clear the
windows, select Defrost or Mix mode and
increase the front blower speed. Do not use the
Recirculation mode without A/C for long
periods, as fogging may occur.Outside Air Intake
Make sure the air intake, located directly in
front of the windshield, is free of obstructions,
such as leaves. Leaves collected in the air
intake may reduce airflow, and if they enter the
plenum, they could plug the water drains. In
Winter months, make sure the air intake is clear
of ice, slush, and snow.
CAUTION!
Failure to follow these cautions can cause
damage to the heating elements:
Use care when washing the inside of the
rear window. Do not use abrasive window
cleaners on the interior surface of the
window. Use a soft cloth and a mild
washing solution, wiping parallel to the
heating elements. Labels can be peeled off
after soaking with warm water.
Do not use scrapers, sharp instruments, or
abrasive window cleaners on the interior
surface of the window.
Keep all objects a safe distance from the
window.
2
20_LA_OM_EN_USC_t.book Page 53
Page 57 of 396
GETTING TO KNOW YOUR VEHICLE55
(Continued)
Auto-Down Feature
The driver and, in some models, passenger
power window switches have an Auto-Down
feature. Push the window switch to the second
detent, release, and the window will go down
automatically.
To open the window part way, push the window
switch to the first detent and release it when
you want the window to stop. To stop the window from going all the way down
during the Auto-Down operation, pull up on the
switch briefly.
WIND BUFFETING
Wind buffeting can be described as the
perception of pressure on the ears or a
helicopter-type sound in the ears. Your vehicle
may exhibit wind buffeting with the windows
down, or the sunroof (if equipped) in certain
open or partially open positions. This is a normal
occurrence and can be minimized. If the
buffeting occurs with the rear windows open,
open the front and rear windows together to
minimize the buffeting. If the buffeting occurs
with the sunroof open, adjust the sunroof
opening to minimize the buffeting or open any
window.
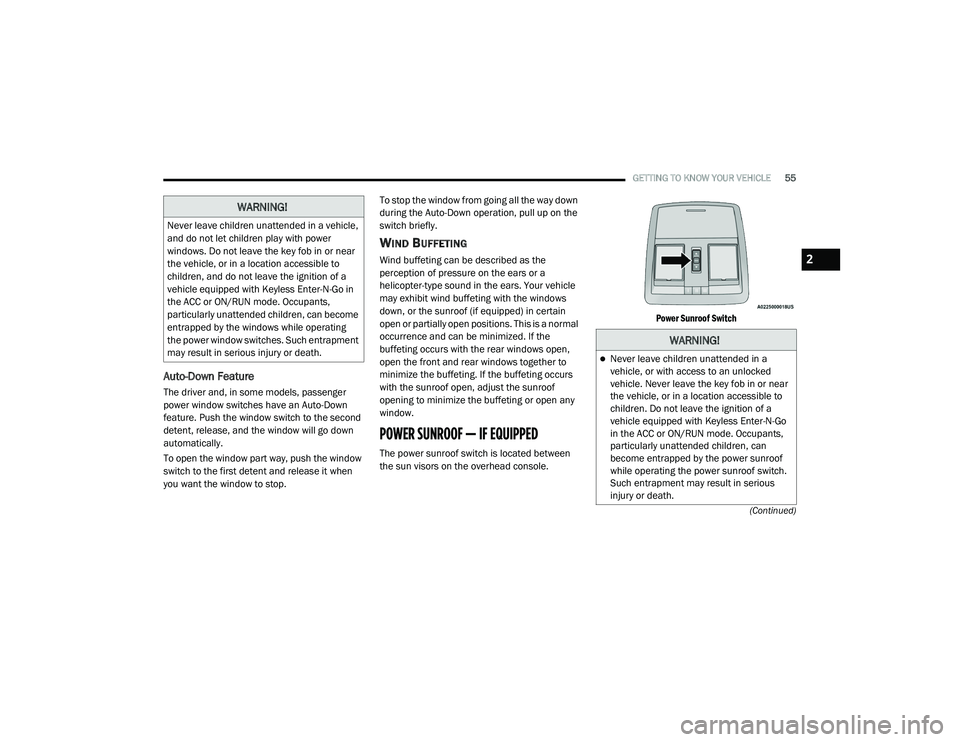
POWER SUNROOF — IF EQUIPPED
The power sunroof switch is located between
the sun visors on the overhead console.
Power Sunroof Switch
WARNING!
Never leave children unattended in a vehicle,
and do not let children play with power
windows. Do not leave the key fob in or near
the vehicle, or in a location accessible to
children, and do not leave the ignition of a
vehicle equipped with Keyless Enter-N-Go in
the ACC or ON/RUN mode. Occupants,
particularly unattended children, can become
entrapped by the windows while operating
the power window switches. Such entrapment
may result in serious injury or death.
WARNING!
Never leave children unattended in a
vehicle, or with access to an unlocked
vehicle. Never leave the key fob in or near
the vehicle, or in a location accessible to
children. Do not leave the ignition of a
vehicle equipped with Keyless Enter-N-Go
in the ACC or ON/RUN mode. Occupants,
particularly unattended children, can
become entrapped by the power sunroof
while operating the power sunroof switch.
Such entrapment may result in serious
injury or death.
2
20_LA_OM_EN_USC_t.book Page 55
Page 58 of 396
56GETTING TO KNOW YOUR VEHICLE
OPENING SUNROOF
Express
Push the switch rearward and release it within
one-half second, the sunroof and sunshade will
open automatically and stop at full open
position. During Express Open operation, any
other actuation of the sunroof switches will stop
the sunroof in a partially open position.
Manual Mode
Push and hold the switch rearward, the sunroof
and sunshade will open and automatically stop
at full open position. Releasing the switch while
the sunroof is in motion will stop the sunroof in
a partially open position. Vent Open
Push and release the Vent switch within one
half second and the sunroof will open to the
vent position. During Express Vent operation,
any other actuation of the sunroof switches will
stop the sunroof operation.
CLOSING SUNROOF
Express
Push the switch forward and release it within
one-half second and the sunroof will close
automatically from any position. During Express
Close operation, any other actuation of the
sunroof switches will stop the sunroof in a
partially open position.
Manual Mode
Push and hold the switch forward and the
sunroof will close from any position and stop at
a full closed position. Releasing the switch while
the sunroof is in motion will stop the sunroof in
a partially open position.
WIND BUFFETING
Wind buffeting can be described as the
perception of pressure on the ears or a
helicopter-type sound in the ears. Your vehicle
may exhibit wind buffeting with the windows
down, or the sunroof (if equipped) in certain open or partially open positions. This is a normal
occurrence and can be minimized. If the
buffeting occurs with the rear windows open,
then open the front and rear windows together
to minimize the buffeting. If the buffeting occurs
with the sunroof open, adjust the sunroof
opening to minimize the buffeting or open any
window.
SUNSHADE OPERATION
The sunshade can be opened manually.
However, the sunshade will open automatically
as the sunroof opens.
NOTE:
The sunshade cannot be closed if the sunroof is
open.
PINCH PROTECT FEATURE
This feature will detect an obstruction in the
closing of the sunroof during the Express Close
operation. If an obstruction in the path of the
sunroof is detected, the sunroof will
automatically retract. Remove the obstruction if
this occurs.
In a collision, there is a greater risk of being
thrown from a vehicle with an open sunroof.
You could also be seriously injured or killed.
Always fasten your seat belt properly and
make sure all passengers are also properly
secured.
Do not allow small children to operate the
sunroof. Never allow your fingers, other
body parts, or any object, to project through
the sunroof opening. Injury may result.
WARNING!
(Continued)
20_LA_OM_EN_USC_t.book Page 56
Page 62 of 396
60GETTING TO KNOW YOUR VEHICLE
To erase the channels, place the ignition in the
ON/RUN position, and push and hold the two
outside HomeLink® buttons (I and III) for up to
20 seconds or until the orange indicator
flashes.
NOTE:
Erasing all channels should only be
performed when programming HomeLink®
for the first time. Do not erase channels when
programming additional buttons.
If you have any problems, or require assis -
tance, please call toll-free 1-800-355-3515
or, on the Internet at HomeLink.com for infor -
mation or assistance.
Programming A Rolling Code
For programming garage door openers that
were manufactured after 1995. These garage
door openers can be identified by the “LEARN”
or “TRAIN” button located where the hanging
antenna is attached to the garage door opener.
NOTE:
It is NOT the button that is normally used to
open and close the door. The name and color of
the button may vary by manufacturer.
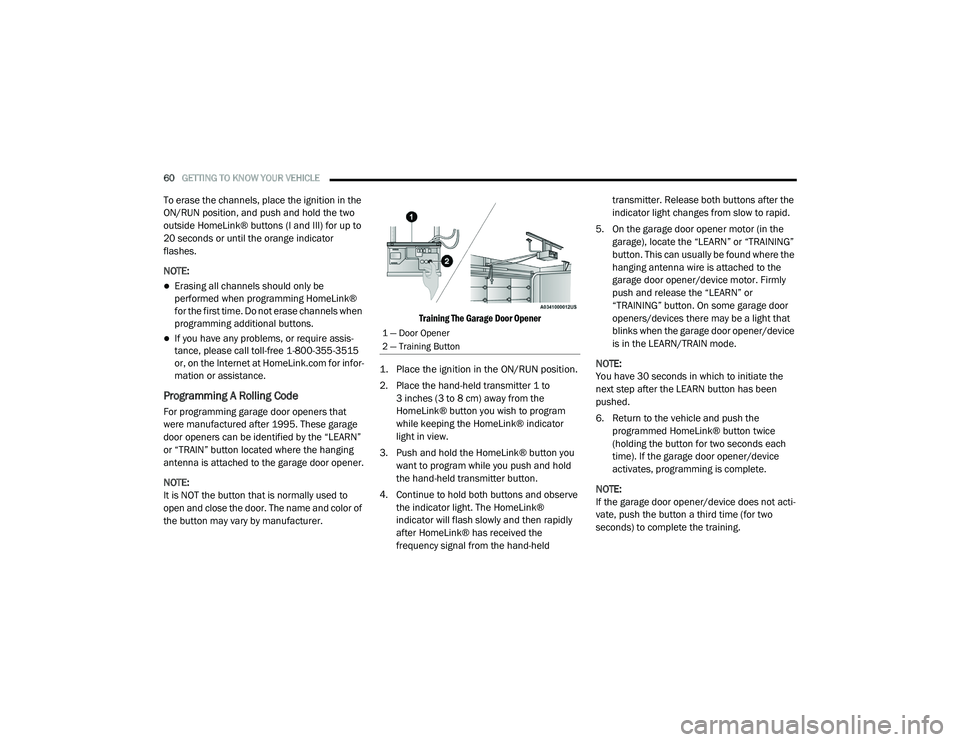
Training The Garage Door Opener
1. Place the ignition in the ON/RUN position.
2. Place the hand-held transmitter 1 to 3 inches (3 to 8 cm) away from the
HomeLink® button you wish to program
while keeping the HomeLink® indicator
light in view.
3. Push and hold the HomeLink® button you want to program while you push and hold
the hand-held transmitter button.
4. Continue to hold both buttons and observe the indicator light. The HomeLink®
indicator will flash slowly and then rapidly
after HomeLink® has received the
frequency signal from the hand-held transmitter. Release both buttons after the
indicator light changes from slow to rapid.
5. On the garage door opener motor (in the garage), locate the “LEARN” or “TRAINING”
button. This can usually be found where the
hanging antenna wire is attached to the
garage door opener/device motor. Firmly
push and release the “LEARN” or
“TRAINING” button. On some garage door
openers/devices there may be a light that
blinks when the garage door opener/device
is in the LEARN/TRAIN mode.
NOTE:
You have 30 seconds in which to initiate the
next step after the LEARN button has been
pushed.
6. Return to the vehicle and push the programmed HomeLink® button twice
(holding the button for two seconds each
time). If the garage door opener/device
activates, programming is complete.
NOTE:
If the garage door opener/device does not acti -
vate, push the button a third time (for two
seconds) to complete the training.
1 — Door Opener
2 — Training Button
20_LA_OM_EN_USC_t.book Page 60
Page 65 of 396

GETTING TO KNOW YOUR VEHICLE63
(Continued)
TROUBLESHOOTING TIPS
If you are having trouble programming
HomeLink®, here are some of the most
common solutions:
Replace the battery in the garage door
opener hand-held transmitter.
Push the LEARN button on the garage door
opener to complete the training for a Rolling
Code.
Did you unplug the device for programming
and remember to plug it back in?
If you have any problems, or require assistance,
please call toll-free 1-800-355-3515 or, on the
Internet at HomeLink.com for information or
assistance.
GENERAL INFORMATION
The following regulatory statement applies to all
Radio Frequency (RF) devices equipped in this
vehicle: This device complies with Part 15 of the FCC
Rules and with Innovation, Science and
Economic Development Canada license-exempt
RSS standard(s). Operation is subject to the
following two conditions:
1. This device may not cause harmful
interference, and
2. This device must accept any interference received, including interference that may
cause undesired operation.
Le présent appareil est conforme aux CNR
d`Innovation, Science and Economic
Development applicables aux appareils radio
exempts de licence. L'exploitation est autorisée
aux deux conditions suivantes:
1. l'appareil ne doit pas produire de brouillage, et
2. l'utilisateur de l'appareil doit accepter tout brouillage radioélectrique subi, même si le
brouillage est susceptible d'en compro -
mettre le fonctionnement.WARNING!
Vehicle exhaust contains carbon monoxide,
a dangerous gas. Do not run your vehicle in
the garage while programming the trans -
ceiver. Exhaust gas can cause serious
injury or death.
Your motorized door or gate will open and
close while you are programming the
universal transceiver. Do not program the
transceiver if people, pets or other objects
are in the path of the door or gate. Only use
this transceiver with a garage door opener
that has a “stop and reverse” feature as
required by Federal safety standards. This
includes most garage door opener models
manufactured after 1982. Do not use a
garage door opener without these safety
features.
WARNING! (Continued)
2
20_LA_OM_EN_USC_t.book Page 63
Page 78 of 396

76GETTING TO KNOW YOUR INSTRUMENT PANEL
5. Push and release the up or down
arrow button to return to previous main
menu.
NOTE:
If the indicator message illuminates when you
start the vehicle, the oil change indicator
system did not reset. If necessary, repeat this
procedure.
Secondary Method Of Resetting Engine Oil Life
1. Without pressing the brake pedal, push the ENGINE START/STOP button and place the
ignition to the ON/RUN position (do not
start the engine).
2. Fully press the accelerator pedal, slowly, three times within ten seconds.
3. Without pushing the brake pedal, push the ENGINE START/STOP button once to return
the ignition to the OFF/LOCK position.
NOTE:
If the indicator message illuminates when you
start the vehicle, the oil change indicator
system did not reset. If necessary, repeat this
procedure.PERFORMANCE SHIFT INDICATOR (PSI)
— I
F EQUIPPED
The Performance Shift Indicator (PSI) is enabled
on vehicles with manual transmission, or when
a vehicle with automatic transmission is in
manual shift mode. The PSI provides the driver
with a visual indication within the instrument
cluster display when the driver configured gear
shift point has been reached and the driver is
still accelerating. This indication notifies the
driver to change gear corresponding to the
configured RPMs in the head unit.
INSTRUMENT CLUSTER DISPLAY
S
ELECTABLE MENU ITEMS
Push and release the up or down arrow
button until the desired Selectable Menu item is
displayed in the instrument cluster display.
Follow the Menu or submenu prompts as
desired.
Speedometer
Push and release the up or down arrow
button until the speedometer menu is displayed
in the instrument cluster display. Push and
release the OK button to toggle units (km/h or
mph) of the speedometer.
Vehicle Info
Push and release the up or down arrow
button until the “Vehicle Info” menu is displayed
in the instrument cluster display. Push and
release the right or left arrow button to
scroll through the submenus items of “Vehicle
Info.” Follow the directional prompts to access
or reset any of the following “Vehicle Info”
submenu items:
Tire Pressure Monitor
If tire pressure is OK for all tires, a vehicle ICON
is displayed with tire pressure values in each
corner of the ICON.
If one or more tires have low pressure, “Inflate
Tire To XX” is displayed with the vehicle ICON
and the tire pressure values in each corner of
the ICON with the pressure value of the low tire
are displayed in a different color than the other
tire pressure value.
If the Tire Pressure system requires service,
“Service Tire Pressure System” is displayed.
Tire PSI is an information only function and
cannot be reset. Refer to “Tire Pressure
Monitoring System (TPMS)” under “Safety” for
further information.
20_LA_OM_EN_USC_t.book Page 76
Page 79 of 396

GETTING TO KNOW YOUR INSTRUMENT PANEL77
Coolant Temp
Displays the actual coolant temperature.
Trans Temp — If Equipped
Displays the actual transmission tempera -
ture.
Oil Temp
Displays the actual oil temperature.
Oil Pressure
Displays the actual oil pressure.
Oil Life
To reset the Oil Life, you must hold the OK
button. The “Hold OK to Reset” instruction will
be displayed at all times, but the following
conditions will need to be met in order to reset
Oil Life:
The vehicle must be off
The ignition must be in the ON/RUN position
If the conditions are met, holding the OK button
will reset the gauge and the numeric display will
return to 100%.
If the conditions are not met, a pop-up message
will display for 5 seconds, describing the
required conditions, and then the Oil Life screen
will reappear. Battery Voltage
Displays the actual battery voltage.
Storage Mode
Through this option, the vehicle can be
placed into Storage Mode. Refer to
“Vehicle Storage” in “Servicing And Main
-
tenance” for further information.
All Wheel Drive (AWD) Status — If Equipped
Displays the status of the All Wheel Drive
system.
Intake Air Temp — If Equipped
Displays the current temperature of the air
entering the engine.
Engine Torque — If Equipped
Displays the current engine torque.
Engine Power — If Equipped
Displays the current engine power.
Air/Fuel Ratio — If Equipped
Displays the air/fuel ratio.
Boost Pressure — If Equipped
Displays the current boost pressure.
I/C Coolant Temp — If Equipped
Displays the current I/C coolant temperature.
Performance Features
Push and release the up or down arrow
button until the Performance menu is displayed
in the instrument cluster display. Push the
right or left arrow button to enter the
submenus.
WARNING!
Measurement of vehicle statistics with the
Performance Features is intended for
off-highway or track use only and should not
be done on any public roadways. It is
recommended that these features be used in
a controlled environment and within the limits
of the law. The capabilities of the vehicle as
measured by the performance pages must
never be exploited in a reckless or dangerous
manner, which can jeopardize the user’s
safety or the safety of others. Only a safe,
attentive, and skillful driver can prevent
accidents.
3
20_LA_OM_EN_USC_t.book Page 77