2020 CITROEN RELAY change time
[x] Cancel search: change timePage 100 of 196

98
Practical information
A clogged passenger compartment filter can adversely affect air conditioning
system performance and generate
undesirable odours.
Oil filter
Change the oil filter each time the engine
oil is changed.
Particle filter (Diesel)
In addition to the catalytic converter, this filter
actively contributes to the preservation of
air quality by trapping the unburnt pollutant
particles. Black exhaust fumes are therefore not
emitted.
Operation
This filter, inserted into the exhaust system,
accumulates the carbonaceous particles. The
engine management computer automatically
and periodically manages the removal of
carbonaceous particles (regeneration).
The regeneration procedure is triggered
according to the amount of accumulated
particles and the conditions of use of the vehicle.
During this phase, you may notice certain
phenomena - accelerated idling, triggering of
the cooling fan, increased smoke and increased
temperature at the exhaust - which have no
impact on the operation of the vehicle and the
environment.
Screenwash and headlamp
washer fluid
To check the level or top up this fluid on
vehicles fitted with headlamp washers,
immobilise the vehicle and switch off the engine.
Reservoir capacity: approximately 5.5 litres.
To access the filler cap, pull the telescopic filler
neck and unclip the cap.
Fluid specification
The fluid must be topped up with a ready-to-use
mixture.
In winter (temperatures below zero), a liquid
containing an agent to prevent freezing must
be used which is appropriate for the prevailing
conditions, in order to protect the elements of the
system (pump, tank, ducts, jets, etc.).
Filling with pure water is prohibited under
all circumstances (risk of freezing,
limestone deposits, etc.).
AdBlue (BlueHDi)
An alert is triggered when the reserve level is
reached.
For more information on Indicators and in
particular the AdBlue range indicators, refer to
the corresponding section.
To avoid the vehicle being immobilised in
accordance with regulations, you must top up the
AdBlue tank.
For more information on AdBlue
® (BlueHDi),
and in particular on the supply of AdBlue, refer to
the corresponding section.
Checks
Unless otherwise indicated, check these
components in accordance with the
manufacturer's service schedule and according
to your engine.
Otherwise, have them checked by a CITROËN
dealer or a qualified workshop.
Only use products recommended by
CITROËN or products of equivalent
quality and specification.
In order to optimise the operation of
components as important as those in the
braking system, CITROËN selects and offers
very specific products.
12 V battery
The battery does not require any maintenance.
However, check regularly that the terminals
are correctly tightened (versions without quick
release terminals) and that the connections are
clean.
For more information on the precautions
to take before any work on the 12 V
battery, refer to the corresponding section.
Versions equipped with Stop & Start are
fitted with a 12 V lead-acid battery of
specific technology and specification.
Its replacement should be carried out only by
a CITROËN dealer or a qualified workshop.
Air filter
Depending on the environment and the
use of the vehicle (e.g. dusty atmosphere,
city driving), change it twice as often, if
necessary .
Passenger compartment
filter
Depending on the environment and the
use of the vehicle (e.g. dusty atmosphere,
city driving), change it twice as often, if
necessary .
Page 101 of 196

99
Practical information
7A clogged passenger compartment filter can adversely affect air conditioning
system performance and generate
undesirable odours.
Oil filter
Change the oil filter each time the engine
oil is changed.
Particle filter (Diesel)
In addition to the catalytic converter, this filter
actively contributes to the preservation of
air quality by trapping the unburnt pollutant
particles. Black exhaust fumes are therefore not
emitted.
Operation
This filter, inserted into the exhaust system,
accumulates the carbonaceous particles. The
engine management computer automatically
and periodically manages the removal of
carbonaceous particles (regeneration).
The regeneration procedure is triggered
according to the amount of accumulated
particles and the conditions of use of the vehicle.
During this phase, you may notice certain
phenomena - accelerated idling, triggering of
the cooling fan, increased smoke and increased
temperature at the exhaust - which have no
impact on the operation of the vehicle and the
environment.
Following prolonged operation of the
vehicle at very low speed or at idle, you
may, in exceptional circumstances, notice the
emission of water vapour at the exhaust while
accelerating. This has no impact on the
vehicle’s behaviour and the environment.
Due to the high exhaust temperatures
caused by the normal operation of the
particle filter, it is recommended not to park
the vehicle on flammable materials (grass, dry
leaves, pine needles, etc.) to avoid any risk of
fire.
Saturation/Regeneration
If there is a risk of clogging, this warning
lamp comes on, accompanied by a
message on the instrument panel display.
This warning is due to the start of saturation of
the particle filter (exceptionally long urban driving
conditions: reduced speed, traffic jams, etc.).
In order to regenerate the filter, it is
recommended to drive as soon as possible -
when traffic conditions and regulations permit
- at a speed of at least 37 mph (60 km/h), with
an engine speed above 2,000 rpm for about
15 minutes (until the warning lamp and/or the
message disappear).
If possible, avoid switching off the engine
before the end of filter regeneration; repeated
interruptions can lead to early deterioration of the
engine oil. It is not recommended to terminate
the filter regeneration with the vehicle stationary.
Malfunction
If this alert persists, do not ignore this warning;
this indicates that a malfunction has occurred in
the exhaust system/particle filter assembly.
Have the assembly checked by a CITROËN
dealer or a qualified workshop.
Manual gearbox
The gearbox does not require any maintenance (no oil change).
Brake pads
Brake wear depends on the style of
driving, particularly in the case of vehicles
used in town, over short distances. It may be
necessary to have the condition of the brakes
checked, even between vehicle services.
Unless there is a leak in the circuit, a drop in the
brake fluid level indicates that the brake pads
are worn.
If this warning lamp comes on, have the
brake pads checked by a CITROËN
dealer or a qualified workshop.
After washing the vehicle, moisture, or in
wintry conditions, ice can form on the
brake discs and pads: braking efficiency may
be reduced. Gently dab the brakes to dry and
defrost them.
Page 102 of 196

100
Practical information
reading and have an adverse effect on road
holding.
Fitting different tyres on the front and rear axles
can cause the ESC to mistime.
AdBlue® (BlueHDi
engines)
To respect the environment and ensure
compliance with the Euro 6 standard, without
adversely affecting the performance or fuel
consumption of its Diesel engines, CITROËN
has taken the decision to equip its vehicles
with a system that associates SCR (Selective
Catalytic Reduction) with a Diesel Particle Filter
(DPF) for the treatment of exhaust gases.
SCR system
Using a liquid called AdBlue® that contains
urea, a catalytic converter turns up to 85% of
the nitrogen oxides (NOx) into nitrogen and
Brake disc wear
For information on checking brake disc
wear, contact a CITROËN dealer or a
qualified workshop.
Manual parking brake
If you notice excessive brake lever travel
or decreased effectiveness, the parking
brake must be adjusted, even between two
services.
This system must be checked by a CITROËN
dealer or a qualified workshop.
Diesel fuel filter
The Diesel fuel filter is located under the bonnet,
close to the brake fluid reservoir.
If this warning lamp comes on, the filter
must be purged to remove water.
You can also purge the fuel filter regularly, every
time the engine oil is changed.
Bleeding the water in the filter
► Couple a clear hose to the bleed screw
1head.
► Place the other end of the clear hose in a
container.
► Loosen bleed screw 2.
► Switch on the ignition.
► Wait for the scavenge pump to stop.
► Switch off the ignition.
► Tighten bleed screw 2.
► Remove, then drain the clear hose and the
container.
► Start the engine.
► Check that there are no leaks.
HDi engines make use of advanced
technology. Any intervention requires a
special qualification guaranteed by the
CITROËN dealer network or a qualified
workshop .
Wheels and tyres
The inflation pressure of all tyres, including the spare wheel, must be
checked on "cold” tyres.
The pressures indicated on the tyre pressure
label are valid for "cold" tyres. If you have driven
for more than 10 minutes or more than 6 miles
(10 kilometres) at over 31 mph (50 km/h), add
0.3 bar (30 kPa) to the values indicated on the
label.
Under-inflation increases fuel
consumption. Non-compliant tyre
pressure causes premature wear on tyres and
has an adverse effect on the vehicle's road
holding - risk of an accident!
Driving with worn or damaged tyres reduces the
braking and road holding performance of the
vehicle. It is recommended to regularly check the
condition of the tyres (tread and sidewalls) and
wheel rims as well as the presence of the valves.
When the wear indicators no longer appear set
back from the tread, the depth of the grooves is
less than 1.6 mm; it is imperative to replace the
tyres.
Using different size wheels and tyres from those
specified can affect the lifetime of tyres, wheel
rotation, ground clearance, the speedometer
Page 114 of 196
11 2
In the event of a breakdown
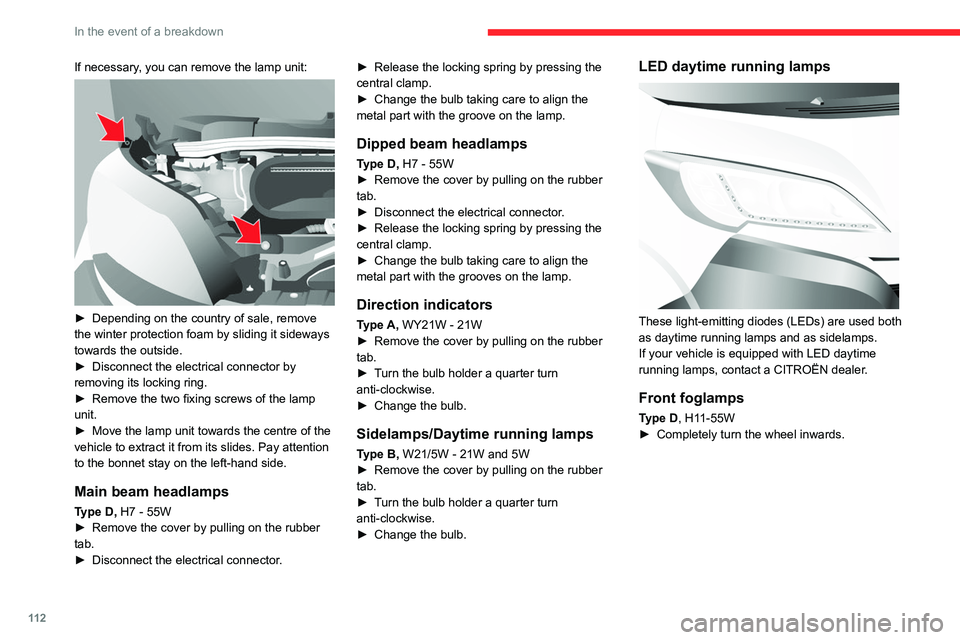
If necessary, you can remove the lamp unit:
► Depending on the country of sale, remove
the winter protection foam by sliding it sideways
towards the outside.
► Disconnect the electrical connector by
removing its locking ring.
► Remove the two fixing screws of the lamp
unit.
► Move the lamp unit towards the centre of the
vehicle to extract it from its slides. Pay attention
to the bonnet stay on the left-hand side.
Main beam headlamps
Type D, H7 - 55W
► Remove the cover by pulling on the rubber
tab.
► Disconnect the electrical connector. ►
Release the locking spring by pressing the
central clamp.
► Change the bulb taking care to align the
metal part with the groove on the lamp.
Dipped beam headlamps
Type D, H7 - 55W
► Remove the cover by pulling on the rubber
tab.
► Disconnect the electrical connector.
► Release the locking spring by pressing the
central clamp.
► Change the bulb taking care to align the
metal part with the grooves on the lamp.
Direction indicators
Type A, WY21W - 21W
► Remove the cover by pulling on the rubber
tab.
► Turn the bulb holder a quarter turn
anti-clockwise.
► Change the bulb.
Sidelamps/Daytime running lamps
Type B, W21/5W - 21W and 5W
► Remove the cover by pulling on the rubber
tab.
► Turn the bulb holder a quarter turn
anti-clockwise.
► Change the bulb.
LED daytime running lamps
These light-emitting diodes (LEDs) are used both
as daytime running lamps and as sidelamps.
If your vehicle is equipped with LED daytime
running lamps, contact a CITROËN dealer.
Front foglamps
Type D, H11-55W
► Completely turn the wheel inwards.
Page 154 of 196
152
Audio system
To protect the system, do not use a USB hub.
The system builds playlists (in temporary
memory); this operation can take from a
few seconds to several minutes at the first
connection.
Reduce the number of non-music files and the
number of folders to reduce the waiting time.
The playlists are updated every time the ignition
is switched off or a USB memory stick is
connected. The lists are memorised: if they are
not modified, the subsequent loading time will
be shorter.
USB socket
Located on the central console, this
socket is used only to power and
recharge the connected portable device.
Auxiliary socket (AUX)
Connect a portable device (MP3 player,
etc.) to the auxiliary jack socket using an
audio cable (not supplied).
First adjust the volume on your portable device
(to a high level). Then adjust the volume on your
audio system.
Controls are managed via the portable device.
The functions of the device connected to the
“AUX” socket are managed directly by this
device: it is therefore not possible to change the
track/folder/playlist or manipulate the playback
Radio, toggle up or down continuously: scan up/
down frequencies until you release the button.
Media, toggle up or down: select next/previous
track.
Media, toggle up or down continuously: fast
forward/rewind until you release the button.
Refuse an incoming call.
End the call in progress.
Radio
Selecting a station
The exterior environment (hills, buildings, tunnels, car parks, underground location,
etc.) may block reception, including in RDS
mode.
This behaviour is normal in the propagation of
radio waves and does not indicate any fault
with the audio system.
Press the "RADIO" button to select the
FM or AM waveband.
Briefly press one of the buttons to
automatically search for a lower/
higher frequency.
Turn the knob to manually search for a lower/higher frequency.
Press the knob to display the list of
stations received locally.
Turn the knob to select a station and press to
select it.
Memorising a station
Press the "RADIO" button to select the
FM or AM waveband.
Press the "A-B-C" button to select one of
the three memorised station levels.
Press and hold a button to memorise the
station being listened to.
The name of the station is displayed and an
audible signal confirms the memorisation.
Press "INFO" to display the information of
the station being listened to.
RDS
RDS, if displayed, allows you to continue
listening to the same station by
automatically retuning to alternative
frequencies. However, in certain conditions,
following this RDS station is not guaranteed
over the whole country, because radio
stations do not cover 100% of the area. When
the reception is weak, the frequency switches
to a regional station.
Press the "MENU" button.
Select "Regional" then press to activate
or deactivate RDS.
Alternative frequency (AF)
Select "Alternative frequency (AF)" then
press to activate or deactivate the
frequency.
When the "Regional” function is
activated, the system is therefore able to
search at any time for the best available
frequency.
Playing TA messages
The TA (Traffic Announcement) function gives priority to TA alert messages. To
operate, this function needs good reception of
a radio station that carries this type of
message. While traffic information is being
broadcast, the current media is automatically
interrupted so that the TA message can be
heard. Normal play of the previously playing
media resumes at the end of the message.
Press the "MENU" button.
Select "Traffic announcement (TA)" then
press to activate or deactivate the
reception of traffic announcements.
Media
USB socket
Insert the USB memory stick or connect
the device to the USB socket in the
central storage space , provided for transferring
data to the system, using a suitable cable (not
supplied).
Page 155 of 196
153
Audio system
11To protect the system, do not use a USB hub.
The system builds playlists (in temporary
memory); this operation can take from a
few seconds to several minutes at the first
connection.
Reduce the number of non-music files and the
number of folders to reduce the waiting time.
The playlists are updated every time the ignition
is switched off or a USB memory stick is
connected. The lists are memorised: if they are
not modified, the subsequent loading time will
be shorter.
USB socket
Located on the central console, this
socket is used only to power and
recharge the connected portable device.
Auxiliary socket (AUX)
Connect a portable device (MP3 player,
etc.) to the auxiliary jack socket using an
audio cable (not supplied).
First adjust the volume on your portable device
(to a high level). Then adjust the volume on your
audio system.
Controls are managed via the portable device.
The functions of the device connected to the
“AUX” socket are managed directly by this
device: it is therefore not possible to change the
track/folder/playlist or manipulate the playback
start/end/pause using the controls on the control
panel or the steering wheel.
Do not leave the cable of your portable device
connected to the “AUX” socket when not in use,
to avoid possible noise from the speakers.
Information and advice
The system supports USB Mass Storage
devices, BlackBerry® devices or Apple® players
via the USB sockets. The adapter cable is not
supplied.
Other devices, not recognised by the system
during connection, must be connected to
the auxiliary socket using a Jack cable (not
supplied).
It is advisable to restrict file names to 20
characters, without using special characters (e.g.
" " ? . ; ù) so as to avoid any reading or display
problems.
Only use USB memory sticks formatted to FAT
32 (File Allocation Table).
To protect the system, do not use a USB hub.
The system does not support the simultaneous connection of two identical
devices (two memory sticks or two
Apple
® players) but it is possible to connect
one memory stick and one Apple® player at
the same time.
It is recommended that you use genuine
Apple® USB cables to guarantee correct
operation.
Connecting Apple® players
Connect the Apple® player to the USB
socket using a suitable cable (not
supplied).
Play starts automatically.
Control is via the audio system.
The classifications available are those of the portable device connected (artists/
albums/types/tracks/playlists/audio books/
podcasts).
The default classification is sorting by artist.
To change the classification used, return to
the first level of the menu and then select the
desired classification (playlists for example)
and confirm to browse the tree to the desired
track.
The audio system software version may not be compatible with the generation of
your Apple
® player.
Page 163 of 196
161
Touch screen audio and telematics system
12– Set the parameter.
– AUX vol. setting .
– Set the parameters.
DAB (Digital Audio
Broadcasting) radio
Terrestrial Digital Radio
Digital radio
Digital radio provides higher quality
reception and also the graphical display
of current information on the radio station
being listened to.
The various "multiplexes/ensembles" offer
a choice of radio stations organised in
alphabetical order.
Press “RADIO” successively to display
the "DAB Radio".
Select the "Navigate" tab.
Select a list from the filters
offered: "All", "Types",
"Ensembles", then select a radio station.
Press the "Update" button to update the
list of "DAB Radio" stations received.
DAB/FM station tracking
"DAB" does not cover 100% of the
territory.
When the digital radio signal is poor, the
"AF" (alternative frequency) option enables
you to continue listening to the same
station by automatically switching to the
corresponding "FM" analogue station (if there
is one).
When the system switches to analogue
station, there is a delay of a few seconds
with sometimes a change in volume.
When the digital signal quality is restored, the
system automatically changes back to "DAB".
If the "DAB" station is not available, the
sound cuts out when the digital signal
quality becomes poor and the "AF"
alternative frequency is crossed out.
Media
Press "MEDIA" to display the media
menus:
Briefly press on the 9 or : buttons to play the previous/next track.
Press and hold the buttons to fast-forward or
rewind the selected track.
Browse –
Browse by: Currently playing, Artists,
Albums, Types, Songs, Playlists,
Audiobooks, Podcasts.
– Browse and select the songs contained in the
active device.
– The selection possibilities depend on the
device connected or the type of CD inserted.
Source
– CD, AUX, USB.
– Select the desired audio source from those
available or insert a device intended for this
purpose; the system starts to play the sources
automatically.
– Bluetooth
®.
– Save a Bluetooth® audio device.
Information
– Information .
– View the information about the track being
listened to.
Random
Press the button to play the songs on the CD,
USB, iPod or Bluetooth
® in random order.
Repeat
Press the button to activate this function.
Audio
– Equalizer.
– Adjust the bass, medium and treble.
– Balance/Fade.
– Adjust the balance of the front and rear
speakers, left and right.
– Press the button in the centre of the arrows to
balance the settings.
– Volume/Speed.
Page 164 of 196
162
Touch screen audio and telematics system
– Select the desired parameter; the option is
highlighted.
– Loudness.
– Optimise the quality of low volume audio.
– Automatic radio.
– Set the radio when starting up or recover the
active state when the ignition key was last turned
to STOP.
– Radio switch-off delay .
– Set the parameter.
– AUX vol. setting .
– Set the parameters.
USB socket
Insert the USB memory stick or connect
the device to the USB socket in the
central storage space , provided for transferring
data to the system, using a suitable cable (not
supplied).
To protect the system, do not use a USB hub.
The system builds playlists (in temporary
memory); this operation can take from a
few seconds to several minutes at the first
connection.
Reduce the number of non-music files and the
number of folders to reduce the waiting time.
The playlists are updated every time the ignition
is switched off or a USB memory stick is
connected. The lists are memorised: if they are
not modified, the subsequent loading time will
be shorter.
USB socket
Located on the central console, this
socket is used only to power and
recharge the connected portable device.
Auxiliary socket (AUX)
Connect a portable device (MP3 player,
etc.) to the auxiliary jack socket using an
audio cable (not supplied).
First adjust the volume on your portable device
(to a high level). Then adjust the volume on your
audio system.
Controls are managed via the portable device.
The functions of the device connected to the
“AUX” socket are managed directly by this
device: it is therefore not possible to change the
track/folder/playlist or manipulate the playback
start/end/pause using the controls on the control
panel or the steering wheel.
Do not leave the cable of your portable device
connected to the “AUX” socket when not in use,
to avoid possible noise from the speakers.
Selecting the source
Press on "MEDIA".
Select the "Source" tab to show the
rolling display of audio sources.
Select the source.
Use the play settings on the screen.
Press the "Rand." button and/or the
"Repeat" button to activate them, press again to
deactivate them.
Information and advice
The audio system will only play audio files with
".wav", ".wma" and ".mp3" file extensions, at bit
rates between 32 Kbps and 320 Kbps.
For audio files with ".aac", ".m4a", ".m4b" and
".mp4" file extensions, the supported sampling
rates are 8 - 96 kHz.
".m3u" and ".wpl" types are also supported.
The system does not manage devices with a
capacity greater than 64 GB.
It is advisable to restrict file names to 20
characters, without using special characters (e.g.
" " ? . ; ù) so as to avoid any reading or display
problems.
The system supports USB mass storage devices, BlackBerry® devices or Apple®
players via the USB sockets. The adapter
cable is not supplied.
Devices are managed using the audio system
controls.
Other devices, not recognised by the system
during connection, must be connected to
the auxiliary socket using a Jack cable (not
supplied).
Only use USB memory sticks formatted to FAT
32 (File Allocation Table).
To protect the system, do not use a USB hub.
The system does not support the simultaneous connection of two identical
devices (two memory sticks or two
Apple
® players) but it is possible to connect
one memory stick and one Apple® player at
the same time.
It is recommended that you use genuine
Apple® USB cables to guarantee correct
operation.
Bluetooth® Streaming
Streaming allows music files on the telephone to
be played via the vehicle's speakers.
Active the Bluetooth
® function on the device.Press "MEDIA".
If there is a media source active, press
the "Source" button.
Select the "Bluetooth®" media source
then press the "Add device” button.
If no device has yet been paired with the system,
a special page is displayed on the screen.
Select "Yes" to start the pairing procedure, and
then search for the name of the system on the
device.
Select the name of the system on the device
and, when requested by the audio system,
enter the PIN code displayed on the screen of