2020 CITROEN RELAY ECU
[x] Cancel search: ECUPage 116 of 196

11 4
In the event of a breakdown
Front/Rear
► Press the points indicated by the arrows, then
remove the courtesy lamp.
► Open the protective flap.
► Remove the bulb by separating the two
contacts.
► Check that the new bulbs are securely held
between the two contacts.
► Close the protective flap.
► Fix the courtesy lamp in its housing and
make sure it is locked.
Rear lamps
1. Brake lamps
Type B, P21W - 21W
2. Brake lamps / Sidelamps
Type B, P21/5W - 21W et 5W
3. Direction indicators
Type B, PY21W - 21W
4. Reversing lamps
Type A, W16W - 16W
5. Foglamp
Type A, W16W - 16W
For more information on the Types of
bulbs , refer to the corresponding
section.
► Remove the faulty bulb, then open the rear
doors.
► Remove the corresponding access flap by
removing its seven fixing screws (van)
or
► Remove the corresponding access flap by
pulling its handle to unclip it (combi).
► Disconnect the electrical connector by
pressing on its central tab.
► Remove the two fixing nuts from the lens unit.
► From the outside, pull the lens unit.
► Remove the six fixing screws from the bulb
holder.
► Open the three retaining tabs and pull the
bulb holder out of its housing.
► Change the bulb.
► Carry out the operations in reverse order to
reposition each bulb.
Number plate lamps
Type C, C5W - 5W
Page 138 of 196

136
Special features
Crew cab
The crew cab, available on van
versions, consists of a bench
seat, seat belts, a storage
compartment and side windows.
It is separated from the loading area by a high-
resistance partition providing comfort and safety.
Rear bench seat
This ergonomic bench seat has four seats.
Storage space
A storage space is available under the bench
seat.
From the cab, tilt the seat cushion forwards to
access it.
Do not tilt the bench seat cushion during
transport.
Do not attach anything to the cab fixing
structure.
Do not exceed the number of passengers
indicated on the registration certificate.
In the rear, the loading area is intended
for carrying goods only.
You are advised to place the goods or heavy
objects as far forwards as possible in the
loading area (towards the cab) and to secure
them by means of straps using the stowing
rings on the floor.
Child seats
Do not install child seats, booster
cushions or carry-cots on the rear seats
of the cab.
Chassis cab / Flatbed cab
The chassis cab and flatbed
cab versions are equipped with
a cab, fixed flatbed and specific
rear lamps.
These versions are also available with other
equipment:
– a double cab,
– a tipper truck.
For more information on all of its
equipment, refer to the corresponding
section.
Changing a bulb
For more information on Types of bulbs,
refer to the corresponding section.
Rear lamps
1. Direction indicators
Type B, PY21W - 21W
2. Brake lamps
Type B, P21W - 21W
3. Sidelamps
Type A, W5W - 5W
4. Reversing lamps
Type A, W16W - 16W
5. Foglamps
Type A, W16W - 16W
► Locate the faulty bulb.
Page 148 of 196

146
Special features
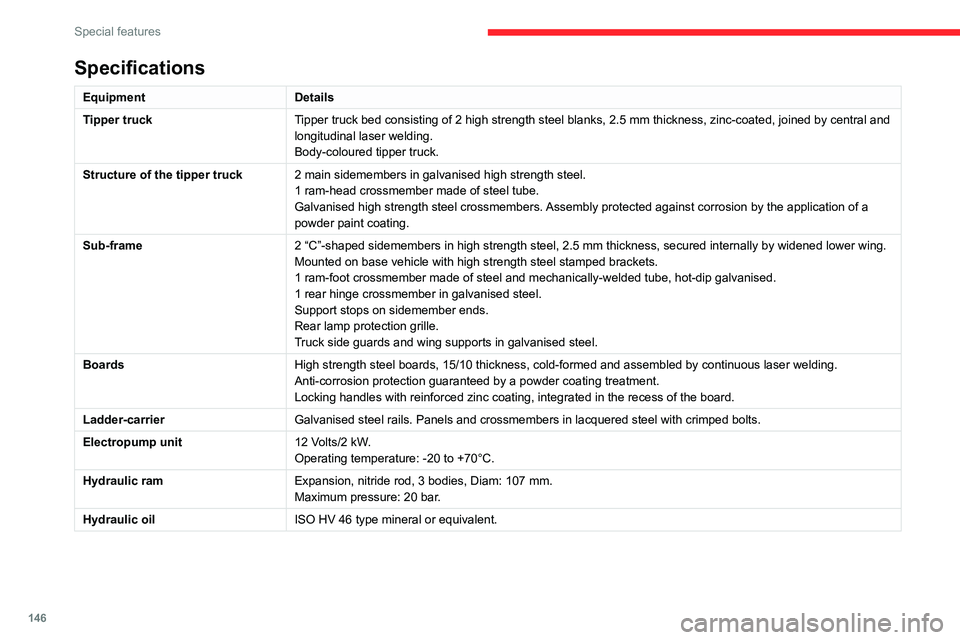
Specifications
EquipmentDetails
Tipper truck Tipper truck bed consisting of 2 high strength steel blanks, 2.5 mm thickness, zinc-coated, joined by central and
longitudinal laser welding.
Body-coloured tipper truck.
Structure of the tipper truck 2 main sidemembers in galvanised high strength steel.
1 ram-head crossmember made of steel tube.
Galvanised high strength steel crossmembers. Assembly protected against corrosion by the application of a
powder paint coating.
Sub-frame 2 “C”-shaped sidemembers in high strength steel, 2.5 mm thickness, secured internally by widened lower wing.
Mounted on base vehicle with high strength steel stamped brackets.
1 ram-foot crossmember made of steel and mechanically-welded tube, hot-dip galvanised.
1 rear hinge crossmember in galvanised steel.
Support stops on sidemember ends.
Rear lamp protection grille.
Truck side guards and wing supports in galvanised steel.
Boards High strength steel boards, 15/10 thickness, cold-formed and assembled by continuous laser welding.
Anti-corrosion protection guaranteed by a powder coating treatment.
Locking handles with reinforced zinc coating, integrated in the recess of the board.
Ladder-carrier Galvanised steel rails. Panels and crossmembers in lacquered steel with crimped bolts.
Electropump unit 12 Volts/2 kW.
Operating temperature: -20 to +70°C.
Hydraulic ram Expansion, nitride rod, 3 bodies, Diam: 107 mm.
Maximum pressure: 20 bar.
Hydraulic oil ISO HV 46 type mineral or equivalent.
Dimensions
This adaptation is available only on L2 single
cab; refer to the table below for the specifications
of the tipper truck.
Tipper truck (in mm)
Useable length 3,200
Overall length 3,248
Useable width 2,000
Overall width 2,100
Height of boards 350
Weight of the conversion (in
kg) 550
For the L2 chassis cab specifications,
refer to the Dimensions section of the
platform version.
Weights and towed loads
(kg)
The braked trailer weight with load transfer can
be increased, provided that the equivalent of this
load is removed from the vehicle so as not to
exceed the GTW. Warning! Towing using a lightly
loaded vehicle can adversely affect roadholding.
The kerb weight is equal to the unladen weight +
driver (75 kg) + tank full to 90%.
Page 149 of 196

147
Special features
10Dimensions
This adaptation is available only on L2 single
cab; refer to the table below for the specifications
of the tipper truck.
Tipper truck (in mm)
Useable length 3,200
Overall length 3,248
Useable width 2,000
Overall width 2,100
Height of boards 350
Weight of the conversion (in
kg) 550
For the L2 chassis cab specifications,
refer to the Dimensions section of the
platform version.
Weights and towed loads
(kg)
The braked trailer weight with load transfer can
be increased, provided that the equivalent of this
load is removed from the vehicle so as not to
exceed the GTW. Warning! Towing using a lightly
loaded vehicle can adversely affect roadholding.
The kerb weight is equal to the unladen weight +
driver (75 kg) + tank full to 90%.
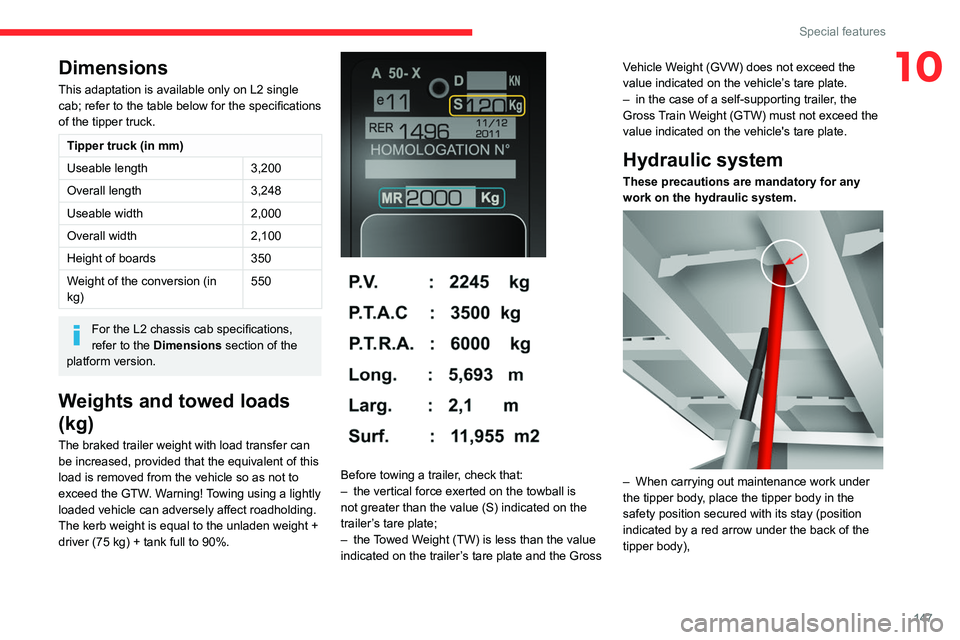
Before towing a trailer, check that:
– the vertical force exerted on the towball is
not greater than the value (S) indicated on the
trailer’s tare plate;
– the Towed Weight (TW) is less than the value
indicated on the trailer’s tare plate and the Gross Vehicle Weight (GVW) does not exceed the
value indicated on the vehicle’s tare plate.
– in the case of a self-supporting trailer, the
Gross Train Weight (GTW) must not exceed the
value indicated on the vehicle's tare plate.
Hydraulic system
These precautions are mandatory for any
work on the hydraulic system.
– When carrying out maintenance work under
the tipper body, place the tipper body in the
safety position secured with its stay (position
indicated by a red arrow under the back of the
tipper body),
Page 167 of 196

165
Touch screen audio and telematics system
12► Insert the USB device into the USB socket
located in the central storage space dedicated
to data transfer.
The system starts preparing the USB device.
– If the system continues to ask you to
insert a USB device, make sure that your
USB device meets the above conditions, and
then try again.
– If you connect multiple USB devices, the
system prompts you to remove devices
so that only the device to be prepared is
connected.
– If there is not enough space on the USB
device, you are prompted to use another USB
device.
– If you connect a USB device that contains
files, the system warns you that files on the
USB device may be deleted.
When the USB device is ready, the message
below appears:
"Navigation updates"
The preparation of the USB device is
finished.
You can now safely remove the USB device.
► Remove the USB device; you can now
download the new map to your USB device.
Install TomTom HOME
To install "TomTom HOME" and create a
"MyTomTom" account, perform the following
steps:
► Download and install the TomTom HOME
app on your computer through this link:
tomtom.com/getstarted
► Select and download TomTom HOME, then
follow the on-screen instructions.
Use a secure Wi-Fi network rather than
3G/4G to download the application on
your computer.
► Connect the USB device to your computer;
"TomTom HOME" starts automatically.
► Select "Log in " in the upper right corner of
"TomTom HOME".
► Select "Register" and enter your information
to create a "MyTomTom" account.
To receive map updates, you must have a "MyTomTom" account.
Once the account is created, you must indicate
whether you want to link your system to your
account. The prepared USB device represents
your system.
► Select “Link device”, then “Close”.
You are now ready to download a map to your
USB device.
Download a map
Connect your USB device to your computer.
Select a map to download
– To check if you can download a map for free
with the map refresh guarantee, select " Tools"
and then "Map refresh guarantee " in "TomTom
HOME".
– To purchase a map update, select " Buy
maps" in "TomTom HOME".
– If you have already purchased an update,
select "Update my device" in "TomTom HOME".
Download a map
If a map update is available for your system, it is
listed as an available update.
If your system already has the most
recent map, no updates are available.
► Select the map to download, then select
"Update and install "; the map will be
downloaded and installed on your USB device.
► Select “Done” once the process is finished.
Install the map
The new map must be downloaded
with the engine running and the
vehicle stationary.
Once you have downloaded a map to your USB
device, you can install it on your system.
► Insert the USB device containing the new
map into the USB socket located in the central
storage space dedicated to data transfer to the
system.
The system detects the presence of a new
map on the USB device. It may also contain
an update of the navigation software if it is
necessary for the new map.
► You must indicate whether you want to
update the system.
► Select "Start".