2020 CITROEN DISPATCH SPACETOURER clock
[x] Cancel search: clockPage 64 of 324

62
When the side seat is up
and the flap is removed,
you must install the anti-
slip net.
Refer to the Anti-slip net
section.
Lowering the seat cushion
F Remove the anti-slip net. Ensure that no object or passenger feet
could obstruct the anchorage points
or prevent the correct latching of the
assembly.
Anti-slip net
Installing the net
F Put the first fastener into the upper cut-
out 1, located beneath the folded seat
cushion. Keep the fastener pressed against
the structure, then turn it a quarter turn (in a
clockwise direction) to lock it.
F
P
ut the second fastener into the lower
cut-out 2 , located on the seat base. Keep
the fastener pressed against the structure,
then turn it a quarter turn (in a clockwise
direction) to lock it.
F
S
ecure the first hook to the ring 3 located in
the glove box.
F
S
ecure the second hook to the ring 4
located on the floor.
F
T
o put the seat cushion back in place, press
firmly on the top of the seat with one hand
to lower the seat cushion until it locks into
the seat position.
Ease of use and comfort
Page 95 of 324

93
Heating
This is an additional and separate system
which heats the passenger compartment and
improves defrosting performance.This indicator lamp is lit while the
system is programmed or set in
operation remotely via the remote
control.
It flashes during the whole duration
of the heating and goes off at the end
of the heating cycle or when stopped
using the remote control.
Ventilation
This system allows ventilation of the passenger
compartment with exterior air to improve the
temperature experienced on entering the
vehicle in summer.
Programming
With CITROËN Connect Nav, use the remote
control to start /stop the additional heating.
With a Bluetooth
® audio system or CITROËN
Connect Radio, use the remote control to start /
stop the additional heating and/or adjust the
preheating times.
With Bluetooth® audio system
F Select " Pre-heat. / Pre-ventil. ".
F
Sel
ect "Activation " and, if necessary for
programming, select " Parameters ".
F
P
ress the MENU
button to
access the main menu.
F
Sel
ect "Heating " to heat the engine and
passenger compartment or " Ventilation " to
ventilate the passenger compartment.
F
Select:
-
t
he 1
st clock to programme/memorise
the time at which the pre-heating
temperature will be reached,
-
t
he 2
nd clock to programme/memorise
a second time at which the pre-heating
temperature will be reached, Using these two clocks and depending on
the season you can, for example, select
one or the other start time.
A message in the screen confirms your
choice.
With CITROËN Connect Radio
Press Applications
to display the
primary page.
Then press " Programmable
heating/ventilation ".
F
Sel
ect the " Status" tab to activate/
deactivate the system.
F
Sel
ect the " Other settings " tab to choose
" Heating " to heat the engine and passenger
compartment or " Ventilation" to ventilate
the passenger compartment.
F
T
hen programme/preset the time at which
the pre-heating temperature will be reached
for each selection.
Press this button to save.
With CITROËN Connect Nav
F Press the " Applications" menu.
F
P
ress the " Vehicle Apps " tab.
3
Ease of use and comfort
Page 200 of 324

198
Keep AdBlue® out of the reach of children,
in its original container.
Procedure
Before starting the top-up procedure, ensure
that the vehicle is parked on a flat and level
sur face.
In wintry conditions, ensure that the
temperature of the vehicle is above -11
°C.
Otherwise the AdBlue
® may be frozen and so
cannot be poured into its tank. Park the vehicle
in a warmer area for a few hours to allow the
top-up to be carried out.
Never put the AdBlue
® into the Diesel fuel
tank.
If any AdBlue
® is splashed, or if there
are any spillages on the bodywork, rinse
immediately with cold water or wipe with a
damp cloth.
If the fluid has crystallised, clean it off
using a sponge and hot water. F
S
witch off the ignition and remove the key
from the switch to switch off the engine.
or
F
W
ith Keyless Entry and Starting, press the
" START/STOP " button to switch off the
engine.
Access to the AdBlue® tank
F From below, pull the black c ove r.
In certain conditions (high temperature, for
example), risks of the release of ammonia
cannot be excluded: do not inhale the vapour.
Vapours containing ammonia have an irritant
effect on mucous membranes (eyes, nose and
throat).
F
T
urn the blue cap 1/6 of a turn anti-
clockwise.
F
L
ift off the cap.
F
O
btain a container of AdBlue
®. After first
checking the use-by date, carefully read
the instructions for use on the label before
pouring the contents of the container into
the vehicle's AdBlue tank.
Or F
I
nsert the AdBlue
® pump nozzle and refill
the tank until the nozzle stops automatically.
F
A
fter refilling, carry out the same operations
in reverse order.
F
R
efit the black cover, starting
at the top.
F
F
or access to the AdBlue
® tank, open the
front left-hand door. To avoid over flowing the AdBlue
® tank:
•
T
op up between 10 and 13
litres using
AdBlue
® containers.
Or
•
D
o not continue after the nozzle’s first
automatic cut-off if you are refilling at a
service station.
Practical information
Page 207 of 324

205
F Turn selector A to the "Inflation" position.
F
U
ncoil the white pipe G fully.
F
C
onnect the white pipe to the
valve of the repaired wheel.
F
C
onnect the compressor's electrical plug to
the vehicle's 12
V socket again.
F
S
tart the vehicle and leave the engine
running.
As soon as possible, go to a CITROËN
dealer or a qualified workshop.
You must inform the technician that this kit
was used. After inspection, the technician
will tell you whether the tyre can be
repaired or if it must be replaced.
F
A
djust the pressure using the compressor
(to inflate: switch B in position " I"
; to
deflate: switch B
in position " O" and press
button
C ), in accordance with the vehicle's
tyre pressure label, located on the driver’s
door aperture.
A significant loss of pressure indicates that
the puncture has not been fully plugged
;
contact a CITROËN dealer or a qualified
workshop for assistance.
F
R
emove the kit and stow it. F
D rive at reduced speed (50 mph
(80
km/h) max.) limiting the distance
travelled to approximately 125
miles
(2 0 0
k m).
It is also possible to use the compressor,
without injecting sealant, to check and, if
necessary, adjust the tyre pressures.
If after 7
minutes this pressure is not
reached, this indicates that the tyre is not
repairable
; contact a CITROËN dealer or
a qualified workshop for assistance.
Do not drive more than 125
miles (200 km)
with a repaired tyre
; contact a CITROËN
dealer or a qualified workshop to change
the tyre.
Should the pressure of one or more tyres
be adjusted, it is necessary to reinitialise
the under-inflation detection system.
For more information on Tyre under-
inflation detection , refer to the
corresponding section.Removing the pipe and
cartridge
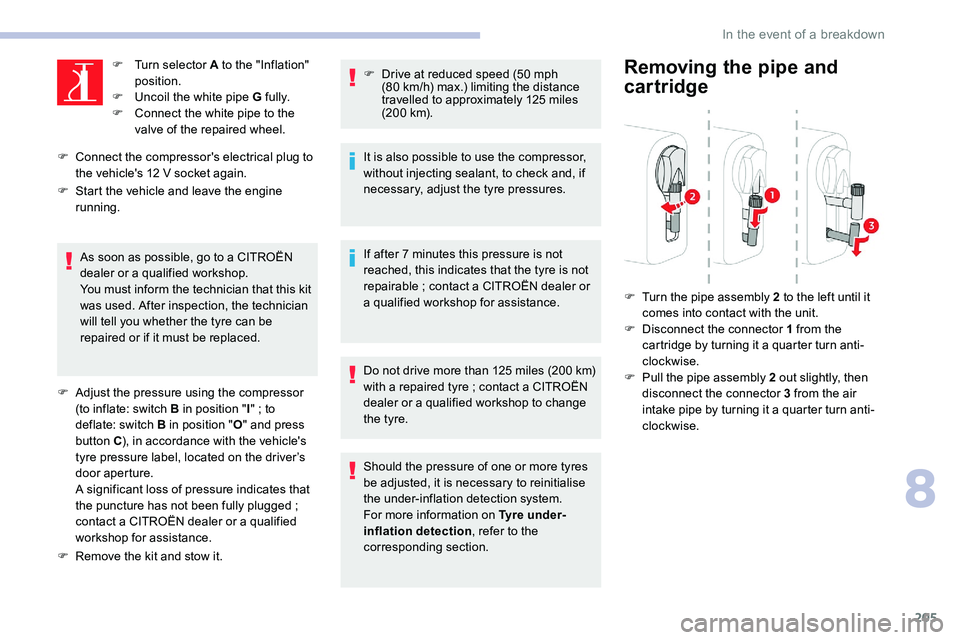
F Turn the pipe assembly 2 to the left until it comes into contact with the unit.
F
D
isconnect the connector 1 from the
cartridge by turning it a quarter turn anti-
clockwise.
F
P
ull the pipe assembly 2 out slightly, then
disconnect the connector 3 from the air
intake pipe by turning it a quarter turn anti-
clockwise.
8
In the event of a breakdown
Page 214 of 324

212
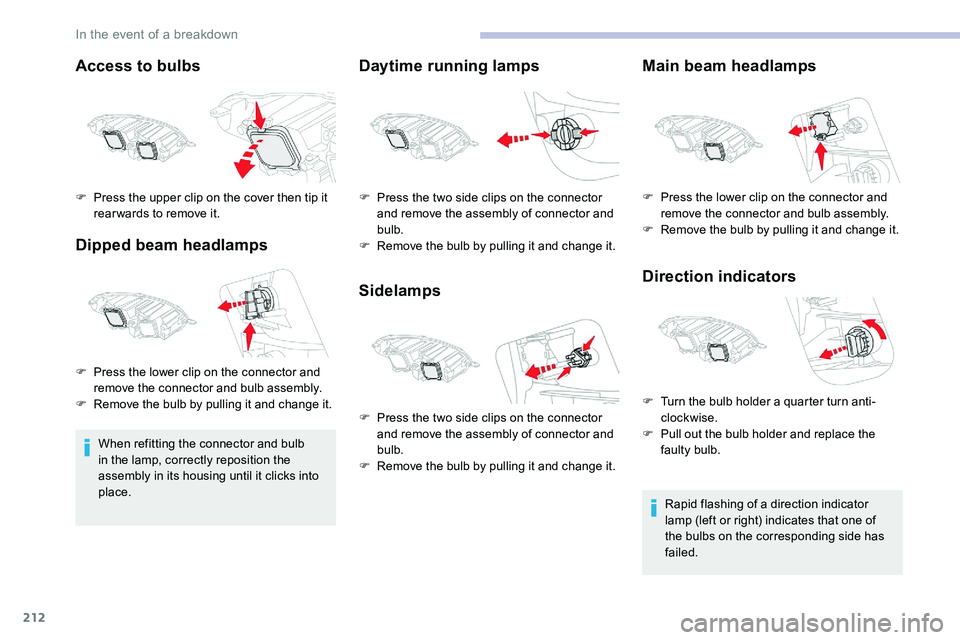
Access to bulbs
Dipped beam headlamps
When refitting the connector and bulb
in the lamp, correctly reposition the
assembly in its housing until it clicks into
place.
Daytime running lamps
SidelampsMain beam headlamps
Direction indicators
Rapid flashing of a direction indicator
lamp (left or right) indicates that one of
the bulbs on the corresponding side has
failed.
F
P
ress the upper clip on the cover then tip it
rear wards to remove it.
F
P
ress the lower clip on the connector and
remove the connector and bulb assembly.
F
R
emove the bulb by pulling it and change it. F
P
ress the two side clips on the connector
and remove the assembly of connector and
bulb.
F
R
emove the bulb by pulling it and change it.
F
P
ress the two side clips on the connector
and remove the assembly of connector and
bulb.
F
R
emove the bulb by pulling it and change it. F
P
ress the lower clip on the connector and
remove the connector and bulb assembly.
F
R
emove the bulb by pulling it and change it.
F
T
urn the bulb holder a quarter turn anti-
clockwise.
F
P
ull out the bulb holder and replace the
faulty bulb.
In the event of a breakdown
Page 215 of 324

213
Headlamps (xenon)
1.Main beam headlamps (H1-55W).
2. Dipped beam headlamps (D8S-25W).
3. Direction indicators (PY21W-21W amber).
Be aware of the zone behind the right
lamp (vehicle direction), which may be hot
with a risk of burning (degassing hoses).
Access to bulbs Dipped beam headlamps
Replacement of D8S xenon bulbs must
be carried out by a CITROËN dealer or
a qualified workshop as there is a risk of
electrocution.
It is recommended that both D8S bulbs be
changed at the same time, in the event of
the failure of one of them.
Main beam headlamps
When refitting the connector and bulb
in the lamp, correctly reposition the
assembly in its housing until it clicks into
place.
F
P
ress the upper clip on the cover then tip it
rear wards to remove it. F
P
ress the lower clip on the connector and
remove the connector and bulb assembly.
F
R
emove the bulb by pulling it and change it.
Direction indicators
Rapid flashing of a direction indicator
lamp (left or right) indicates that one of
the bulbs on the corresponding side has
failed.
Daytime running lamps/
sidelamps
F Turn the bulb holder a quarter turn anti-
clockwise.
F
P
ull out the bulb holder and replace the
faulty bulb.
8
In the event of a breakdown
Page 216 of 324

214
For the replacement of these bulbs, contact a
CITROËN dealer or a qualified workshop.
A replacement kit for the LEDs is available from
CITROËN dealers.
Front foglamps
H11- 5 5 W
F Under the front bumper, unscrew the fixing screws of the deflector A , then remove it.F
T
urn the bulb holder a quarter turn anti-
clockwise and remove it.
F
R
eplace the faulty bulb.
To replace this type of bulb, you can also
contact a CITROËN dealer or a qualified
workshop.
Direction indicator side
repeater
- Push the repeater towards the rear and take it out.
-
W
hen refitting, engage the repeater towards
the front and then bring it towards the rear.
Amber coloured bulbs (direction indicators and
side repeaters) must be replaced with bulbs of
identical specification and colour.
Rear lamps
1. Brake lamps/sidelamps (P21/5W-21/5W).
2. Direction indicators (PY21W-21W amber).
3. Reversing lamps (P21W-21W).
4. Foglamps/sidelamps (P21/5W-21/4W).
For vehicles with interior trim, contact a
CITROËN dealer or a qualified workshop
to have the work done.
F
I
dentify the faulty bulb then, depending on
version, open the rear doors or the tailgate.
F
P
ress the locking clip and disconnect the
connector.
In the event of a breakdown
Page 217 of 324

215
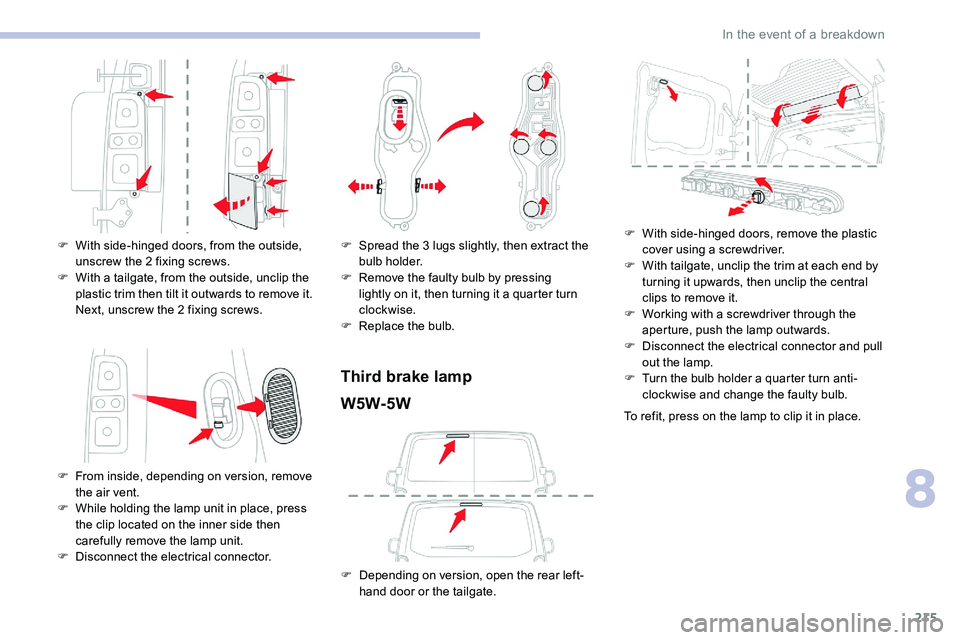
F With side-hinged doors, from the outside, unscrew the 2 fixing screws.
F
W
ith a tailgate, from the outside, unclip the
plastic trim then tilt it outwards to remove it.
Next, unscrew the 2 fixing screws.
F
F
rom inside, depending on version, remove
the air vent.
F
W
hile holding the lamp unit in place, press
the clip located on the inner side then
carefully remove the lamp unit.
F
D
isconnect the electrical connector. F
S pread the 3 lugs slightly, then extract the
bulb holder.
F
R
emove the faulty bulb by pressing
lightly on it, then turning it a quarter turn
clockwise.
F
R
eplace the bulb.
Third brake lampW5W-5W
F Depending on version, open the rear left- hand door or the tailgate. F
W
ith side-hinged doors, remove the plastic
cover using a screwdriver.
F
W
ith tailgate, unclip the trim at each end by
turning it upwards, then unclip the central
clips to remove it.
F
W
orking with a screwdriver through the
aperture, push the lamp outwards.
F
D
isconnect the electrical connector and pull
out the lamp.
F
T
urn the bulb holder a quarter turn anti-
clockwise and change the faulty bulb.
To refit, press on the lamp to clip it in place.
8
In the event of a breakdown