Page 67 of 324

65
Access to row 3
F Using the handle, release the rear feet then tip the seat for ward.
F
T
o return the seat, tip the bench towards the
rear until the feet lock into place..
It is not necessary to fold the backrest
(table position) to tip the bench seat for
access to row 3.
Folding the backrest to the
table position
F Put the head restraints in the low position. F
F
rom the rear, lower the handle to release
the backrest.
F
F
rom the front, raise the handle to release
the backrest.
F
F
old the backrest onto the cushion.
F
T
o return the backrest to its normal position,
raise the handle and pull the backrest up.
Do not leave objects (such as a bag or
toys) on the cushion when folding the
backrest.
Tilting
F If your vehicle has the facility, place the backrest in the table position.
F
U
sing the handle, release the rear feet then
tip the seat for ward.
F
T
o return the seat, tip the bench towards the
rear until the feet lock into place..
Removing
F If the vehicle is so equipped, place the backrest in the table position.
F
T
ip the bench seat.
F
R
elease the front feet using the handles.
F
D
isengage the bench seat from its
anchorages.
F
R
emove the bench seat.
Refitting
F Check that there is no object obstructing the anchorages and preventing the feet locking
into place.
3
Ease of use and comfort
Page 68 of 324

66
F Engage the front feet in the anchorages on the floor (as shown above).
F
L
ock the front feet using the handles.
F
T
ip the bench seat backwards until the rear
feet lock into place.
Be careful of passengers' feet when
tipping. F
I f the vehicle is so equipped, pull the control
and raise the backrest (from the rear, lower
the handle).
Check that the seat has correctly locked
on the floor when returned to the seating
position.
Fixed rear seat and bench
seat
The different levels of equipment and settings
described hereafter vary according to the
version and the configuration of the vehicle.
The seat has a backrest that may be fixed or
folding (table position).
The bench seat has a one-piece backrest that
may be fixed or folding (table position). For more information on the Seat belts
,
refer to the corresponding section.
Access to row 3
(example for an individual seat)
F
U
sing the handle, release the rear feet then
tip the seat for ward.
F
T
o return the seat to the normal position,
tip the seat backwards until the rear feet
engage in their anchorages.
It is not necessary to fold the backrest
(table position) to tip the bench seat and
so access row 3.
Ease of use and comfort
Page 70 of 324
68
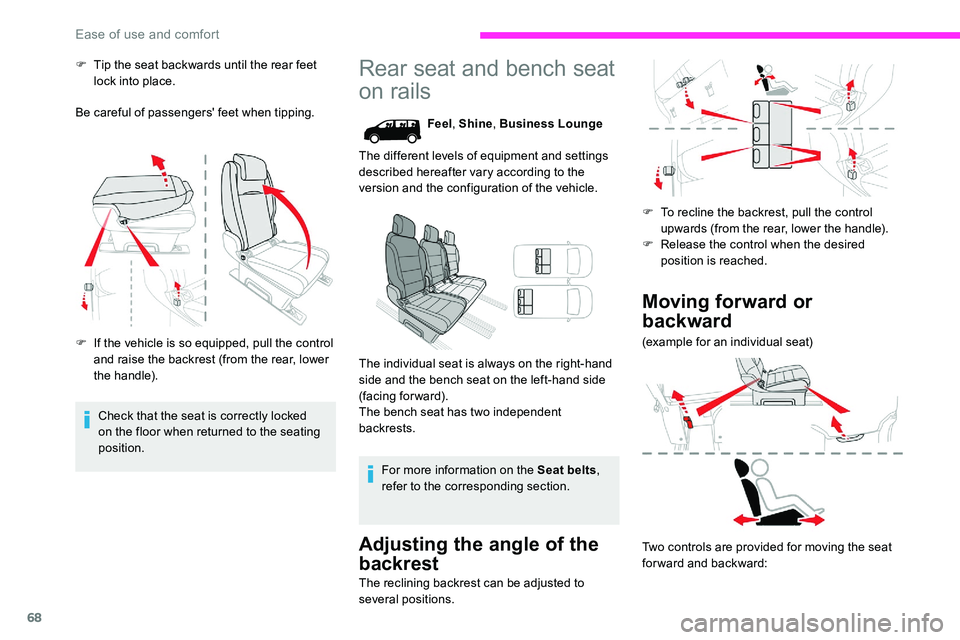
F Tip the seat backwards until the rear feet lock into place.
Be careful of passengers' feet when tipping.
F
I
f the vehicle is so equipped, pull the control
and raise the backrest (from the rear, lower
the handle).
Check that the seat is correctly locked
on the floor when returned to the seating
position.Rear seat and bench seat
on rails
Feel , Shine , Business Lounge
The different levels of equipment and settings
described hereafter vary according to the
version and the configuration of the vehicle.
The individual seat is always on the right-hand
side and the bench seat on the left-hand side
(facing forward).
The bench seat has two independent
backrests.
For more information on the Seat belts ,
refer to the corresponding section.
Adjusting the angle of the
backrest
The reclining backrest can be adjusted to
several positions. F
T
o recline the backrest, pull the control
upwards (from the rear, lower the handle).
F
R
elease the control when the desired
position is reached.
Moving forward or
backward
(example for an individual seat)
Two controls are provided for moving the seat
forward and backward:
Ease of use and comfort
Page 72 of 324

70
F Use the front control to move the seat so that it is between the markings.
Removing
(example of an individual seat)
F M ove the seat for ward for access to the
strap.
F
F
old the backrest to the table position
Refitting
Before refitting the seat or bench seat in
the vehicle, pull the strap fully to ensure
that the latching mechanism has engaged.
F
F
rom the rear, pull the strap fully to release
the anchorages and tip the seat for wards to
place it in the vertical position. F
R
emove the seat through the side door for
row 2 or through the rear for row 3. Do not use the strap to lift the seat or
bench seat.
(example of an individual seat)
F
C
heck that nothing is obstructing the rails.
F P lace the front part of the guides on the
rails.
F
T
ip the seat to align the rear of the guides in
the rails.
F
S
lide the seat for wards or backwards until it
engages in the notches.
F
Ra
ise the backrest.
Check that the seat has correctly locked
on the floor when returned to the seating
position.
Ease of use and comfort
Page 75 of 324

73
F Check that nothing is obstructing the rails.
F
F
it the front part on the rails.
F
T
ip the seat to align the rear of the guides in
the rails.
F
S
lide the seat for wards or backwards until it
engages in the notches.
F
Ra
ise the backrest.
Check that the seat has correctly locked
on the floor when returned to the seating
position.
Crew cab, fixed
It comprises a fixed bench seat, seat belts,
storage compartments (depending on
equipment) and side windows.
It is separated from the loading area by a high-
strength partition offering comfort and safety.
Rear bench seat
This ergonomic bench seat has three seats.
The two outer seats are fitted with ISOFIX
mountings.
For more information on the ISOFIX
mountings , refer to the corresponding
section.
Storage compartment Under seat cushion storage
wells
If the vehicle is so equipped, they are located
underneath the centre and outer left-hand
seats.
To gain access to it from the cab, tip the
required seat forwards.
If applicable, a storage compartment is
available at the front, underneath the bench
seat.
3
Ease of use and comfort
Page 80 of 324

78
When the USB socket is used, the
portable device charges automatically.
While charging, a message is displayed
if the power consumption of the portable
device exceeds the amperage supplied by
the vehicle.
For more information on the use of this
equipment, refer to the Audio equipment
and telematics section.
JACK socket
This allows the connection of a portable device
for listening to audio files via the vehicle's
speakers.
The files are managed using the portable
device.
For more details on how to use this
equipment, refer to the Audio equipment
and telematics section.
220 V socket
If your vehicle is so equipped, a 220 V/50 Hz
s ocket (maximum power: 150 W) is located
underneath the front right-hand seat and is
therefore accessible from the second row.
It operates with the engine running, as well as
in STOP mode of Stop & Start.
F
Ra
ise the cover.
F
C
heck that the indicator lamp is on in green.
F
C
onnect your multimedia or other electrical
device (telephone charger, laptop computer,
CD-DVD player, bottle warmer, etc.).
In the event of a fault, the warning lamp flashes
green.
Have it checked by a CITROËN dealer or a
qualified workshop.
Luggage retaining net
Attached to the stowing rings on the rear floor,
it allows objects to be held down. Connect only one device at a time to the
socket (no extension lead or multi-socket
connector).
Connect only devices with class II
insulation (shown on the device).
Do not use a device with a metal case.
As a safety measure, when electrical
consumption is high and when required by
the vehicle's electrical system (particular
weather conditions, electrical overload,
etc.), the current supply to the socket will
be cut off ; the green indicator lamp goes
of f.
Ease of use and comfort
Page 85 of 324

83
Retractable sliding table
Shine, Business Lounge
It comprises a closed central storage space
with a lid. Unfolded, it provides a table with
two tops on which objects can be placed. The
central area includes two cup holders and can
also be used to place small objects (credit card,
pen, etc.).
The assembly is mounted on a runner allowing
it to be positioned either in row 2 or row 3.
Storage
F Slide back the cover for access to 11 litres
of storage space.
The storage space can only support a
maximum weight of 3
kg ; do not exceed
this maximum load in use.
Moving forward or
backward
F Lift the control (without going beyond the point of resistance) and slide the assembly
forwards or backwards. F
R
elease the control when it is in the desired
position.
F
C
heck that the table is secured on the
runner. If this is not the case, move the
assembly slightly to the next notch on the
r u n n e r.
You can move the table in both the open
and stowed position. However, to ensure
safety, it is advised that you handle the
assembly in the stowed position.
For the table to run smoothly, ensure that
no objects are blocking the space used by
the runner on the floor.
Before manoeuvring the table, check that
there is nothing on the table.
Unfolding
F Operate the control on the top and pull the table assembly up until it clicks into place.
3
Ease of use and comfort
Page 86 of 324

84
F Pull each table top fully up then pivot them on each side into the horizontal position.
Folding
F Raise each table top, going beyond the point of resistance, to the vertical position.
F
P
ush each table top down into its housing
until it clicks into place.
F
P
ush the control then tip the table assembly
downward until it clicks into place.
Before stowing the table tops, check that
they are clear. Before tipping the assembly
down, check that the two table tops have
clicked home in the low position and that
there is nothing in the cup holder area
(such as a can or pen).
Cup holders
Two cups or cans and small objects (such as
a credit card, portable ashtray or pen) can be
carried in the middle of the unfolded table.
Liquids carried in an open vessel (a cup
or mug) could be spilt, presenting a risk.
Be careful.
Never use the table in this position while
the vehicle is being driven.
Removal
F Raise the control fully to release the anchorages and tip the table assembly
forward.
F
R
emove the table assembly through the
sliding door in row 2.
Changing the direction
Remove a seat to make this easier.
Refitting
F Check that there is no object obstructing the runner and preventing locking.Check that there is nothing in the space
around the runner on the floor, so that the
table disengages cleanly.
With the table removed, you can turn it 180°.
Ease of use and comfort