2020 CITROEN C5 AIRCROSS lock
[x] Cancel search: lockPage 218 of 292

216
(+) Positive terminal.
It has a quick-release clamp.
(-) Negative terminal.
As the battery's negative terminal is not
accessible, a remote earth point is placed near
the battery.
Starting using another
battery
When your vehicle's battery is discharged, the
engine can be started using a backup battery
(external or from another vehicle) and jump
leads or using a
battery booster.
For access to the (+) terminal:
F
u
nlock the bonnet by activating the internal
release lever, then the external safety catch.
F
r
aise the bonnet.
Never start the engine by connecting
a battery charger.
Never use a 24 V or higher battery
b o o s t e r.
Check beforehand that the backup
battery has a nominal voltage of 12 V and
a capacity at least equal to that of the
discharged battery.
The two vehicles must not be in contact
with each other.
Switch off all the electrical consumers
on both vehicles (audio system, wipers,
lighting, etc.).
Make sure that the jump leads are not
close to the moving parts of the engine
(fan, belt, etc.).
Do not disconnect the (+) terminal while
the engine is running. F
C
onnect the red cable to the (+) terminal of
flat battery A (at the metal elbow), then to
the (+) terminal of backup battery B or the
b o o s t e r.
F
C
onnect one end of the green or black
cable to the (-) terminal of backup battery
B or the booster (or to an earth point on the
assisting vehicle).
F
C
onnect the other end of the green or black
cable to earth point C on the broken down
vehicle.
F
L
ift the plastic cover on the (+) terminal, if
your vehicle has one. F
S
tart the engine of the assisting vehicle and
leave it running for a few minutes.
F
O
perate the starter on the broken down
vehicle and let the engine run.
If the engine does not start straight away,
switch off the ignition and wait a few moments
before trying again.
F
W
ait for it to return to idle.
F
D
isconnect the jump leads in reverse
order .
F
R
efit the plastic cover to the (+) terminal, if
your vehicle has one.
F A llow the engine to run for at least
30 minutes, by driving or with the vehicle
stationary, so that the battery reaches an
adequate state of charge.
If your vehicle has an automatic gearbox,
never try to start the engine by pushing
the vehicle.
In the event of a breakdown
Page 220 of 292

218
F switch off the ignition and wait for four minutes.
At the battery, it is only necessary to
disconnect the (+) terminal.
Quick-release terminal clamp
Disconnecting the (+) terminal Reconnecting the (+) terminal
Do not apply force when pressing the
lever, as if the clamp is not positioned
correctly, locking will be impossible; start
the procedure again.
After reconnecting the battery
F Depending on equipment, lift the plastic
cover on the (+) terminal.
F
Ra
ise the lever A fully to release the clamp B .
F
R
emove the clamp B by lifting it off.
F Raise the lever A fully.
F R eplace the open clamp B on the (+)
terminal.
F
P
ush the clamp B fully down.
F
L
ower the lever A to lock the clamp B .
F
D
epending on equipment, lower the plastic
cover on the (+) terminal. After reconnecting the battery, turn on the
ignition and wait 1
minute before starting
the engine, in order to enable the electronic
systems to initialise.
If minor problems nevertheless persist
following this operation, contact a CITROËN
dealer or a qualified workshop.
Referring to the corresponding section, you
must reinitialise certain systems yourself, such
as:
-
t
he key with remote control or electronic key
(depending on version),
- t he sunroof and its electric blind,
-
t
he electric windows,
-
t
he date and time,
-
t
he preset radio stations.
The Stop & Start system may not be
operational during the trip following the
first engine start.
In this case, the system will only be
available again after a
continuous
period of immobilisation of the vehicle,
a period which depends on the exterior
temperature and the state of charge of the
battery (up to about 8
hours).
In the event of a breakdown
Page 221 of 292

219
Towing the vehicle
Procedure for having your vehicle towed or
for towing another vehicle using a removable
mechanical device.
Access to the tools
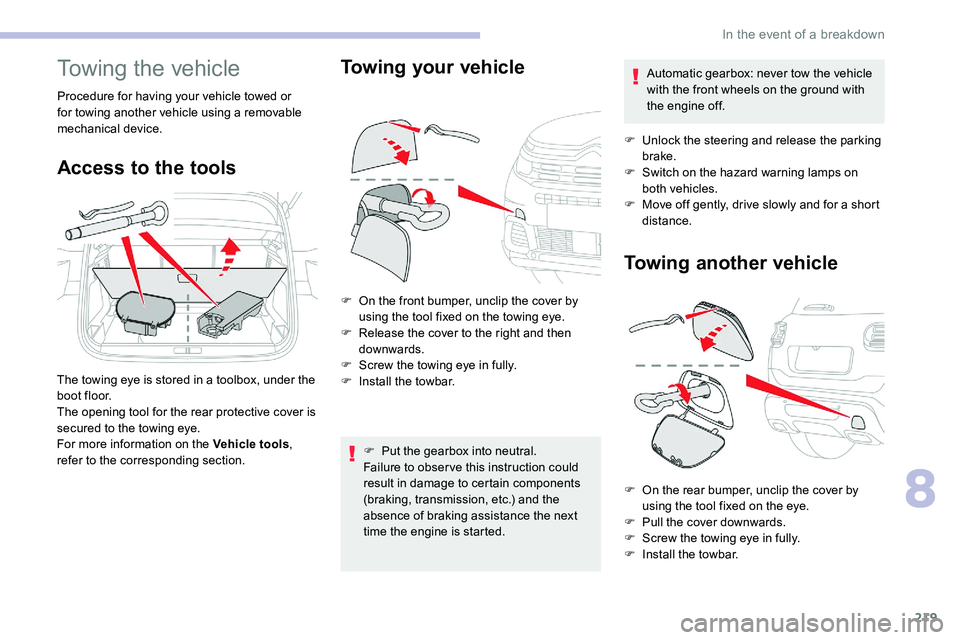
The towing eye is stored in a toolbox, under the
bo ot floor.
The opening tool for the rear protective cover is
secured to the towing eye.
For more information on the Vehicle tools ,
refer to the corresponding section.
Towing your vehicle
F On the front bumper, unclip the cover by using the tool fixed on the towing eye.
F
R
elease the cover to the right and then
downwards.
F
S
crew the towing eye in fully.
F
I
nstall the towbar.F
P
ut the gearbox into neutral.
Failure to obser ve this instruction could
result in damage to certain components
(braking, transmission, etc.) and the
absence of braking assistance the next
time the engine is started. Automatic gearbox: never tow the vehicle
with the front wheels on the ground with
the engine off.
F
U
nlock the steering and release the parking
brake.
F
S
witch on the hazard warning lamps on
both vehicles.
F
M
ove off gently, drive slowly and for a short
distance.
Towing another vehicle
F On the rear bumper, unclip the cover by using the tool fixed on the eye.
F
P
ull the cover downwards.
F
S
crew the towing eye in fully.
F
I
nstall the towbar.
8
In the event of a breakdown
Page 222 of 292

220
F Switch on the hazard warning lamps on both vehicles.
F
M
ove off gently, drive slowly and for a short
distance. General recommendations
Obser ve the legislation in force in the
country where you are driving.
Ensure that the weight of the towing
vehicle is higher than that of the towed
vehicle.
The driver must remain at the wheel of
the towed vehicle and must have a
valid
driving licence.
When towing a
vehicle with all four
wheels on the ground, always use an
approved towing arm; rope and straps are
prohibited.
The towing vehicle must move off gently.
When the vehicle is towed with its engine
off, there is no longer braking and steering
assistance.
In the following cases, you must always
call on a
professional recovery ser vice:
-
v
ehicle broken down on a motor way or
main road,
-
f
our-wheel drive vehicle,
-
w
hen it is not possible to put the
gearbox into neutral, unlock the
steering, or release the parking brake,
-
w
hen it is not possible to tow a vehicle
with an automatic gearbox, engine
running,
-
t
owing with only two wheels on the
ground,
-
w
here there is no approved towbar,
etc. available.
In the event of a breakdown
Page 232 of 292

6
Press "OK" to confirm.
Radio reception may be affected by the
use of electrical equipment not approved
by the Brand, such as a
USB charger
connected to the 12
V socket.
The exterior environment (hills, buildings,
tunnels, basement car parks, etc.)
may block reception, including in RDS
mode. This behaviour is normal in the
propagation of radio waves and does not
indicate any failure of the audio system.
Changing waveband
Press Radio Media to display the
primary page.
Press the " OPTIONS" button to go to the
secondary page.
Press "Band" to change waveband.
Press in the grey area to confirm.
Presetting a station
Select a radio station or frequency.
Make a short press on the star
outline. If the star is solid, the radio
station is already preset.
Or
Select a
radio station or frequency.
Press " Preset".
Make a
long press on one of the
buttons to preset the station.
Activating/Deactivating RDS
Press Radio Media to display the
primary page.
Press the " OPTIONS" button to go to the
secondary page.
Activate/deactivate " RDS".
Press in the grey zone to confirm.
RDS, if activated, allows you to continue
listening to the same station by automatically
retuning to alternative frequencies. However,
in certain conditions, coverage of an RDS
station may not be assured throughout the
entire country as radio stations do not cover
100% of the territory. This explains the loss
of reception of the station during a
journey.
Displaying text information
The "Radio Text" function allows
information transmitted by the radio
station and related to the station or the
song playing to be displayed.Press Radio Media to display the
primary page.
Press the " OPTIONS" button to go to the
secondary page.
Activate/deactivate " INFO".
Press in the grey zone to confirm.
CITROËN Connect Radio
Page 236 of 292

10
It is recommended that file names are less
than 20 characters long and do not contain any
special characters (e.g. " ? . ; ù) so as to avoid
any reading or display problems.
Use only USB memory sticks in FAT32
format
(File Allocation Table).
It is recommended that the original USB
cable for the portable device be used.
In order to be able to play a
burned CDR or
CDRW, select standards ISO
9660 level 1, 2, or
Joliet, if possible, when burning the CD.
If the disc is burned in another format, it may
not be played correctly.
It is recommended that the same burning
standard be always used on an individual disc,
with the lowest speed possible (4x maximum)
for the best acoustic quality.
In the particular case of a
multi-session CD, the
Joliet standard is recommended.
TelephoneMirrorLinkTM smartphone
connection
The "MirrorLinkTM" function requires
a
compatible smartphone and
applications.
Telephone not connected by
Bluetooth®
Connect a USB cable. The
sm artphone charges when
connected by the USB cable.
From the system, press
" Telephone " to display the primary
page.
Press " MirrorLink
TM" to start the
application in the system.
Depending on the smartphone, it may be
necessary to activate the " MirrorLinkTM" function.
During the procedure, several
screen pages relating to certain
functions are displayed.
Accept to start and complete the
connection. When connecting a smartphone
to the system, it is recommended
that Bluetooth
® be started on the
smartphone.
Telephone connected by
Bluetooth®
From the system, press
" Telephone " to display the primary
page.
USB sockets
Depending on equipment, for more information
on the USB sockets compatible with the
CarPlay
®, MirrorLinkTM or Android Auto
applications, refer to the "Ease of use and
comfort" section. The synchronisation of a
smartphone
allows users to display applications
adapted to the CarPlay
®, MirrorLinkTM
or Android Auto technology of the
smartphone on the vehicle screen. For
the CarPlay
® technology, the CarPlay®
function must be activated on the
smartphone beforehand.
For the communication process between
the smartphone and the system to
work, it is essential in all cases that the
smartphone is unlocked.
As the principles and standards are
constantly changing, it is recommended
that you keep the smar tphone's
operating system up-to- date, as well
as the date and time of the smar tphone
and of the system .
For the list of eligible smartphones, go to
the Brand's national website.
Connect a
USB cable. The
smartphone charges when
connected by the USB cable.
CITROËN Connect Radio
Page 243 of 292

17
Radio
QUESTIONRESPONSESOLUTION
The reception quality of the tuned radio station
gradually deteriorates or the stored stations are
not working (no sound, 87,5
MHz is displayed,
e t c .) . The vehicle is too far from the transmitter of
the station or no transmitter is present in the
geographical area.
Activate the "RDS" function by means of the
upper band to enable the system to check
whether there is a
more power ful transmitter in
the geographical area.
The environment (hills, buildings, tunnels,
basement car parks, etc.) blocks reception,
including in RDS mode. This phenomenon is normal and does not
indicate a
failure of the audio equipment.
The aerial is absent or has been damaged (for
example when going through a
car wash or into
an underground car park). Have the aerial checked by a
dealer.
I cannot find some radio stations in the list of
received stations.
The name of the radio station changes. The station is not received or has changed its
name in the list.
Press the round arrow on the "List" tab of the
"Radio" page.
Some radio stations send other information
in place of their name (the title of the song for
example).
The system interprets these details as the
station name.
.
CITROËN Connect Radio
Page 263 of 292

17
Select "Weather ".
Press this button to display primary
information.
Press this button to display the
detailed weather information.
The temperature displayed at 6
a.m. will
be the maximum temperature for the day.
The temperature displayed at 6
p.m. will
be the minimum temperature for the night.
Applications
Connectivity
Press Applications to display the
primary page.
Press " Connectivity " to go to the CarPlay
®,
MirrorLinkTM or Android Auto functions.
CarPlay® smartphone
connection
USB sockets
Depending on equipment, for more information
on the USB sockets compatible with the
CarPlay
®, MirrorLinkTM or Android Auto
applications, refer to the "Ease of use and
comfort" section. The synchronisation of a
smartphone
allows users to display applications
adapted to the CarPlay
®, MirrorLinkTM
or Android Auto technology of the
smartphone on the vehicle screen. For
the CarPlay
® technology, the CarPlay®
function must be activated on the
smartphone beforehand.
For the communication process between
the smartphone and the system to
work, it is essential in all cases that the
smartphone is unlocked.
As the principles and standards are
constantly changing, it is recommended
that you keep the smar tphone's
operating system up-to- date, as well
as the date and time of the smar tphone
and of the system .
For the list of eligible smartphones, go to
the Brand's national website. Connect a
USB cable. The
smartphone charges when
connected by the USB cable.
Press " Telephone " to display the
CarPlay
® inter face.
Or Connect a
USB cable. The
smartphone charges when
connected by the USB cable.
From the system, press
" Applications " to display the
primary page.
Press " Connectivity " to go to the CarPlay
®
function.
Press "CarPlay " to display the
CarPlay
® inter face.
On connecting the USB cable, the
CarPlay
® function deactivates the
system's Bluetooth® mode.
When the USB cable is disconnected and
the ignition is switched off then back on,
the system will not automatically switch to
Radio Media mode, a change of source
will have to be done manually.
.
CITROËN Connect Nav