Page 288 of 328

286MULTIMEDIA
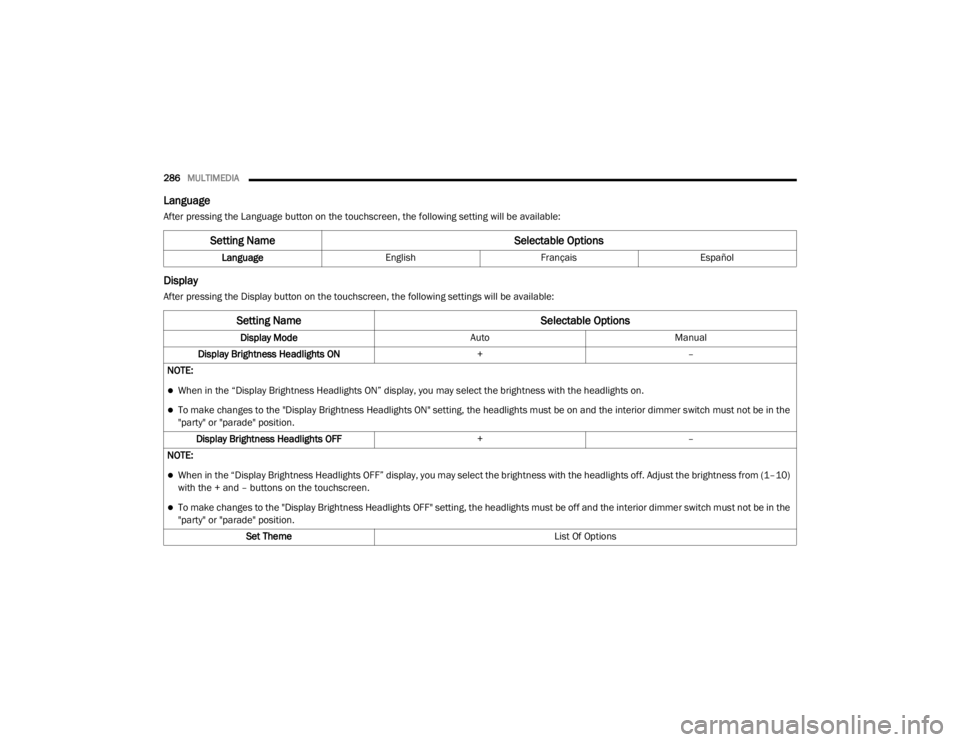
Language
After pressing the Language button on the touchscreen, the following setting will be available:
Display
After pressing the Display button on the touchscreen, the following settings will be available:
Setting Name Selectable Options
LanguageEnglishFrançais Español
Setting Name Selectable Options
Display ModeAutoManual
Display Brightness Headlights ON +–
NOTE:
When in the “Display Brightness Headlights ON” display, you may select the brightness with the headlights on.
To make changes to the "Display Brightness Headlights ON" setting, the headlights must be on and the interior dimmer switch must not be in the
"party" or "parade" position. Display Brightness Headlights OFF +–
NOTE:
When in the “Display Brightness Headlights OFF” display, you may select the brightness with the headlights off. Adjust the brightness from (1–10)
with the + and – buttons on the touchscreen.
To make changes to the "Display Brightness Headlights OFF" setting, the headlights must be off and the interior dimmer switch must not be in the
"party" or "parade" position. Set Theme List Of Options
20_LX_OM_EN_USC_t.book Page 286
Page 297 of 328

MULTIMEDIA295
NOTE:
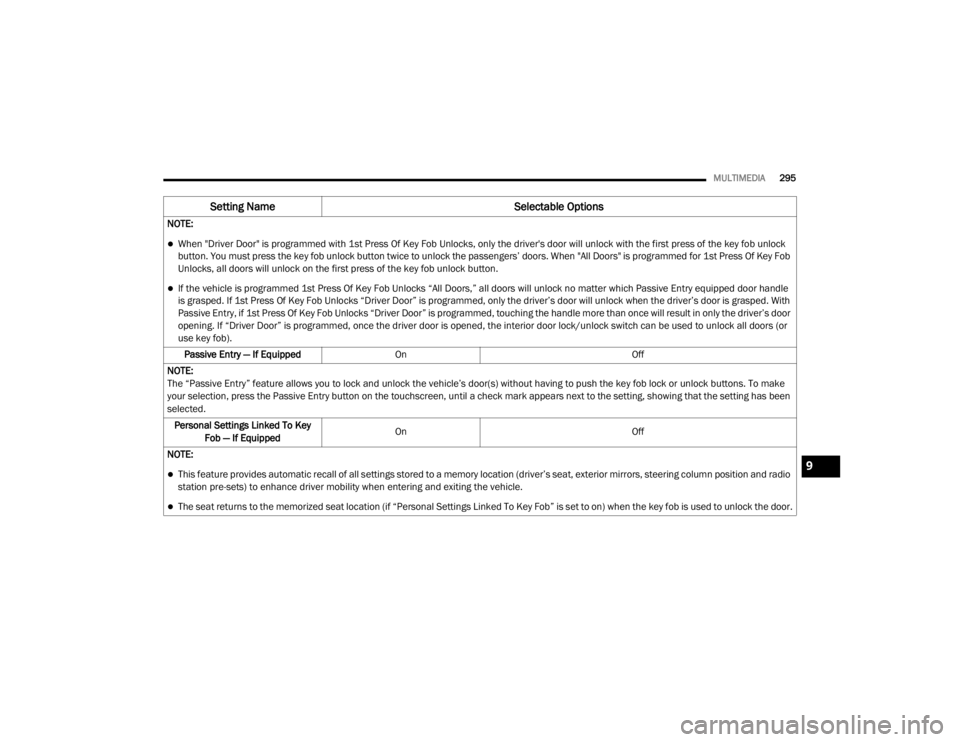
When "Driver Door" is programmed with 1st Press Of Key Fob Unlocks, only the driver's door will unlock with the first press of the key fob unlock
button. You must press the key fob unlock button twice to unlock the passengers’ doors. When "All Doors" is programmed for 1st Press Of Key Fob
Unlocks, all doors will unlock on the first press of the key fob unlock button.
If the vehicle is programmed 1st Press Of Key Fob Unlocks “All Doors,” all doors will unlock no matter which Passive Entry equipped door handle
is grasped. If 1st Press Of Key Fob Unlocks “Driver Door” is programmed, only the driver’s door will unlock when the driver’s door is grasped. With
Passive Entry, if 1st Press Of Key Fob Unlocks “Driver Door” is programmed, touching the handle more than once will result in only the driver’s door
opening. If “Driver Door” is programmed, once the driver door is opened, the interior door lock/unlock switch can be used to unlock all doors (or
use key fob).
Passive Entry — If Equipped On Off
NOTE:
The “Passive Entry” feature allows you to lock and unlock the vehicle’s door(s) without having to push the key fob lock or unlock buttons. To make
your selection, press the Passive Entry button on the touchscreen, until a check mark appears next to the setting, showing that the setting has been
selected. Personal Settings Linked To Key Fob — If Equipped On
Off
NOTE:
This feature provides automatic recall of all settings stored to a memory location (driver’s seat, exterior mirrors, steering column position and radio
station pre-sets) to enhance driver mobility when entering and exiting the vehicle.
The seat returns to the memorized seat location (if “Personal Settings Linked To Key Fob” is set to on) when the key fob is used to unlock the door.
Setting Name Selectable Options
9
20_LX_OM_EN_USC_t.book Page 295
Page 299 of 328

MULTIMEDIA297
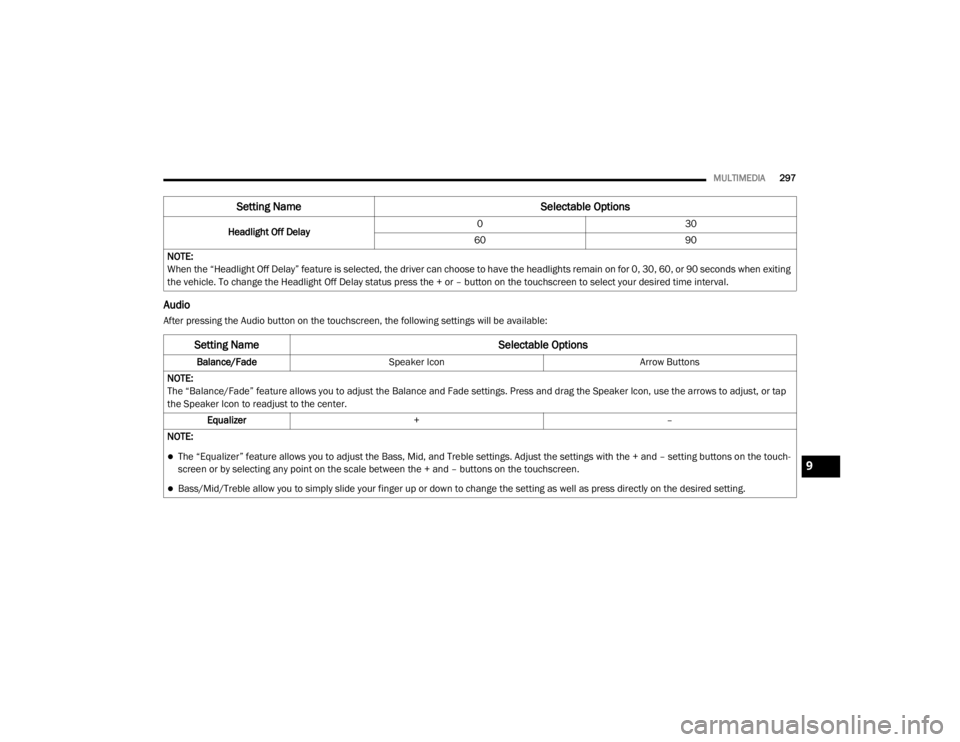
Audio
After pressing the Audio button on the touchscreen, the following settings will be available:Headlight Off Delay
0
30
60 90
NOTE:
When the “Headlight Off Delay” feature is selected, the driver can choose to have the headlights remain on for 0, 30, 60, or 90 seconds when exiting
the vehicle. To change the Headlight Off Delay status press the + or – button on the touchscreen to select your desired time interval.
Setting Name Selectable Options
Setting NameSelectable Options
Balance/FadeSpeaker Icon Arrow Buttons
NOTE:
The “Balance/Fade” feature allows you to adjust the Balance and Fade settings. Press and drag the Speaker Icon, use the arrows to adjust, or tap
the Speaker Icon to readjust to the center. Equalizer + –
NOTE:
The “Equalizer” feature allows you to adjust the Bass, Mid, and Treble settings. Adjust the settings with the + and – setting buttons on the touch -
screen or by selecting any point on the scale between the + and – buttons on the touchscreen.
Bass/Mid/Treble allow you to simply slide your finger up or down to change the setting as well as press directly on the desired setting.
9
20_LX_OM_EN_USC_t.book Page 297
Page 306 of 328

304MULTIMEDIA
La operación de este equipo está sujeta a las
siguientes dos condiciones:
1. es posible que este equipo o dispositivo no
cause interferencia perjudicial y
2. este equipo o dispositivo debe aceptar cualquier interferencia, incluyendo la que
pueda causar su operación no deseada.
NOTE:
Changes or modifications not expressly
approved by the party responsible for compli -
ance could void the user’s authority to operate
the equipment.
NOTE:
This equipment has been tested and found to
comply with the limits for a Class B digital
device, pursuant to Part 15 of the FCC Rules.
These limits are designed to provide reason -
able protection against harmful interference
in a residential installation. This equipment
generates, uses, and can radiate radio
frequency energy and, if not installed and
used in accordance with the instructions,
may cause harmful interference to radio communications. However, there is no guar
-
antee that interference will not occur in a
particular installation.
If this equipment does cause harmful inter -
ference to radio or television reception,
which can be determined by turning the
equipment off and on, the user is encour -
aged to try to correct the interference by one
or more of the following measures:
a. Increase the separation between the equipment and receiver.
b. Consult an authorized dealer or an expe -
rienced radio technician for help.
UCONNECT VOICE RECOGNITION QUICK TIPS
INTRODUCING UCONNECT
Start using Uconnect Voice Recognition with
these helpful quick tips. It provides the key
Voice Commands and tips you need to know to
control your Uconnect system.
NOTE:
If you see the NAV icon on the bottom bar, or in
the Apps menus, of your touchscreen, you have
the Uconnect 4C NAV system. If not, you have a
Uconnect 4C system.
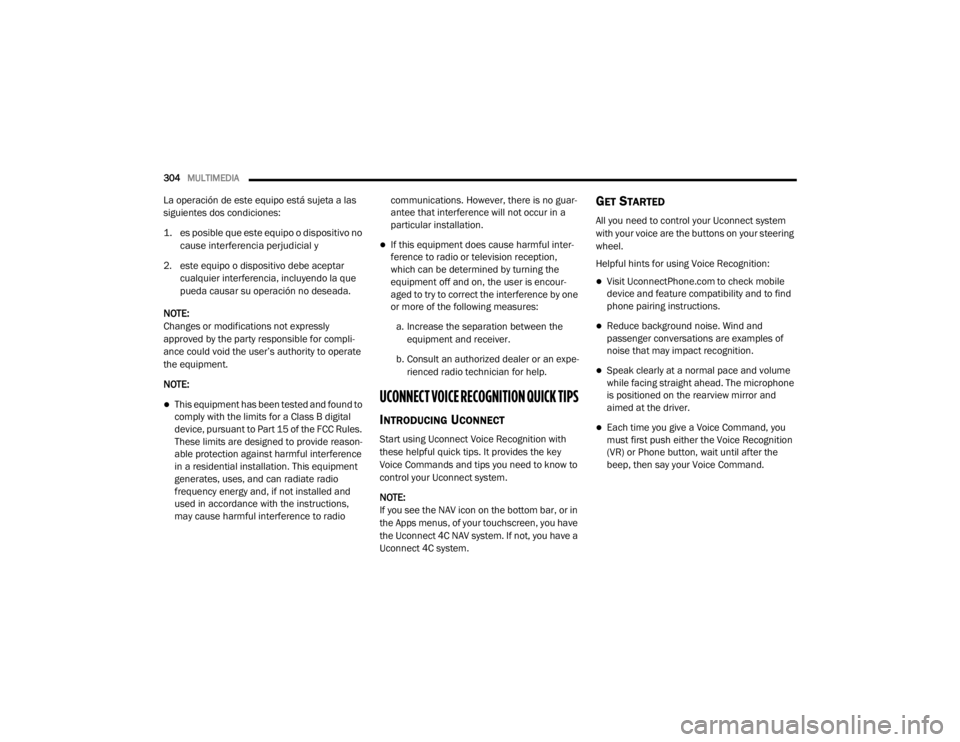
GET STARTED
All you need to control your Uconnect system
with your voice are the buttons on your steering
wheel.
Helpful hints for using Voice Recognition:
Visit UconnectPhone.com to check mobile
device and feature compatibility and to find
phone pairing instructions.
Reduce background noise. Wind and
passenger conversations are examples of
noise that may impact recognition.
Speak clearly at a normal pace and volume
while facing straight ahead. The microphone
is positioned on the rearview mirror and
aimed at the driver.
Each time you give a Voice Command, you
must first push either the Voice Recognition
(VR) or Phone button, wait until after the
beep, then say your Voice Command.
20_LX_OM_EN_USC_t.book Page 304
Page 307 of 328

MULTIMEDIA305
You can interrupt the help message or
system prompts by pushing the VR or Phone
button and saying a Voice Command from
the current category.
Uconnect Voice Command Buttons
BASIC VOICE COMMANDS
The basic Voice Commands below can be given
at any point while using your Uconnect system.
Push the VR button . After the beep, say:
“Cancel ” to stop a current voice session
“Help ” to hear a list of suggested Voice
Commands
“ Repeat ” to listen to the system prompts
again
Uconnect 4C/4C NAV
Notice the visual cues that inform you of your
voice recognition system’s status. Cues appear
on the touchscreen.
RADIO
Use your voice to quickly get to the AM, FM, or
SiriusXM® Satellite Radio stations you would
like to hear. (Subscription or included
SiriusXM® Satellite Radio trial required).
Push the VR button . After the beep, say:
“ Tune to ninety-five-point-five FM”
“Tune to Satellite Channel Hits 1”
TIP:
At any time, if you are not sure of what to say or
want to learn a Voice Command, push the VR
button and say “ Help.” The system provides
you with a list of commands.
MEDIA
Uconnect offers connections via USB,
Bluetooth® and auxiliary ports (if equipped).
Voice operation is only available for connected
USB and AUX devices.
1 — Push To Initiate Or To Answer A Phone Call,
Send Or Receive A Text
2 — For All Radios: Push To Begin Radio, Media,
Or Climate Functions. For Uconnect 4C NAV Sys-
tem Only: Push To Begin Navigation Function
3 — Push To End Call
9
20_LX_OM_EN_USC_t.book Page 305