2020 CHEVROLET SILVERADO suspension
[x] Cancel search: suspensionPage 154 of 495
 - 2020 - CTC - 1/27/20
Instruments and Controls 153
.Vehicle Security
. Brakes
. Steering
. Ride Control Systems
. Drive")
Chevrolet Silverado Owner Manual (GMNA-Localizing-U.S./Canada/Mexico-
13337620) - 2020 - CTC - 1/27/20
Instruments and Controls 153
.Vehicle Security
. Brakes
. Steering
. Ride Control Systems
. Driver Assistance Systems
. Cruise Control
. Lighting and Bulb Replacement
. Wiper/Washer Systems
. Doors and Windows
. Seat Belts
. Airbag Systems
. Engine and Transmission
. Tire Pressure
. Battery
Engine Power Messages
ENGINE POWER IS REDUCED
This message displays when the
vehicle's propulsion power is
reduced. A reduction in propulsion
power can affect the vehicle's ability
to accelerate. If this message is on,
but there is no observed reduction in performance, proceed to your
destination. The performance may
be reduced the next time the vehicle
is driven. The vehicle may be driven
while this message is on, but
maximum acceleration and speed
may be reduced. Anytime this
message stays on, or displays
repeatedly, the vehicle should be
taken to your dealer for service as
soon as possible.
Under certain operating conditions,
propulsion will be disabled. Try
restarting after the vehicle has been
off for 30 seconds.
Vehicle Speed Messages
SPEED LIMITED TO
XXX KM/H (MPH)
This message shows that the
vehicle speed has been limited to
the speed displayed. The limited
speed is a protection for various
propulsion and vehicle systems,
such as lubrication, thermal, brakes,
suspension, Teen Driver if
equipped, or tires.
Vehicle
Personalization
The following are all possible
vehicle personalization features.
Depending on the vehicle, some
may not be available.
For System, Apps, and Personal
features and functions, see
“Settings”
in the infotainment
manual.
To access the vehicle
personalization menu:
1. Touch the Settings icon on the Home Page of the infotainment
display.
2. Touch Vehicle to display a list of available options.
3. Touch to select the desired feature setting.
4. Touch
9orRto turn a feature
off or on.
5. Touch
zto go to the top level
of the Settings menu.
Page 194 of 495
 - 2020 - CTC - 1/27/20
Driving and Operating 193
After operation in mud or sand,
have the brake linings cleaned and
chec")
Chevrolet Silverado Owner Manual (GMNA-Localizing-U.S./Canada/Mexico-
13337620) - 2020 - CTC - 1/27/20
Driving and Operating 193
After operation in mud or sand,
have the brake linings cleaned and
checked. These substances can
cause glazing and uneven braking.
Check the body structure, driveline,
steering, suspension, wheels, tires,
and exhaust system for damage and
check the fuel lines and cooling
system for any leakage.
More frequent maintenance service
is required. See theMaintenance
Schedule 0437.
Driving on Wet Roads
Rain and wet roads can reduce
vehicle traction and affect your
ability to stop and accelerate.
Always drive slower in these types
of driving conditions and avoid
driving through large puddles and
deep-standing or flowing water.
{Warning
Wet brakes can cause crashes.
They might not work as well in a
quick stop and could cause
pulling to one side. You could
lose control of the vehicle.
After driving through a large
puddle of water or a car/vehicle
wash, lightly apply the brake
pedal until the brakes work
normally.
Flowing or rushing water creates
strong forces. Driving through
flowing water could cause the
vehicle to be carried away. If this
happens, you and other vehicle
occupants could drown. Do not
ignore police warnings and be
very cautious about trying to drive
through flowing water.
Hydroplaning
Hydroplaning is dangerous. Water
can build up under the vehicle's
tires so they actually ride on the
water. This can happen if the road is
wet enough and you are going fast
enough. When the vehicle is
hydroplaning, it has little or no
contact with the road.
There is no hard and fast rule about
hydroplaning. The best advice is to
slow down when the road is wet.
Other Rainy Weather Tips
Besides slowing down, other wet
weather driving tips include:
.
Allow extra following distance.
. Pass with caution.
. Keep windshield wiping
equipment in good shape.
. Keep the windshield washer fluid
reservoir filled.
. Have good tires with proper
tread depth. See Tires0375.
. Turn off cruise control.
Page 201 of 495
Chevrolet Silverado Owner Manual (GMNA-Localizing-U.S./Canada/Mexico-
13337620) - 2020 - CTC - 1/27/20
200 Driving and Operating
of the driver, passengers, and
cargo should never exceed the
vehicle's capacity weight.
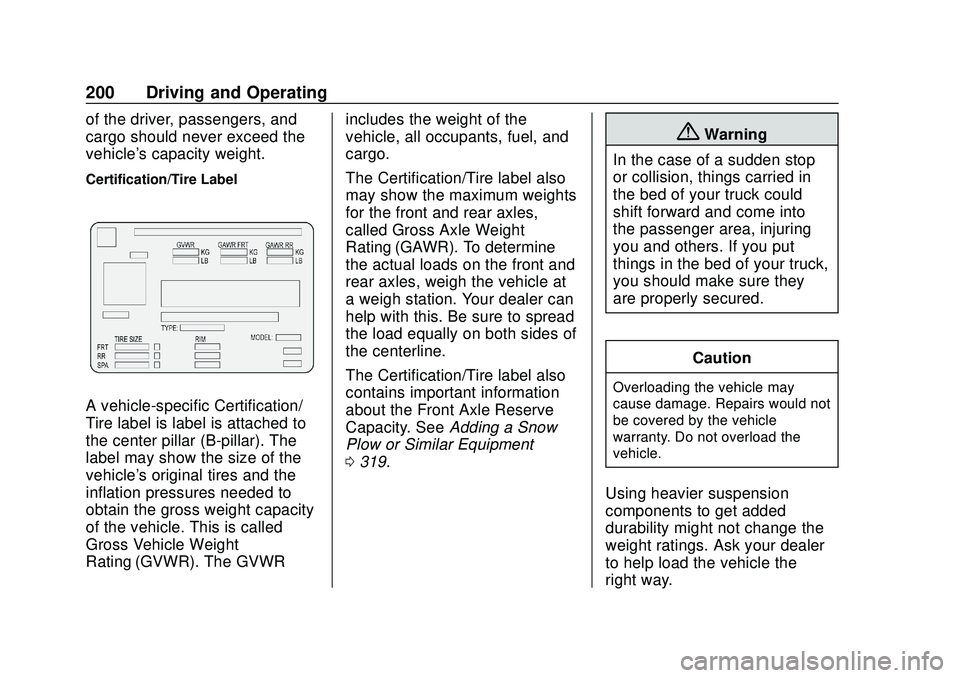
Certification/Tire Label
A vehicle-specific Certification/
Tire label is label is attached to
the center pillar (B-pillar). The
label may show the size of the
vehicle's original tires and the
inflation pressures needed to
obtain the gross weight capacity
of the vehicle. This is called
Gross Vehicle Weight
Rating (GVWR). The GVWRincludes the weight of the
vehicle, all occupants, fuel, and
cargo.
The Certification/Tire label also
may show the maximum weights
for the front and rear axles,
called Gross Axle Weight
Rating (GAWR). To determine
the actual loads on the front and
rear axles, weigh the vehicle at
a weigh station. Your dealer can
help with this. Be sure to spread
the load equally on both sides of
the centerline.
The Certification/Tire label also
contains important information
about the Front Axle Reserve
Capacity. See
Adding a Snow
Plow or Similar Equipment
0 319.
{Warning
In the case of a sudden stop
or collision, things carried in
the bed of your truck could
shift forward and come into
the passenger area, injuring
you and others. If you put
things in the bed of your truck,
you should make sure they
are properly secured.
Caution
Overloading the vehicle may
cause damage. Repairs would not
be covered by the vehicle
warranty. Do not overload the
vehicle.
Using heavier suspension
components to get added
durability might not change the
weight ratings. Ask your dealer
to help load the vehicle the
right way.
Page 235 of 495
 - 2020 - CTC - 1/27/20
234 Driving and Operating
When HDC is activated, the initial
HDC speed is set to the current
driv")
Chevrolet Silverado Owner Manual (GMNA-Localizing-U.S./Canada/Mexico-
13337620) - 2020 - CTC - 1/27/20
234 Driving and Operating
When HDC is activated, the initial
HDC speed is set to the current
driving speed. It can be increased or
decreased by pressing +RES or
SET- on the steering wheel, or by
applying the accelerator or brake
pedal. This adjusted speed
becomes the new set speed.
HDC will remain enabled between
30 and 60 km/h (19 and 37 mph);
however, vehicle speed cannot be
set or maintained in this range. HDC
will automatically disable if the
vehicle speed is above 80 km/h
(50 mph) or above 60 km/h
(37 mph) for at least 30 seconds.
5must be pressed again to
re-enable HDC. HDC may disable
after an extended period of use.
If this happens, HDC will require
time to cool down. The length of
time HDC remains active depends
on road conditions, grade, set
speed, vehicle loading, and outside
temperature.
When enabled, if the vehicle speed
is above 30 km/h (19 mph) and
below 60 km/h (37 mph), a DIC
message will display.
Driver Mode Control
This feature adds a sportier feel,
provides a more comfortable ride,
or assists in different weather
conditions or terrain. Depending on
the option package, available
features, and mode selected; the
suspension, steering, and
powertrain will change settings to
achieve the desired mode
characteristics. If the vehicle is
equipped with magnetic ride control,
selecting the various Driver Modes
enhances the ride performance for
the road conditions and the
selected mode.
Mode availability is dependent upon
vehicle trim level, region, and
optional features.
Not all drive modes are available on
all models. 1500 series vehicles
may have Normal, Sport, Snow/Ice,
Off Road, Terrain, and Tow Haul.
2500/3500 series vehicles may
have Normal, Off Road, Snow/Ice,
and Tow/Haul.
Mode Activation
To activate and deactivate Tow/Haul
turn the Drive Mode knob to the left.
For activation of modes other than
Tow/Haul, turn the Drive Mode knob
to the right.
Page 236 of 495
 - 2020 - CTC - 1/27/20
Driving and Operating 235
Vehicles with the MODE graphic on
the knob will have a menu selection
s")
Chevrolet Silverado Owner Manual (GMNA-Localizing-U.S./Canada/Mexico-
13337620) - 2020 - CTC - 1/27/20
Driving and Operating 235
Vehicles with the MODE graphic on
the knob will have a menu selection
screen in the instrument cluster to
select the desired mode. When the
Drive Mode knob is turned to the
right, the mode list will display and
activate the next available mode.If equipped, select Terrain Mode by
pressing the
gbelow the 4m
transfer case button.
Modes:
Normal Mode :Use for normal city
and highway driving to provide a
smooth, soft ride. This mode
provides a balanced setting
between comfort and handling. This
is the standard mode and when
selected, there is no indicator in the
instrument cluster.
8Sport Mode : Use where road
conditions or personal preference
demand a more controlled
response. When you enter this mode you will
immediately feel a down shift. In this
mode, the vehicle also monitors
driving behaviors and automatically
enables Performance Shift Features
when spirited driving is detected.
These features maintain lower
transmission gears to increase
available engine braking and
improve acceleration response. The
vehicle will exit these features and
return to normal operation after a
short period when no spirited driving
is detected. The steering will
change to provide more precise
control. If the vehicle has Magnetic
Ride Control, the suspension will
change to provide better cornering
performance.
When selected, the Sport Mode light
displays in the instrument cluster.
6Snow/Ice Mode :
Snow/Ice
Mode is used for slippery surfaces
to help control wheel speed. Snow
Mode will adjust acceleration to
optimize traction on a slippery
surface. The accelerator pedal will
reduce engine torque at small pedal
Page 326 of 495
 - 2020 - CTC - 1/27/20
Vehicle Care 325
California Proposition
65 Warning
{Warning
Most motor vehicles, including
this o")
Chevrolet Silverado Owner Manual (GMNA-Localizing-U.S./Canada/Mexico-
13337620) - 2020 - CTC - 1/27/20
Vehicle Care 325
California Proposition
65 Warning
{Warning
Most motor vehicles, including
this one, as well as many of its
service parts and fluids, contain
and/or emit chemicals known to
the State of California to cause
cancer and birth defects or other
reproductive harm. Engine
exhaust, many parts and
systems, many fluids, and some
component wear by-products
contain and/or emit these
chemicals. For more information
go to www.P65Warnings.ca.gov/
passenger-vehicle.
See Battery - North America 0354
and
Jump Starting - North America
0 415 and the back cover.
California Perchlorate
Materials Requirements
Certain types of automotive
applications, such as airbag
initiators, seat belt pretensioners,
and lithium batteries contained in
electronic keys, may contain
perchlorate materials. Perchlorate
Material –special handling may
apply. See www.dtsc.ca.gov/
hazardouswaste/perchlorate.
Accessories and
Modifications
Adding non-dealer accessories or
making modifications to the vehicle
can affect vehicle performance and
safety, including such things as
airbags, braking, stability, ride and
handling, emissions systems,
aerodynamics, durability, and
electronic systems like antilock
brakes, traction control, and stability
control. These accessories or
modifications could even cause
malfunction or damage not covered
by the vehicle warranty. Damage to suspension components
caused by modifying vehicle height
outside of factory settings will not be
covered by the vehicle warranty.
Damage to vehicle components
resulting from modifications or the
installation or use of non-GM
certified parts, including control
module or software modifications, is
not covered under the terms of the
vehicle warranty and may affect
remaining warranty coverage for
affected parts.
GM Accessories are designed to
complement and function with other
systems on the vehicle. See your
dealer to accessorize the vehicle
using genuine GM Accessories
installed by a dealer technician.
Also, see
Adding Equipment to the
Airbag-Equipped Vehicle 080.
Page 401 of 495
 - 2020 - CTC - 1/27/20
400 Vehicle Care
Whenever a wheel, wheel bolt,
or wheel nut is replaced on a dual
wheel setup, ch")
Chevrolet Silverado Owner Manual (GMNA-Localizing-U.S./Canada/Mexico-
13337620) - 2020 - CTC - 1/27/20
400 Vehicle Care
Whenever a wheel, wheel bolt,
or wheel nut is replaced on a dual
wheel setup, check the wheel nut
torque after 160,1 600, and
10 000 km (100,1,000, and
6,000 mi) of driving. For proper
torque, see“Wheel Nut Torque”
under Capacities and Specifications
0 454.
See If a Tire Goes Flat 0401 for
more information.
Used Replacement Wheels
{Warning
Replacing a wheel with a used
one is dangerous. How it has
been used or how far it has been
driven may be unknown. It could
fail suddenly and cause a crash.
When replacing wheels, use a
new GM original equipment
wheel.
Tire Chains
{Warning
If the vehicle has LT275/65R18,
275/60R20, LT275/65R20,
or 275/50R22 size tires, do not
use tire chains. If the vehicle is a
1500 Series with LT265/70R17
size tires, do not use tire chains.
They can damage the vehicle
because there is not enough
clearance. Tire chains used on a
vehicle without the proper amount
of clearance can cause damage
to the brakes, suspension,
or other vehicle parts. The area
damaged by the tire chains could
cause you to lose control of the
vehicle, and you or others may be
injured in a crash.
Use another type of traction
device only if its manufacturer
recommends it for use on the
vehicle's tire size combination
and road conditions. Follow that
(Continued)
Warning (Continued)
manufacturer's instructions. To
help avoid damage to the vehicle,
drive slowly, readjust, or remove
the device if it is contacting the
vehicle, and do not spin the
vehicle's wheels.
If you do find traction devices that
will fit, install them on the rear
tires.
Caution
Use tire chains only where legal
and only when necessary. Use
chains that are the proper size
for the tires. If the vehicle has
265/70R17 or 265/65R18 size
tires, they may be installed on the
tires of the rear axle only. If the
vehicle is a dual rear wheel model
and has LT235/80R17 tires,
chains may be installed on the
tires of the rear axle only. If the(Continued)
Page 420 of 495
 - 2020 - CTC - 1/27/20
Vehicle Care 419
good battery. Use a remote
positive (+) terminal if the
vehicle has one.
9. Conn")
Chevrolet Silverado Owner Manual (GMNA-Localizing-U.S./Canada/Mexico-
13337620) - 2020 - CTC - 1/27/20
Vehicle Care 419
good battery. Use a remote
positive (+) terminal if the
vehicle has one.
9. Connect one end of the black negative (−) cable to the
negative (−) terminal of the
good battery. Use a remote
negative (−) terminal if the
vehicle has one.
Do not let the other end touch
anything until the next step.
10. Connect the other end of the negative (−) cable to the
remote negative (−) terminal to
the discharged battery.
11. Start the vehicle with the good battery and run the engine for a
while.
12. Try to start the vehicle that had the dead battery. If it will not
start after a few tries, it
probably needs service.Caution
If the jumper cables are
connected or removed in the
wrong order, electrical shorting
may occur and damage the
vehicle. The repairs would not be
covered by the vehicle warranty.
Always connect and remove the
jumper cables in the correct order,
making sure that the cables do
not touch each other or other
metal.
Jumper Cable Removal
Reverse the sequence exactly when
removing the jumper cables.
After starting the disabled vehicle
and removing the jumper cables,
allow it to idle for several minutes.
Towing the Vehicle
Caution
Incorrectly towing a disabled
vehicle may cause damage. The
damage would not be covered by
the vehicle warranty. Do not lash
or hook to suspension
components. Use the proper
straps around the tires to secure
the vehicle. Do not drag a locked
wheel/tire. Use tire skates or
dollies under any locked wheel/
tire while loading the vehicle. Do
not use a sling type lift to tow the
vehicle. This could damage the
vehicle.
Caution
If the vehicle cannot be shifted
into Neutral (N), do not use the
tow eye to tow the vehicle.
Vehicle damage may occur.