2020 CHEVROLET SILVERADO key
[x] Cancel search: keyPage 326 of 495

Chevrolet Silverado Owner Manual (GMNA-Localizing-U.S./Canada/Mexico-
13337620) - 2020 - CTC - 1/27/20
Vehicle Care 325
California Proposition
65 Warning
{Warning
Most motor vehicles, including
this one, as well as many of its
service parts and fluids, contain
and/or emit chemicals known to
the State of California to cause
cancer and birth defects or other
reproductive harm. Engine
exhaust, many parts and
systems, many fluids, and some
component wear by-products
contain and/or emit these
chemicals. For more information
go to www.P65Warnings.ca.gov/
passenger-vehicle.
See Battery - North America 0354
and
Jump Starting - North America
0 415 and the back cover.
California Perchlorate
Materials Requirements
Certain types of automotive
applications, such as airbag
initiators, seat belt pretensioners,
and lithium batteries contained in
electronic keys, may contain
perchlorate materials. Perchlorate
Material –special handling may
apply. See www.dtsc.ca.gov/
hazardouswaste/perchlorate.
Accessories and
Modifications
Adding non-dealer accessories or
making modifications to the vehicle
can affect vehicle performance and
safety, including such things as
airbags, braking, stability, ride and
handling, emissions systems,
aerodynamics, durability, and
electronic systems like antilock
brakes, traction control, and stability
control. These accessories or
modifications could even cause
malfunction or damage not covered
by the vehicle warranty. Damage to suspension components
caused by modifying vehicle height
outside of factory settings will not be
covered by the vehicle warranty.
Damage to vehicle components
resulting from modifications or the
installation or use of non-GM
certified parts, including control
module or software modifications, is
not covered under the terms of the
vehicle warranty and may affect
remaining warranty coverage for
affected parts.
GM Accessories are designed to
complement and function with other
systems on the vehicle. See your
dealer to accessorize the vehicle
using genuine GM Accessories
installed by a dealer technician.
Also, see
Adding Equipment to the
Airbag-Equipped Vehicle 080.
Page 346 of 495

Chevrolet Silverado Owner Manual (GMNA-Localizing-U.S./Canada/Mexico-
13337620) - 2020 - CTC - 1/27/20
Vehicle Care 345
Automatic Coolant Service Fill
Instructions (L3B Engine)
See 3.0L Duramax Diesel
supplement for the diesel engine
procedure.
If equipped, this feature assists in
filling and removing air from the
cooling system after service of
components or when coolant is
added after being too low.
To activate the fill and air removal
process:1. With a cold system, add coolant to the indicated mark
on the surge tank.
2. Replace the cap on the surge tank.
3. Connect the vehicle to a battery charger.
4. Set the ignition to Service or Accessory Mode. See Ignition
Positions (Keyless Access)
0 205 or
Ignition Positions (Key Access)
0 207.
5. Turn off the air conditioning. 6. Set the parking brake.
7. At the same time, press the
accelerator and the brake for
automatic transmission
vehicles for two seconds, then
release.
At the end of the cycle, check the
coolant level in the surge tank and
add coolant if it is low. Turn off the
vehicle, allow the Electronic Control
Module (ECM) to go to sleep, about
two minutes, and repeat Steps 3–7.
Listen for pump activation and
movement of the control valves
while watching the level of the
coolant in the surge tank. If the tank
empties, turn the ignition off,
carefully remove the surge tank cap,
refill to the indicated mark, and
repeat Steps 3–6. The fill and air
removal process will run for
approximately 10 minutes.
How to Add Coolant to the
Coolant Surge Tank for
Gasoline Engines Except L3B
If the vehicle has a diesel engine,
see “Cooling System” in the
Duramax diesel supplement for the
proper coolant fill procedure.
{Warning
Spilling coolant on hot engine
parts can burn you. Coolant
contains ethylene glycol and it will
burn if the engine parts are hot
enough.
{Warning
Plain water, or other liquids such
as alcohol, can boil before the
proper coolant mixture will. With
plain water or the wrong mixture,
the engine could get too hot but
there would not be an overheat
(Continued)
Page 356 of 495

Chevrolet Silverado Owner Manual (GMNA-Localizing-U.S./Canada/Mexico-
13337620) - 2020 - CTC - 1/27/20
Vehicle Care 355
SeeCalifornia Proposition
65 Warning 0325 and the back
cover.
Vehicle Storage
{Warning
Batteries have acid that can burn
you and gas that can explode.
You can be badly hurt if you are
not careful. See Jump Starting -
North America 0415 for tips on
working around a battery without
getting hurt.
Infrequent Usage: Remove the
black, negative (−) cable from the
battery to keep the battery from
running down.
Extended Storage: Remove the
black, negative (−) cable from the
battery or use a battery trickle
charger.
Negative Battery Cable
Disconnection
{Warning
Before disconnecting the negative
battery cable, turn off all features,
turn the ignition off, and remove
the key, if equipped, from the
vehicle. If this is not done, you or
others could be injured, and the
vehicle could be damaged.
Caution
If the battery is disconnected with
the ignition on or the vehicle in
Retained Accessory Power
(RAP), the OnStar back-up
battery will be permanently
discharged and will need to be
replaced.
1. Make sure the lamps, features, and accessories are turned off.
2. Turn the ignition off and remove the key, if equipped. For vehicles equipped with the Stop/
Start system:
1. Loosen and remove the
negative battery cable nut (1)
at the battery sensor
connection.
2. Remove the negative battery cable (2) from the battery
sensor stud.
3. Cover the negative battery cable terminal, battery sensor
stud, and negative battery post
with a non-conductive material
to prevent any contact with the
negative battery cable.
Page 360 of 495

Chevrolet Silverado Owner Manual (GMNA-Localizing-U.S./Canada/Mexico-
13337620) - 2020 - CTC - 1/27/20
Vehicle Care 359
1. Before starting this check, besure there is enough room
around the vehicle.
2. Apply both the parking brake and the regular brake.
Do not use the accelerator
pedal, and be ready to turn off
the engine immediately if it
starts.
3. Try to start the engine in each gear. The vehicle should start
only in P (Park) or N (Neutral).
If the vehicle starts in any other
position, contact your dealer for
service.
Automatic Transmission
Shift Lock Control
Function Check
{Warning
When you are doing this
inspection, the vehicle could
move suddenly. If the vehicle
moves, you or others could be
injured. 1. Before starting this check, be
sure there is enough room
around the vehicle. It should be
parked on a level surface.
2. Apply the parking brake. Be ready to apply the regular
brake immediately if the vehicle
begins to move.
3. With the engine off, turn the ignition on, but do not start the
engine. Without applying the
regular brake, try to move the
shift lever out of P (Park) with
normal effort. If the shift lever
moves out of P (Park), contact
your dealer for service.
Ignition Transmission
Lock Check
If equipped with Key Access
ignition, while parked, and with the
parking brake set, try to turn the
ignition off in each shift lever
position. The ignition should turn to
off only when the shift lever is in
P (Park). The ignition key should come out
only when the ignition is off. Contact
your dealer if service is required.
Park Brake and P (Park)
Mechanism Check
{Warning
When you are doing this check,
the vehicle could begin to move.
You or others could be injured
and property could be damaged.
Make sure there is room in front
of the vehicle in case it begins to
roll. Be ready to apply the regular
brake at once should the vehicle
begin to move.
Park on a fairly steep hill, with the
vehicle facing downhill. Keeping
your foot on the regular brake, set
the parking brake.
. To check the parking brake's
holding ability: With the engine
running and the transmission in
N (Neutral), slowly remove foot
Page 404 of 495

Chevrolet Silverado Owner Manual (GMNA-Localizing-U.S./Canada/Mexico-
13337620) - 2020 - CTC - 1/27/20
Vehicle Care 403
5. Wheel Blocks
6. Wing Nut Retaining WheelBlocks
The equipment is under the second
row seats, if equipped, or behind the
front row seats on regular cab
models.
1. Turn the knob on the jack counterclockwise to lower the
jack head to release the jack
from its holder.
2. Turn the wing nut counterclockwise to remove the
wheel blocks and the wheel
block retainer.
3. Turn the wing nut used to retain the storage bag and
tools counterclockwise to
remove it.
Use the jack handle extensions and
the wheel wrench to remove the
underbody-mounted spare tire.
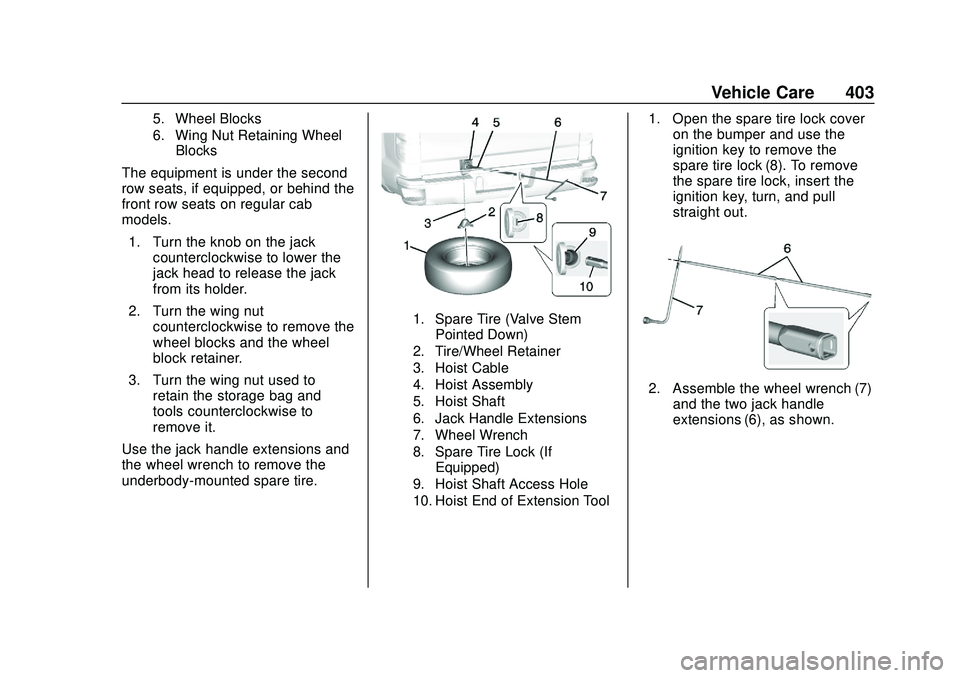
1. Spare Tire (Valve Stem Pointed Down)
2. Tire/Wheel Retainer
3. Hoist Cable
4. Hoist Assembly
5. Hoist Shaft
6. Jack Handle Extensions
7. Wheel Wrench
8. Spare Tire Lock (If Equipped)
9. Hoist Shaft Access Hole
10. Hoist End of Extension Tool
1. Open the spare tire lock cover on the bumper and use the
ignition key to remove the
spare tire lock (8). To remove
the spare tire lock, insert the
ignition key, turn, and pull
straight out.
2. Assemble the wheel wrench (7)and the two jack handle
extensions (6), as shown.
Page 423 of 495

Chevrolet Silverado Owner Manual (GMNA-Localizing-U.S./Canada/Mexico-
13337620) - 2020 - CTC - 1/27/20
422 Vehicle Care
{Warning
Shifting a four-wheel-drive
vehicle's transfer case into
N (Neutral) can allow the vehicle
to move even if the transmission
is in P (Park). You or others could
be injured. Set the parking brake
and use wheel blocks before
shifting the transfer case to
N (Neutral).
To dinghy tow: 1. Position the vehicle being towed behind the tow vehicle,
facing forward and on a level
surface.
2. Securely attach the vehicle being towed to the tow vehicle.
3. Start the engine.
4. Shift the transfer case to N (Neutral). See “Shifting into
N (Neutral)” underFour-Wheel
Drive 0223. 5. With the engine running,
release the parking brake and
verify that the transfer case is
in N (Neutral) by shifting the
transmission to D (Drive) and
then to R (Reverse). There
should be no movement while
shifting the transmission.
6. Shift the transmission to D (Drive).
7. If equipped with an ignition key, turn the ignition to ACC/
ACCESSORY. If equipped with
Keyless Access, turn the
engine off. Disregard the Shift
to P (Park) DIC message. See
Ignition Positions (Keyless
Access) 0205 or
Ignition Positions (Key Access)
0 207.
{Warning
To avoid death, serious injury,
or property damage, before
dinghy towing the vehicle, always
disconnect and secure the
(Continued)
Warning (Continued)
negative battery cable and cover
the negative battery post and
cable with a non-conductive
material. If the battery is left
connected or the battery cable
contacts the post, the Electric
Parking Brake may activate
during towing, which could cause
a crash.
8. Disconnect the negative (–) battery cable. See “Negative
Battery Cable Disconnection”
in Battery - North America
0 354.
9. Shift the transmission to P (Park).
Caution
If the steering column is locked,
vehicle damage may occur.
10. Move the steering wheel to make sure the steering column
is unlocked.
Page 424 of 495

Chevrolet Silverado Owner Manual (GMNA-Localizing-U.S./Canada/Mexico-
13337620) - 2020 - CTC - 1/27/20
Vehicle Care 423
11. If the vehicle has an ignitionkey, keep it in the towed
vehicle in ACC/ACCESSORY
to prevent the steering column
from locking. If the vehicle is
equipped with Keyless Access,
keep the RKE transmitter
outside of the vehicle and
manually lock the doors.
Access the vehicle by using
the key in the door lock. See
Door Locks 026.
Disconnecting the Towed Vehicle
Before disconnecting from the tow
vehicle: 1. Park on a level surface. Secure the vehicle with wheel blocks.
2. Re-connect the negative (–) battery. See Battery - North
America 0354.
3. Turn on the ignition with the engine off. For vehicles with a
key, turn the ignition to ON/
RUN with the engine off. If the
vehicle is equipped with
Keyless Access, with your foot
off the brake pedal, press and
hold ENGINE START/STOP for five seconds until the green
light comes on in the button.
See
Ignition Positions (Keyless
Access) 0205 or
Ignition Positions (Key Access)
0 207.
4. Set the parking brake. See Electric Parking Brake 0229.
5. Disconnect from the tow vehicle.
6. Shift the transmission to N (Neutral).
7. Shift the transfer case to 2
m
(Two-Wheel Drive High). When
the shift to 2
m(Two-Wheel
Drive High) is complete, the
light in the instrument cluster
will stop flashing and stay lit.
See Four-Wheel-Drive Light
0 138.
8. Start the engine. Check that the vehicle is in 2
m(Two-Wheel
Drive High) by starting the
engine and shifting the
transmission to D (Drive) and
then to R (Reverse). There
should be movement of the
vehicle while shifting. 9. Shift the transmission to
P (Park) and turn off the
ignition.
10. Release the parking brake and remove the wheel blocks.
11. Reset any lost presets. The outside temperature
display will default to 0 °C
(32 °F) but will reset with
normal usage.
Dolly Towing
Page 430 of 495

Chevrolet Silverado Owner Manual (GMNA-Localizing-U.S./Canada/Mexico-
13337620) - 2020 - CTC - 1/27/20
Vehicle Care 429
Caution (Continued)
Damage could occur and the
repairs would not be covered by
the vehicle warranty.
Brake System
Visually inspect brake lines and
hoses for proper hook-up, binding,
leaks, cracks, chafing, etc. Inspect
disc brake pads for wear and rotors
for surface condition. Inspect drum
brake linings/shoes for wear or
cracks. Inspect all other brake parts.
Steering, Suspension, and
Chassis Components
Visually inspect steering,
suspension, and chassis
components for damaged, loose,
or missing parts or signs of wear at
least once a year.
Inspect power steering for proper
attachment, connections, binding,
cracks, chafing, etc.
Visually check constant velocity joint
boots and axle seals for leaks.2500/3500 Series vehicles, at least
every engine oil change lubricate
the upper and lower control arm ball
joints. Control arm ball joints on
1500 series vehicles are
maintenance-free.
2500/3500 Series vehicles equipped
with steering linkage, at least every
engine oil change lubricate the tie
rod ball joints, idler arm pivot shaft
bearings, idler arm socket, and
pitman arm socket.
Caution
Lubrication of applicable
suspension points should not be
done unless the temperature is
−12 °C (10 °F) or higher,
or damage could result.
Body Component Lubrication
Lubricate all key lock cylinders,
hood hinges, liftgate hinges, and the
steel fuel door hinge unless the
components are plastic. Applying
silicone grease on weatherstrips
with a clean cloth will make them
last longer, seal better, and not stick
or squeak.
Underbody Maintenance
At least twice a year, spring and fall,
use plain water to flush any
corrosive materials from the
underbody. Take care to thoroughly
clean any areas where mud and
other debris can collect. If equipped
with power assist steps, extend
them and then use a high pressure
wash to clean all joints and gaps.
Do not directly power wash the
transfer case and/or front/rear axle
output seals. High pressure water
can overcome the seals and
contaminate the fluid. Contaminated
fluid will decrease the life of the
transfer case and/or axles and
should be replaced.
Sheet Metal Damage
If the vehicle is damaged and
requires sheet metal repair or
replacement, make sure the body
repair shop applies anti-corrosion