2020 CHEVROLET SILVERADO park assist
[x] Cancel search: park assistPage 287 of 495

Chevrolet Silverado Owner Manual (GMNA-Localizing-U.S./Canada/Mexico-
13337620) - 2020 - CTC - 1/27/20
286 Driving and Operating
The vehicle can tow in D (Drive).
Shift the transmission to a lower
gear if the transmission shifts too
often under heavy loads and/or hilly
conditions.
When towing at higher altitudes,
engine coolant will boil at a lower
temperature than at lower altitudes.
If the engine is turned off
immediately after towing at high
altitude on steep uphill grades, the
vehicle could show signs similar to
engine overheating. To avoid this,
let the engine run, preferably on
level ground, with the transmission
in P (Park) for a few minutes before
turning the engine off. If the
overheat warning comes on, see
Engine Overheating0347.
Viewing Systems
If equipped, the viewing systems on
the vehicle can improve visibility
while hitching, backing, and driving
with a trailer. See Driver Assistance
Systems 0252.
Parking on Hills
{Warning
To prevent serious injury or death,
always park your vehicle and
trailer on a level surface when
possible.
When parking your vehicle and your
trailer on a hill: 1. Press the brake pedal, but do not shift into P (Park) yet. Turn
the wheels into the curb if
facing downhill or into traffic if
facing uphill.
2. Have someone place chocks under the trailer wheels.
3. Gradually release the brake pedal to allow the chocks to
absorb the load of the trailer.
4. Reapply the brake pedal. Then apply the parking brake and
shift into P (Park).
5. Release the brake pedal.
Leaving After Parking on a Hill
1. Apply and hold the brake pedal.
.Start the engine.
. Shift into a gear.
. Release the parking brake.
2. Let up on the brake pedal.
3. Drive slowly until the trailer is clear of the chocks.
4. Stop and have someone pick up and store the chocks.
Launching and Retrieving
a Boat
Backing the Trailer into the Water
{Warning
.Have all passengers get out
of the vehicle before
backing onto the sloped part
of the ramp. Lower the
driver and passenger side
windows before backing
onto the ramp. This will
(Continued)
Page 288 of 495

Chevrolet Silverado Owner Manual (GMNA-Localizing-U.S./Canada/Mexico-
13337620) - 2020 - CTC - 1/27/20
Driving and Operating 287
Warning (Continued)
provide a means of escape
in the unlikely event the
vehicle slides into the water.
. If the boat launch surface is
slippery, have the driver
remain in the vehicle with
the brake pedal applied
while the boat is being
launched. The boat launch
can be especially slippery at
low tide when part of the
ramp was previously
submerged at high tide. Do
not back onto the ramp to
launch the boat if you are
not sure the vehicle can
maintain traction.
. Do not move the vehicle if
someone is in the path of
the trailer. Some parts of the
trailer might be underwater
and not visible to people
who are assisting in
launching the boat. Disconnect the wiring to the trailer
before backing the trailer into the
water to prevent damage to the
electrical circuits on the trailer.
Reconnect the wiring to the trailer
after removing the trailer from the
water. If the trailer has electric
brakes that can function when the
trailer is submerged, it might help to
leave the electrical trailer connector
attached to maintain trailer brake
functionality while on the boat ramp.
To back the trailer into the water:
1. If equipped, place the vehicle in four-wheel-drive high.
2. Slowly back down the boat ramp until the boat is floating,
but no further than necessary.
3. Press and hold the brake pedal, but do not shift into
P (Park) yet.
4. Have someone place chocks under the front wheels of the
vehicle.
5. Gradually release the brake pedal to allow the chocks to
absorb the load of the trailer. 6. Reapply the brake pedal. Then
apply the parking brake and
shift into P (Park).
7. Release the brake pedal.
Pulling the Trailer from the Water
To pull the trailer out of the water: 1. Press and hold the brake pedal.
2. Start the engine and shift into gear.
3. Release the parking brake.
4. Let up on the brake pedal.
5. Drive slowly until the tires are clear of the chocks.
6. Stop and have someone pick up and store the chocks.
7. Slowly pull the trailer from the water.
8. Once the vehicle and trailer have been driven from the
sloped part of the boat ramp,
the vehicle can be shifted from
four-wheel-drive high. Shift into
Page 301 of 495

Chevrolet Silverado Owner Manual (GMNA-Localizing-U.S./Canada/Mexico-
13337620) - 2020 - CTC - 1/27/20
300 Driving and Operating
Trailer Lamps
Always check that all trailer lamps
are working at the beginning of each
trip, and periodically on longer trips.
If equipped, the Trailering App will
monitor the RH turn/brake lamp
circuit, LH turn/brake lamp circuit,
running lamp circuit, and reverse
lamp circuits on the trailer. DIC
messages and Trailering App alerts
may be displayed if lighting circuit
issues are detected on the trailer.
Pressing START LIGHT TEST in the
Trailering App automatically
activates the trailer lamps. The
Trailering App is not a substitute for
manually inspecting your trailer
lamps. SeeTrailering App 0306.
Turn Signals When Towing a
Trailer
When properly connected, the trailer
turn signals will illuminate to indicate
the vehicle is turning, changing
lanes, or stopping. When towing a
trailer, the arrows on the instrument
cluster will illuminate even if the
trailer is not properly connected or
the bulbs are burned out.
Tow/Haul Mode
For instructions on how to enter
Tow/Haul Mode, see Driver Mode
Control 0234.
Tow/Haul assists when pulling a
heavy trailer or a large or heavy
load. See Tow/Haul Mode 0223.
Tow/Haul Mode is designed to be
most effective when the vehicle and
trailer combined weight is at least
75% of the vehicle's Gross
Combined Weight Rating (GCWR).
See “Trailer Weight ”under Trailer
Towing 0288.
Tow/Haul Mode is most useful when
towing a heavy trailer or carrying a
large or heavy load:
. Through rolling terrain.
. In stop-and-go traffic.
. In busy parking lots.
Operating the vehicle in Tow/Haul
Mode when lightly loaded or not
towing will not cause damage;
however, it is not recommended and
may result in unpleasant engine and transmission driving characteristics,
heavy or light steering efforts, and
reduced fuel economy.
Integrated Trailer Brake
Control System
The vehicle may have an Integrated
Trailer Brake Control (ITBC) system
for use with electric trailer brakes or
most electric over hydraulic trailer
brake systems. These instructions
apply to both types of electric trailer
brakes.
This symbol is on the Trailer Brake
Control Panel on vehicles with an
ITBC system. The power output to
the trailer brakes is proportional to
the amount of vehicle braking. This
available power output to the trailer
brakes can be adjusted to a wide
range of trailering situations.
Page 308 of 495

Chevrolet Silverado Owner Manual (GMNA-Localizing-U.S./Canada/Mexico-
13337620) - 2020 - CTC - 1/27/20
Driving and Operating 307
.The transmission is shifted out
of P (Park).
. The brake pedal is pressed.
. The turn signal is activated.
. The hazard warning lights are
activated.
Trailering App
If equipped, the Trailering App is on
the Home Page of the infotainment
display.
If equipped this feature allows
profiles for connected trailers to be
created to view status, to store and
track trailer usage information, and
to set up towing assistance
features.
The Trailering App Preview will
appear when the Trailering App is
opened for the first time from the
Home Page. Touch GET STARTED
in the Trailering App to go into
the app.
When a trailer is electrically
connected, there will be an option to
create a profile, use a guest profile,
or cancel. After Cancel is selected a
third time, Don’t Remind Me will display and touching that will turn off
the trailer detection pop-up. To turn
the Trailer Detection Alert on, select
ON in the Settings tab.
When a trailer is electrically
connected and after a Trailer Profile
has been created, the trailer
detection pop-up will appear with a
list of all of the custom Trailer
Profiles made on the vehicle. To
load an existing Trailer Profile,
select one of the Trailer Profiles
listed, or load the Guest Trailer
Profile by selecting GUEST
TRAILER. Touching Cancel,
Accessory/No trailer, or shifting the
vehicle from P (Park), will select
Accessory/No trailer as the active
Trailer Profile and will dismiss the
pop- up.
Create a Trailer Profile
1. Touch Create Profile on the pop-up or touch + Add Trailer
in the Trailering App.
2. Create a name for the trailer. 3. Select the hitch type.
A checklist profile will be
created based on the type
selected.
4. Select the trailer type.
A pop-up will indicate the setup is
complete. Touch DONE to complete
the process or touch TRAILER
FEATURE SETUP to set up the
Tow/Haul Mode reminder, Trailer
Tire Pressure Monitoring System,
if equipped, maintenance reminders,
or towing assistance, if equipped.
Import a Trailer Profile
A trailer profile saved to an OnStar
account can be imported to the
vehicle. 1. Touch Import Profile on the pop-up.
2. Select a trailer profile from the list.
3. Touch IMPORT.
A pop-up will indicate the import
was successful. Touch OK to return
to the trailer list and select the trailer
profile. The Tow/Haul Mode
Page 310 of 495

Chevrolet Silverado Owner Manual (GMNA-Localizing-U.S./Canada/Mexico-
13337620) - 2020 - CTC - 1/27/20
Driving and Operating 309
4. Move to the next tire andrepeat Step 3 for each sensor.
The horn chirps twice when all
sensors are completed.
5. Return to the vehicle to complete the setup.
Maintenance Reminders
To set up maintenance reminders,
touch the Trailer Maintenance icon.
Select Yes to set up the
maintenance reminders for the
Trailer Profile. Follow the on-screen
prompts. The maximum number of
reminders is 50. Select No to return
to the previous screen.
Towing Assistance
If the Transparent Trailer feature is
available, touch the Towing
Assistance icon to set up
transparent trailer.
Touch Yes to begin set up or touch
No to return to the previous screen.
Follow the on-screen instructions.
A rear trailer camera must be
mounted on the trailer and
electrically connected to the vehicle before transparent trailer feature
can be used. See
Assistance
Systems for Parking or Backing
0 253.
Trailer dimensions must be in range
and transparent trailer must be
calibrated prior to use.
Transparent Trailer Setup
To complete setup for transparent
trailer:
1. Select the number of axles on the trailer.
2. Enter trailer dimensions .Trailer Length: 300 cm
(118.1 in) –970 cm
(381.8 in). Measure from
center of coupler to furthest
rear point on the trailer.
. Trailer Width: 120 cm
(47.2 in) –260 cm
(102.3 in). Measure from
left edge to right edge.
. Trailer Height: 1 cm
(0.39 in) –450 cm
(177.1 in). Measure from
ground to tallest point. .
Hitching Point Length:
180 cm (70.8 in) –970 cm
(381.8 in). Measure from
center of coupler to middle
of tires.
. Trailer Tongue Length:
50 cm (119.6 in) –220 cm
(86.6 in). Measure from
center of coupler to trailer
front wall.
. Vehicle Hitch Height: 10 cm
(3.9 in) –100 cm (39.3 in).
Measure from ground to top
of coupler.
. Vehicle Hitch Length: 10 cm
(3.9 in) –100 cm (39.3 in).
Measure from hitch receiver
to center of ball.
3. If trailer dimensions are out of range, this feature will be
unavailable. Select OK to
return.
4. Ensure rear trailer camera is connected.
5. Follow instructions to drive forward to complete calibration.
Page 346 of 495

Chevrolet Silverado Owner Manual (GMNA-Localizing-U.S./Canada/Mexico-
13337620) - 2020 - CTC - 1/27/20
Vehicle Care 345
Automatic Coolant Service Fill
Instructions (L3B Engine)
See 3.0L Duramax Diesel
supplement for the diesel engine
procedure.
If equipped, this feature assists in
filling and removing air from the
cooling system after service of
components or when coolant is
added after being too low.
To activate the fill and air removal
process:1. With a cold system, add coolant to the indicated mark
on the surge tank.
2. Replace the cap on the surge tank.
3. Connect the vehicle to a battery charger.
4. Set the ignition to Service or Accessory Mode. See Ignition
Positions (Keyless Access)
0 205 or
Ignition Positions (Key Access)
0 207.
5. Turn off the air conditioning. 6. Set the parking brake.
7. At the same time, press the
accelerator and the brake for
automatic transmission
vehicles for two seconds, then
release.
At the end of the cycle, check the
coolant level in the surge tank and
add coolant if it is low. Turn off the
vehicle, allow the Electronic Control
Module (ECM) to go to sleep, about
two minutes, and repeat Steps 3–7.
Listen for pump activation and
movement of the control valves
while watching the level of the
coolant in the surge tank. If the tank
empties, turn the ignition off,
carefully remove the surge tank cap,
refill to the indicated mark, and
repeat Steps 3–6. The fill and air
removal process will run for
approximately 10 minutes.
How to Add Coolant to the
Coolant Surge Tank for
Gasoline Engines Except L3B
If the vehicle has a diesel engine,
see “Cooling System” in the
Duramax diesel supplement for the
proper coolant fill procedure.
{Warning
Spilling coolant on hot engine
parts can burn you. Coolant
contains ethylene glycol and it will
burn if the engine parts are hot
enough.
{Warning
Plain water, or other liquids such
as alcohol, can boil before the
proper coolant mixture will. With
plain water or the wrong mixture,
the engine could get too hot but
there would not be an overheat
(Continued)
Page 348 of 495

Chevrolet Silverado Owner Manual (GMNA-Localizing-U.S./Canada/Mexico-
13337620) - 2020 - CTC - 1/27/20
Vehicle Care 347
Caution
If the pressure cap is not tightly
installed, coolant loss and engine
damage may occur. Be sure the
cap is properly and tightly
secured.
Engine Overheating
If the vehicle has the Duramax
diesel engine, see the Duramax
diesel supplement.
Caution
Do not run the engine if there is a
leak in the engine cooling system.
This can cause a loss of all
coolant and can damage the
system and vehicle. Have any
leaks fixed right away.
The vehicle has several indicators
to warn of engine overheating. There is a coolant temperature
gauge in the vehicle's instrument
cluster. See
Engine Coolant
Temperature Gauge 0131.
In addition, there are ENGINE
OVERHEATED STOP ENGINE,
ENGINE OVERHEATED IDLE
ENGINE, and ENGINE POWER IS
REDUCED messages in the Driver
Information Center (DIC).
If the decision is made not to lift the
hood when this warning appears,
get service help right away. See
Roadside Assistance Program
0 462.
If the decision is made to lift the
hood, make sure the vehicle is
parked on a level surface.
2.7L L4, 4.3L V6, 5.3L V8, and 6.2L
V8 Engines
Check to see if the engine cooling
fans are running. If the engine is
overheating, the fans should be
running. If they are not, do not
continue to run the engine and have
the vehicle serviced. If the engine or transmission detects
an impending hot fluid condition,
then the transmission may force
upshifts to limit temperatures.
Downshifts may also be prevented
in this instance. Normal operation
may continue unless the display
indicates there is a hot condition
and engine should be idled.
If Steam is Coming from the
Engine Compartment
{Warning
Steam and scalding liquids from a
hot cooling system are under
pressure. Turning the pressure
cap, even a little, can cause them
to come out at high speed and
you could be burned. Never turn
the cap when the cooling system,
including the pressure cap, is hot.
Wait for the cooling system and
pressure cap to cool.
Page 403 of 495
Chevrolet Silverado Owner Manual (GMNA-Localizing-U.S./Canada/Mexico-
13337620) - 2020 - CTC - 1/27/20
402 Vehicle Care
If a tire goes flat, avoid further tire
and wheel damage by driving slowly
to a level place, well off the road,
if possible. Turn on the hazard
warning flashers. SeeHazard
Warning Flashers 0166.
{Warning
Changing a tire can be
dangerous. The vehicle can slip
off the jack and roll over or fall
causing injury or death. Find a
level place to change the tire. To
help prevent the vehicle from
moving:
1. Set the parking brake firmly.
2. Put the shift lever inP (Park).
3. For vehicles with four-wheel drive with an N (Neutral)
transfer case position, be
sure the transfer case is in a
drive gear —not in
N (Neutral).
(Continued)
Warning (Continued)
4. Turn off the engine and donot restart while the vehicle
is raised.
5. Do not allow passengers to remain in the vehicle.
6. Place wheel blocks, if equipped, on both sides of
the tire at the opposite
corner of the tire being
changed.
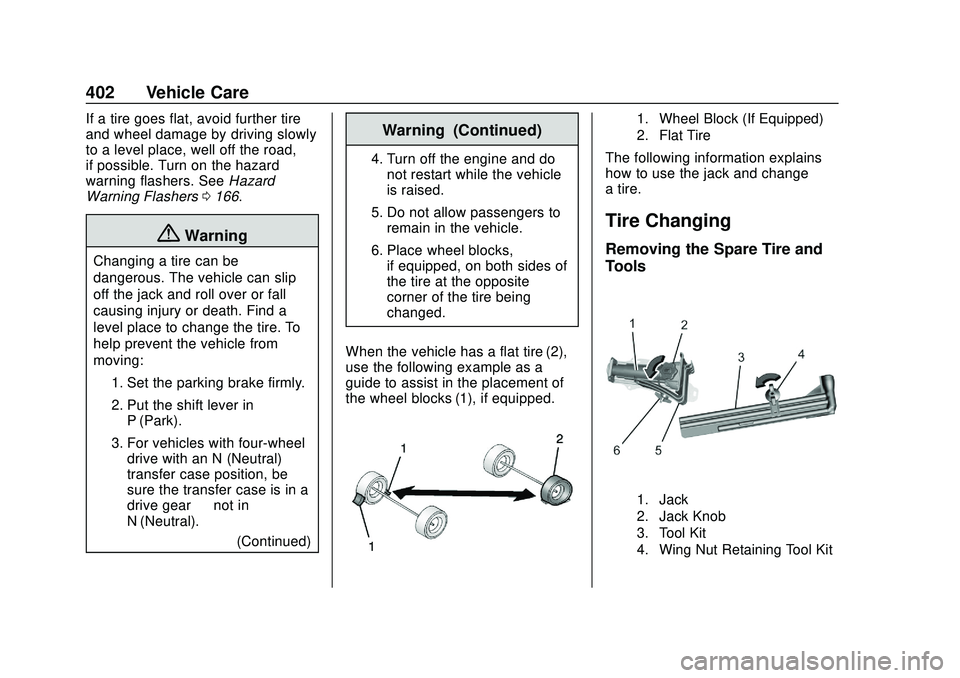
When the vehicle has a flat tire (2),
use the following example as a
guide to assist in the placement of
the wheel blocks (1), if equipped.
1. Wheel Block (If Equipped)
2. Flat Tire
The following information explains
how to use the jack and change
a tire.
Tire Changing
Removing the Spare Tire and
Tools
1. Jack
2. Jack Knob
3. Tool Kit
4. Wing Nut Retaining Tool Kit