2020 CHEVROLET SILVERADO engine
[x] Cancel search: enginePage 371 of 495

Chevrolet Silverado Owner Manual (GMNA-Localizing-U.S./Canada/Mexico-
13337620) - 2020 - CTC - 1/27/20
370 Vehicle Care
FusesUsage
78 Engine control module
79 Auxiliary battery
80 Cabin cooling pump
81 Trailer stop/turn lamp right
82 TIM
83 FTZM
84 Trailer brake
85 ENG
86 Engine control module
87 Injector B even
88 O2 B sensor
89 O2 A sensor
90 Injector A odd
91 Engine control module throttle
control
92 Cool fan clutch Relays
Usage
5 Headlamp
18 DC/AC inverter
23 Rear window defogger
35 Parking lamp
36 Run/Crank
43 Second fuel pump
59 A/C clutch
64 Starter Motor (LD & HD DSL) / Cool
Fan Clutch
(HD Gas)
70 Starter Pinion (LD) / Starter Motor
(HD Gas)
77 PowertrainInstrument Panel Fuse
Block (Left)
The left instrument panel fuse block
access door is on the driver side
edge of the instrument panel.
The vehicle may not be equipped
with all of the fuses, relays, and
features shown.
Pull off the cover to access the fuse
block. A fuse puller is available in
the left instrument panel end cap.
Page 380 of 495
Chevrolet Silverado Owner Manual (GMNA-Localizing-U.S./Canada/Mexico-
13337620) - 2020 - CTC - 1/27/20
Vehicle Care 379
code molded onto the sidewall.
GM's TPC specifications meet or
exceed all federal safety
guidelines.
(3) Dual Tire Maximum Load
:
Maximum load that can be
carried and the maximum
pressure needed to support that
load when used in a dual
configuration. For information on
recommended tire pressure see
Tire Pressure0383 and
Vehicle Load Limits 0197.
(4) DOT (Department of
Transportation)
:The
Department of Transportation
(DOT) code indicates that the
tire is in compliance with the
U.S. Department of
Transportation Motor Vehicle
Safety Standards.
DOT Tire Date of
Manufacture
:The last four
digits of the TIN indicate the
tire manufactured date. The
first two digits represent the week (01-52) and the last two
digits, the year. For example, the
third week of the year 2010
would have a four-digit DOT
date of 0310.
(5) Tire Identification Number
(TIN)
:The letters and numbers
following the DOT code are the
Tire Identification Number (TIN).
The TIN shows the
manufacturer and plant code,
tire size, and date the tire was
manufactured. The TIN is
molded onto both sides of the
tire, although only one side may
have the date of manufacture.
(6) Tire Ply Material
:The type
of cord and number of plies in
the sidewall and under the tread.
(7) Single Tire Maximum
Load
:Maximum load that can
be carried and the maximum
pressure needed to support that load when used as a single. For
information on recommended
tire pressure see
Tire Pressure
0 383 and
Vehicle Load Limits 0197.
Tire Designations
Tire Size
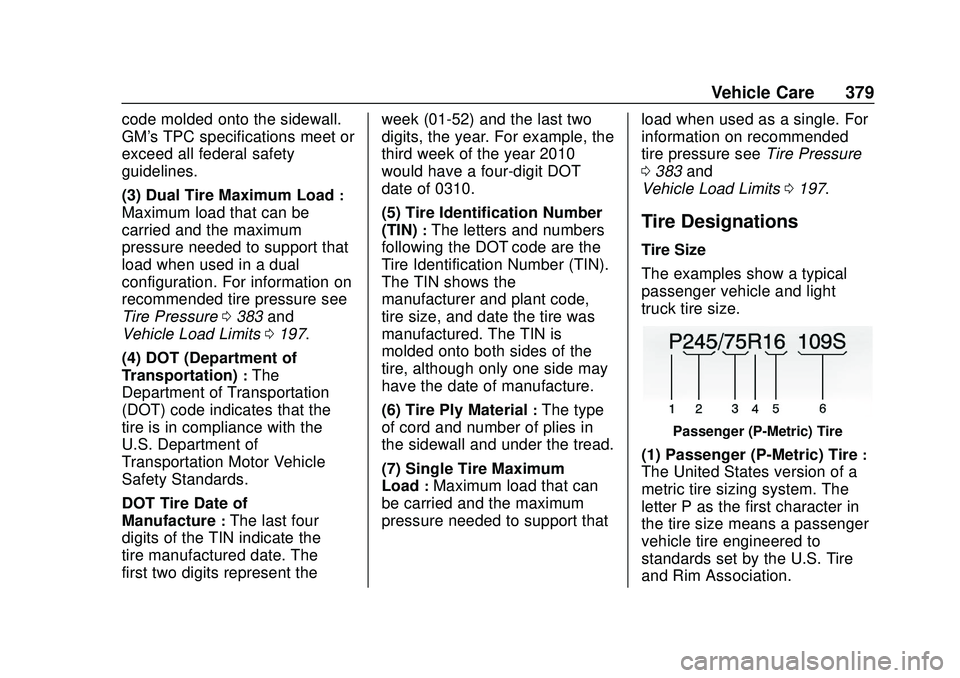
The examples show a typical
passenger vehicle and light
truck tire size.
Passenger (P-Metric) Tire
(1) Passenger (P-Metric) Tire:
The United States version of a
metric tire sizing system. The
letter P as the first character in
the tire size means a passenger
vehicle tire engineered to
standards set by the U.S. Tire
and Rim Association.
Page 381 of 495
Chevrolet Silverado Owner Manual (GMNA-Localizing-U.S./Canada/Mexico-
13337620) - 2020 - CTC - 1/27/20
380 Vehicle Care
(2) Tire Width:The three-digit
number indicates the tire section
width in millimeters from
sidewall to sidewall.
(3) Aspect Ratio
:A two-digit
number that indicates the tire
height-to-width measurements.
For example, if the tire size
aspect ratio is 75, as shown in
item C of the tire illustration, it
would mean that the tire's
sidewall is 75 percent as high as
it is wide.
(4) Construction Code
:A letter
code is used to indicate the type
of ply construction in the tire.
The letter R means radial ply
construction; the letter D means
diagonal or bias ply
construction.
(5) Rim Diameter
:Diameter of
the wheel in inches.
(6) Service Description
:These
characters represent the load
index and speed rating of the
tire. The load index represents the load carrying capacity a tire
is certified to carry. The speed
rating is the maximum speed a
tire is certified to carry a load.
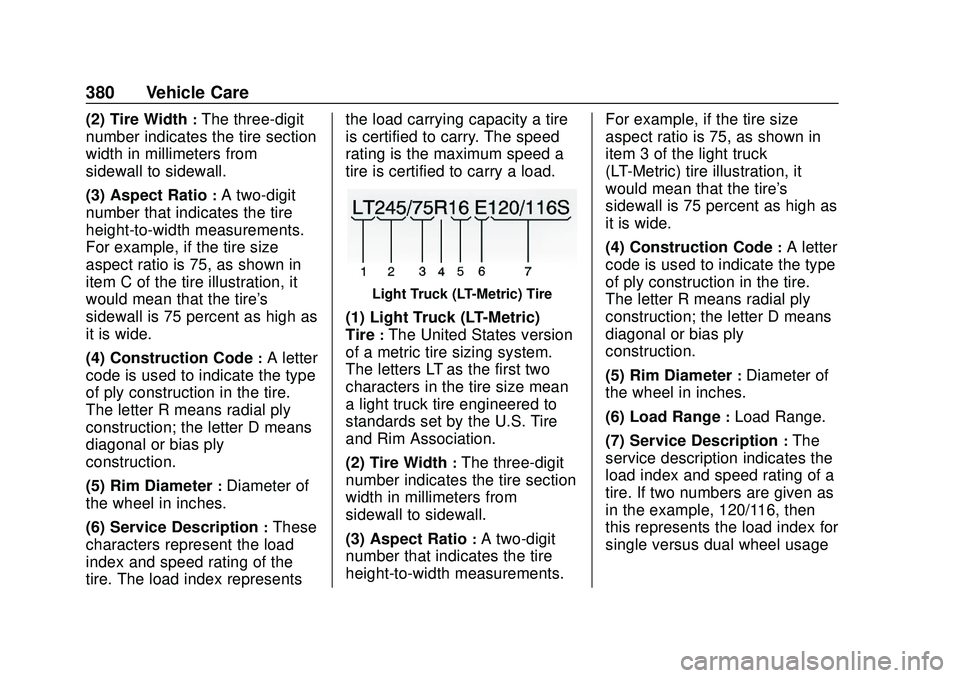
Light Truck (LT-Metric) Tire
(1) Light Truck (LT-Metric)
Tire
:The United States version
of a metric tire sizing system.
The letters LT as the first two
characters in the tire size mean
a light truck tire engineered to
standards set by the U.S. Tire
and Rim Association.
(2) Tire Width
:The three-digit
number indicates the tire section
width in millimeters from
sidewall to sidewall.
(3) Aspect Ratio
:A two-digit
number that indicates the tire
height-to-width measurements. For example, if the tire size
aspect ratio is 75, as shown in
item 3 of the light truck
(LT-Metric) tire illustration, it
would mean that the tire's
sidewall is 75 percent as high as
it is wide.
(4) Construction Code
:A letter
code is used to indicate the type
of ply construction in the tire.
The letter R means radial ply
construction; the letter D means
diagonal or bias ply
construction.
(5) Rim Diameter
:Diameter of
the wheel in inches.
(6) Load Range
:Load Range.
(7) Service Description
:The
service description indicates the
load index and speed rating of a
tire. If two numbers are given as
in the example, 120/116, then
this represents the load index for
single versus dual wheel usage
Page 403 of 495
Chevrolet Silverado Owner Manual (GMNA-Localizing-U.S./Canada/Mexico-
13337620) - 2020 - CTC - 1/27/20
402 Vehicle Care
If a tire goes flat, avoid further tire
and wheel damage by driving slowly
to a level place, well off the road,
if possible. Turn on the hazard
warning flashers. SeeHazard
Warning Flashers 0166.
{Warning
Changing a tire can be
dangerous. The vehicle can slip
off the jack and roll over or fall
causing injury or death. Find a
level place to change the tire. To
help prevent the vehicle from
moving:
1. Set the parking brake firmly.
2. Put the shift lever inP (Park).
3. For vehicles with four-wheel drive with an N (Neutral)
transfer case position, be
sure the transfer case is in a
drive gear —not in
N (Neutral).
(Continued)
Warning (Continued)
4. Turn off the engine and donot restart while the vehicle
is raised.
5. Do not allow passengers to remain in the vehicle.
6. Place wheel blocks, if equipped, on both sides of
the tire at the opposite
corner of the tire being
changed.
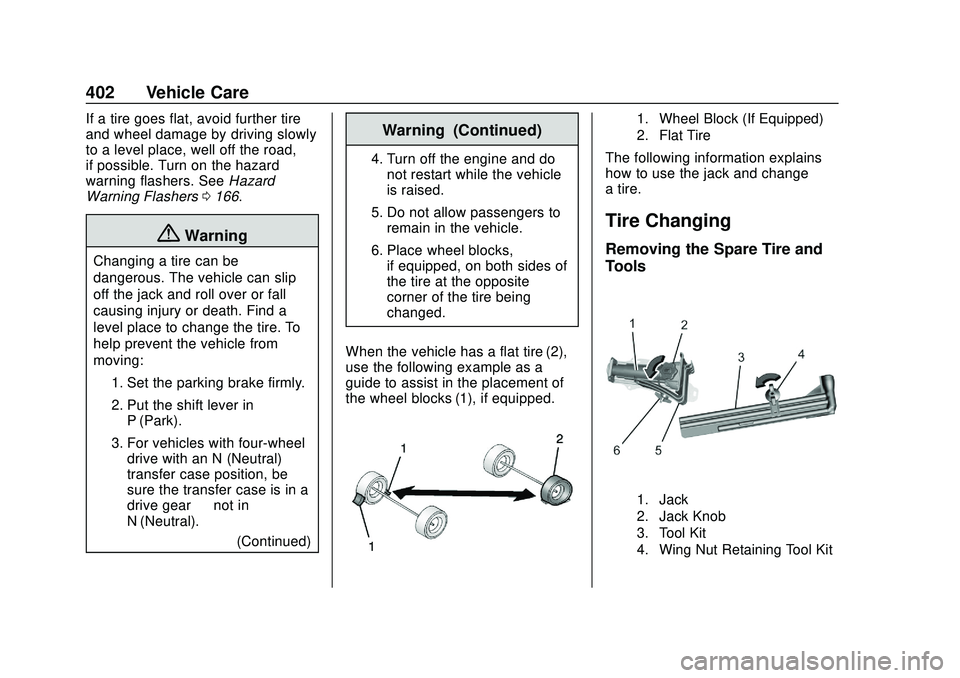
When the vehicle has a flat tire (2),
use the following example as a
guide to assist in the placement of
the wheel blocks (1), if equipped.
1. Wheel Block (If Equipped)
2. Flat Tire
The following information explains
how to use the jack and change
a tire.
Tire Changing
Removing the Spare Tire and
Tools
1. Jack
2. Jack Knob
3. Tool Kit
4. Wing Nut Retaining Tool Kit
Page 417 of 495
Chevrolet Silverado Owner Manual (GMNA-Localizing-U.S./Canada/Mexico-
13337620) - 2020 - CTC - 1/27/20
416 Vehicle Care
Caution
Ignoring these steps could result
in costly damage to the vehicle
that would not be covered by the
vehicle warranty. Trying to start
the vehicle by pushing or pulling it
will not work, and it could damage
the vehicle.
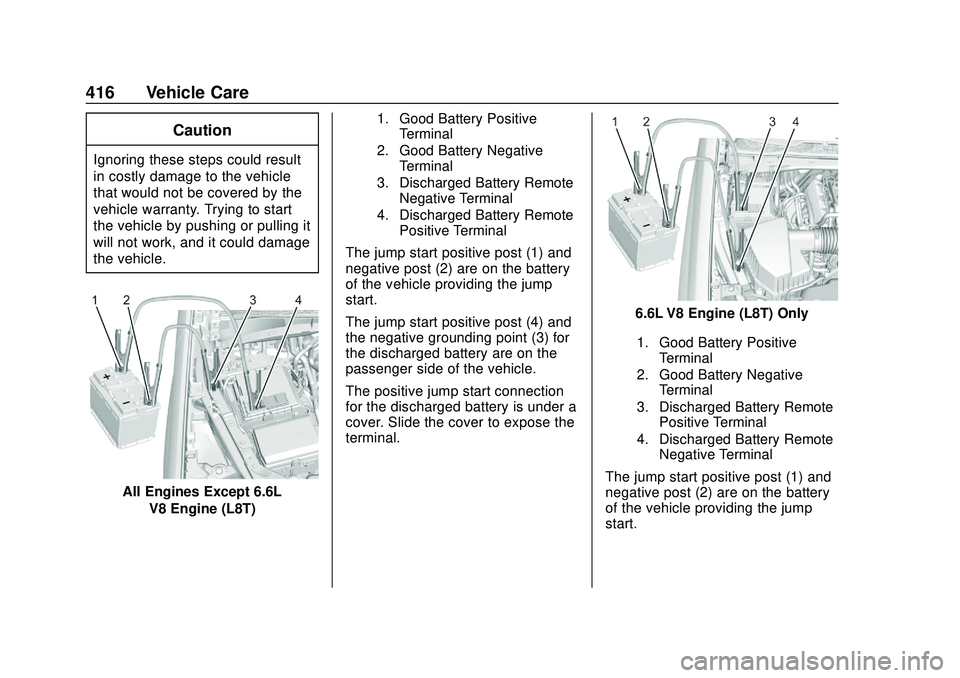
All Engines Except 6.6LV8 Engine (L8T)
1. Good Battery PositiveTerminal
2. Good Battery Negative Terminal
3. Discharged Battery Remote Negative Terminal
4. Discharged Battery Remote Positive Terminal
The jump start positive post (1) and
negative post (2) are on the battery
of the vehicle providing the jump
start.
The jump start positive post (4) and
the negative grounding point (3) for
the discharged battery are on the
passenger side of the vehicle.
The positive jump start connection
for the discharged battery is under a
cover. Slide the cover to expose the
terminal.
6.6L V8 Engine (L8T) Only
1. Good Battery PositiveTerminal
2. Good Battery Negative Terminal
3. Discharged Battery Remote Positive Terminal
4. Discharged Battery Remote Negative Terminal
The jump start positive post (1) and
negative post (2) are on the battery
of the vehicle providing the jump
start.
Page 418 of 495

Chevrolet Silverado Owner Manual (GMNA-Localizing-U.S./Canada/Mexico-
13337620) - 2020 - CTC - 1/27/20
Vehicle Care 417
The jump start positive post (3) and
the negative grounding point (4) for
the discharged battery are on the
passenger side of the vehicle.
The positive jump start connection
for the discharged battery is under a
cover. Slide the cover to expose the
terminal.1. Check the other vehicle. It must have a 12-volt battery
with a negative ground system.
Caution
If the other vehicle does not have
a 12-volt system with a negative
ground, both vehicles can be
damaged. Only use a vehicle that
has a 12-volt system with a
negative ground for jump starting.
2. If you have a vehicle with a diesel engine with two
batteries, you should know
before you begin that,
especially in cold weather, you
may not be able to get enough
power from a single battery in another vehicle to start your
diesel engine. If your vehicle
has more than one battery,
using the battery that is closer
to the starter will reduce
electrical resistance. This is
located on the passenger side,
in the rear of the engine
compartment.
3. Get the vehicles close enough so the jumper cables can
reach, but be sure the vehicles
are not touching each other.
If they are, it could cause an
unwanted ground connection.
You would not be able to start
your vehicle, and the bad
grounding could damage the
electrical systems.
To avoid the possibility of the
vehicles rolling, set the parking
brake firmly on both vehicles
involved in the jump start
procedure. Put the automatic
transmission in P (Park) before
setting the parking brake. If you
have a four-wheel-drive vehicle, be sure the transfer
case is in a drive gear, not in
N (Neutral).
Caution
If any accessories are left on or
plugged in during the jump
starting procedure, they could be
damaged. The repairs would not
be covered by the vehicle
warranty. Whenever possible, turn
off or unplug all accessories on
either vehicle when jump starting.
4. Turn the ignition off on both vehicles. Unplug unnecessary
accessories plugged into the
accessory power outlets. Turn
off the radio and all the lamps
that are not needed. This will
avoid sparks and help save
both batteries. And it could
save the radio!
5. Open the hood on the other vehicle and locate the
positive (+) and negative (−)
terminal locations on that
vehicle.
Page 419 of 495

Chevrolet Silverado Owner Manual (GMNA-Localizing-U.S./Canada/Mexico-
13337620) - 2020 - CTC - 1/27/20
418 Vehicle Care
The positive (+) terminal is
under a red plastic cover at the
positive battery post. To
uncover the positive (+)
terminal, open the red plastic
cover.
For more information on the
location of the remote
positive (+) and remote
negative (−) terminals, see
Engine Compartment Overview
0328.
{Warning
An electric fan can start up even
when the engine is not running
and can injure you. Keep hands,
clothing, and tools away from any
underhood electric fan.
{Warning
Using a match near a battery can
cause battery gas to explode.
People have been hurt doing this,
(Continued)
Warning (Continued)
and some have been blinded.
Use a flashlight if you need more
light.
Battery fluid contains acid that
can burn you. Do not get it on
you. If you accidentally get it in
your eyes or on your skin, flush
the place with water and get
medical help immediately.
{Warning
Fans or other moving engine
parts can injure you badly. Keep
your hands away from moving
parts once the engine is running.
6. Check that the jumper cables do not have loose or missing
insulation. If they do, you could
get a shock. The vehicles
could be damaged too. Before you connect the cables,
here are some basic things you
should know. Positive (+) will
go to positive (+) or to a remote
positive (+) terminal if the
vehicle has one. Negative (−)
will go to a heavy, unpainted
metal engine part or to a
remote negative (−) terminal if
the vehicle has one.
Do not connect positive (+) to
negative (−) or you will get a
short that would damage the
battery and maybe other parts
too. And do not connect the
negative (−) cable to the
negative (−) terminal on the
dead battery because this can
cause sparks.
7. Connect one end of the red positive (+) cable to the remote
positive (+) terminal of the
vehicle with the discharged
battery.
8. Do not let the other end touch metal. Connect it to the
positive (+) terminal of the
Page 420 of 495
Chevrolet Silverado Owner Manual (GMNA-Localizing-U.S./Canada/Mexico-
13337620) - 2020 - CTC - 1/27/20
Vehicle Care 419
good battery. Use a remote
positive (+) terminal if the
vehicle has one.
9. Connect one end of the black negative (−) cable to the
negative (−) terminal of the
good battery. Use a remote
negative (−) terminal if the
vehicle has one.
Do not let the other end touch
anything until the next step.
10. Connect the other end of the negative (−) cable to the
remote negative (−) terminal to
the discharged battery.
11. Start the vehicle with the good battery and run the engine for a
while.
12. Try to start the vehicle that had the dead battery. If it will not
start after a few tries, it
probably needs service.Caution
If the jumper cables are
connected or removed in the
wrong order, electrical shorting
may occur and damage the
vehicle. The repairs would not be
covered by the vehicle warranty.
Always connect and remove the
jumper cables in the correct order,
making sure that the cables do
not touch each other or other
metal.
Jumper Cable Removal
Reverse the sequence exactly when
removing the jumper cables.
After starting the disabled vehicle
and removing the jumper cables,
allow it to idle for several minutes.
Towing the Vehicle
Caution
Incorrectly towing a disabled
vehicle may cause damage. The
damage would not be covered by
the vehicle warranty. Do not lash
or hook to suspension
components. Use the proper
straps around the tires to secure
the vehicle. Do not drag a locked
wheel/tire. Use tire skates or
dollies under any locked wheel/
tire while loading the vehicle. Do
not use a sling type lift to tow the
vehicle. This could damage the
vehicle.
Caution
If the vehicle cannot be shifted
into Neutral (N), do not use the
tow eye to tow the vehicle.
Vehicle damage may occur.