2020 CHEVROLET SILVERADO ignition
[x] Cancel search: ignitionPage 4 of 24

4F Optional equipment
KEYLESS ACCESS SYSTEMF
REMOTE KEYLESS ENTRY TRANSMITTER (KEY FOB)F
The Keyless Access System enables operation of the doors and tailgate wi\
thout removing the Remote Keyless Entry (RKE) transmitter from your pocket or purse. \
The transmitter must be within 3 feet of the tailgate or the door being unlocked.
KEYLESS UNLOCKING
With the transmitter within range:
Press the button on the driver’s door handle to unlock the driver’s door; press it again within 5 seconds to unlock all doors and tailgate.
Press the button on the front passenger’s door handle to unlock all doors and tailgate.
Press the button on the tailgate to lower the standard tailgate.
KEYLESS LOCKING
With the ignition off, the transmitter removed from the vehicle, and all\
doors closed:
Press the button on any front door handle to lock all doors and tailgate immediate\
ly.
If Passive Locking is turned on, all doors will lock automatically after\
a short delay.
Note: To change the door lock and unlock settings, go to Settings > Vehicle > Remote Lock, Unlock, Start.
See Keys, Doors and Windows in your Owner’s Manual.
Lock
Press to lock all doors and tailgate.
Unlock
Press to unlock the driver’s door.
Press again to unlock all doors and tailgate.
Press and hold until the windows are fully open.F To enable, go to Settings > Vehicle > Remote Lock, Unlock, Start.
Press and hold the Lock/Unlock button for 1 second to fold/unfold the power mirrors.F To enable, go to Settings > Vehicle > Comfort and Convenience.
Power ReleaseF/Power TailgateF
Press twice to lower the tailgate.
To raise the power tailgateF, press once and then press again and hold until the tailgate is fully closed.
Vehicle Locator/Panic Alarm
Press and release to locate your vehicle. The exterior lamps flash and the horn chirps 3 times.
Press and hold to activate the alarm. Press again to cancel the alarm.
Remote Vehicle StartF
Press and release the Lock button and then press and hold the button until the turn signal lamps flash to start the engine from outside the vehicle. After entering the vehicle, turn on the ignition.
To cancel a remote start, press and hold the button until the parking lamps turn off.
See Keys, Doors and Windows in your Owner’s Manual.
Page 5 of 24

5
STARTING THE VEHICLE
With the vehicle in Park or Neutral, rotate the key clockwise to the Start position.
TURNING OFF THE VEHICLE
Shift to Park.
Push the key all the way in (1) and then rotate the key counter-clockwise to the Lock/Off position (2).
See Driving and Operating in your Owner’s Manual.
The Remote Keyless Entry transmitter must be in the vehicle to turn on t\
he ignition.
STARTING THE ENGINE/ON
With the transmission in Park or Neutral, press and hold the brake pedal and then press the ENGINE START/STOP button to start the engine. The green button indi-cator will illuminate.
Note: If the Remote Keyless Entry transmitter battery is weak, place the transmitter in the pocket in the center storage compartment (under the bench seat) or center console cupholders (bucket seats) to enable the engine to start. Replace the transmitter battery as soon as possible.
STOPPING THE ENGINE/OFF
Shift to Park and press the ENGINE START/STOP button to turn off the engine. The green button indicator will turn off.
Power will be available for 10 minutes to operate the audio system until\
the driver’s door is opened and to operate the windows and sunroofF until any door is opened.
ACCESSORY MODE
With the engine off and the brake pedal not depressed, press the ENGINE START/STOP button to place the ignition in accessory mode to operate the radio, win\
dows and other accessories with the engine off. The amber button indicator will i\
lluminate.
See Driving and Operating in your Owner’s Manual.
F Optional equipment
KEYLESS (PUSHBUTTON) STARTF
KEYED IGNITION SYSTEM (If EquIppEd)
2
1
Page 7 of 24

7
FRONT SEAT STORAGEF
SEAT ADJUSTMENTS
A. Seat Cushion Adjustment
Move the horizontal control to move the seat forward or rearward and to tilt, raise or lower the seat.
B. Seatback Adjustment
Move the vertical control to recline or raise the seatback.
C. Lumbar Adjustment
Move the rear control to adjust the lumbar support.
SET MEMORY POSITIONS
1. With the vehicle in Park, adjust the driver’s seat and power outside mirrorsF to the desired positions.
2. Press and release the SET button on the driver’s door. A beep will sound.
3. Immediately press and hold button 1 or 2 until two beeps sound. Use the button that matches the Driver Information Center welcome message indicating driver \
1 or 2 (key fob 1 or 2).
To store a seat position for more clearance when exiting the vehicle, re\
peat these steps using the Exit button instead of button 1 or 2.
RECALL POSITIONS Press and hold button 1 or 2 or Exit until the set position is reached.
The memory/exit positions can be programmed to be recalled automatically\
when the ignition is turned on/off (for exit recall, the driver’s door must b\
e opened).
To set the automatic recall options, go to Settings > Vehicle > Seating \
Position > Set Entry Memory and Set Exit Memory.
POWER FRONT SEATSF
See Seats and Restraints in your Owner’s Manual.
The bench seat has a foldable center seatback and may have a center stor\
age compartmentF.
Fold down the center seatback to access the storage compartment and cuph\
olders. Press the latch and lift to open the storage compartment.
The bucket seats have a center console with a storage compartment.
Press the latch and lift to open the storage compartment.
See Seats and Restraints in your Owner’s Manual.
F Optional equipment
AC
B
Page 9 of 24

9F Optional equipment
HEATED/VENTILATED FRONT SEATSF
AUTO HEATED SEATS
When the vehicle is on, the automatic heated seats will activate based o\
n the vehicle’s interior temperature. Turn off the seats using the heated seat buttons o\
n the center of the instrument panel.
To enable the auto heated seats, go to Settings > Vehicle > Climate and \
Air Quality > Auto Heated Seats.
See Seats and Restraints in your Owner’s Manual.
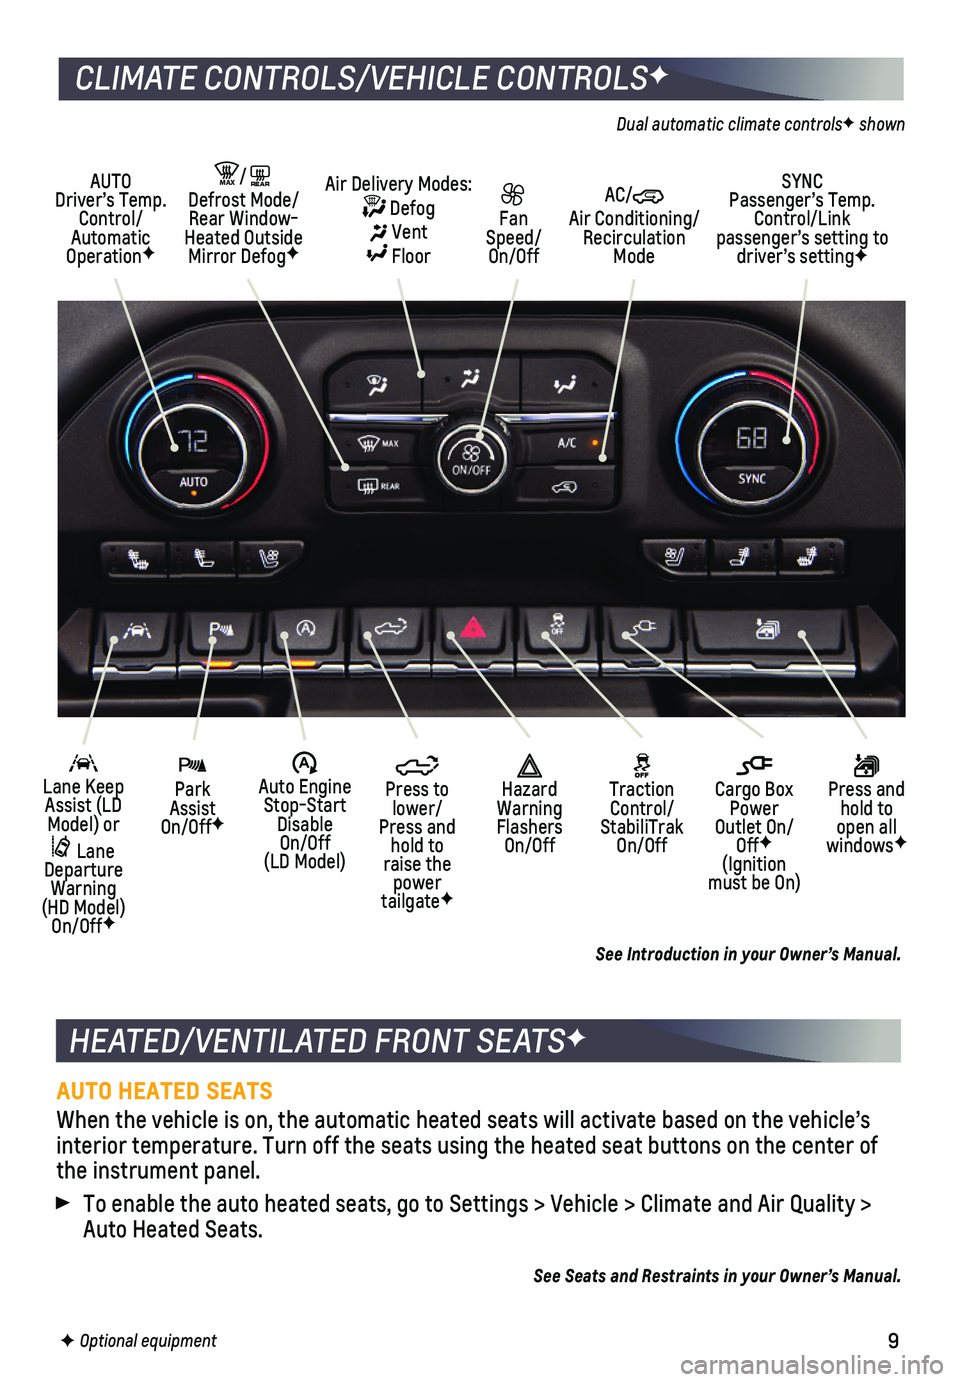
CLIMATE CONTROLS/VEHICLE CONTROLSF
AUTO Driver’s Temp. Control/Automatic OperationF
SYNC Passenger’s Temp. Control/Link passenger’s setting to driver’s settingF
AC/ Air Conditioning/ Recirculation Mode
Fan Speed/ On/Off
MAX/REAR Defrost Mode/Rear Window-Heated Outside Mirror DefogF
Air Delivery Modes: Defog Vent Floor
Park Assist On/OffF
Lane Keep Assist (LD Model) or
Lane Departure Warning (HD Model) On/OffF
Press and hold to open all windowsF
�$ Auto Engine Stop-Start Disable On/Off (LD Model)
Press to lower/Press and hold to raise the power tailgateF
Cargo Box Power Outlet On/OffF (Ignition must be On)
Hazard Warning Flashers On/Off
Traction Control/ StabiliTrak On/Off
Dual automatic climate controlsF shown
See Introduction in your Owner’s Manual.
Page 15 of 24

15
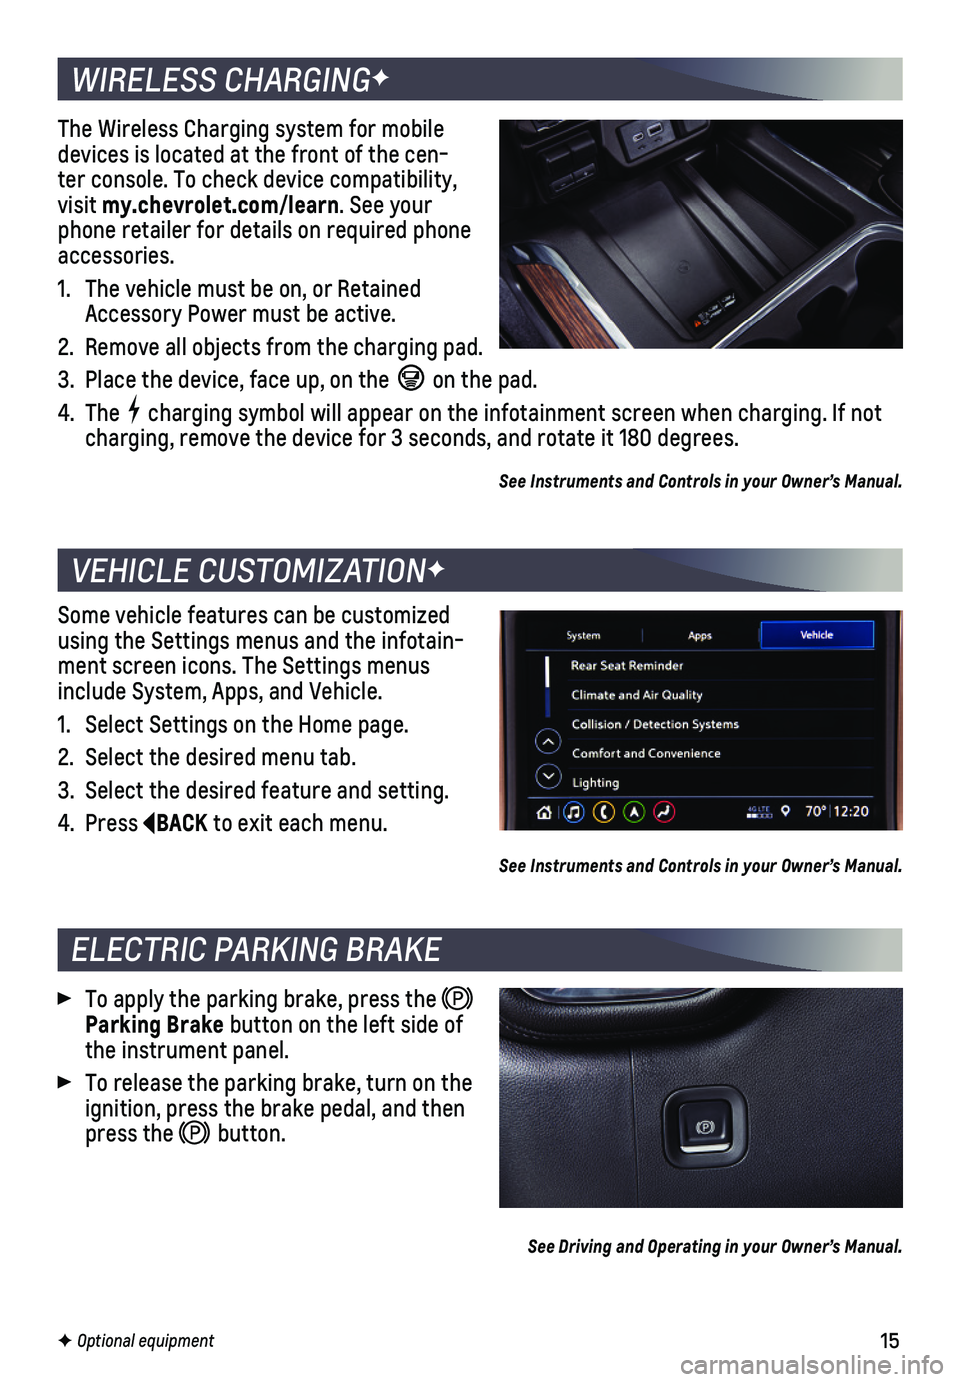
WIRELESS CHARGINGF
VEHICLE CUSTOMIZATIONF
The Wireless Charging system for mobile devices is located at the front of the cen-ter console. To check device compatibility, visit my.chevrolet.com/learn. See your phone retailer for details on required phone accessories.
1. The vehicle must be on, or Retained Accessory Power must be active.
2. Remove all objects from the charging pad.
3. Place the device, face up, on the on the pad.
4. The charging symbol will appear on the infotainment screen when charging. If\
not charging, remove the device for 3 seconds, and rotate it 180 degrees.
See Instruments and Controls in your Owner’s Manual.
Some vehicle features can be customized using the Settings menus and the infotain-ment screen icons. The Settings menus include System, Apps, and Vehicle.
1. Select Settings on the Home page.
2. Select the desired menu tab.
3. Select the desired feature and setting.
4. Press BACK to exit each menu.
See Instruments and Controls in your Owner’s Manual.
F Optional equipment
To apply the parking brake, press the Parking Brake button on the left side of the instrument panel.
To release the parking brake, turn on the ignition, press the brake pedal, and then press the button.
See Driving and Operating in your Owner’s Manual.
ELECTRIC PARKING BRAKE
Page 22 of 24

22
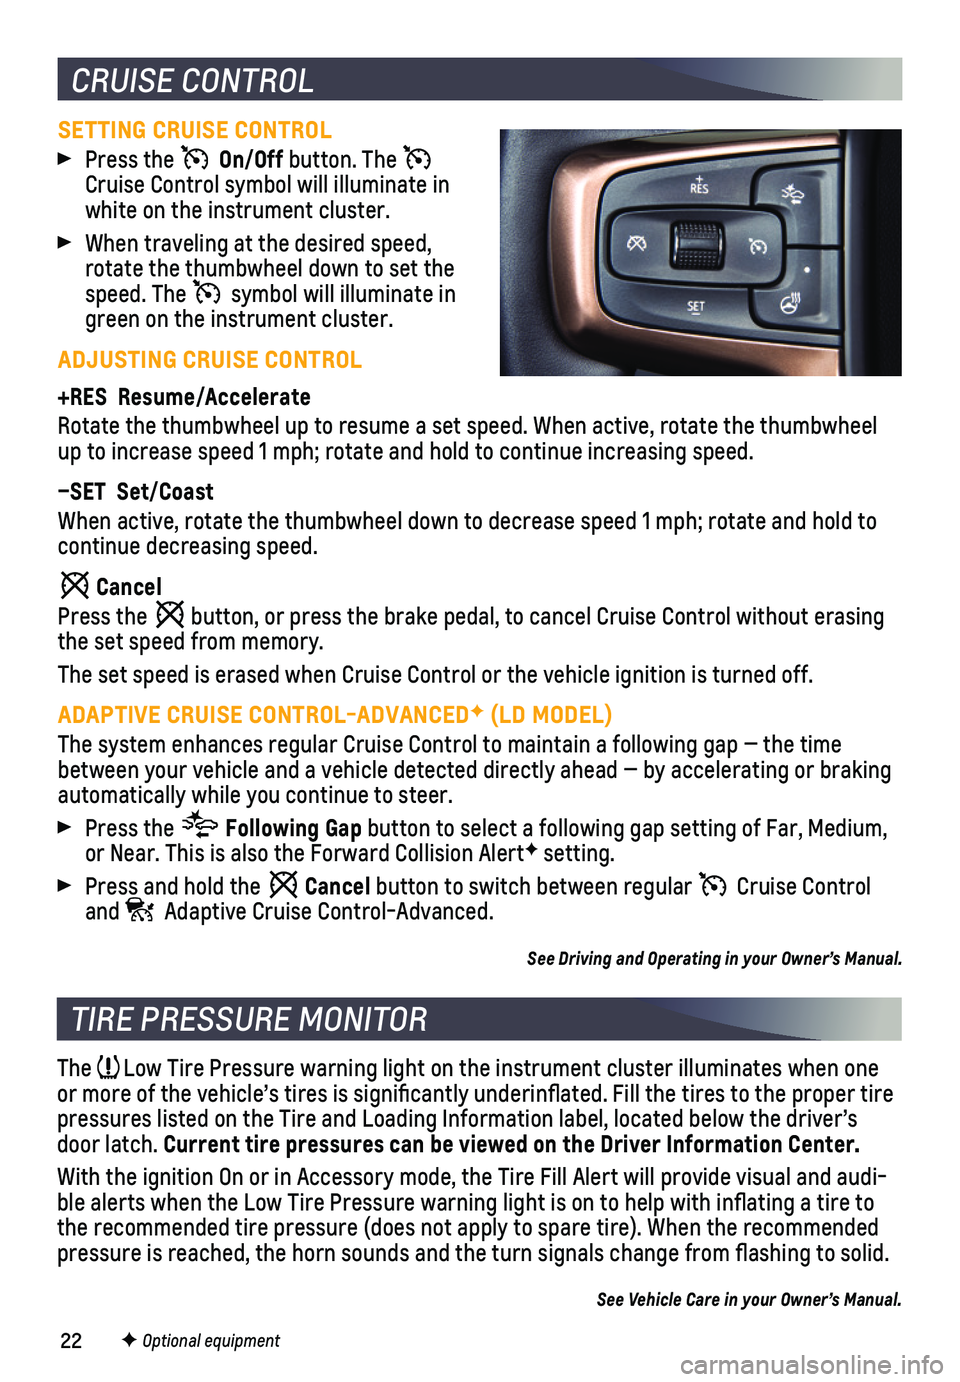
CRUISE CONTROL
SETTING CRUISE CONTROL
Press the On/Off button. The Cruise Control symbol will illuminate in white on the instrument cluster.
When traveling at the desired speed, rotate the thumbwheel down to set the speed. The symbol will illuminate in green on the instrument cluster.
ADJUSTING CRUISE CONTROL
+RES Resume/Accelerate
Rotate the thumbwheel up to resume a set speed. When active, rotate the \
thumbwheel up to increase speed 1 mph; rotate and hold to continue increasing speed\
.
–SET Set/Coast
When active, rotate the thumbwheel down to decrease speed 1 mph; rotate \
and hold to continue decreasing speed.
Cancel
Press the button, or press the brake pedal, to cancel Cruise Control without erasi\
ng the set speed from memory.
The set speed is erased when Cruise Control or the vehicle ignition is t\
urned off.
ADAPTIVE CRUISE CONTROL-ADVANCEDF (LD MODEL)
The system enhances regular Cruise Control to maintain a following gap —\
the time between your vehicle and a vehicle detected directly ahead — by accel\
erating or braking automatically while you continue to steer.
Press the Following Gap button to select a following gap setting of Far, Medium, or Near. This is also the Forward Collision AlertF setting.
Press and hold the Cancel button to switch between regular Cruise Control and Adaptive Cruise Control-Advanced.
See Driving and Operating in your Owner’s Manual.
TIRE PRESSURE MONITOR
The Low Tire Pressure warning light on the instrument cluster illuminates wh\
en one or more of the vehicle’s tires is significantly underinflated. Fi\
ll the tires to the proper tire pressures listed on the Tire and Loading Information label, located belo\
w the driver’s door latch. Current tire pressures can be viewed on the Driver Information Center.
With the ignition On or in Accessory mode, the Tire Fill Alert will prov\
ide visual and audi-ble alerts when the Low Tire Pressure warning light is on to help with i\
nflating a tire to the recommended tire pressure (does not apply to spare tire). When the\
recommended pressure is reached, the horn sounds and the turn signals change from fl\
ashing to solid.
See Vehicle Care in your Owner’s Manual.
F Optional equipment