2020 CHEVROLET SILVERADO brake
[x] Cancel search: brakePage 2 of 24

2
INSTRUMENT PANEL
Cruise Control/ Forward Collision AlertF/Heated Steering WheelF Buttons
Electric Parking Brake Switch
Power MirrorF/Window Buttons
Driver Information Center ControlsF/Voice Recognition Buttons
Audio Volume Control (behind steering wheel)
Steering Wheel Adjustment Lever
Audio Next/Previous Favorite Station Controls (behind steering wheel)
Exterior/Instrument Panel/Cargo Lamp Controls
4WD ControlsF/Drive Mode Control
Turn Signal/Windshield Wipers Lever
Range Selection Mode Buttons
Driver Information Center
HUD ControlsF (behind steering wheel)
Low Fuel
Traction Control Off
Brake System
Cruise Control
StabiliTrak Active
StabiliTrak Off
Forward Collision Alert
Security
PARK Electric Parking Brake
Electric Parking Brake Service
Lights On Reminder
Airbag Readiness
Engine Oil Pressure
Check Engine
Lane Keep Assist (LD Model)
SYMBOLS
LD gasoline model shown
Page 3 of 24
3
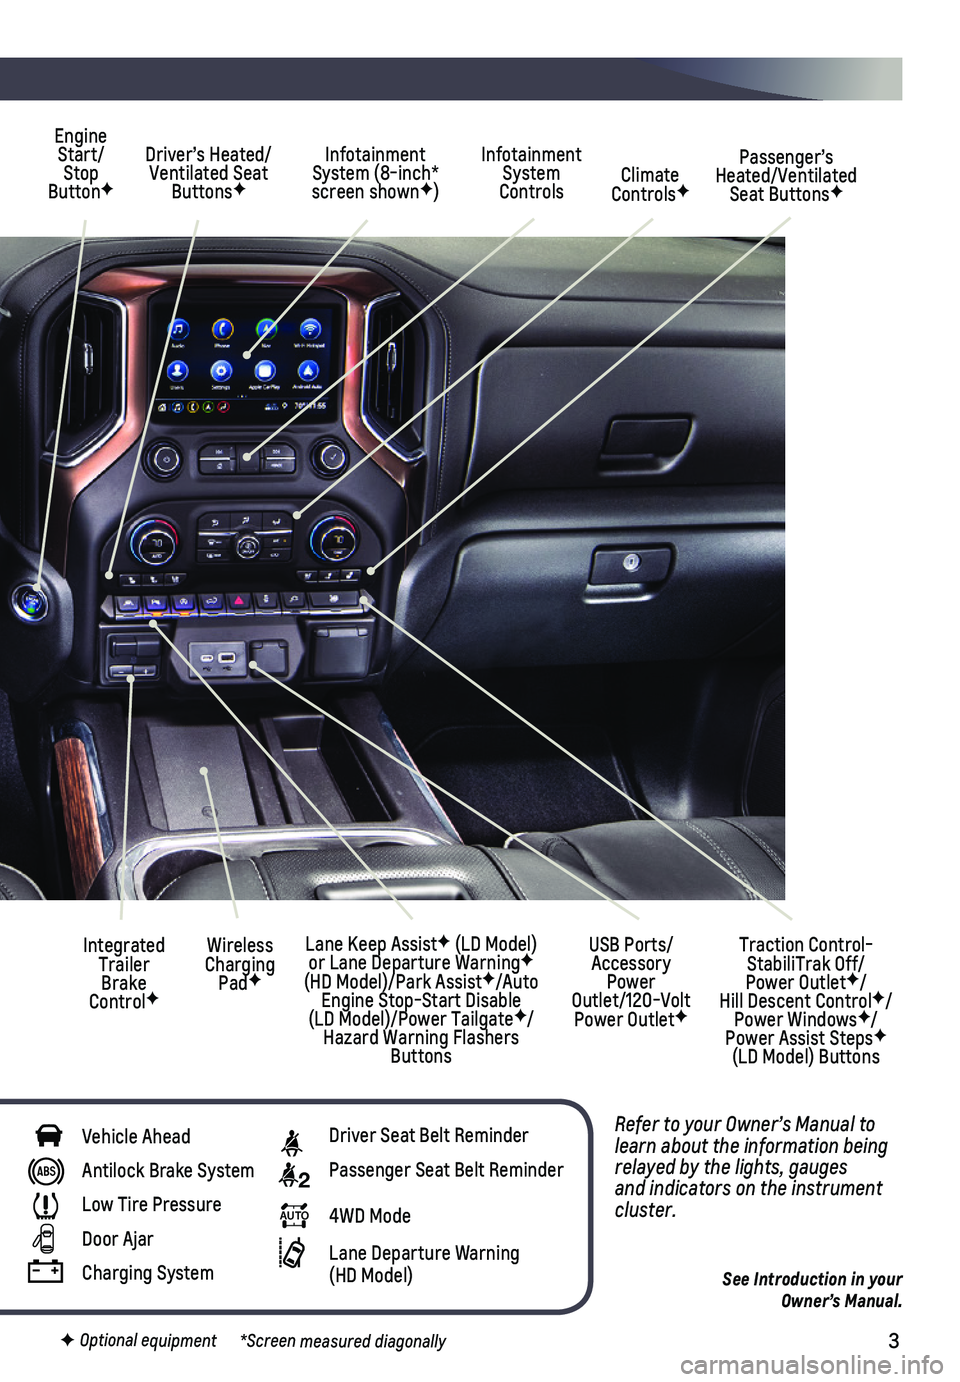
Refer to your Owner’s Manual to learn about the information being relayed by the lights, gauges and indicators on the instrument cluster.
See Introduction in your Owner’s Manual.
Driver’s Heated/Ventilated Seat ButtonsF
Infotainment System (8-inch* screen shownF)
Passenger’s Heated/Ventilated Seat ButtonsF
Infotainment System Controls Climate ControlsF
USB Ports/ Accessory Power Outlet/120-Volt Power OutletF
Engine Start/Stop ButtonF
Integrated Trailer Brake ControlF
Wireless Charging PadF
Lane Keep AssistF (LD Model) or Lane Departure WarningF (HD Model)/Park AssistF/Auto Engine Stop-Start Disable (LD Model)/Power TailgateF/Hazard Warning Flashers Buttons
F Optional equipment *Screen measured diagonally
Traction Control-StabiliTrak Off/ Power OutletF/ Hill Descent ControlF/Power WindowsF/Power Assist StepsF (LD Model) Buttons
Vehicle Ahead
Antilock Brake System
Low Tire Pressure
Door Ajar
Charging System
Driver Seat Belt Reminder
2 Passenger Seat Belt Reminder
AUTO 4WD Mode
Lane Departure Warning (HD Model)
Page 5 of 24

5
STARTING THE VEHICLE
With the vehicle in Park or Neutral, rotate the key clockwise to the Start position.
TURNING OFF THE VEHICLE
Shift to Park.
Push the key all the way in (1) and then rotate the key counter-clockwise to the Lock/Off position (2).
See Driving and Operating in your Owner’s Manual.
The Remote Keyless Entry transmitter must be in the vehicle to turn on t\
he ignition.
STARTING THE ENGINE/ON
With the transmission in Park or Neutral, press and hold the brake pedal and then press the ENGINE START/STOP button to start the engine. The green button indi-cator will illuminate.
Note: If the Remote Keyless Entry transmitter battery is weak, place the transmitter in the pocket in the center storage compartment (under the bench seat) or center console cupholders (bucket seats) to enable the engine to start. Replace the transmitter battery as soon as possible.
STOPPING THE ENGINE/OFF
Shift to Park and press the ENGINE START/STOP button to turn off the engine. The green button indicator will turn off.
Power will be available for 10 minutes to operate the audio system until\
the driver’s door is opened and to operate the windows and sunroofF until any door is opened.
ACCESSORY MODE
With the engine off and the brake pedal not depressed, press the ENGINE START/STOP button to place the ignition in accessory mode to operate the radio, win\
dows and other accessories with the engine off. The amber button indicator will i\
lluminate.
See Driving and Operating in your Owner’s Manual.
F Optional equipment
KEYLESS (PUSHBUTTON) STARTF
KEYED IGNITION SYSTEM (If EquIppEd)
2
1
Page 6 of 24

6F Optional equipment
STEERING WHEEL ADJUSTMENTF
With the vehicle parked, pull the lever under the steering column to adjust the steering wheel up or down and closer or farther away.F Push up the lever to lock the steering wheel in place.
See Instruments and Controls in your Owner’s Manual.
AUTO ENGINE STOP/START OPERATION (Ld ModEL)
To help conserve fuel, the auto engine stop/start system may automatical\
ly stop the engine, if operating conditions are met, when the brake pedal is pressed\
and the vehicle is at a complete stop. The tachometer gauge will read AUTO STOP. The aud\
io system, climate controls and other accessories will continue to operate. When the brake pedal is released or the accelerator pedal is pressed, the engine will automatically restart. After parking the vehicle and turn-ing off the engine, the tachometer gauge will read OFF.
The engine may remain running or restart when the vehicle is stopped if:
• A minimum vehicle speed is not reached.
• The engine or transmission is not at the required operating temperature.\
• The outside temperature is not in the required operating range.
• The shift lever is in any gear other than Drive (D).
• The battery charge is low.
• The climate control system requires the engine to run based on the curre\
nt settings.
• The Auto Stop has reached the maximum allowed time.
AUTO ENGINE STOP/START DISABLE
Press the �$ button on the center of the instrument panel when the engine is run-ning to disable the auto engine stop/start system. The button indicator \
will turn off.
The auto engine stop/start system is enabled each time the vehicle is st\
arted.
See Driving and Operating in your Owner’s Manual.
Page 15 of 24
15
WIRELESS CHARGINGF
VEHICLE CUSTOMIZATIONF
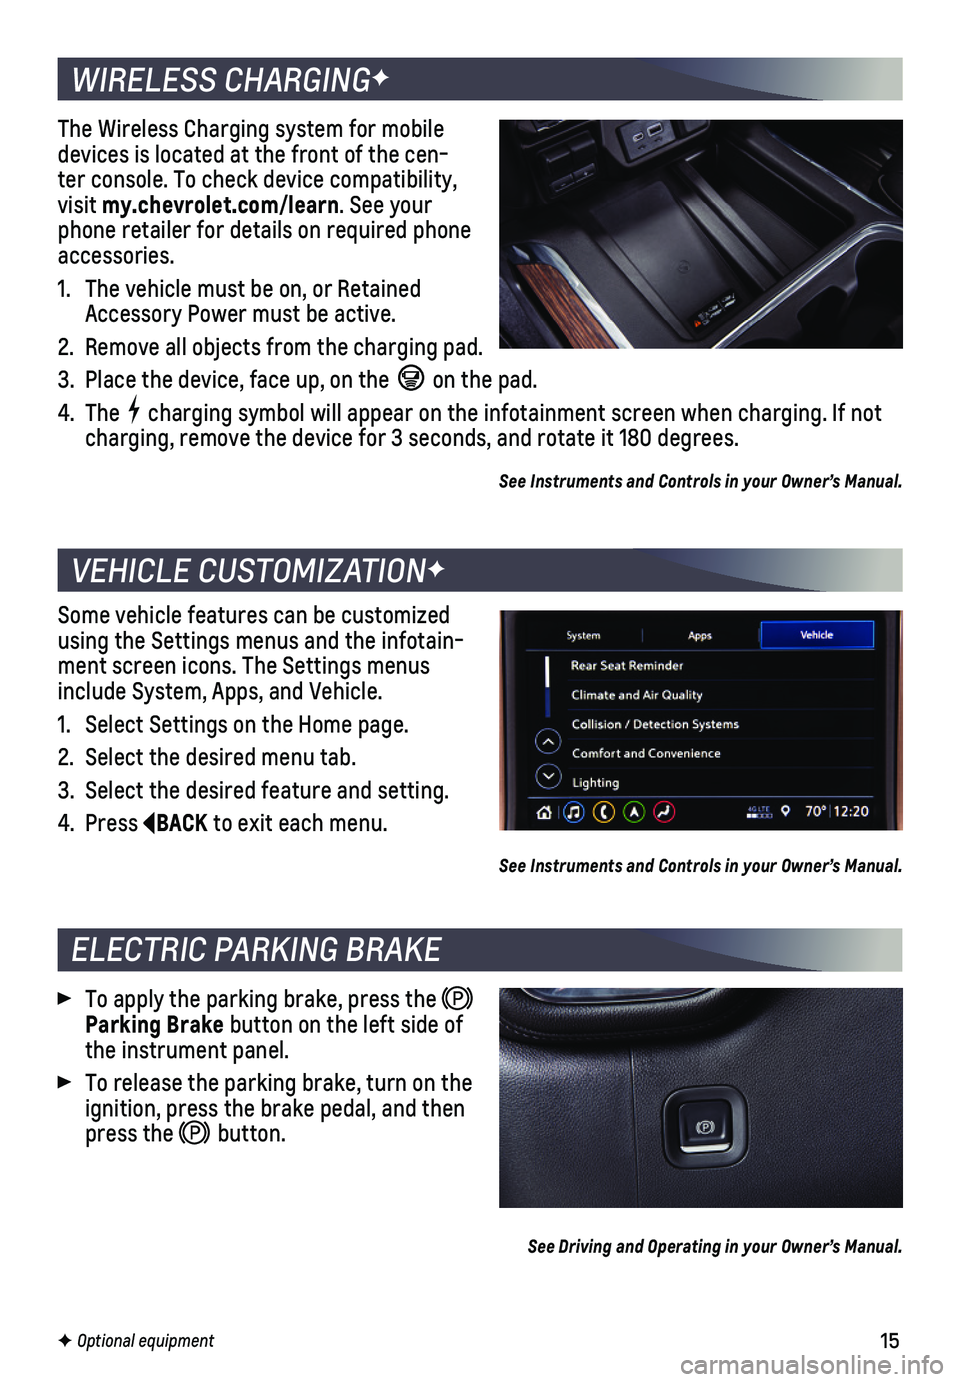
The Wireless Charging system for mobile devices is located at the front of the cen-ter console. To check device compatibility, visit my.chevrolet.com/learn. See your phone retailer for details on required phone accessories.
1. The vehicle must be on, or Retained Accessory Power must be active.
2. Remove all objects from the charging pad.
3. Place the device, face up, on the on the pad.
4. The charging symbol will appear on the infotainment screen when charging. If\
not charging, remove the device for 3 seconds, and rotate it 180 degrees.
See Instruments and Controls in your Owner’s Manual.
Some vehicle features can be customized using the Settings menus and the infotain-ment screen icons. The Settings menus include System, Apps, and Vehicle.
1. Select Settings on the Home page.
2. Select the desired menu tab.
3. Select the desired feature and setting.
4. Press BACK to exit each menu.
See Instruments and Controls in your Owner’s Manual.
F Optional equipment
To apply the parking brake, press the Parking Brake button on the left side of the instrument panel.
To release the parking brake, turn on the ignition, press the brake pedal, and then press the button.
See Driving and Operating in your Owner’s Manual.
ELECTRIC PARKING BRAKE
Page 17 of 24
17F Optional equipment
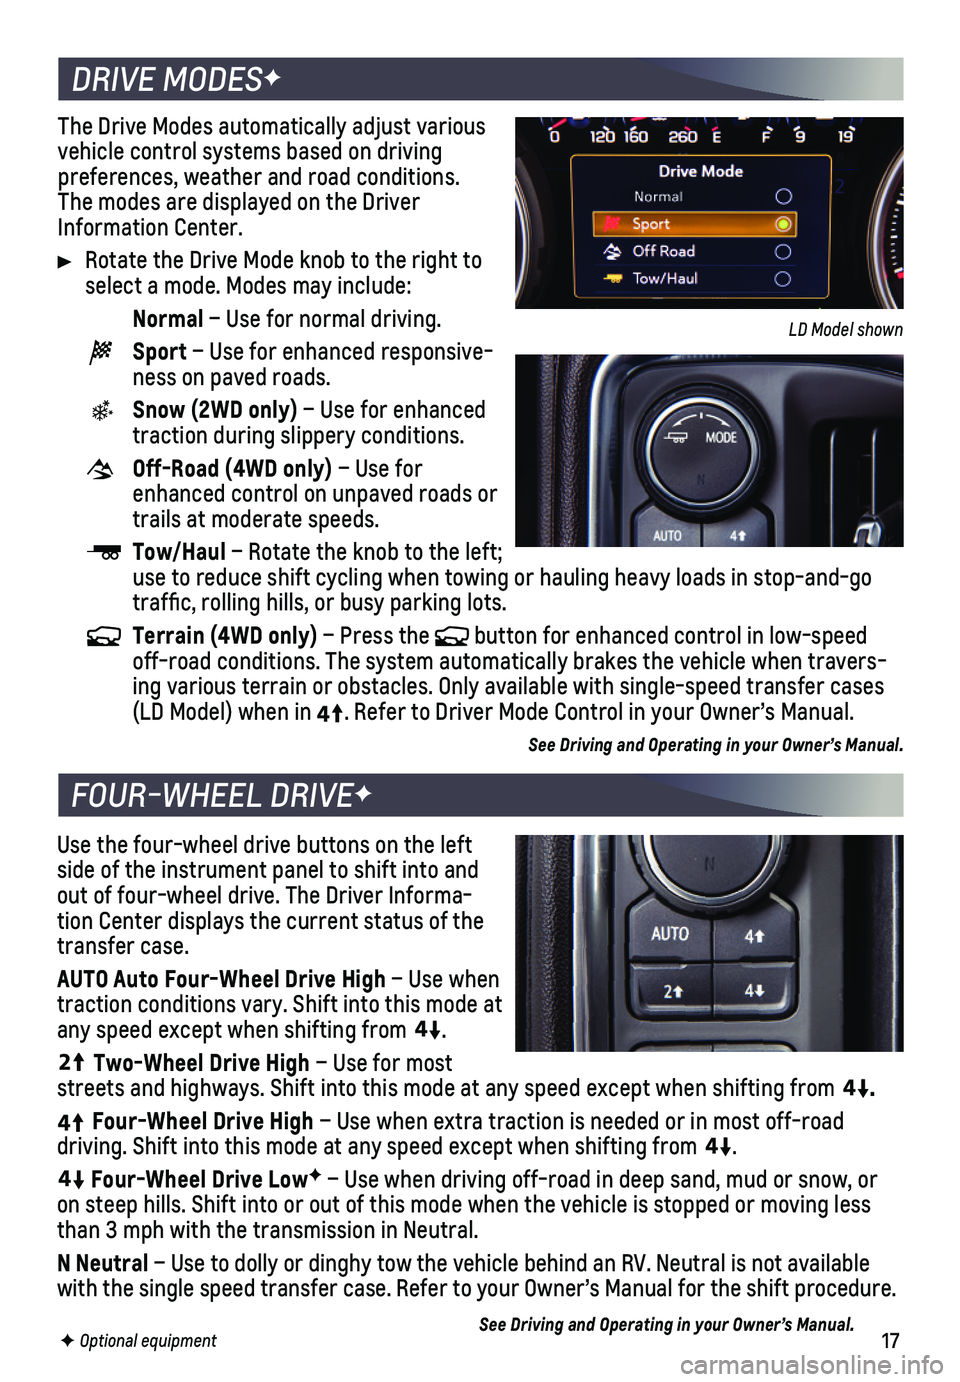
The Drive Modes automatically adjust various vehicle control systems based on driving preferences, weather and road conditions. The modes are displayed on the Driver Information Center.
Rotate the Drive Mode knob to the right to select a mode. Modes may include:
Normal – Use for normal driving.
Sport – Use for enhanced responsive-ness on paved roads.
Snow (2WD only) – Use for enhanced traction during slippery conditions.
Off-Road (4WD only) – Use for enhanced control on unpaved roads or trails at moderate speeds.
Tow/Haul – Rotate the knob to the left; use to reduce shift cycling when towing or hauling heavy loads in stop-a\
nd-go traffic, rolling hills, or busy parking lots.
Terrain (4WD only) – Press the button for enhanced control in low-speed off-road conditions. The system automatically brakes the vehicle when tr\
avers-ing various terrain or obstacles. Only available with single-speed trans\
fer cases (LD Model) when in4
4
2
. Refer to Driver Mode Control in your Owner’s Manual.
See Driving and Operating in your Owner’s Manual.
Use the four-wheel drive buttons on the left side of the instrument panel to shift into and out of four-wheel drive. The Driver Informa-tion Center displays the current status of the transfer case.
AUTO Auto Four-Wheel Drive High – Use when traction conditions vary. Shift into this mode at any speed except when shifting from
4
4
2
.
44
2
Two-Wheel Drive High – Use for most streets and highways. Shift into this mode at any speed except when shif\
ting from
44
2
.
4
4
2
Four-Wheel Drive High – Use when extra traction is needed or in most off-road
driving. Shift into this mode at any speed except when shifting from
44
2
.
44
2
Four-Wheel Drive LowF – Use when driving off-road in deep sand, mud or snow, or on steep hills. Shift into or out of this mode when the vehicle is stopp\
ed or moving less than 3 mph with the transmission in Neutral.
N Neutral – Use to dolly or dinghy tow the vehicle behind an RV. Neutral is no\
t available with the single speed transfer case. Refer to your Owner’s Manual for\
the shift procedure.
See Driving and Operating in your Owner’s Manual.
DRIVE MODESF
FOUR-WHEEL DRIVEF
LD Model shown
Page 18 of 24
18F Optional equipment
DRIVER ASSISTANCE SYSTEMSF
Safety or driver assistance features are no substitute for the driver’\
s responsibility to operate the vehicle in a safe manner. The driver should remain attentive to traffic, surroundings and road conditions at all times. Read your Owner’s Manual for important feature limitations and information.
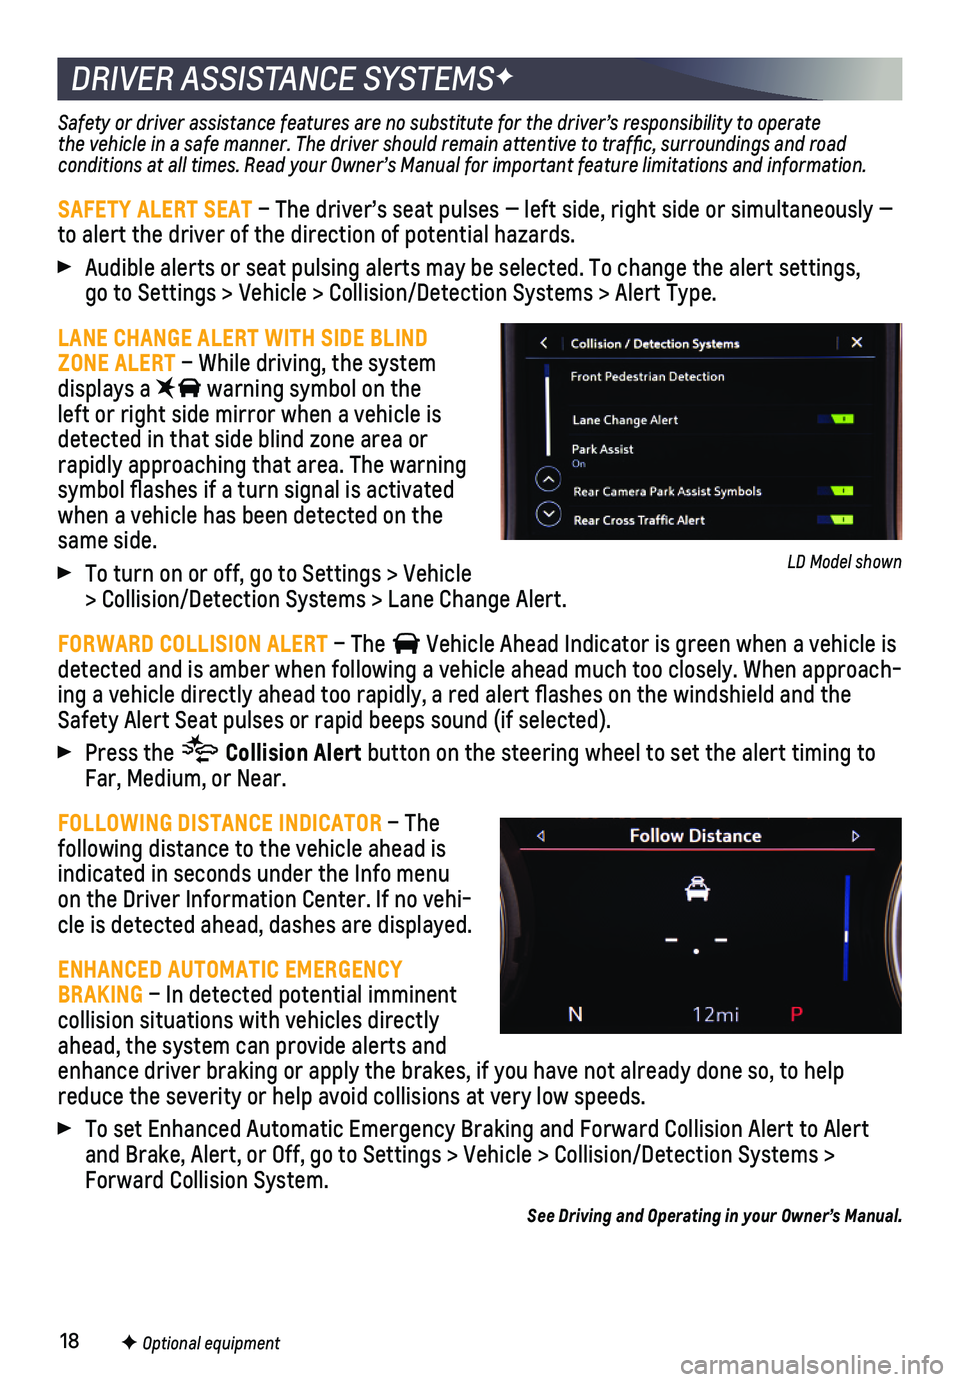
SAFETY ALERT SEAT – The driver’s seat pulses — left side, right side or simultan\
eously — to alert the driver of the direction of potential hazards.
Audible alerts or seat pulsing alerts may be selected. To change the ale\
rt settings, go to Settings > Vehicle > Collision/Detection Systems > Alert Type.
LANE CHANGE ALERT WITH SIDE BLIND ZONE ALERT – While driving, the system displays a warning symbol on the left or right side mirror when a vehicle is detected in that side blind zone area or rapidly approaching that area. The warning symbol flashes if a turn signal is activated when a vehicle has been detected on the same side.
To turn on or off, go to Settings > Vehicle > Collision/Detection Systems > Lane Change Alert.
FORWARD COLLISION ALERT – The Vehicle Ahead Indicator is green when a vehicle is detected and is amber when following a vehicle ahead much too closely. W\
hen approach-ing a vehicle directly ahead too rapidly, a red alert flashes on the w\
indshield and the Safety Alert Seat pulses or rapid beeps sound (if selected).
Press the Collision Alert button on the steering wheel to set the alert timing to Far, Medium, or Near.
FOLLOWING DISTANCE INDICATOR – The following distance to the vehicle ahead is
indicated in seconds under the Info menu on the Driver Information Center. If no vehi-cle is detected ahead, dashes are displayed.
ENHANCED AUTOMATIC EMERGENCY BRAKING – In detected potential imminent collision situations with vehicles directly ahead, the system can provide alerts and enhance driver braking or apply the brakes, if you have not already done\
so, to help reduce the severity or help avoid collisions at very low speeds.
To set Enhanced Automatic Emergency Braking and Forward Collision Alert \
to Alert and Brake, Alert, or Off, go to Settings > Vehicle > Collision/Detection\
Systems > Forward Collision System.
See Driving and Operating in your Owner’s Manual.
LD Model shown
Page 19 of 24
19F Optional equipment
DRIVER ASSISTANCE SYSTEMSF
FRONT PEDESTRIAN BRAKING (LD Model) – During daytime driving, the system can detect pedestrians directly ahead up to a distance of approximately 131 \
ft. and dis-plays an amber indicator. When approaching a detected pedestrian too quickly, a red alert flashes on the windshield and the Safety Alert Seat pulses or rapid beeps sound (if selected). The system may enhance driver braking or automatically brake\
the vehicle, if you have not already done so.
To set to Alert and Brake, Alert, or Off, go to Settings > Vehicle > Col\
lision/Detection Systems > Front Pedestrian Detection.
LANE KEEP ASSIST WITH LANE DEPARTURE WARNING (LD Model) – The system may help you avoid collisions due to unintentional lane departures. The Lane Keep Assist indicator is green if the system is available to assist. If the vehicle \
approaches a detected lane marking without using a turn signal in that direction, the system m\
ay assist by
gently turning the steering wheel and displaying an amber .
If active driver steering is not detected, the amber may flash and the Safety Alert Seat may pulse or beeps may sound (if selected) on the side of the dep\
arture direction as the lane marking is crossed. The Lane Keep Assist system does not con\
tinuously steer the vehicle; the driver needs to steer and be in complete control of the\
vehicle.
To turn on or off, press the Lane Keep Assist button on the center of the instru-ment panel.
LANE DEPARTURE WARNING (HD Model) – When crossing a detected lane marking with-out using a turn signal in that direction, the system flashes an amber\
indicator on the instrument cluster and the Safety Alert Seat pulses or beeps sound (if \
selected) on the side of the lane departure direction.
To turn on or off, press the Lane Departure Warning button on the center of the instrument panel.
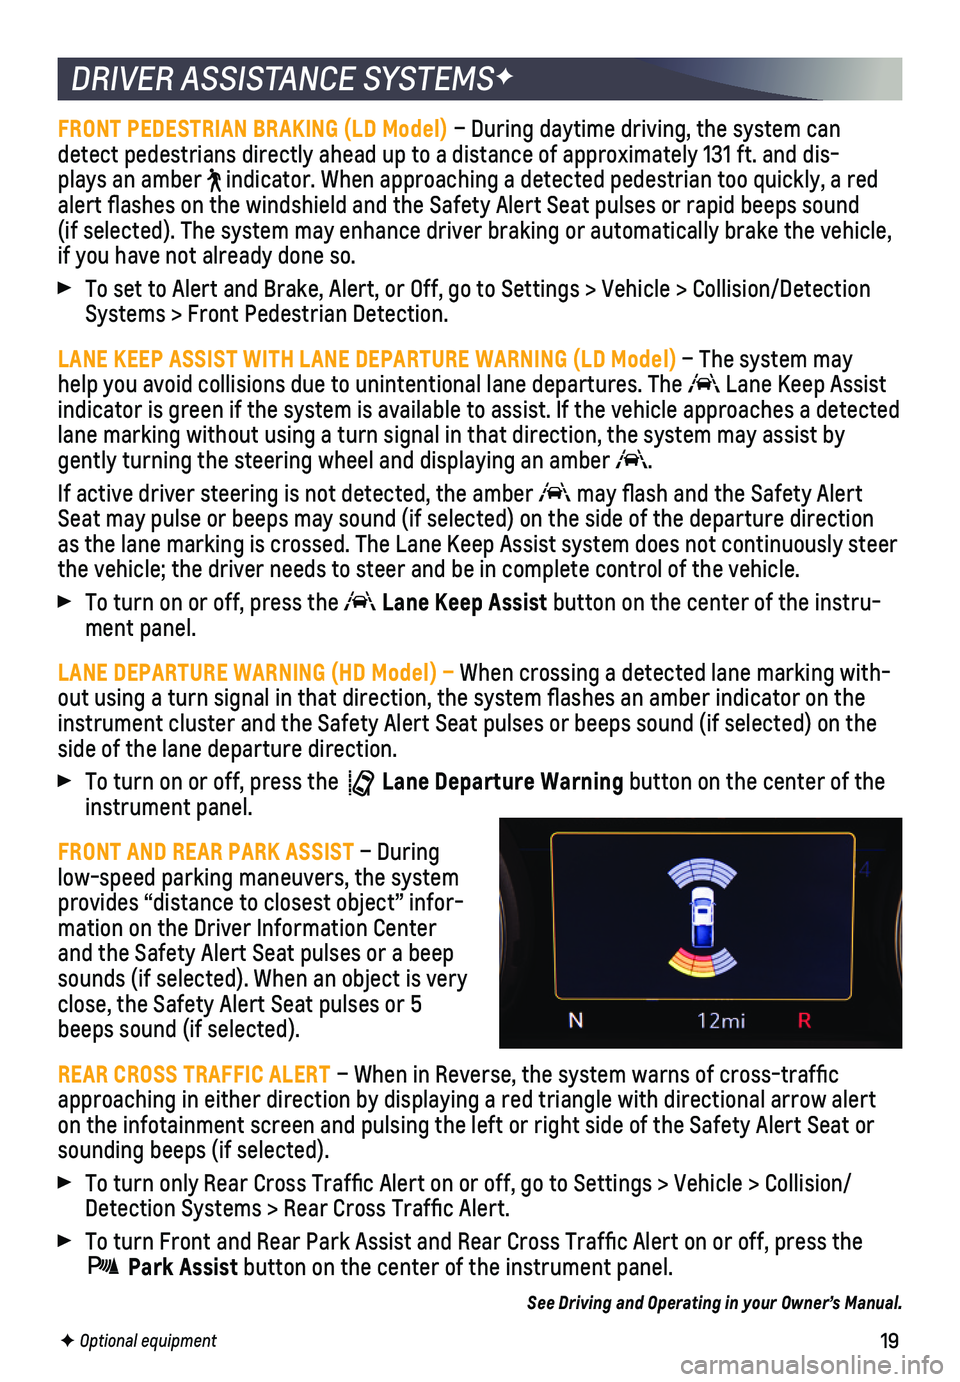
FRONT AND REAR PARK ASSIST – During low-speed parking maneuvers, the system
provides “distance to closest object” infor-mation on the Driver Information Center and the Safety Alert Seat pulses or a beep sounds (if selected). When an object is very close, the Safety Alert Seat pulses or 5 beeps sound (if selected).
REAR CROSS TRAFFIC ALERT – When in Reverse, the system warns of cross-traffic approaching in either direction by displaying a red triangle with direct\
ional arrow alert on the infotainment screen and pulsing the left or right side of the Safety Alert Seat or sounding beeps (if selected).
To turn only Rear Cross Traffic Alert on or off, go to Settings > Vehi\
cle > Collision/Detection Systems > Rear Cross Traffic Alert.
To turn Front and Rear Park Assist and Rear Cross Traffic Alert on or \
off, press the
Park Assist button on the center of the instrument panel.
See Driving and Operating in your Owner’s Manual.