2020 CHEVROLET SILVERADO 2500 AUX
[x] Cancel search: AUXPage 43 of 500
Chevrolet Silverado Owner Manual (GMNA-Localizing-U.S./Canada/Mexico-
13337620) - 2020 - CRC - 4/2/19
42 Keys, Doors, and Windows
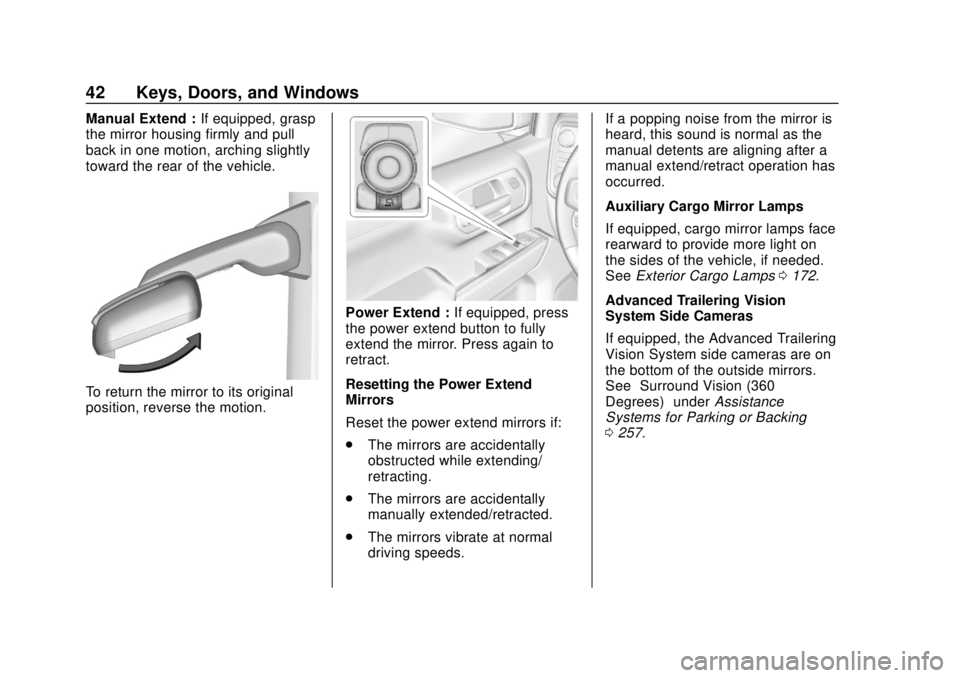
Manual Extend :If equipped, grasp
the mirror housing firmly and pull
back in one motion, arching slightly
toward the rear of the vehicle.
To return the mirror to its original
position, reverse the motion.
Power Extend : If equipped, press
the power extend button to fully
extend the mirror. Press again to
retract.
Resetting the Power Extend
Mirrors
Reset the power extend mirrors if:
. The mirrors are accidentally
obstructed while extending/
retracting.
. The mirrors are accidentally
manually extended/retracted.
. The mirrors vibrate at normal
driving speeds. If a popping noise from the mirror is
heard, this sound is normal as the
manual detents are aligning after a
manual extend/retract operation has
occurred.
Auxiliary Cargo Mirror Lamps
If equipped, cargo mirror lamps face
rearward to provide more light on
the sides of the vehicle, if needed.
See
Exterior Cargo Lamps 0172.
Advanced Trailering Vision
System Side Cameras
If equipped, the Advanced Trailering
Vision System side cameras are on
the bottom of the outside mirrors.
See “Surround Vision (360
Degrees)” underAssistance
Systems for Parking or Backing
0 257.
Page 166 of 500

Chevrolet Silverado Owner Manual (GMNA-Localizing-U.S./Canada/Mexico-
13337620) - 2020 - CRC - 4/2/19
Lighting 165
Lighting
Exterior Lighting
Exterior Lamp Controls . . . . . . . 165
Exterior Lamps OffReminder . . . . . . . . . . . . . . . . . . . 167
Headlamp High/Low-Beam Changer . . . . . . . . . . . . . . . . . . . . 167
Flash-to-Pass . . . . . . . . . . . . . . . . 168
Daytime Running Lamps (DRL) . . . . . . . . . . . . . . . 168
Automatic Headlamp System . . . . . . . . . . . . . . . . . . . . . . 168
Hazard Warning Flashers . . . . . 169
Turn and Lane-Change Signals . . . . . . . . . . . . . . . . . . . . . . 170
Fog Lamps . . . . . . . . . . . . . . . . . . . 170
Task Lighting . . . . . . . . . . . . . . . . . 171
Auxiliary Roof-Mounted Lamp . . . . . . . . 171
Exterior Cargo Lamps . . . . . . . . 172
Interior Lighting
Instrument Panel Illumination Control . . . . . . . . . . . . . . . . . . . . . . 173
Dome Lamps . . . . . . . . . . . . . . . . . 173
Reading Lamps . . . . . . . . . . . . . . 173
Lighting Features
Entry Lighting . . . . . . . . . . . . . . . . 174
Exit Lighting . . . . . . . . . . . . . . . . . . 174
Battery Load Management . . . 174
Battery Power Protection . . . . . 175
Exterior Lighting Battery Saver . . . . . . . . . . . . . . . . . . . . . . . 175Exterior Lighting
Exterior Lamp Controls
The exterior lamp control is on the
instrument panel to the left of the
steering wheel.
O: Turns off the automatic
headlamps and Daytime Running
Lamps (DRL). Turn the headlamp
control to
Oagain to turn the
automatic headlamps or DRL
back on.
Page 172 of 500
Chevrolet Silverado Owner Manual (GMNA-Localizing-U.S./Canada/Mexico-
13337620) - 2020 - CRC - 4/2/19
Lighting 171
When the headlamps are changed
to high beam, the fog lamps also go
off. When the high-beam headlamps
are turned off, the fog lamps will
come on again.
Some localities have laws that
require the headlamps to be on with
the fog lamps.
Task Lighting
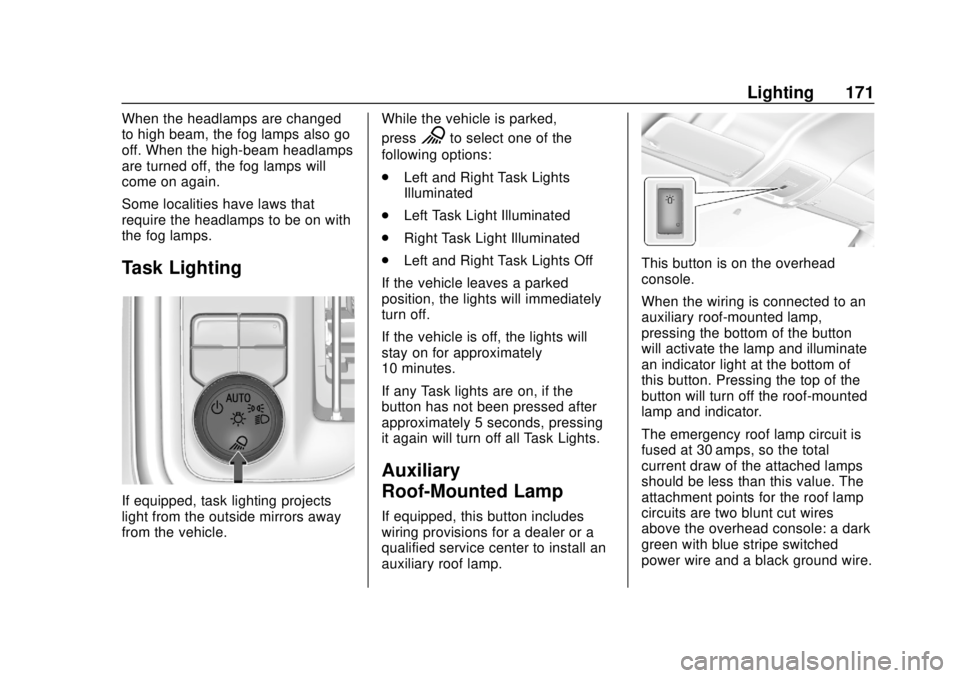
If equipped, task lighting projects
light from the outside mirrors away
from the vehicle.While the vehicle is parked,
press
Kto select one of the
following options:
. Left and Right Task Lights
Illuminated
. Left Task Light Illuminated
. Right Task Light Illuminated
. Left and Right Task Lights Off
If the vehicle leaves a parked
position, the lights will immediately
turn off.
If the vehicle is off, the lights will
stay on for approximately
10 minutes.
If any Task lights are on, if the
button has not been pressed after
approximately 5 seconds, pressing
it again will turn off all Task Lights.
Auxiliary
Roof-Mounted Lamp
If equipped, this button includes
wiring provisions for a dealer or a
qualified service center to install an
auxiliary roof lamp.
This button is on the overhead
console.
When the wiring is connected to an
auxiliary roof-mounted lamp,
pressing the bottom of the button
will activate the lamp and illuminate
an indicator light at the bottom of
this button. Pressing the top of the
button will turn off the roof-mounted
lamp and indicator.
The emergency roof lamp circuit is
fused at 30 amps, so the total
current draw of the attached lamps
should be less than this value. The
attachment points for the roof lamp
circuits are two blunt cut wires
above the overhead console: a dark
green with blue stripe switched
power wire and a black ground wire.
Page 217 of 500
Chevrolet Silverado Owner Manual (GMNA-Localizing-U.S./Canada/Mexico-
13337620) - 2020 - CRC - 4/11/19
216 Driving and Operating
Warning (Continued)
function. An ungrounded
outlet could cause an
electric shock.
. Use a weatherproof,
heavy-duty, 15 amp-rated
extension cord if needed.
Failure to use the
recommended extension
cord in good operating
condition, or using a
damaged heater or
extension cord, could make
it overheat and cause a fire,
property damage, electric
shock, and injury.
. Do not operate the vehicle
with the heater cord
permanently attached to the
(Continued)
Warning (Continued)
vehicle. Possible heater
cord and thermostat
damage could occur.
. While in use, do not let the
heater cord touch vehicle
parts or sharp edges. Never
close the hood on the
heater cord.
. Before starting the vehicle,
unplug the cord, reattach
the cover to the plug, and
securely fasten the cord.
Keep the cord away from
any moving parts.
5. Before starting the engine, be sure to unplug and store
the cord.
The length of time the heater should
remain plugged in depends on
several factors. Ask a dealer in the
area where you will be parking the
vehicle for the best advice on this.
Retained Accessory
Power (RAP)
When the ignition is turned from on
to off, the following features (if
equipped) will continue to function
for up to 10 minutes, or until the
driver door is opened. These
features will also work when the
ignition is in RUN or ACC/
ACCESSORY:
. Infotainment System
. Power Windows (during RAP
this functionality will be lost
when any door is opened)
. Sunroof (during RAP this
functionality will be lost when
any door is opened)
. Auxiliary Power Outlet
. Audio System
. OnStar System
Page 302 of 500
Chevrolet Silverado Owner Manual (GMNA-Localizing-U.S./Canada/Mexico-
13337620) - 2020 - CRC - 4/11/19
Driving and Operating 301
attaching points on the bumper;
otherwise, safety chains should be
attached to holes on the trailer hitch.
Cross the safety chains under the
tongue of the trailer to help prevent
the tongue from contacting the road
if it becomes separated from the
hitch. Always leave enough slack in
the safety chains to allow the
combination to turn. Never allow
safety chains to drag on the ground.
Trailer Brakes
Loaded trailers over 900 kg
(2,000 lb) must be equipped with
brake systems and with brakes for
each axle. Trailer braking equipment
conforming to Canadian Standards
Association (CSA) requirement
CAN3-D313, or its equivalent, is
recommended.
State or local regulations may
require trailers to have their own
braking system if the loaded weight
of the trailer exceeds certain
minimums that can vary from state
to state. Read and follow the
instructions for the trailer brakes so
they are installed, adjusted, andmaintained properly. Never attempt
to tap into your vehicle's hydraulic
brake system. If you do, both the
vehicle antilock brakes and the
trailer brakes may not function,
which could result in a crash.
Auxiliary Battery
If equipped, the vehicle's auxiliary
battery can be used to supply
electrical power to additional
equipment that may be added, such
as a slide-in camper.
Locate the auxiliary battery
connector under the hood on the
driver side of the vehicle, next to the
engine compartment fuse block.
Follow the proper installation
instructions included with any
electrical equipment that is installed.
Caution
To prevent draining the auxiliary
battery, always turn off electrical
equipment when not in use and
do not use any equipment that
(Continued)
Caution (Continued)
may exceed the
maximum amperage rating of
30 amps.
Trailer Wiring Harness
Basic Trailer Wiring
If the vehicle is not equipped with a
trailer connector on the rear bumper,
a 7-wire trailering harness is tied to
the vehicles frame. The harness
requires the installation of a trailer
connector, which is available
through your dealer.
Use only a round, seven-wire
connector with flat blade terminals
meeting SAE J2863 specifications
for proper electrical connectivity.
The seven-wire harness contains
the following trailer circuits:
Stop/Turn
Signal Left Yellow/Blue
Stop/Turn
Signal Right Green/Violet
Page 303 of 500
Chevrolet Silverado Owner Manual (GMNA-Localizing-U.S./Canada/Mexico-
13337620) - 2020 - CRC - 4/11/19
302 Driving and Operating
Tail/Parking
LampsGray/Brown
Reverse Lamps White/Green
Battery Feed Red/Green
Ground White
Electric Trailer
Brake Blue
Heavy-Duty Trailer Wiring Harness
Package
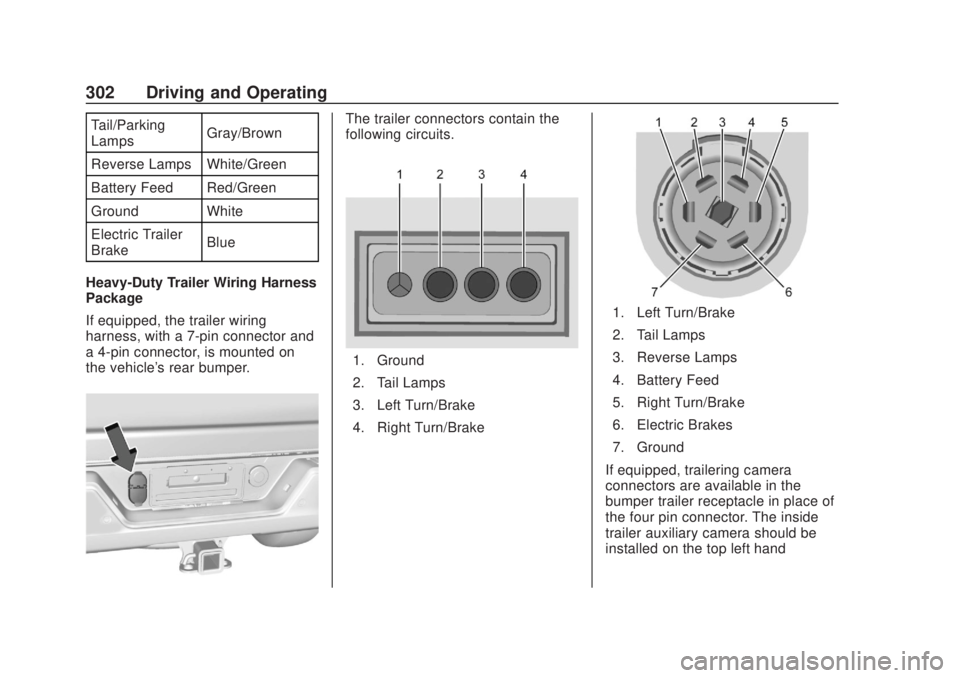
If equipped, the trailer wiring
harness, with a 7-pin connector and
a 4-pin connector, is mounted on
the vehicle's rear bumper.The trailer connectors contain the
following circuits.
1. Ground
2. Tail Lamps
3. Left Turn/Brake
4. Right Turn/Brake
1. Left Turn/Brake
2. Tail Lamps
3. Reverse Lamps
4. Battery Feed
5. Right Turn/Brake
6. Electric Brakes
7. Ground
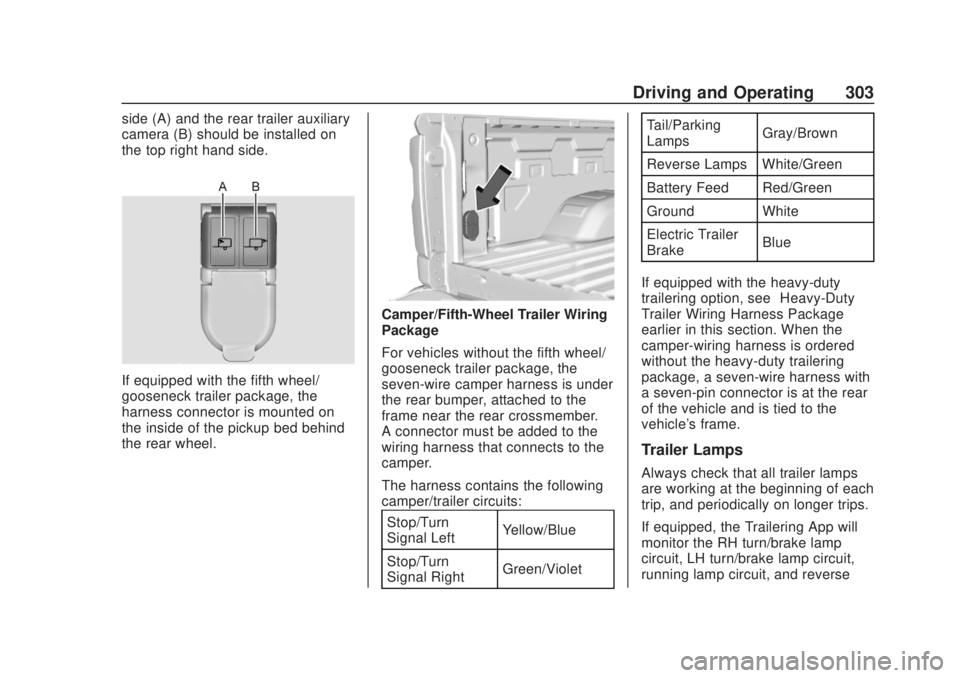
If equipped, trailering camera
connectors are available in the
bumper trailer receptacle in place of
the four pin connector. The inside
trailer auxiliary camera should be
installed on the top left hand
Page 304 of 500
Chevrolet Silverado Owner Manual (GMNA-Localizing-U.S./Canada/Mexico-
13337620) - 2020 - CRC - 4/11/19
Driving and Operating 303
side (A) and the rear trailer auxiliary
camera (B) should be installed on
the top right hand side.
If equipped with the fifth wheel/
gooseneck trailer package, the
harness connector is mounted on
the inside of the pickup bed behind
the rear wheel.
Camper/Fifth-Wheel Trailer Wiring
Package
For vehicles without the fifth wheel/
gooseneck trailer package, the
seven-wire camper harness is under
the rear bumper, attached to the
frame near the rear crossmember.
A connector must be added to the
wiring harness that connects to the
camper.
The harness contains the following
camper/trailer circuits:Stop/Turn
Signal Left Yellow/Blue
Stop/Turn
Signal Right Green/Violet Tail/Parking
Lamps
Gray/Brown
Reverse Lamps White/Green
Battery Feed Red/Green
Ground White
Electric Trailer
Brake Blue
If equipped with the heavy-duty
trailering option, see “Heavy-Duty
Trailer Wiring Harness Package”
earlier in this section. When the
camper-wiring harness is ordered
without the heavy-duty trailering
package, a seven-wire harness with
a seven-pin connector is at the rear
of the vehicle and is tied to the
vehicle's frame.
Trailer Lamps
Always check that all trailer lamps
are working at the beginning of each
trip, and periodically on longer trips.
If equipped, the Trailering App will
monitor the RH turn/brake lamp
circuit, LH turn/brake lamp circuit,
running lamp circuit, and reverse
Page 323 of 500
Chevrolet Silverado Owner Manual (GMNA-Localizing-U.S./Canada/Mexico-
13337620) - 2020 - CRC - 4/11/19
322 Driving and Operating
reminder will appear to turn on Tow/
Haul Mode when the Trailer Profile
is active.
If Tow/Haul Mode is on and this
setting is on for a Trailer Profile, the
reminder will not appear when the
Trailer Profile is active.Conversions and
Add-Ons
Add-On Electrical
Equipment
{Warning
The Data Link Connector (DLC) is
used for vehicle service
and Emission Inspection/
Maintenance testing. See
Malfunction Indicator Lamp
(Check Engine Light)0138.
A device connected to the DLC —
such as an aftermarket fleet or
driver-behavior tracking device —
may interfere with vehicle
systems. This could affect vehicle
operation and cause a crash.
Such devices may also access
information stored in the vehicle’s
systems.
Caution
Some electrical equipment can
damage the vehicle or cause
components to not work and
would not be covered by the
vehicle warranty. Always check
with your dealer before adding
electrical equipment.
Add-on equipment can drain the
vehicle's 12-volt battery, even if the
vehicle is not operating.
The vehicle has an airbag system.
Before attempting to add anything
electrical to the vehicle, see
Servicing the Airbag-Equipped
Vehicle 083 and
Adding Equipment to the
Airbag-Equipped Vehicle 083.
For information on wiring auxiliary
switches, see www.gmupfitter.com
or contact your dealer.