2020 CHEVROLET SILVERADO 2500 horn
[x] Cancel search: hornPage 119 of 500

Chevrolet Silverado Owner Manual (GMNA-Localizing-U.S./Canada/Mexico-
13337620) - 2020 - CRC - 4/2/19
118 Instruments and Controls
Instruments and
Controls
Controls
Steering Wheel Adjustment . . . 119
Steering Wheel Controls . . . . . . 120
Heated Steering Wheel . . . . . . . 120
Horn . . . . . . . . . . . . . . . . . . . . . . . . . . 120
Windshield Wiper/Washer . . . . 120
Compass . . . . . . . . . . . . . . . . . . . . . 121
Clock . . . . . . . . . . . . . . . . . . . . . . . . . 121
Power Outlets . . . . . . . . . . . . . . . . 122
Wireless Charging . . . . . . . . . . . . 124
Warning Lights, Gauges, and
Indicators
Warning Lights, Gauges, andIndicators . . . . . . . . . . . . . . . . . . . 126
Instrument Cluster . . . . . . . . . . . . 127
Speedometer . . . . . . . . . . . . . . . . . 131
Odometer . . . . . . . . . . . . . . . . . . . . . 131
Trip Odometer . . . . . . . . . . . . . . . . 131
Tachometer . . . . . . . . . . . . . . . . . . . 132
Fuel Gauge . . . . . . . . . . . . . . . . . . . 132
Engine Oil Pressure Gauge . . . . . . . . . . . . . . . . . . . . . . 133
Engine Coolant Temperature Gauge . . . . . . . . . . . . . . . . . . . . . . 134 Voltmeter Gauge . . . . . . . . . . . . . 135
Seat Belt Reminders . . . . . . . . . 135
Airbag Readiness Light . . . . . . . 136
Passenger Airbag Status
Indicator . . . . . . . . . . . . . . . . . . . . 136
Charging System Light . . . . . . . 137
Malfunction Indicator Lamp (Check Engine Light) . . . . . . . . 138
Brake System Warning Light . . . . . . . . . . . . . . . . . . . . . . . . 140
Electric Parking Brake Light . . . . . . . . . . . . . . . . . . . . . . . . 140
Service Electric Parking Brake Light . . . . . . . . . . . . . . . . . . . . . . . . 141
Antilock Brake System (ABS) Warning Light . . . . . . . . . . . . . . . 141
Four-Wheel-Drive Light . . . . . . . 141
Tow/Haul Mode Light . . . . . . . . . 142
Hill Descent Control Light . . . . 142
Lane Departure Warning (LDW) Light (2500/3500
Series) . . . . . . . . . . . . . . . . . . . . . . 142
Lane Keep Assist (LKA) Light (1500 Series) . . . . . . . . . . . . . . . 142
Vehicle Ahead Indicator . . . . . . 143
Pedestrian Ahead Indicator . . . 143
Traction Off Light . . . . . . . . . . . . . 143
Traction Control System (TCS)/ Electronic Stability Control
Light . . . . . . . . . . . . . . . . . . . . . . . . 143 Electronic Stability Control
(ESC) Off Light . . . . . . . . . . . . . . 144
Engine Coolant Temperature Warning Light . . . . . . . . . . . . . . . 144
Driver Mode Control Light . . . . 145
Tire Pressure Light . . . . . . . . . . . 145
Engine Oil Pressure Light
(Uplevel Cluster) . . . . . . . . . . . . 146
Low Fuel Warning Light . . . . . . 146
Security Light . . . . . . . . . . . . . . . . . 146
High-Beam On Light . . . . . . . . . . 146
Front Fog Lamp Light . . . . . . . . . 147
Lamps On Reminder . . . . . . . . . 147
Cruise Control Light . . . . . . . . . . 147
Door Ajar Light . . . . . . . . . . . . . . . 147
Information Displays
Driver Information Center (DIC) (Base Level) . . . . . . . . . . . . . . . . 148
Driver Information Center (DIC) (Midlevel and Uplevel) . . . . . . 149
Head-Up Display (HUD) . . . . . . 152
Vehicle Messages
Vehicle Messages . . . . . . . . . . . . 155
Engine Power Messages . . . . . 156
Vehicle Speed Messages . . . . . 156
Vehicle Personalization
Vehicle Personalization . . . . . . . 156
Page 121 of 500
Chevrolet Silverado Owner Manual (GMNA-Localizing-U.S./Canada/Mexico-
13337620) - 2020 - CRC - 4/2/19
120 Instruments and Controls
Steering Wheel Controls
The infotainment system can be
operated by using the steering
wheel controls. See“Steering Wheel
Controls” in the infotainment
manual.
Heated Steering Wheel
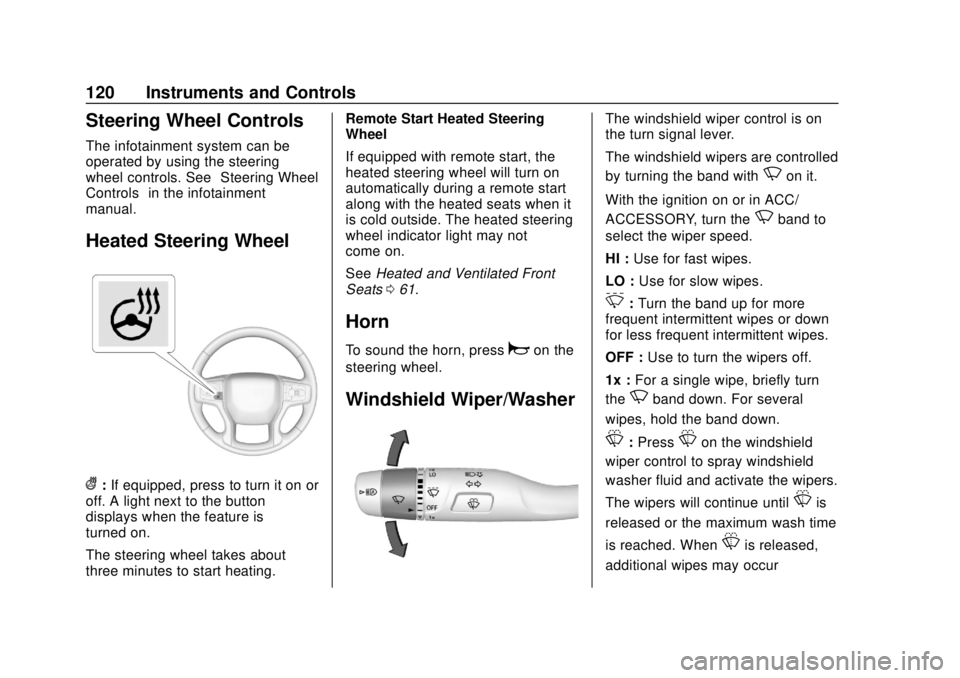
(: If equipped, press to turn it on or
off. A light next to the button
displays when the feature is
turned on.
The steering wheel takes about
three minutes to start heating. Remote Start Heated Steering
Wheel
If equipped with remote start, the
heated steering wheel will turn on
automatically during a remote start
along with the heated seats when it
is cold outside. The heated steering
wheel indicator light may not
come on.
See
Heated and Ventilated Front
Seats 061.
Horn
To sound the horn, pressaon the
steering wheel.
Windshield Wiper/Washer
The windshield wiper control is on
the turn signal lever.
The windshield wipers are controlled
by turning the band with
Non it.
With the ignition on or in ACC/
ACCESSORY, turn the
Nband to
select the wiper speed.
HI : Use for fast wipes.
LO : Use for slow wipes.
3:Turn the band up for more
frequent intermittent wipes or down
for less frequent intermittent wipes.
OFF : Use to turn the wipers off.
1x : For a single wipe, briefly turn
the
Nband down. For several
wipes, hold the band down.
L: PressLon the windshield
wiper control to spray windshield
washer fluid and activate the wipers.
The wipers will continue until
Lis
released or the maximum wash time
is reached. When
Lis released,
additional wipes may occur
Page 160 of 500
Chevrolet Silverado Owner Manual (GMNA-Localizing-U.S./Canada/Mexico-
13337620) - 2020 - CRC - 4/2/19
Instruments and Controls 159
Exit Lighting
This setting specifies how long the
headlamps stay on after the vehicle
is turned off and exited.
Touch Off, 30 Seconds, 60 Seconds,
or 120 Seconds.
Power Door Locks
Touch and the following may
display:
.Open Door Anti Lock Out
. Auto Door Unlock
. Delayed Door Lock
Open Door Anti Lock Out
This setting prevents the driver door
from locking when the door is open.
If this setting is on, the Delayed
Door Lock menu will not be
available.
Touch Off or On.
Auto Door Unlock
This setting allows selection of
which doors will automatically
unlock when the vehicle is shifted
into P (Park). Touch Off, All Doors, or Driver Door.
Delayed Door Lock
This setting delays the locking of
the vehicle’
s doors.
Touch Off or On.
Remote Lock, Unlock, Start
Touch and the following may
display:
. Remote Unlock Light Feedback
. Remote Lock Feedback
. Remote Door Unlock
. Remote Start Auto Cool Seats
. Remote Start Auto Heat Seats
. Remote Window Operation
. Passive Door Unlock
. Passive Door Lock
. Remote Left in Vehicle Alert
Remote Unlock Light Feedback
This setting flashes the exterior
lamps when the vehicle is unlocked
with the RKE transmitter.
Touch Off or Flash Lights. Remote Lock Feedback
This setting specifies how the
vehicle responds when the vehicle
is locked with the RKE transmitter.
Touch Off, Lights and Horn, Lights
Only, or Horn Only.
Remote Door Unlock
This setting specifies whether all
doors, or just the driver door, unlock
when pressing
Kon the RKE
transmitter.
Touch All Doors or Driver Door.
Remote Start Auto Cool Seats
If equipped and turned on, this
feature will turn on the ventilated
seats when using remote start on
warm days. See Heated and
Ventilated Front Seats 061 and
Remote Vehicle Start 024.
Touch Off or On.
Remote Start Auto Heat Seats
If equipped and turned on, this
feature will turn on the heated seats
when using remote start on
Page 161 of 500
Chevrolet Silverado Owner Manual (GMNA-Localizing-U.S./Canada/Mexico-
13337620) - 2020 - CRC - 4/2/19
160 Instruments and Controls
cold days. SeeHeated and
Ventilated Front Seats 061 and
Remote Vehicle Start 024.
If equipped with Auto Heated
Steering Wheel, this feature will turn
on when the Remote Start Auto
Heated Seats turn on.
Touch Off or On.
Remote Window Operation
If equipped, this feature enables
remote operation of the windows
with the RKE transmitter. See
Remote Keyless Entry (RKE)
System Operation (Key Access)
0 13 or
Remote Keyless Entry (RKE)
System Operation (Keyless Access)
0 15.
Touch Off or On.
Passive Door Unlock
This allows the selection of what
doors will unlock when using the
button on the driver door to unlock
the vehicle.
Touch Off, All Doors, or Driver
Door Only. Passive Door Lock
This allows passive locking to be
turned on or off and selects
feedback. See
Remote Keyless
Entry (RKE) System Operation (Key
Access) 013 or
Remote Keyless Entry (RKE)
System Operation (Keyless Access)
0 15.
Touch Off, On with Horn
Chirp, or On.
Remote Left in Vehicle Alert
This feature sounds an alert when
the RKE transmitter is left in the
vehicle. This menu also enables
Remote No Longer In Vehicle Alert.
Touch Off or On.
Seating Position
Touch and the following may
display:
. Seat Entry Memory
. Seat Exit Memory Seat Entry Memory
This feature automatically recalls
the previously stored 1 or 2 button
positions when the ignition is
changed from off to on or ACC/
ACCESSORY. See
Memory Seats
0 59.
Touch Off or On.
Seat Exit Memory
This feature automatically recalls
the previously stored exit button
positions when the ignition is
changed from on or ACC/
ACCESSORY to off if the driver
door is open or opened. See
Memory Seats 059.
Touch Off or On.
Teen Driver
See “Teen Driver” under“Settings”
in the infotainment manual.
Valet Mode
This will lock the infotainment
system and steering wheel controls.
It may also limit access to vehicle
storage locations, if equipped.
Page 313 of 500

Chevrolet Silverado Owner Manual (GMNA-Localizing-U.S./Canada/Mexico-
13337620) - 2020 - CRC - 4/11/19
312 Driving and Operating
Trailer Feature Setup
Tow/Haul Mode Reminder
To turn the Tow/Haul Mode
Reminder setting on, touch Yes. To
turn it off, touch No.
Trailer Tire Pressure Setup
If the Trailer Tire Pressure
Monitoring System (TTPMS) is
detected, touch the Tire Pressure
Monitoring icon to set up tire
pressure monitoring.Touch Yes to
set up the sensors or touch No to
return to the previous screen.
A trailer must be electrically
connected to the vehicle before
starting the sensor-to-vehicle learn
process.
After selecting Start from the Learn
Sensors screen, use the Tool
Method or the Manual Method
(described below) to learn each tire
sensor, during which the current tire
number will be highlighted.
Each sensor has a minimum of
two minutes to learn, shown by a
timer. After a sensor is learned, a
checkmark appears next to the tire,the vehicle horn will sound, the
vehicle’s brake lamps will flash, and
all working trailer lamps will flash.
It then moves to the next sensor.
To cancel the process touch Stop.
The recommended tire pressure
must be entered for the trailer tires.
This allows the vehicle to alert when
the tire pressure is high or low.
TTPMS must learn the location of
the installed tire sensors to show
correct air pressure and
temperature for each tire. To set up,
use one of the following options or
see a tire or trailer dealer for
service. The learning process must
be repeated when the trailer tires
are rotated or replaced. See
“Editing
a Trailer Profile” later in this section
for tire pressure sensor relearn
information.
Tool Method: A TTPMS activation
tool can be purchased separately to
learn the sensor locations.
Manual Method: Without the tool,
the air pressure can be increased or
decreased in each tire for
10 seconds. Do not exceed the maximum inflation pressure found
on the tire sidewalls. Make sure to
re-adjust tire pressure to the
recommended level when the
process is complete.
Sensor Learning Steps
To complete the sensor-to-vehicle
learn process:
1. Touch Start on the Learn Sensors screen. The horn
chirps twice and the Learning
Active screen appears on the
infotainment display.
2. Start with the driver side front trailer tire.
3. Activate the tool near the valve stem or adjust the air pressure
of this tire until the horn chirps
and all working vehicle and
trailer lights flash.
The process stops without
saving the sensor locations if
this step takes more than
two minutes.
Page 314 of 500
Chevrolet Silverado Owner Manual (GMNA-Localizing-U.S./Canada/Mexico-
13337620) - 2020 - CRC - 4/11/19
Driving and Operating 313
4. Move to the next tire andrepeat Step 3 for each sensor.
The horn chirps twice when all
sensors are completed.
5. Return to the vehicle to complete the setup.
Maintenance Reminders
To set up maintenance reminders,
touch the Trailer Maintenance icon.
Select Yes to set up the
maintenance reminders for the
Trailer Profile. Follow the on-screen
prompts. The maximum number of
reminders is 50. Select No to return
to the previous screen.
Towing Assistance
If the Transparent Trailer feature is
available, touch the Towing
Assistance icon to set up
transparent trailer.
Touch Yes to begin set up or touch
No to return to the previous screen.
Follow the on-screen instructions.
A rear trailer camera must be
mounted on the trailer and
electrically connected to the vehicle before transparent trailer feature
can be used. See
Assistance
Systems for Parking or Backing
0 257.
Trailer dimensions must be in range
and transparent trailer must be
calibrated prior to use.
Transparent Trailer Setup
To complete setup for transparent
trailer: 1. Select the number of axles on the trailer.
2. Enter trailer dimensions .Trailer Length: 300
cm (118.1 in)
–970 cm (381.8 in).
Measure from center of
coupler to furthest rear
point on the trailer.
. Trailer Width:
120 cm (47.2 in) –
260 cm (102.3 in). Measure
from left edge to right edge. .
Trailer Height:
1 cm (.39 in) –
450 cm (177.1 in). Measure
from ground to tallest point.
. Hitching Point Length:
180 cm (70.8 in)
–970 cm (381.8 in).
Measure from center of
coupler to middle of tires.
. Trailer Tongue Length:
50 cm (119.6 in) –220
cm (86.6 in). Measure from
center of coupler to trailer
front wall.
. Vehicle Hitch Height:
10 cm (3.9 in) –
100 cm (39.3 in). Measure
from ground to top of
coupler.
. Vehicle Hitch Length:
10 cm (3.9 in) –
100 cm;(39.3 in). Measure
from hitch receiver to center
of ball.
3. If trailer dimensions are out of range, this feature will be
unavailable. Select OK to
return.
Page 374 of 500
Chevrolet Silverado Owner Manual (GMNA-Localizing-U.S./Canada/Mexico-
13337620) - 2020 - CRC - 4/10/19
Vehicle Care 373
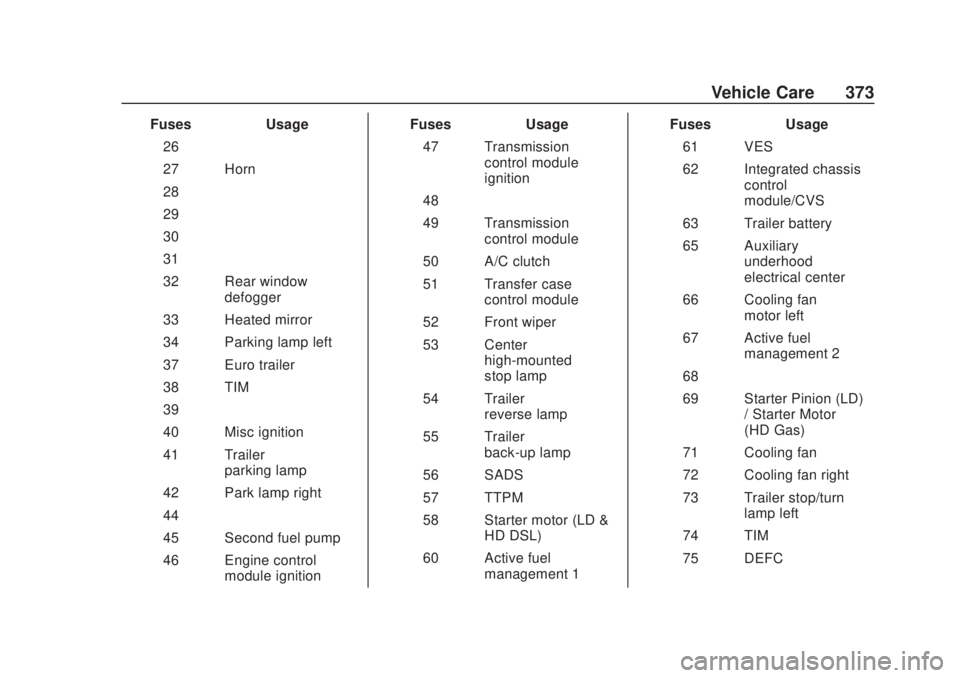
FusesUsage
26 –
27 Horn
28 –
29 –
30 –
31 –
32 Rear window defogger
33 Heated mirror
34 Parking lamp left
37 Euro trailer
38 TIM
39 –
40 Misc ignition
41 Trailer parking lamp
42 Park lamp right
44 –
45 Second fuel pump
46 Engine control module ignition Fuses
Usage
47 Transmission control module
ignition
48 –
49 Transmission control module
50 A/C clutch
51 Transfer case control module
52 Front wiper
53 Center high-mounted
stop lamp
54 Trailer reverse lamp
55 Trailer back-up lamp
56 SADS
57 TTPM
58 Starter motor (LD & HD DSL)
60 Active fuel management 1 Fuses
Usage
61 VES
62 Integrated chassis control
module/CVS
63 Trailer battery
65 Auxiliary underhood
electrical center
66 Cooling fan motor left
67 Active fuel management 2
68 –
69 Starter Pinion (LD) / Starter Motor
(HD Gas)
71 Cooling fan
72 Cooling fan right
73 Trailer stop/turn lamp left
74 TIM
75 DEFC
Page 393 of 500
Chevrolet Silverado Owner Manual (GMNA-Localizing-U.S./Canada/Mexico-
13337620) - 2020 - CRC - 4/10/19
392 Vehicle Care
.Operating electronic devices or
being near facilities using radio
wave frequencies similar to the
TPMS could cause the TPMS
sensors to malfunction.
If the TPMS is not functioning
properly, it cannot detect or signal a
low tire pressure condition. See
your dealer for service if the TPMS
malfunction light and DIC message
come on and stay on.
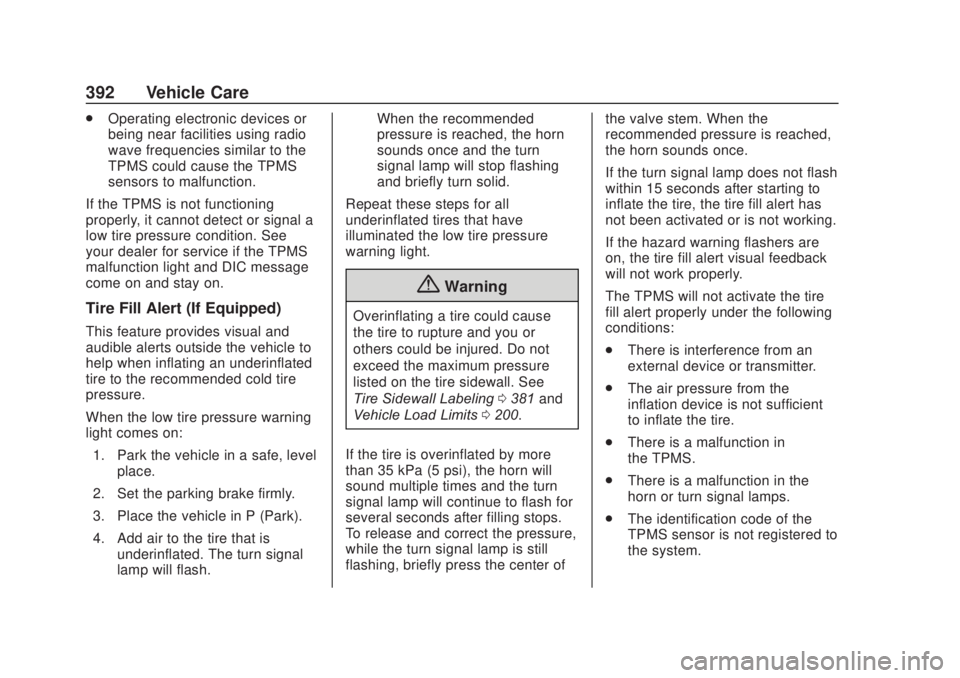
Tire Fill Alert (If Equipped)
This feature provides visual and
audible alerts outside the vehicle to
help when inflating an underinflated
tire to the recommended cold tire
pressure.
When the low tire pressure warning
light comes on:
1. Park the vehicle in a safe, level place.
2. Set the parking brake firmly.
3. Place the vehicle in P (Park).
4. Add air to the tire that is underinflated. The turn signal
lamp will flash. When the recommended
pressure is reached, the horn
sounds once and the turn
signal lamp will stop flashing
and briefly turn solid.
Repeat these steps for all
underinflated tires that have
illuminated the low tire pressure
warning light.
{Warning
Overinflating a tire could cause
the tire to rupture and you or
others could be injured. Do not
exceed the maximum pressure
listed on the tire sidewall. See
Tire Sidewall Labeling 0381 and
Vehicle Load Limits 0200.
If the tire is overinflated by more
than 35 kPa (5 psi), the horn will
sound multiple times and the turn
signal lamp will continue to flash for
several seconds after filling stops.
To release and correct the pressure,
while the turn signal lamp is still
flashing, briefly press the center of the valve stem. When the
recommended pressure is reached,
the horn sounds once.
If the turn signal lamp does not flash
within 15 seconds after starting to
inflate the tire, the tire fill alert has
not been activated or is not working.
If the hazard warning flashers are
on, the tire fill alert visual feedback
will not work properly.
The TPMS will not activate the tire
fill alert properly under the following
conditions:
.
There is interference from an
external device or transmitter.
. The air pressure from the
inflation device is not sufficient
to inflate the tire.
. There is a malfunction in
the TPMS.
. There is a malfunction in the
horn or turn signal lamps.
. The identification code of the
TPMS sensor is not registered to
the system.