2020 CHEVROLET MALIBU fuel cap
[x] Cancel search: fuel capPage 102 of 358
Chevrolet Malibu Owner Manual (GMNA-Localizing-U.S./Canada/Mexico-
13555849) - 2020 - CRC - 8/16/19
Instruments and Controls 101
.At the service station, the fuel
pump shuts off before the gauge
reads full.
. It takes a little more or less fuel
to fill up than the gauge
indicated. For example, the
gauge indicated the tank was
half full, but it actually took a
little more or less than half the
tank's capacity to fill the tank.
. The gauge moves a little while
turning a corner or speeding up.
. The gauge takes a few seconds
to stabilize after the ignition is
turned on, and goes back to
empty when the ignition is
turned off.Engine Coolant
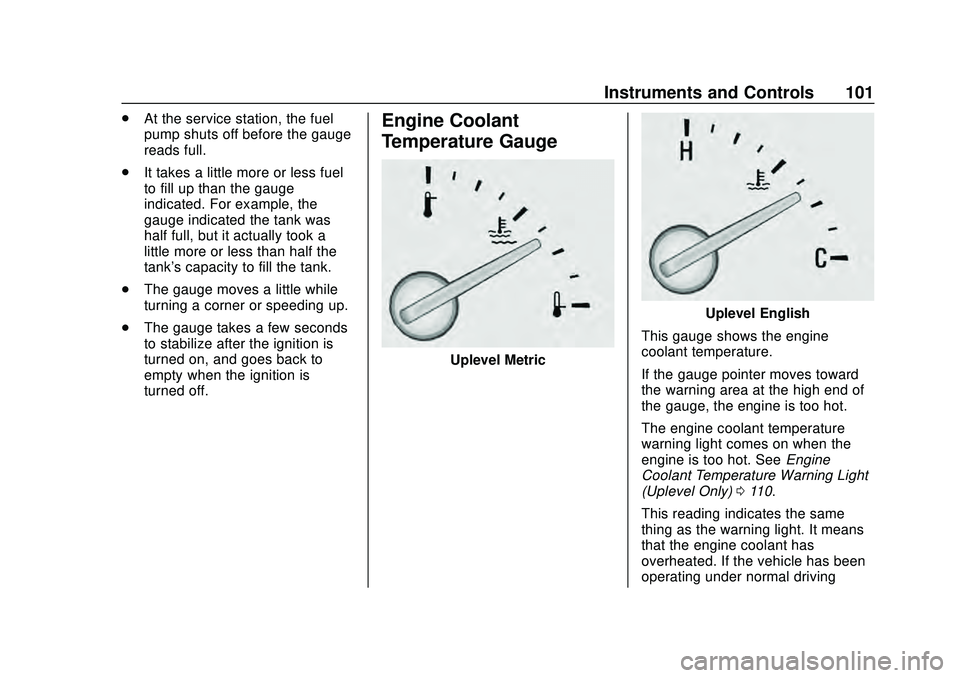
Temperature Gauge
Uplevel Metric
Uplevel English
This gauge shows the engine
coolant temperature.
If the gauge pointer moves toward
the warning area at the high end of
the gauge, the engine is too hot.
The engine coolant temperature
warning light comes on when the
engine is too hot. See Engine
Coolant Temperature Warning Light
(Uplevel Only) 0110.
This reading indicates the same
thing as the warning light. It means
that the engine coolant has
overheated. If the vehicle has been
operating under normal driving
Page 106 of 358

Chevrolet Malibu Owner Manual (GMNA-Localizing-U.S./Canada/Mexico-
13555849) - 2020 - CRC - 8/16/19
Instruments and Controls 105
Caution (Continued)
Maintenance test. See
Accessories and Modifications
0213.
If the light is flashing : A
malfunction has been detected that
could damage the emission control
system and increase vehicle
emissions. Diagnosis and service
may be required.
To help prevent damage, reduce
vehicle speed and avoid hard
accelerations and uphill grades.
If towing a trailer, reduce the
amount of cargo being hauled as
soon as possible.
If the light continues to flash, find a
safe place to park. Turn the vehicle
off and wait at least 10 seconds
before restarting the engine. If the
light is still flashing, follow the
previous guidelines and see your
dealer for service as soon as
possible. If the light is on steady :
A
malfunction has been detected.
Diagnosis and service may be
required.
Check the following:
. If fuel has been added to the
vehicle using the capless fuel
funnel adapter, make sure that it
has been removed. See “Filling
the Tank with a Portable Gas
Can” under Filling the Tank
0 200. The diagnostic system
can detect if the adapter has
been left installed in the vehicle,
allowing fuel to evaporate into
the atmosphere. A few driving
trips with the adapter removed
may turn off the light.
. Poor fuel quality can cause
inefficient engine operation and
poor driveability, which may go
away once the engine is warmed
up. If this occurs, change the
fuel brand. It may require at
least one full tank of the proper fuel to turn the light off. See
Recommended Fuel (1.5L
Engine)
0198 or
Recommended Fuel (2.0L
Engine) 0199.
If the light remains on, see your
dealer.
Emissions Inspection and
Maintenance Programs
If the vehicle requires an Emissions
Inspection/Maintenance test, the
test equipment will likely connect to
the vehicle's Data Link
Connector (DLC).
The DLC is under the instrument
panel to the left of the steering
wheel. Connecting devices that are
not used to perform an Emissions
Inspection/Maintenance test or to
service the vehicle may affect
Page 152 of 358
Chevrolet Malibu Owner Manual (GMNA-Localizing-U.S./Canada/Mexico-
13555849) - 2020 - CRC - 8/16/19
Driving and Operating 151
Warning (Continued)
the fan speed to the highest
setting. See“Climate
Control Systems.”
For more information about CO,
see Engine Exhaust 0163.
To save fuel, run the engine for
short periods to warm the vehicle
and then shut the engine off and
partially close the window. Moving
about to keep warm also helps.
If it takes time for help to arrive,
when running the engine, push the
accelerator pedal slightly so the
engine runs faster than the idle
speed. This keeps the battery
charged to restart the vehicle and to
signal for help with the headlamps.
Do this as little as possible, to
save fuel.
If the Vehicle Is Stuck
Slowly and cautiously spin the
wheels to free the vehicle when
stuck in sand, mud, ice, or snow. If stuck too severely for the traction
system to free the vehicle, turn the
traction system off and use the
rocking method. See
Traction
Control/Electronic Stability Control
0 170.
{Warning
If the vehicle's tires spin at high
speed, they can explode, and you
or others could be injured. The
vehicle can overheat, causing an
engine compartment fire or other
damage. Spin the wheels as little
as possible and avoid going
above 56 km/h (35 mph).
Rocking the Vehicle to Get
it Out
Turn the steering wheel left and
right to clear the area around the
front wheels. Turn off any traction
system. Shift back and forth
between R (Reverse) and a low
forward gear, spinning the wheels
as little as possible. To prevent
transmission wear, wait until the wheels stop spinning before shifting
gears. Release the accelerator
pedal while shifting, and press
lightly on the accelerator pedal
when the transmission is in gear.
Slowly spinning the wheels in the
forward and reverse directions
causes a rocking motion that could
free the vehicle. If that does not get
the vehicle out after a few tries, it
might need to be towed out. If the
vehicle does need to be towed out,
see
Towing the Vehicle 0289.
Vehicle Load Limits
It is very important to know how
much weight the vehicle can
carry. This weight is called the
vehicle capacity weight and
includes the weight of all
occupants, cargo, and all
nonfactory-installed options.
Two labels on the vehicle may
show how much weight it may
properly carry: the Tire and
Loading Information label and
the Certification label.
Page 155 of 358
Chevrolet Malibu Owner Manual (GMNA-Localizing-U.S./Canada/Mexico-
13555849) - 2020 - CRC - 8/16/19
154 Driving and Operating
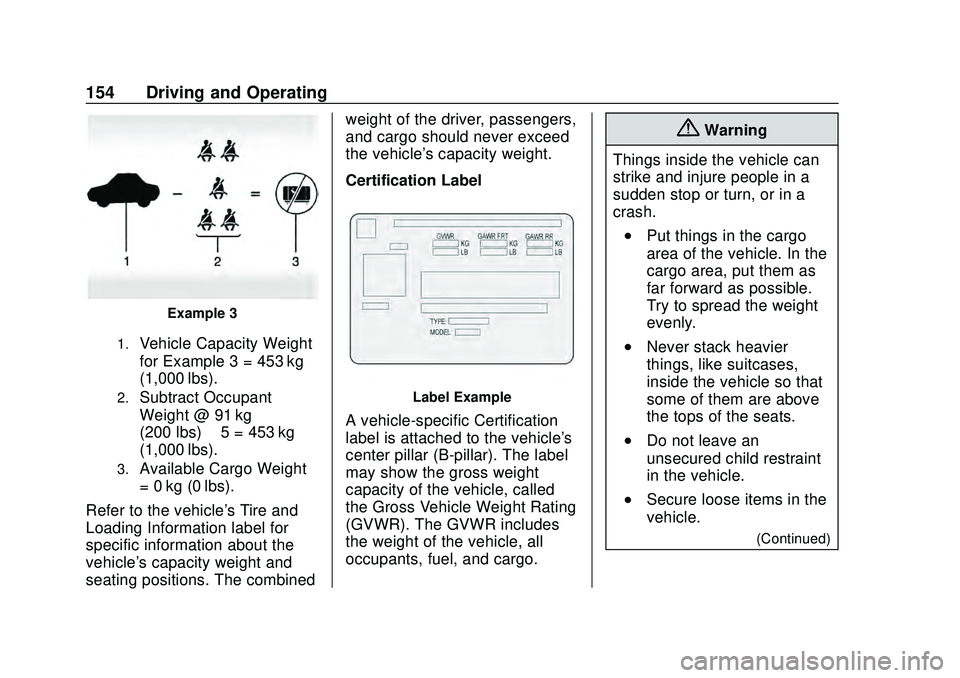
Example 3
1.Vehicle Capacity Weight
for Example 3 = 453 kg
(1,000 lbs).
2.Subtract Occupant
Weight @ 91 kg
(200 lbs) × 5 = 453 kg
(1,000 lbs).
3.Available Cargo Weight
= 0 kg (0 lbs).
Refer to the vehicle's Tire and
Loading Information label for
specific information about the
vehicle's capacity weight and
seating positions. The combined weight of the driver, passengers,
and cargo should never exceed
the vehicle's capacity weight.
Certification Label
Label Example
A vehicle-specific Certification
label is attached to the vehicle's
center pillar (B-pillar). The label
may show the gross weight
capacity of the vehicle, called
the Gross Vehicle Weight Rating
(GVWR). The GVWR includes
the weight of the vehicle, all
occupants, fuel, and cargo.
{Warning
Things inside the vehicle can
strike and injure people in a
sudden stop or turn, or in a
crash.
.Put things in the cargo
area of the vehicle. In the
cargo area, put them as
far forward as possible.
Try to spread the weight
evenly.
.Never stack heavier
things, like suitcases,
inside the vehicle so that
some of them are above
the tops of the seats.
.Do not leave an
unsecured child restraint
in the vehicle.
.Secure loose items in the
vehicle.
(Continued)
Page 202 of 358
Chevrolet Malibu Owner Manual (GMNA-Localizing-U.S./Canada/Mexico-
13555849) - 2020 - CRC - 8/16/19
Driving and Operating 201
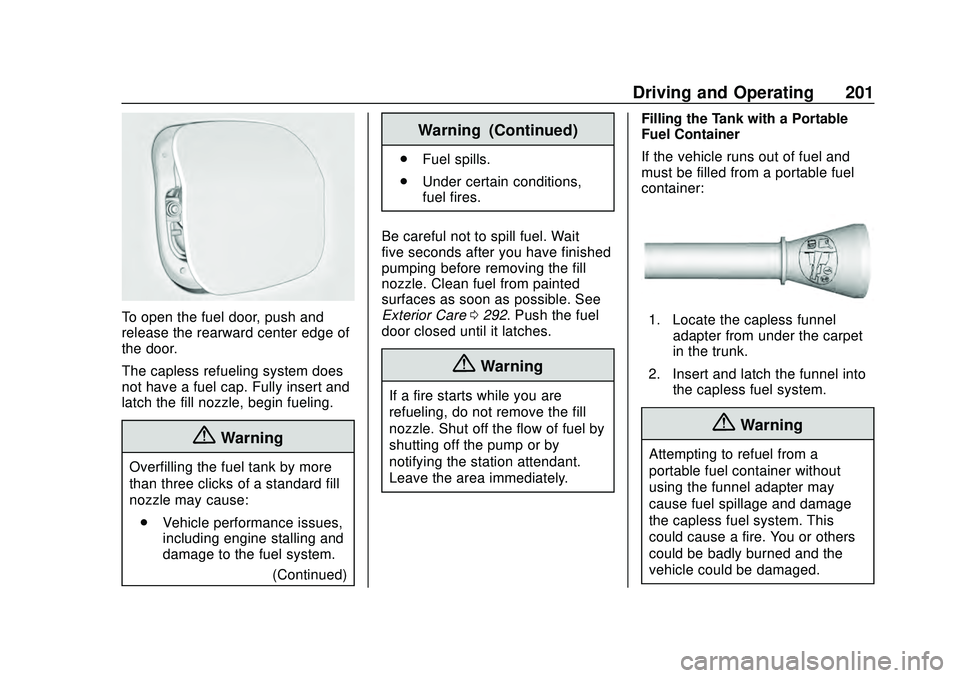
To open the fuel door, push and
release the rearward center edge of
the door.
The capless refueling system does
not have a fuel cap. Fully insert and
latch the fill nozzle, begin fueling.
{Warning
Overfilling the fuel tank by more
than three clicks of a standard fill
nozzle may cause:. Vehicle performance issues,
including engine stalling and
damage to the fuel system.
(Continued)
Warning (Continued)
.Fuel spills.
. Under certain conditions,
fuel fires.
Be careful not to spill fuel. Wait
five seconds after you have finished
pumping before removing the fill
nozzle. Clean fuel from painted
surfaces as soon as possible. See
Exterior Care 0292. Push the fuel
door closed until it latches.
{Warning
If a fire starts while you are
refueling, do not remove the fill
nozzle. Shut off the flow of fuel by
shutting off the pump or by
notifying the station attendant.
Leave the area immediately. Filling the Tank with a Portable
Fuel Container
If the vehicle runs out of fuel and
must be filled from a portable fuel
container:
1. Locate the capless funnel
adapter from under the carpet
in the trunk.
2. Insert and latch the funnel into the capless fuel system.
{Warning
Attempting to refuel from a
portable fuel container without
using the funnel adapter may
cause fuel spillage and damage
the capless fuel system. This
could cause a fire. You or others
could be badly burned and the
vehicle could be damaged.
Page 233 of 358
Chevrolet Malibu Owner Manual (GMNA-Localizing-U.S./Canada/Mexico-
13555849) - 2020 - CRC - 8/21/19
232 Vehicle Care
When the brake fluid falls to a low
level, the brake warning light comes
on. SeeBrake System Warning
Light 0106.
Brake fluid absorbs water over time
which degrades the effectiveness of
the brake fluid. Replace brake fluid
at the specified intervals to prevent
increased stopping distance. See
Maintenance Schedule 0304.
What to Add
Use only GM approved DOT 3
brake fluid from a clean, sealed
container. See Recommended
Fluids and Lubricants 0313.
{Warning
The wrong or contaminated brake
fluid could result in damage to the
brake system. This could result in
the loss of braking leading to a
possible injury. Always use the
proper GM approved brake fluid.
Caution
If brake fluid is spilled on the
vehicle's painted surfaces, the
paint finish can be damaged.
Immediately wash off any painted
surface.
Battery - North America
The original equipment battery is
maintenance free. Do not remove
the cap and do not add fluid.
The vehicle has a standard 12-volt
battery under the hood. See Engine
Compartment Overview 0216.
Refer to the replacement number
shown on the original battery label
when a new 12-volt battery is
needed.
Stop/Start System
If equipped with the 1.5L L4 engine,
the vehicle has a Stop/Start system
to shut off the engine to help
conserve fuel. See Stop/Start
System 0158. Vehicles with a 1.5L engine have an
Absorbed Glass Mat (AGM) 12-volt
battery. Installation of a standard
12-volt battery will result in reduced
12-volt battery life.
When using a 12-volt battery
charger on the 12-volt AGM battery,
some chargers have an AGM
battery setting on the charger.
If available, use the AGM setting on
the charger, to limit charge voltage
to 14.8 volts.
{Warning
WARNING:
Battery posts,
terminals, and related
accessories contain lead and lead
compounds, chemicals known to
the State of California to cause
cancer and birth defects or other
reproductive harm. Batteries also
contain other chemicals known to
the State of California to cause
cancer. WASH HANDS AFTER
HANDLING. For more information
go to www.P65Warnings.ca.gov/
passenger-vehicle.
Page 256 of 358
Chevrolet Malibu Owner Manual (GMNA-Localizing-U.S./Canada/Mexico-
13555849) - 2020 - CRC - 8/21/19
Vehicle Care 255
For example, if the tire size
aspect ratio is 60, as shown in
item (3) of the illustration, it
would mean that the tire's
sidewall is 60 percent as high as
it is wide.
(4) Construction Code
:A letter
code is used to indicate the type
of ply construction in the tire.
The letter “R”means radial ply
construction; the letter “D”
means diagonal or bias ply
construction.
(5) Rim Diameter
:Diameter of
the wheel in inches.
(6) Service Description
:These
characters represent the load
index and speed rating of the
tire. The load index represents
the load carrying capacity a tire
is certified to carry. The speed
rating is the maximum speed a
tire is certified to carry a load.
Tire Terminology and
Definitions
Air Pressure:The amount of
air inside the tire pressing
outward on each square inch of
the tire. Air pressure is
expressed in kPa (kilopascal)
or psi (pounds per square inch).
Accessory Weight
:The
combined weight of optional
accessories. Some examples of
optional accessories are
automatic transmission, power
windows, power seats, and air
conditioning.
Aspect Ratio
:The relationship
of a tire's height to its width.
Belt
:A rubber coated layer of
cords between the plies and the
tread. Cords may be made from
steel or other reinforcing
materials. Bead
:The tire bead contains
steel wires wrapped by steel
cords that hold the tire onto
the rim.
Bias Ply Tire
:A pneumatic tire
in which the plies are laid at
alternate angles less than
90 degrees to the centerline of
the tread.
Cold Tire Pressure
:The
amount of air pressure in a tire,
measured in kPa (kilopascal)
or psi (pounds per square inch)
before a tire has built up heat
from driving. See Tire Pressure
0 257.
Curb Weight
:The weight of a
motor vehicle with standard and
optional equipment including the
maximum capacity of fuel, oil,
and coolant, but without
passengers and cargo.
DOT Markings
:A code molded
into the sidewall of a tire
signifying that the tire is in
compliance with the U.S.
Page 259 of 358
Chevrolet Malibu Owner Manual (GMNA-Localizing-U.S./Canada/Mexico-
13555849) - 2020 - CRC - 8/21/19
258 Vehicle Care
{Warning
Neither tire underinflation nor
overinflation is good.
Underinflated tires, or tires
that do not have enough air,
can result in:
.Tire overloading and
overheating which could
lead to a blowout.
.Premature or
irregular wear.
.Poor handling.
.Reduced fuel economy.
Overinflated tires, or tires that
have too much air, can
result in:
.Unusual wear.
.Poor handling.
.Rough ride.
.Needless damage from
road hazards. The Tire and Loading
Information label on the vehicle
indicates the original equipment
tires and the correct cold tire
inflation pressures. The
recommended pressure is the
minimum air pressure needed to
support the vehicle's maximum
load carrying capacity. See
Vehicle Load Limits
0151.
How the vehicle is loaded
affects vehicle handling and ride
comfort. Never load the vehicle
with more weight than it was
designed to carry.
When to Check
Check the pressure of the tires
once a month or more. Do not
forget the compact spare, if the
vehicle has one. The cold
compact spare tire pressure
should be at 420 kPa (60 psi).
See Compact Spare Tire 0285. How to Check
Use a good quality pocket-type
gauge to check tire pressure.
Proper tire inflation cannot be
determined by looking at the tire.
Check the tire inflation pressure
when the tires are cold, meaning
the vehicle has not been driven
for at least three hours or no
more than 1.6 km (1 mi).
Remove the valve cap from the
tire valve stem. Press the tire
gauge firmly onto the valve to
get a pressure measurement.
If the cold tire inflation pressure
matches the recommended
pressure on the Tire and
Loading Information label, no
further adjustment is necessary.
If the inflation pressure is low,
add air until the recommended
pressure is reached. If the
inflation pressure is high, press
on the metal stem in the center
of the tire valve to release air.