2020 CHEVROLET MALIBU Replace battery
[x] Cancel search: Replace batteryPage 9 of 358

Chevrolet Malibu Owner Manual (GMNA-Localizing-U.S./Canada/Mexico-
13555849) - 2020 - CRC - 8/16/19
8 Keys, Doors, and Windows
The key that is part of the Remote
Keyless Entry (RKE) transmitter can
be used for all locks.
To remove the key, press the button
near the bottom of the transmitter,
and pull the key out. Never pull the
key out without pressing the button.
If it becomes difficult to turn the key,
inspect the key blade for debris.
See your dealer if a new key is
needed.
If locked out of the vehicle, see
Roadside Assistance Program
0323.
With an active OnStar or connected
service plan, an OnStar Advisor
may remotely unlock the vehicle.
See OnStar Overview 0335.
Remote Keyless Entry
(RKE) System
See Radio Frequency Statement
0 329.
If there is a decrease in the Remote
Keyless Entry (RKE) operating
range:
. Check the distance. The
transmitter may be too far from
the vehicle. .
Check the location. Other
vehicles or objects may be
blocking the signal.
. Check the transmitter's battery.
See “Battery Replacement” later
in this section.
. If the transmitter is still not
working correctly, see your
dealer or a qualified technician
for service.
Remote Keyless Entry
(RKE) System Operation
The Keyless Access system allows
for vehicle entry when the Remote
Keyless Entry (RKE) transmitter is
within 1 m (3 ft). See “Keyless
Access Operation” following.
The transmitter functions may work
up to 60 m (197 ft) away from the
vehicle.
Other conditions can impact the
performance of the transmitter. See
Remote Keyless Entry (RKE)
System 08.
Page 13 of 358

Chevrolet Malibu Owner Manual (GMNA-Localizing-U.S./Canada/Mexico-
13555849) - 2020 - CRC - 8/16/19
12 Keys, Doors, and Windows
Key Access
To access a vehicle with a weak
transmitter battery, seeDoor Locks
0 17.
Programming Transmitters to
the Vehicle
Only RKE transmitters programmed
to the vehicle will work. If a
transmitter is lost or stolen, a
replacement can be purchased and
programmed through your dealer.
The vehicle can be reprogrammed
so that lost or stolen transmitters no
longer work. Any remaining
transmitters will need to be
reprogrammed. Each vehicle can
have up to eight transmitters
matched to it.
Programming with Recognized
Transmitters
A new transmitter can be
programmed to the vehicle when
there are two recognized
transmitters. To program, the vehicle
must be off and all of the transmitters, both currently
recognized and new, must be
with you.
1. Place the two recognized transmitters in the cupholder.
2. Remove the key lock cylinder cap on the driver door handle.
See Door Locks 017. Insert
the vehicle key of the new
transmitter into the key lock
cylinder on the outside of the
driver door and turn the key
counterclockwise five times
within 10 seconds.
The DIC displays READY FOR
REMOTE #2, 3, 4 or 5.
3. Place the first new transmitter
into the transmitter pocket with
the buttons facing the rear of
the vehicle. The transmitter
pocket is inside the center
console storage area.
4. Press ENGINE START/STOP. When the transmitter is
learned, the DIC will show that
it is ready to program the next
transmitter.
5. Remove the transmitter from the transmitter pocket and
press
KorQ.
Page 15 of 358

Chevrolet Malibu Owner Manual (GMNA-Localizing-U.S./Canada/Mexico-
13555849) - 2020 - CRC - 8/16/19
14 Keys, Doors, and Windows
When all additional transmitters
are programmed, press and
hold ENGINE START/STOP for
12 seconds to exit
programming mode.
7. Return the key back into the transmitter.
8. Replace the key lock cylinder cap. See Door Locks 017.
Starting the Vehicle with a Low
Transmitter Battery
While trying to start the vehicle,
if the transmitter battery is weak or if
there is interference with the signal,
the DIC may display NO REMOTE
DETECTED or NO REMOTE KEY
WAS DETECTED PLACE KEY IN
TRANSMITTER POCKET THEN
START YOUR VEHICLE. The DIC
may also display REPLACE
BATTERY IN REMOTE KEY.
To start the vehicle:
1. Open the center console and place the transmitter in the
transmitter pocket with the
buttons facing the rear of the
vehicle. 2. With the vehicle in P (Park) or
N (Neutral), press the brake
pedal and press ENGINE
START/STOP. See Starting the
Engine 0157.
Replace the transmitter battery
as soon as possible.
Battery Replacement
{Warning
Never allow children to play with
the RKE transmitter. The
transmitter contains a small
battery, which can be a choking
hazard. If swallowed, internal
burns can occur, resulting in
severe injury or death. Seek
medical attention immediately if a
battery is swallowed.
{Warning
To avoid personal injury, do not
touch metal surfaces on the RKE
transmitter when it has been
exposed to extreme heat. These
surfaces can be hot to the touch
at temperatures above 59 °C (138
°F).
Caution
When replacing the battery, do
not touch any of the circuitry on
the transmitter. Static from your
body could damage the
transmitter.
Caution
Always replace the battery with
the correct type. Replacing the
battery with an incorrect type
could potentially create a risk of (Continued)
Page 16 of 358

Chevrolet Malibu Owner Manual (GMNA-Localizing-U.S./Canada/Mexico-
13555849) - 2020 - CRC - 8/16/19
Keys, Doors, and Windows 15
Caution (Continued)
battery explosion. Dispose of
used batteries according to
instructions and local laws. Do
not attempt to burn, crush, or cut
the used battery, and avoid
exposing the battery to
environments with extremely low
air pressures or high
temperatures.
Replace the battery if the DIC
displays REPLACE BATTERY IN
REMOTE KEY.
The battery is not rechargeable. To
replace the battery:
1. Press the button on the side of the RKE transmitter near the
bottom and pull the key out.
Never pull the key out without
pressing the button.2. Separate the two halves of thetransmitter using a flat tool
inserted into the bottom center
of the transmitter. Do not use
the key slot.
Page 17 of 358

Chevrolet Malibu Owner Manual (GMNA-Localizing-U.S./Canada/Mexico-
13555849) - 2020 - CRC - 8/16/19
16 Keys, Doors, and Windows
3. Remove the battery by pushingon the battery and sliding it
toward the bottom of the
transmitter. Do not use a metal
object.
4. Insert the new battery, positive side facing the back cover.
Push the battery down until it is
held in place. Replace with a
CR2032 or equivalent battery.
5. Snap the battery cover back on to the transmitter.
6. Reinsert the key.
Remote Vehicle Start
If equipped, this feature allows the
engine to be started from outside
the vehicle.
/: This button will be on the RKE
transmitter if the vehicle has remote
start.
The climate control system will
determine the best mode and
temperature setting for operation
during the remote start. Once the
vehicle is started with the Engine
Start/Stop button, the climate control
system will begin to operate at the
last customer selected operating
mode and temperature. The rear
window defogger may come on
during a remote start based on cold
ambient conditions. The rear defog
indicator light does not come on
during a remote start.
If the vehicle has heated seats, they
may come on during a remote start.
See Heated and Ventilated Front
Seats 041. Laws in some local communities
may restrict the use of remote
starters. For example, some laws
require a person using remote start
to have the vehicle in view. Check
local regulations for any
requirements.
Other conditions can affect the
performance of the transmitter. See
Remote Keyless Entry (RKE)
System
08.
If your vehicle is low on fuel, do not
use the remote start feature. The
vehicle may run out of fuel.
Starting the Engine Using Remote
Start
To start the engine using the remote
start feature:
1. Press and release
Q.
2. Immediately after completing Step 1, press and hold
/for at
least four seconds or until the
turn signal lamps flash. The
turn signal lamps flashing
confirms the request to remote
start the vehicle has been
received.
Page 20 of 358
Chevrolet Malibu Owner Manual (GMNA-Localizing-U.S./Canada/Mexico-
13555849) - 2020 - CRC - 8/16/19
Keys, Doors, and Windows 19
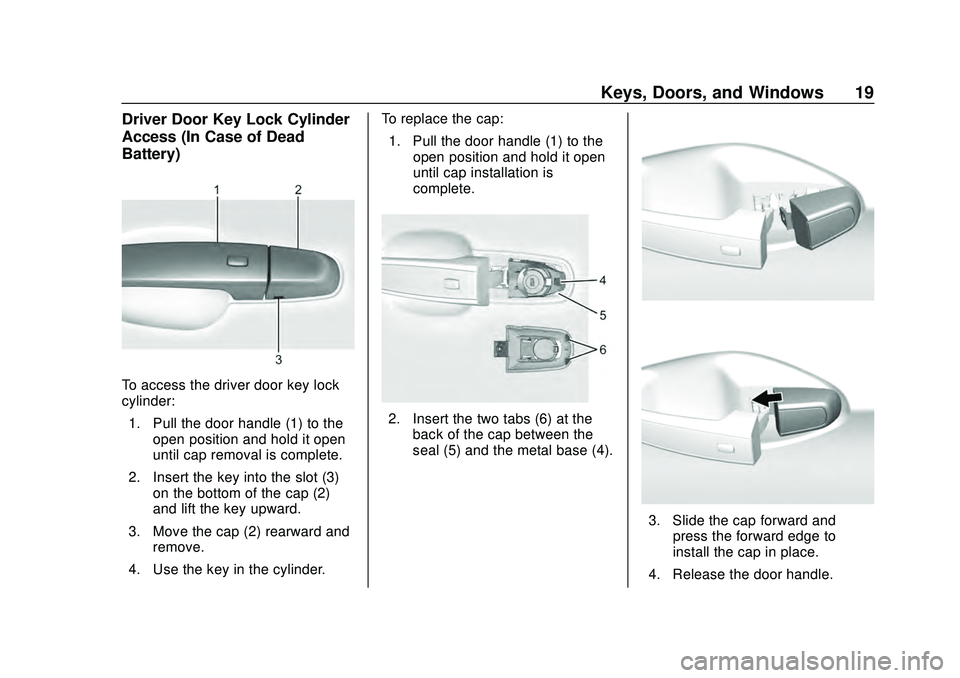
Driver Door Key Lock Cylinder
Access (In Case of Dead
Battery)
To access the driver door key lock
cylinder:1. Pull the door handle (1) to the open position and hold it open
until cap removal is complete.
2. Insert the key into the slot (3) on the bottom of the cap (2)
and lift the key upward.
3. Move the cap (2) rearward and remove.
4. Use the key in the cylinder. To replace the cap:
1. Pull the door handle (1) to the open position and hold it open
until cap installation is
complete.
2. Insert the two tabs (6) at theback of the cap between the
seal (5) and the metal base (4).
3. Slide the cap forward andpress the forward edge to
install the cap in place.
4. Release the door handle.
Page 65 of 358
Chevrolet Malibu Owner Manual (GMNA-Localizing-U.S./Canada/Mexico-
13555849) - 2020 - CRC - 8/16/19
64 Seats and Restraints
{Warning
Stowing articles under the
passenger seat or between the
passenger seat cushion and
seatback may interfere with the
proper operation of the passenger
sensing system.
Servicing the
Airbag-Equipped Vehicle
Airbags affect how the vehicle
should be serviced. There are parts
of the airbag system in several
places around the vehicle. Your
dealer and the service manual have
information about servicing the
vehicle and the airbag system. To
purchase a service manual, see
Publication Ordering Information
0329.
{Warning
For up to 10 seconds after the
vehicle is turned off and the 12‐
volt battery is disconnected, an
airbag can still inflate during
improper service. You can be
injured if you are close to an
airbag when it inflates. Avoid
yellow connectors. They are
probably part of the airbag
system. Be sure to follow proper
service procedures, and make
sure the person performing work
for you is qualified to do so.
Adding Equipment to the
Airbag-Equipped Vehicle
Adding accessories that change the
vehicle's frame, bumper system,
height, front end, or side sheet
metal may keep the airbag system
from working properly.
The operation of the airbag system
can also be affected by changing,
including improperly repairing or
replacing, any parts of the following: .
Airbag system, including airbag
modules, front or side impact
sensors, sensing and diagnostic
module, or airbag wiring
. Front seats, including stitching,
seams or zippers
. Seat belts
. Steering wheel, instrument
panel, overhead console, ceiling
trim, or pillar garnish trim
. Inner door seals, including
speakers
Your dealer and the service manual
have information about the location
of the airbag modules and sensors,
sensing and diagnostic module, and
airbag wiring along with the proper
replacement procedures.
In addition, the vehicle has a
passenger sensing system for the
front outboard passenger position,
which includes sensors that are part
of the passenger seat. The
passenger sensing system may not
operate properly if the original seat
trim is replaced with non-GM
covers, upholstery, or trim; or with
Page 105 of 358

Chevrolet Malibu Owner Manual (GMNA-Localizing-U.S./Canada/Mexico-
13555849) - 2020 - CRC - 8/16/19
104 Instruments and Controls
Charging System Light
The charging system light comes on
briefly when the ignition is turned
on, but the engine is not running, as
a check to show the light is working.
It should go out when the engine is
started.
If the light stays on, or comes on
while driving, there may be a
problem with the electrical charging
system. Have it checked by your
dealer. Driving while this light is on
could drain the battery.
When this light comes on, or is
flashing, the Driver Information
Center (DIC) also displays a
message.
If a short distance must be driven
with the light on, be sure to turn off
all accessories, such as the radio
and air conditioner.
Malfunction Indicator
Lamp (Check Engine
Light)
This light is part of the vehicle’s
emission control on-board
diagnostic system. If this light is on
while the engine is running, a
malfunction has been detected and
the vehicle may require service. The
light should come on to show that it
is working when the ignition is in
Service Mode. SeeIgnition
Positions 0155.
Malfunctions are often indicated by
the system before any problem is
noticeable. Being aware of the light
and seeking service promptly when
it comes on may prevent damage.
Caution
If the vehicle is driven continually
with this light on, the emission
control system may not work as
well, the fuel economy may be
lower, and the vehicle may not
run smoothly. This could lead to
costly repairs that might not be
covered by the vehicle warranty.
Caution
Modifications to the engine,
transmission, exhaust, intake,
or fuel system, or the use of
replacement tires that do not
meet the original tire
specifications, can cause this light
to come on. This could lead to
costly repairs not covered by the
vehicle warranty. This could also
affect the vehicle’s ability to pass
an Emissions Inspection/
(Continued)