2020 CHEVROLET MALIBU change wheel
[x] Cancel search: change wheelPage 223 of 358

Chevrolet Malibu Owner Manual (GMNA-Localizing-U.S./Canada/Mexico-
13555849) - 2020 - CRC - 8/21/19
222 Vehicle Care
include engine revolutions, engine
temperature, and miles driven.
Based on driving conditions, the
mileage at which an oil change is
indicated can vary considerably. For
the oil life system to work properly,
the system must be reset every time
the oil is changed.
When the system has calculated
that oil life has been diminished, it
indicates that an oil change is
necessary. A CHANGE ENGINE
OIL SOON message displays.
Change the oil as soon as possible
within the next 1 000 km (600 mi).
It is possible that, if driving under
the best conditions, the oil life
system may indicate that an oil
change is not necessary for up to a
year. The engine oil and filter must
be changed at least once a year
and, at this time, the system must
be reset. Your dealer has trained
service people who will perform this
work and reset the system. It is also
important to check the oil regularly
over the course of an oil drain
interval and keep it at the proper
level.If the system is ever reset
accidentally, the oil must be
changed at 5 000 km (3,000 mi)
since the last oil change.
Remember to reset the oil life
system whenever the oil is changed.
How to Reset the Engine Oil
Life System
1. Using the DIC controls on the
right side of the steering wheel,
display REMAINING OIL LIFE
on the DIC. See Driver
Information Center (DIC) (Base
Level) 0113 or
Driver Information Center (DIC)
(Uplevel) 0116. When
remaining oil life is low, the
CHANGE ENGINE OIL SOON
message will appear on the
display.
2. Press
Von the DIC controls
and hold down for a few
seconds to clear the CHANGE
ENGINE OIL SOON message
and reset the oil life at 100%.
Be careful not to reset the oil
life display accidentally at any
time other than after the oil is changed. It cannot be reset
accurately until the next oil
change.
The system is reset when the
CHANGE ENGINE OIL SOON
message is off and the REMAINING
OIL LIFE message is displayed.
If the CHANGE ENGINE OIL SOON
message comes back on when the
vehicle is started, the engine oil life
system has not been reset. Repeat
the procedure.
Automatic Transmission
Fluid
It is not necessary to check the
transmission fluid level.
A transmission fluid leak is the only
reason for fluid loss. If a leak
occurs, take the vehicle to your
dealer and have it repaired as soon
as possible.
Page 252 of 358
Chevrolet Malibu Owner Manual (GMNA-Localizing-U.S./Canada/Mexico-
13555849) - 2020 - CRC - 8/21/19
Vehicle Care 251
All-Season Tires
This vehicle may come with
all-season tires. These tires are
designed to provide good overall
performance on most road surfaces
and weather conditions. Original
equipment tires designed to GM's
specific tire performance criteria
have a TPC specification code
molded onto the sidewall. Original
equipment all-season tires can be
identified by the last two characters
of this TPC code, which will
be“MS.”
Consider installing winter tires on
the vehicle if frequent driving on
snow or ice-covered roads is
expected. All-season tires provide
adequate performance for most
winter driving conditions, but they
may not offer the same level of
traction or performance as winter
tires on snow or ice-covered roads.
See Winter Tires 0251.
Winter Tires
This vehicle was not originally
equipped with winter tires. Winter
tires are designed for increased
traction on snow and ice-covered
roads. Consider installing winter
tires on the vehicle if frequent
driving on ice or snow covered
roads is expected. See your dealer
for details regarding winter tire
availability and proper tire selection.
Also, see Buying New Tires 0266.
With winter tires, there may be
decreased dry road traction,
increased road noise, and shorter
tread life. After changing to winter
tires, be alert for changes in vehicle
handling and braking.
If using winter tires:
. Use tires of the same brand and
tread type on all four wheel
positions.
. Use only radial ply tires of the
same size, load range, and
speed rating as the original
equipment tires. Winter tires with the same speed
rating as the original equipment tires
may not be available for H, V, W, Y,
and ZR speed rated tires. If winter
tires with a lower speed rating are
chosen, never exceed the tire's
maximum speed capability.
Low-Profile Tires
If the vehicle has 245/45R18 or
245/40R19 size tires, they are
classified as low-profile tires.
Caution
Low-profile tires are more
susceptible to damage from road
hazards or curb impact than
standard profile tires. Tire and/or
wheel assembly damage can
occur when coming into contact
with road hazards like potholes,
or sharp edged objects, or when
sliding into a curb. The warranty
does not cover this type of
damage. Keep tires set to the
correct inflation pressure and (Continued)
Page 267 of 358
Chevrolet Malibu Owner Manual (GMNA-Localizing-U.S./Canada/Mexico-
13555849) - 2020 - CRC - 8/21/19
266 Vehicle Care
Lightly coat the inner diameter of
the wheel hub opening with
wheel bearing grease after a
wheel change or tire rotation to
prevent corrosion or rust
buildup. Do not get grease on
the wheel mounting surface or
on the wheel nuts or bolts.
When It Is Time for New
Tires
Factors such as maintenance,
temperatures, driving speeds,
vehicle loading, and road conditions
affect the wear rate of the tires.
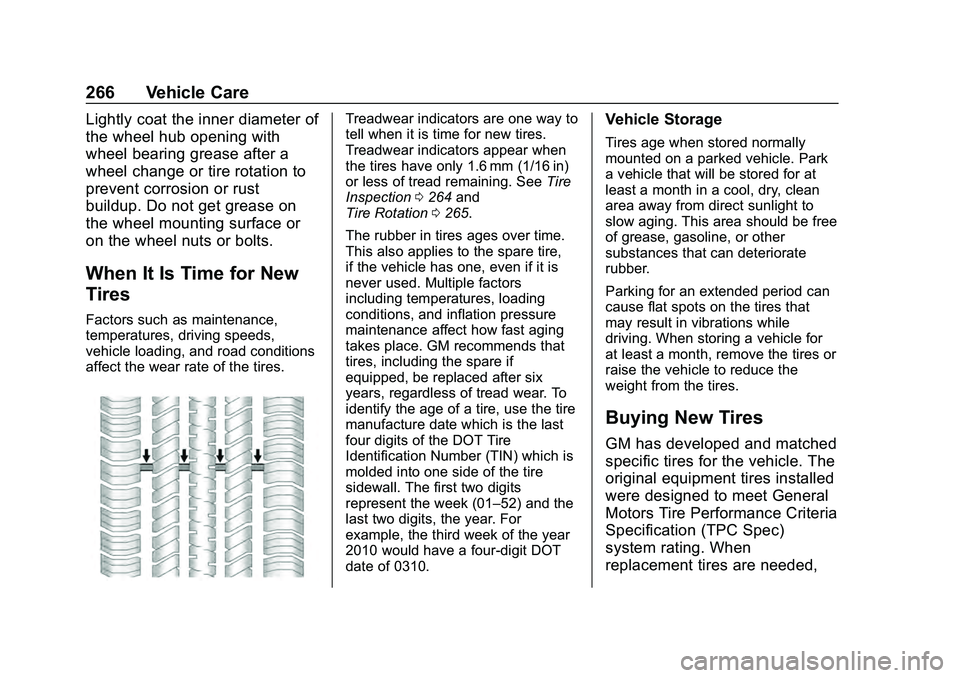
Treadwear indicators are one way to
tell when it is time for new tires.
Treadwear indicators appear when
the tires have only 1.6 mm (1/16 in)
or less of tread remaining. SeeTire
Inspection 0264 and
Tire Rotation 0265.
The rubber in tires ages over time.
This also applies to the spare tire,
if the vehicle has one, even if it is
never used. Multiple factors
including temperatures, loading
conditions, and inflation pressure
maintenance affect how fast aging
takes place. GM recommends that
tires, including the spare if
equipped, be replaced after six
years, regardless of tread wear. To
identify the age of a tire, use the tire
manufacture date which is the last
four digits of the DOT Tire
Identification Number (TIN) which is
molded into one side of the tire
sidewall. The first two digits
represent the week (01–52) and the
last two digits, the year. For
example, the third week of the year
2010 would have a four-digit DOT
date of 0310.Vehicle Storage
Tires age when stored normally
mounted on a parked vehicle. Park
a vehicle that will be stored for at
least a month in a cool, dry, clean
area away from direct sunlight to
slow aging. This area should be free
of grease, gasoline, or other
substances that can deteriorate
rubber.
Parking for an extended period can
cause flat spots on the tires that
may result in vibrations while
driving. When storing a vehicle for
at least a month, remove the tires or
raise the vehicle to reduce the
weight from the tires.
Buying New Tires
GM has developed and matched
specific tires for the vehicle. The
original equipment tires installed
were designed to meet General
Motors Tire Performance Criteria
Specification (TPC Spec)
system rating. When
replacement tires are needed,
Page 273 of 358
Chevrolet Malibu Owner Manual (GMNA-Localizing-U.S./Canada/Mexico-
13555849) - 2020 - CRC - 8/21/19
272 Vehicle Care
If a front tire fails, the flat tire
creates a drag that pulls the vehicle
toward that side. Take your foot off
the accelerator pedal and grip the
steering wheel firmly. Steer to
maintain lane position, and then
gently brake to a stop, well off the
road, if possible.
A rear blowout, particularly on a
curve, acts much like a skid and
may require the same correction as
used in a skid. Stop pressing the
accelerator pedal and steer to
straighten the vehicle. It may be
very bumpy and noisy. Gently brake
to a stop, well off the road,
if possible.
{Warning
Driving on a flat tire will cause
permanent damage to the tire.
Re-inflating a tire after it has been
driven on while severely
underinflated or flat may cause a
blowout and a serious crash.
Never attempt to re-inflate a tire(Continued)
Warning (Continued)
that has been driven on while
severely underinflated or flat.
Have your dealer or an authorized
tire service center repair or
replace the flat tire as soon as
possible.
{Warning
Lifting a vehicle and getting under
it to do maintenance or repairs is
dangerous without the
appropriate safety equipment and
training. If a jack is provided with
the vehicle, it is designed only for
changing a flat tire. If it is used for
anything else, you or others could
be badly injured or killed if the
vehicle slips off the jack. If a jack
is provided with the vehicle, only
use it for changing a flat tire. If a tire goes flat, avoid further tire
and wheel damage by driving slowly
to a level place, well off the road,
if possible. Turn on the hazard
warning flashers. See
Hazard
Warning Flashers 0128.
{Warning
Changing a tire can be
dangerous. The vehicle can slip
off the jack and roll over or fall
causing injury or death. Find a
level place to change the tire. To
help prevent the vehicle from
moving:
1. Set the parking brake firmly.
2. Put an automatictransmission in P (Park) or a
manual transmission in
1 (First) or R (Reverse).
3. Turn off the engine and do not restart while the vehicle
is raised.
4. Do not allow passengers to remain in the vehicle.
(Continued)
Page 274 of 358
Chevrolet Malibu Owner Manual (GMNA-Localizing-U.S./Canada/Mexico-
13555849) - 2020 - CRC - 8/21/19
Vehicle Care 273
Warning (Continued)
5. Place wheel blocks,if equipped, on both sides of
the tire at the opposite
corner of the tire being
changed.
This vehicle may come with a jack
and spare tire or a tire sealant and
compressor kit. To use the jacking
equipment to change a spare tire
safely, follow the instructions below.
Then see Tire Changing 0280. To
use the tire sealant and compressor
kit, see Tire Sealant and
Compressor Kit 0273.
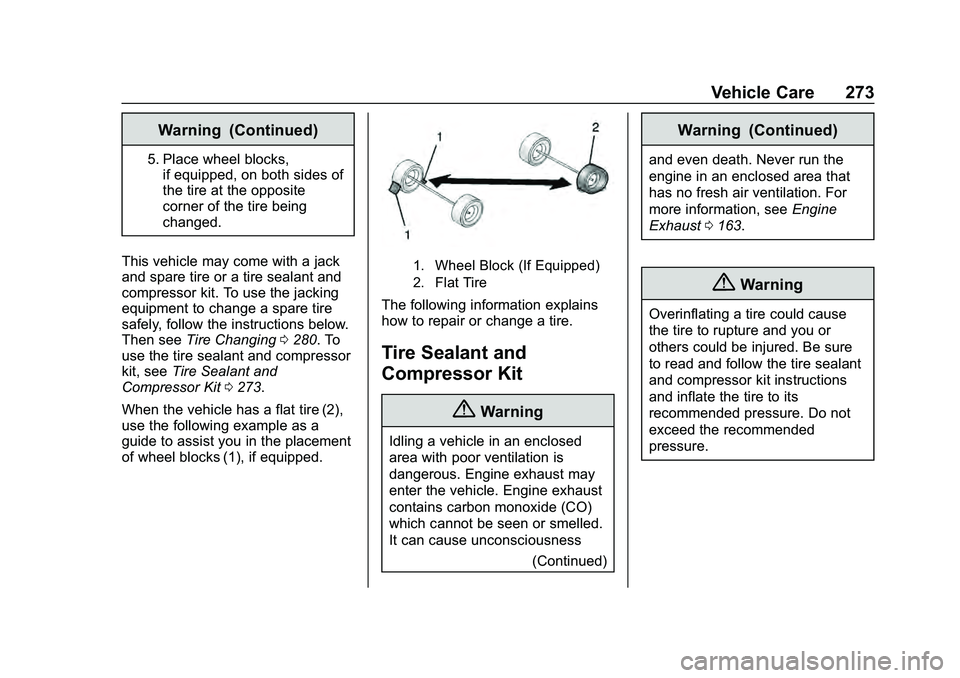
When the vehicle has a flat tire (2),
use the following example as a
guide to assist you in the placement
of wheel blocks (1), if equipped.
1. Wheel Block (If Equipped)
2. Flat Tire
The following information explains
how to repair or change a tire.
Tire Sealant and
Compressor Kit
{Warning
Idling a vehicle in an enclosed
area with poor ventilation is
dangerous. Engine exhaust may
enter the vehicle. Engine exhaust
contains carbon monoxide (CO)
which cannot be seen or smelled.
It can cause unconsciousness (Continued)
Warning (Continued)
and even death. Never run the
engine in an enclosed area that
has no fresh air ventilation. For
more information, seeEngine
Exhaust 0163.
{Warning
Overinflating a tire could cause
the tire to rupture and you or
others could be injured. Be sure
to read and follow the tire sealant
and compressor kit instructions
and inflate the tire to its
recommended pressure. Do not
exceed the recommended
pressure.
Page 281 of 358
Chevrolet Malibu Owner Manual (GMNA-Localizing-U.S./Canada/Mexico-
13555849) - 2020 - CRC - 8/21/19
280 Vehicle Care
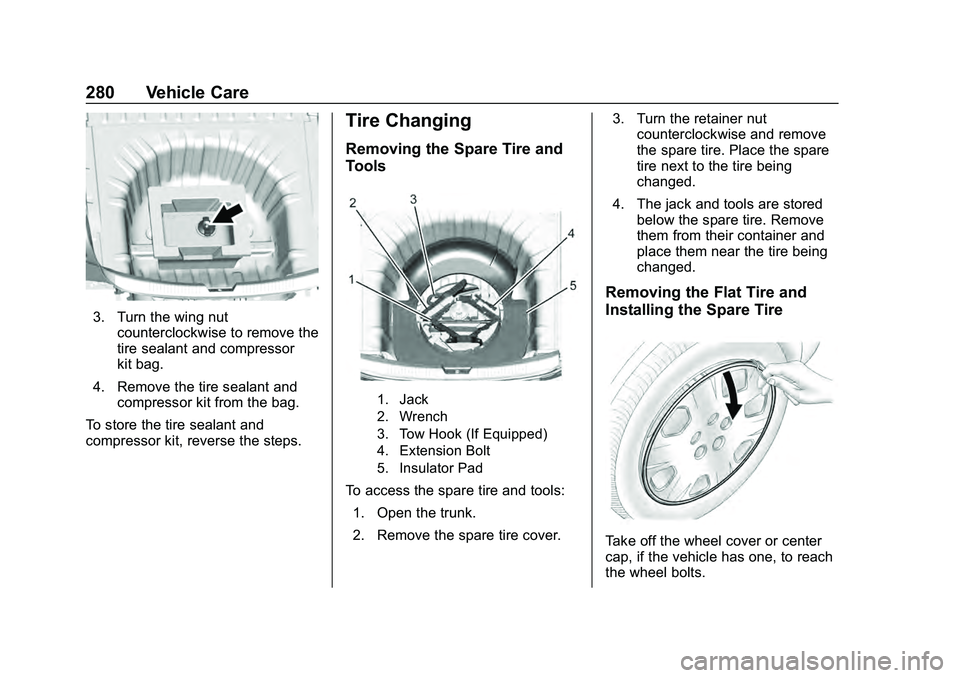
3. Turn the wing nutcounterclockwise to remove the
tire sealant and compressor
kit bag.
4. Remove the tire sealant and compressor kit from the bag.
To store the tire sealant and
compressor kit, reverse the steps.
Tire Changing
Removing the Spare Tire and
Tools
1. Jack
2. Wrench
3. Tow Hook (If Equipped)
4. Extension Bolt
5. Insulator Pad
To access the spare tire and tools: 1. Open the trunk.
2. Remove the spare tire cover. 3. Turn the retainer nut
counterclockwise and remove
the spare tire. Place the spare
tire next to the tire being
changed.
4. The jack and tools are stored below the spare tire. Remove
them from their container and
place them near the tire being
changed.
Removing the Flat Tire and
Installing the Spare Tire
Take off the wheel cover or center
cap, if the vehicle has one, to reach
the wheel bolts.
Page 351 of 358

Chevrolet Malibu Owner Manual (GMNA-Localizing-U.S./Canada/Mexico-
13555849) - 2020 - CRC - 8/16/19
350 Index
Front Seats (cont'd)Heated and Ventilated . . . . . . . . . . 41
Fuel Additives . . . . . . . . . . . . . . . . . . . . . 200
Economy, Driving for Better . . . 144
Filling a Portable Fuel
Container . . . . . . . . . . . . . . . . . . . 202
Filling the Tank . . . . . . . . . . . . . . . 200
Foreign Countries . . . . . . . . . . . . 199
Gauge . . . . . . . . . . . . . . . . . . . . . . . . 100
Low Fuel Warning Light . . . . . . . . 111
Management, Active . . . . . . . . . . 162
Prohibited Fuels . . . . . . . . . . . . . . 199
Recommended . . . . . . . . . . 198, 199
Top Tier . . . . . . . . . . . . . . . . . . . . . . 198
Fuses Engine Compartment FuseBlock . . . . . . . . . . . . . . . . . . . . . . . . 243
Fuses and Circuit Breakers . . . 242
Instrument Panel Fuse Block . . . . . . . . . . . . . . . . . . . . . . . . 247
G
Gas Strut(s) . . . . . . . . . . . . . . . . . . . . 236
GaugesEngine CoolantTemperature . . . . . . . . . . . . . . . . 101
Fuel . . . . . . . . . . . . . . . . . . . . . . . . . . 100 Gauges (cont'd)
Odometer . . . . . . . . . . . . . . . . . . . . . . . 99
Speedometer . . . . . . . . . . . . . . . . . . . 99
Tachometer . . . . . . . . . . . . . . . . . . . . . 99
Trip Odometer . . . . . . . . . . . . . . . . . . 99
Warning Lights and
Indicators . . . . . . . . . . . . . . . . . . . . . 95
General Information Service and Maintenance . . . . . 302
Towing . . . . . . . . . . . . . . . . . . . . . . . . 202
Vehicle Care . . . . . . . . . . . . . . . . . . 212
Glove Box . . . . . . . . . . . . . . . . . . . . . . . 85
GM Mobility Reimbursement Program . . . . . . . . . . . . . . . . . . . . . . . 323
H
Halogen Bulbs . . . . . . . . . . . . . . . . . . 238
Hazard Warning Flashers . . . . . . . 128
Head Restraints . . . . . . . . . . . . . . . . . 33
Headlamps
Aiming . . . . . . . . . . . . . . . . . . . . . . . . 237
Automatic . . . . . . . . . . . . . . . . . . . . . 128
Bulb Replacement . . . . . . . . . . . . 238
Daytime RunningLamps (DRL) . . . . . . . . . . . . . . . . 127
Flash-to-Pass . . . . . . . . . . . . . . . . . 127 Headlamps (cont'd)
Headlamps, Front Turn
Signal, Sidemarker, and
Parking Lamps . . . . . . . . . . . . . . 238
High-Beam On Light . . . . . . . . . . .112
High/Low Beam Changer . . . . . 127
Lamps On Reminder . . . . . . . . . .112
Heated Rear Seats . . . . . . . . . . . . . . . . . . . . . 45
Steering Wheel . . . . . . . . . . . . . . . . . 89
Heated and Ventilated Front Seats . . . . . . . . . . . . . . . . . . . . . . . . . . 41
Heated Mirrors . . . . . . . . . . . . . . . . . . . 27
Heater Engine . . . . . . . . . . . . . . . . . . . . . . . . 159
Heating . . . . . . . . . . . . . . . . . . . . 134, 137
High Voltage Devices and Wiring . . . . . . . . . . . . . . . . . . . . . . . . . 241
High-Beam On Light . . . . . . . . . . . . 112
High-Speed Operation . . . . . . . . . . 259
Hill and Mountain Roads . . . . . . . . 149
Hill Start Assist (HSA) . . . . . . . . . . 169
Hood . . . . . . . . . . . . . . . . . . . . . . . . . . . 214
Horn . . . . . . . . . . . . . . . . . . . . . . . . . . . . . 89
How to Wear Seat Belts Properly . . . . . . . . . . . . . . . . . . . . . . . . 47
HVAC . . . . . . . . . . . . . . . . . . . . . . 134, 137
Page 355 of 358
Chevrolet Malibu Owner Manual (GMNA-Localizing-U.S./Canada/Mexico-
13555849) - 2020 - CRC - 8/16/19
354 Index
RoofSunroof . . . . . . . . . . . . . . . . . . . . . . . . . 30
Rotation, Tires . . . . . . . . . . . . . . . . . . 265
Routing, Engine Drive Belt . . . . . . 318
Running the Vehicle While Parked . . . . . . . . . . . . . . . . . . . . . . . . 163
S
Safety Defects ReportingCanadian Government . . . . . . . . 331
General Motors . . . . . . . . . . . . . . . 331
U.S. Government . . . . . . . . . . . . . 330
Safety Locks . . . . . . . . . . . . . . . . . . . . . 21
Safety System Check . . . . . . . . . . . . 52
Scheduling Appointments . . . . . . . 325
Sealant Kit, Tire . . . . . . . . . . . . . . . . 273
Seat Belts . . . . . . . . . . . . . . . . . . . . . . . 45 Care . . . . . . . . . . . . . . . . . . . . . . . . . . . . 52
Extender . . . . . . . . . . . . . . . . . . . . . . . . 52
How to Wear Seat BeltsProperly . . . . . . . . . . . . . . . . . . . . . . . 47
Lap-Shoulder Belt . . . . . . . . . . . . . . 49
Reminders . . . . . . . . . . . . . . . . . . . . 102
Replacing after a Crash . . . . . . . . 53
Use During Pregnancy . . . . . . . . . . 51
Seats
Adjustment, Front . . . . . . . . . . . . . . . 35
Head Restraints . . . . . . . . . . . . . . . . 33 Seats (cont'd)
Heated and Ventilated Front . . . . 41
Heated, Rear . . . . . . . . . . . . . . . . . . . 45
Lumbar Adjustment, Front . . . . . . 36
Memory . . . . . . . . . . . . . . . . . . . . . . . . . 38
Power Adjustment, Front . . . . . . . 36
Rear . . . . . . . . . . . . . . . . . . . . . . . . . . . . 42
Reclining Seatbacks . . . . . . . . . . . . 36
Securing Child Restraints . . . . 80, 82
Security
Light . . . . . . . . . . . . . . . . . . . . . . . . . . . 111
OnStar . . . . . . . . . . . . . . . . . . . . . . . 337
Vehicle . . . . . . . . . . . . . . . . . . . . . . . . . 24
Vehicle Alarm . . . . . . . . . . . . . . . . . . . 24
Service . . . . . . . . . . . . . . . . . . . . . . . . . 142 Accessories andModifications . . . . . . . . . . . . . . . . 213
Climate Control System . . . . . . . 134
Doing Your Own Work . . . . . . . . 214
Maintenance Records . . . . . . . . 315
Maintenance, General
Information . . . . . . . . . . . . . . . . . . 302
Parts Identification . . . . . . . . . . . . 316
Scheduling Appointments . . . . . 325
Service Electric Parking Brake Light . . . . . . . . . . . . . . . . . . . . 107
Services Special Application . . . . . . . . . . . 309 Servicing the Airbag . . . . . . . . . . . . . 64
Shift Lock Control Function
Check, Automatic
Transmission . . . . . . . . . . . . . . . . . . 234
Shifting Into Park . . . . . . . . . . . . . . . . . . . . . . 160
Out of Park . . . . . . . . . . . . . . . . . . . 161
Side Blind Zone Alert (SBZA) . . . 193
Signals, Turn and Lane-Change . . . . . . . . . . . . . . . . . 129
Spare Tire
Compact . . . . . . . . . . . . . . . . . . . . . . 285
Special Application Services . . . . 309
Specifications and Capacities . . . . . . . . . . . . . . . . . . . . . 317
Speedometer . . . . . . . . . . . . . . . . . . . . 99
StabiliTrak
OFF Light . . . . . . . . . . . . . . . . . . . . . 109
Start Assist, Hill . . . . . . . . . . . . . . . . . 169
Start Vehicle, Remote . . . . . . . . . . . 16
Starter Switch Check . . . . . . . . . . . 234
Starting the Engine . . . . . . . . . . . . . 157
Steering . . . . . . . . . . . . . . . . . . . . . . . . 146 Heated Wheel . . . . . . . . . . . . . . . . . . 89
Wheel Adjustment . . . . . . . . . . . . . . 89
Wheel Controls . . . . . . . . . . . . . . . . . 89
Stop/Start System . . . . . . . . . . . . . . 158