2020 CHEVROLET MALIBU brake
[x] Cancel search: brakePage 2 of 16

2
Memory Seat ButtonsF
Instrument Panel Illumination Control/Exterior Lamps Control
Driver Information Center
Voice Recognition Buttons/Driver Information Center Controls
Windshield Wipers Lever
Audio Next/Previous Favorite Station Controls (behind steering wheel)
Turn Signal Lever/IntelliBeam ControlF
Heated Steering WheelF/Cruise Control/Forward Collision AlertF/Lane Keep AssistF Buttons
Power Mirror/Window Switches
INSTRUMENT PANEL
Keyless (Pushbutton) Start
Audio Volume Controls (behind steering wheel)
Steering Wheel Adjustment Lever
Low Fuel
Traction Control Off
Brake System
Cruise Control
StabiliTrak Active
StabiliTrak Off
Security
Electric Parking Brake
Service Electric Parking Brake
Lights On Reminder
Airbag Readiness
Engine Oil Pressure
Check Engine
Lane Keep Assist
SYMBOLS
Page 3 of 16

3
Refer to your Owner’s Manual to learn about the information being relayed by the lights, gauges and indicators on the instrument cluster.
See In Brief in your Owner’s Manual.
Hazard Warning Flashers Button
Infotainment System Touch ScreenF
Passenger’s Heated/Ventilated Seat ButtonsF
Electronic Range Select Mode Control
Traction Control/Rear Park AssistF/Auto Parking AssistF Buttons
Driver’s Heated/Ventilated Seat ButtonsF
Automatic Climate ControlsF
USB Port/Accessory Power Outlet
Vehicle Ahead
Pedestrian Ahead
Antilock Brake System
Low Tire Pressure
Door Ajar
Charging System
Driver Seat Belt Reminder
2 Passenger Seat Belt Reminder
F Optional equipment
Page 5 of 16

5
KEYLESS (PUSHBUTTON) START
AUTO ENGINE STOP/START OPERATION
(NON-HYBRID MODEL)
The Remote Keyless Entry (RKE) transmitter must be in the vehicle to turn on the ignition.
STARTING THE ENGINE
With the transmission in Park or Neutral, press the brake pedal and then press the ENGINE START/STOP button. The button indicator will be green.
On hybrid models, the illuminated Vehicle Ready light indicates the vehicle is ready to drive.
Note: If the RKE transmitter battery is weak, place the transmitter in the pocket in the center console to enable the engine to start. Replace the transmitter battery as soon as possible.
STOPPING THE ENGINE/OFF
Shift to Park and press the ENGINE START/STOP button.
ACCESSORY MODE
With the engine off and the brake pedal not depressed, press the ENGINE START/STOP button. The button indicator will be amber.
See Driving and Operating in your Owner’s Manual.
A fuel-saving stop/start system has been integrated with the 1.5L four-c\
ylinder engine. While driving, when the brake is applied and the vehicle is at a complet\
e stop, the auto-matic engine stop/start system may turn off the engine, referred to as a\
n Auto Stop. In Auto Stop mode, the tachometer gauge will read AUTO STOP. The audio syst\
em, climate controls and other accessories will continue to operate. Upon releasing \
the brake pedal or applying the accelerator pedal, the engine will restart. After parkin\
g the vehicle and turning off the engine, the tachometer gauge will read OFF.
The engine may remain running or restart when the vehicle is stopped if:\
• A minimum vehicle speed is not reached.
• The engine or transmission is not at the required operating temperature.\
• The outside temperature is not in the required operating range.
• The shift lever is in any gear other than Drive (D).
• The battery charge is low.
• The climate control system requires the engine to run based on the curre\
nt settings.
• The Auto Stop has reached the maximum allowed time.
See Driving and Operating in your Owner’s Manual.
Page 12 of 16

12
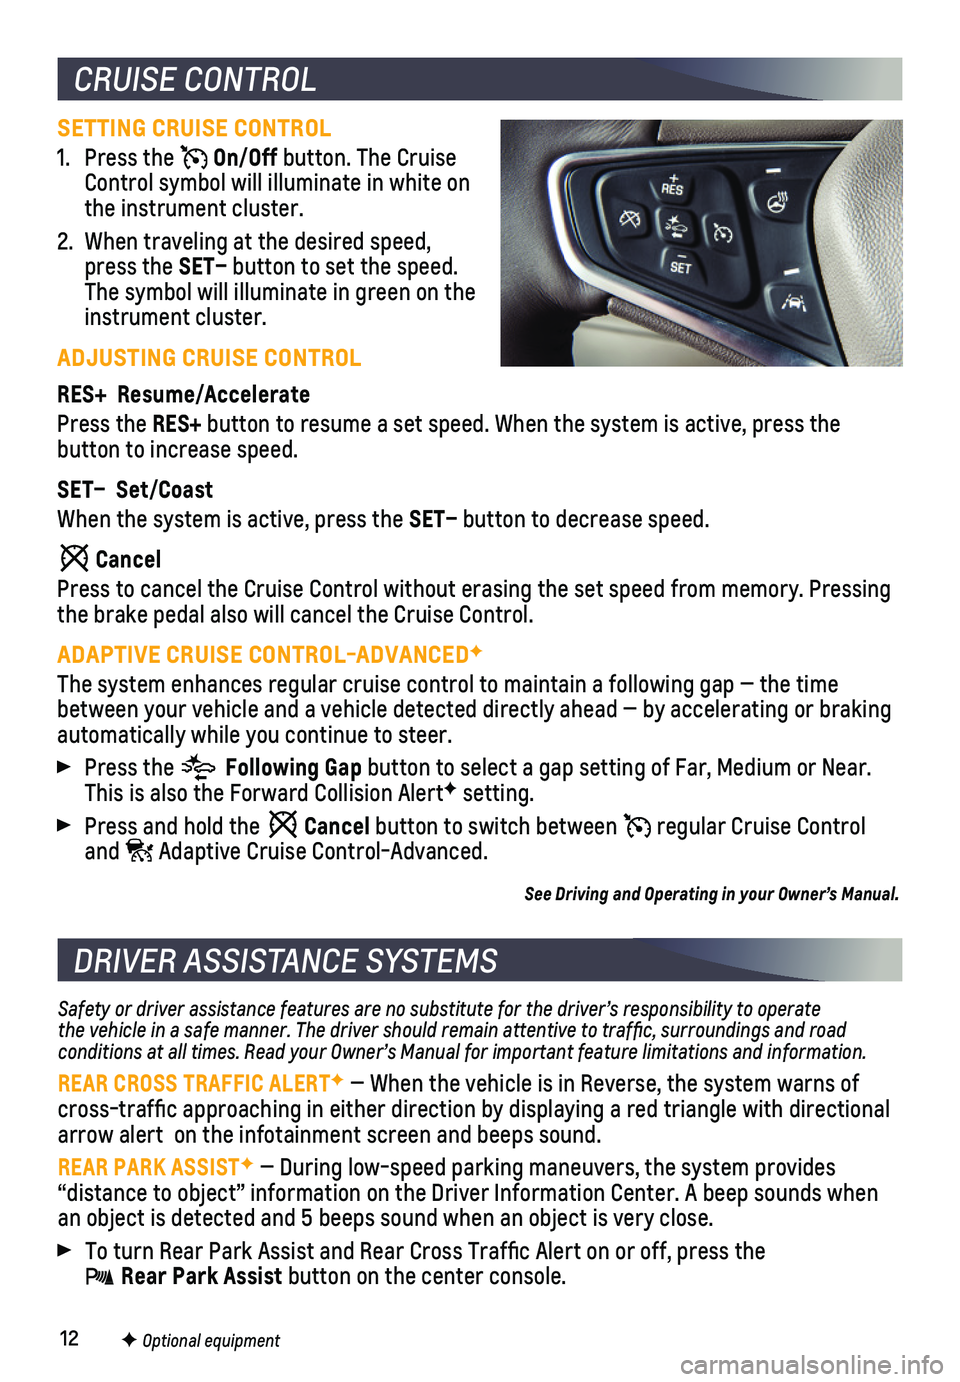
SETTING CRUISE CONTROL
1. Press the On/Off button. The Cruise Control symbol will illuminate in white on the instrument cluster.
2. When traveling at the desired speed, press the SET– button to set the speed. The symbol will illuminate in green on the instrument cluster.
ADJUSTING CRUISE CONTROL
RES+ Resume/Accelerate
Press the RES+ button to resume a set speed. When the system is active, press the
button to increase speed.
SET– Set/Coast
When the system is active, press the SET– button to decrease speed.
Cancel
Press to cancel the Cruise Control without erasing the set speed from me\
mory. Pressing the brake pedal also will cancel the Cruise Control.
ADAPTIVE CRUISE CONTROL-ADVANCEDF
The system enhances regular cruise control to maintain a following gap —\
the time between your vehicle and a vehicle detected directly ahead — by accel\
erating or braking automatically while you continue to steer.
Press the Following Gap button to select a gap setting of Far, Medium or Near. This is also the Forward Collision AlertF setting.
Press and hold the Cancel button to switch between regular Cruise Control and Adaptive Cruise Control-Advanced.
See Driving and Operating in your Owner’s Manual.
CRUISE CONTROL
DRIVER ASSISTANCE SYSTEMS
Safety or driver assistance features are no substitute for the driver’\
s responsibility to operate the vehicle in a safe manner. The driver should remain attentive to traffic, surroundings and road conditions at all times. Read your Owner’s Manual for important feature limitations and information.
REAR CROSS TRAFFIC ALERTF — When the vehicle is in Reverse, the system warns of cross-traffic approaching in either direction by displaying a red tria\
ngle with directional arrow alert on the infotainment screen and beeps sound.
REAR PARK ASSISTF — During low-speed parking maneuvers, the system provides
“distance to object” information on the Driver Information Center.\
A beep sounds when an object is detected and 5 beeps sound when an object is very close.
To turn Rear Park Assist and Rear Cross Traffic Alert on or off, press\
the Rear Park Assist button on the center console.
F Optional equipment
Page 13 of 16

13F Optional equipment
DRIVER ASSISTANCE SYSTEMS
REAR VISION CAMERA — When the vehicle is in Reverse, a view of the area behind the vehicle displays on the infotainment screen. Vehicle speed must be below\
8 mph.
TRACTION CONTROL — The full-time traction control system limits wheelspin in diffic\
ult driving conditions. The system turns on automatically every time the veh\
icle is started. Turn off traction control if the vehicle is stuck and rocking the vehicl\
e is required.
To turn traction control on or off, press the Traction Control button on the center console.
LANE CHANGE ALERT WITH SIDE BLIND ZONE ALERTF — While driving, the system
displays a warning symbol on the left or right side mirror when a vehicle is detect\
ed in that side blind zone area or rapidly approaching that area. The warni\
ng symbol flashes if a turn signal is activated when a vehicle has been detected on the sa\
me side.
To turn on or off, go to Settings > Vehicle > Collision/Detection System\
s > Lane Change Alert.
LANE KEEP ASSIST WITH LANE DEPARTURE WARNINGF — The system may help you avoid collisions due to unintentional lane departures. The Lane Keep Assist Indicator is green on the instrument cluster if the system is available to assist.\
If the vehicle approaches a detected lane marking without using a turn signal in that d\
irection, the system may assist by gently turning the steering wheel and displaying an\
amber .
If active driver steering is not detected, the amber may flash and 3 beeps may sound on the side of the departure direction as the lane marking is crossed. T\
he Lane Keep Assist system does not continuously steer the vehicle; the driver needs \
to steer and be in complete control of the vehicle.
To turn on or off, press the Lane Keep Assist button on the steering wheel.
FORWARD COLLISION ALERTF — The Vehicle Ahead Indicator is green on the instru-ment cluster when a vehicle is detected and is amber when following a ve\
hicle ahead much too closely. When approaching a detected vehicle directly ahead too\
rapidly, a red alert flashes on the windshield and rapid beeps sound.
Press the Collision Alert button on the steering wheel to set the alert timing to Far, Medium, or Near. The setting is displayed on the Driver Information\
Center.
ENHANCED AUTOMATIC EMERGENCY BRAKINGF — In detected potential imminent
collision situations with vehicles directly ahead, the system can provid\
e alerts and enhance driver braking or apply the brakes, if you have not already done\
so, to help reduce the severity or help avoid collisions at very low speeds.
To set Enhanced Automatic Emergency Braking and Forward Collision Alert \
to Alert and Brake, Alert, or Off, go to Settings > Vehicle > Collision/Detection\
Systems > Forward Collision System.
FRONT PEDESTRIAN BRAKINGF — During daytime driving, the system can detect
pedestrians directly ahead up to a distance of approximately 131 feet an\
d displays an amber indicator. When approaching a detected pedestrian too quickly, a red ale\
rt flashes on the windshield and rapid beeps sound. The system may enhanc\
e driver
braking or automatically brake the vehicle, if you have not already done\
so.
To set the system to Alert and Brake, Alert, or Off, go to Settings > Ve\
hicle > Collision/ Detection Systems > Front Pedestrian Detection.
See Driving and Operating in your Owner’s Manual.
Page 14 of 16

14
HYBRID OVERVIEW (IF EQUIPPED)
HYBRID FEATURES
The Malibu Hybrid has an electric drive unit integrated with the highly \
efficient 1.8-liter four-cylinder engine. This blending of electric and gasoline propulsion \
maximizes fuel economy. The system continuously adjusts the operation of the engine, hi\
gh-powered electric drive unit and trunk-mounted lithium-ion battery to provide out\
standing
performance while using significantly less fuel than a conventionally \
powered vehicle.
HYBRID OPERATION
While driving, the gasoline engine will seamlessly turn on when necessar\
y to provide power. It will turn off when not needed to save fuel.
The engine may remain running while driving when:
• Accelerating or driving up hills.
• Vehicle speed is greater than 55 mph (88 kph).
• Charging the high-voltage battery.
• Cabin warming is requested based on the climate control settings.
The engine and electric drive unit work together to provide the required\
propulsion power at the highest efficiency. This may result in higher engine spee\
ds than expected.
See Driving and Operating in your Owner’s Manual.
VEHICLE STARTING With the vehicle in Park or Neutral, press the brake pedal and then pres\
s the ENGINE START/STOP button.
The Vehicle Ready indicator will illuminate when the vehicle is ready to be \
driven. The engine will start only if required to charge the high-voltage battery or\
to warm the cabin.
In temperatures below 32°F/0°C, the engine start will be delayed w\
hile the hybrid system is initializing. The “Initializing – Wait To Shift” message wil\
l be displayed on the Driver Information Center. Wait to shift the vehicle from Park until the messag\
e is no longer displayed and the Vehicle Ready indicator is illuminated.
REGENERATIVE BRAKING
Regenerative braking captures some of the kinetic energy from the moving\
vehicle and stores it in the high-voltage battery, contributing to increased energy \
efficiency. Braking less aggressively allows for more energy recovery.
See Driving and Operating in your Owner’s Manual.
Page 15 of 16

15
HYBRID LOW GEAR
Operating in Low Gear provides the ability to slow without using the bra\
kes. Vehicle operation during acceleration and cruising is not changed.
L2 (Low 2) – increased regenerative braking as the accelerator pedal is released\
.
L1 (Low 1) – maximum regenerative braking to slow the vehicle.
L (Low) – should be used when descending steep grades or in stop-and-go traffi\
c.
See Driving and Operating in your Owner’s Manual.
HYBRID DISPLAYS
Power Gauge – When accelerating or driving, the Power gauge on the instrument
cluster shows the amount of power provided by the propulsion system to propel the vehicle. When coasting or braking, it shows the amount of power provided\
by the
regenerative braking system or the conventional brakes to slow the vehic\
le. Operating the vehicle close to the zero power position during acceleration and braking will result in higher efficiency.
Efficiency Gauge – The Efficiency gauge on the instrument cluster is a guide to driving in an efficient manner. Keeping the indicator in the center of the gau\
ge indicates higher efficiency.
Drive Cycle Info – This screen on the Driver Information Center (DIC) displays the d\
is-tance traveled and average fuel economy for the current trip. The screen\
also is shown when the vehicle is turned off, displaying the information for the compl\
eted trip.
Total Power – This DIC screen provides a numeric representation of the total power being used to propel or stop the vehicle. It shows the power being provi\
ded by the high-voltage battery or charging the high-voltage battery as well as the power provided by the engine.
EV Operation – This DIC screen displays a bar that moves from left to right as th\
e driver requests more power from the propulsion system. While in electric vehicle (EV) mode, maintaining the bar in the green zone maximizes electric operation.
Power Flow – This display on the infotainment screen indicates the current hybri\
d
operating mode, the energy flow direction and the high-voltage battery\
charge level. The operating modes include Engine Power, Battery Power, Hybrid Power, and R\
egen Power Recovery.
Consumption History – This display on the infotainment screen shows the average fuel economy in 5-mile increments over the last 50 miles.
See Instruments and Controls in your Owner’s Manual.
CLIMATE CONTROL SETTINGS
The climate control settings affect the efficiency of the vehicle. To \
maximize efficiency in warm weather, operate the climate controls in the Automatic mode at t\
he highest
comfortable temperature setting or turn off the air conditioning system \
when climate conditions allow.See Climate Controls in your Owner’s Manual.
HYBRID FEATURES