Page 301 of 415
Chevrolet Equinox Owner Manual (GMNA-Localizing-U.S./Canada/Mexico-
13555863) - 2020 - CRC - 8/2/19
300 Vehicle Care
To remove the fuse block cover,
squeeze the clips on the cover and
lift it straight up. SeeEngine
Compartment Overview 0270.
Caution
Spilling liquid on any electrical
component on the vehicle may
damage it. Always keep the
covers on any electrical
component.
The vehicle may not be equipped
with all of the fuses, relays, and
features shown.
Fuses Usage
F01 Starter 1
F02 Starter 2
F03 Lambda sensor 1
F04 Engine control module Fuses Usage
F05 FlexFuel sensor
F06 Transmission control module
F07 –
F08 Engine control module
F09 Air conditioning clutch
Page 302 of 415

Chevrolet Equinox Owner Manual (GMNA-Localizing-U.S./Canada/Mexico-
13555863) - 2020 - CRC - 8/2/19
Vehicle Care 301
FusesUsage
F10 Canister vent solenoid
F11 Fuel system
F12 Front heated seats
F13 Engine coolant pump
F14 –
F15 Lambda sensor 2
F16 Ignition coils
F17 Engine control module
F18 Selective catalytic reduction module
(diesel only)
F19 NOx soot sensor (diesel only)
F20 DC DC converter 2
F21 Shift control
F22 Antilock brake pump
F23 Front/Rear washer pump
F24 – Fuses
Usage
F25 Diesel fuel heater (diesel only)
F26 –
F27 Antilock brake valves
F28 LD trailer
F29 Rear window defogger
F30 Mirror defroster
F31 –
F32 Variable functions
F33 –
F34 Horn
F35 –
F36 Right high-beam headlamp
F37 Left high-beam headlamp
F38 Automatic headlamp leveling
F39 Fog lamps
F40 – Fuses
Usage
F41 Transmission range control module
F42 Motorized headlamp
F43 –
F44 Interior rearview mirror
F45 Passenger side ventilated seat
F46 Driver side ventilated seat
F47 Steering column lock assembly
F48 Rear wiper
F49 –
F50 Heated steering wheel
F51 Right daytime running lamp
F52 Engine control module/
Transmission control
F53 –
Page 303 of 415

Chevrolet Equinox Owner Manual (GMNA-Localizing-U.S./Canada/Mexico-
13555863) - 2020 - CRC - 8/2/19
302 Vehicle Care
FusesUsage
F54 –
F55 Front wiper speed/ Control
F56 –
F57 Left daytime running lamp
Relays Usage
K01 Starter solenoid
K02 Air conditioning control
K03 Engine control module
K04 Front wiper control
K05 Starter solenoid
K06 Fuel heater (diesel only)
K07 –
K08 –
K09 Front wiper speed
K10 –
K11 – Relays
Usage
K12 High-beam headlamps
K13 Headlamps/Daytime running lamps
K14 Run/Crank
K15 Rear window defogger
*K16 Horn
*K17 Selective catalytic reduction
(diesel only)
*K18 Fog lamps
*K19 Coolant pump
*K20 –
*K21 Rear washer pump
*K22 Front washer pump
*K23 Rear wiper control
* PCB relays are not serviceable.Instrument Panel Fuse
Block
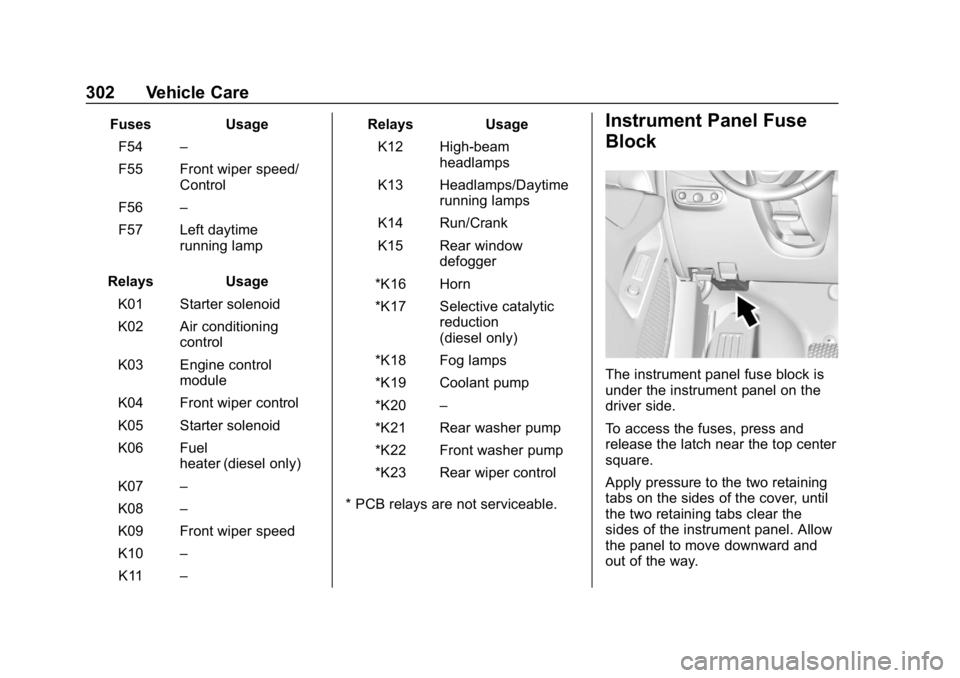
The instrument panel fuse block is
under the instrument panel on the
driver side.
To access the fuses, press and
release the latch near the top center
square.
Apply pressure to the two retaining
tabs on the sides of the cover, until
the two retaining tabs clear the
sides of the instrument panel. Allow
the panel to move downward and
out of the way.
Page 305 of 415
Chevrolet Equinox Owner Manual (GMNA-Localizing-U.S./Canada/Mexico-
13555863) - 2020 - CRC - 8/2/19
304 Vehicle Care
FusesUsage
F18 Body control module 7
F19 Exterior mirror
F20 Body control module 1
F21 Body control module 4
F22 Body control module 6
F23 Electric steering column lock
F24 Sensing and diagnostic module
F25 Occupancy sensor
F26 –
F27 Power seats
F28 Rear windows
F29 –
F30 –
F31 Steering wheel controls Fuses
Usage
F32 Body control module 8
F33 Heating, ventilation, and air conditioning
F34 Passive entry, passive start
F35 Liftgate latch
F36 Wireless charger module/USB
accessory
F37 Cigarette lighter
F38 OnStar
F39 Instrument panel USB
F40 Camera module/ Liftgate module
F41 Park assist module
F42 Radio
Relays Usage
K01 –
K02 Retained accessory power Relays
Usage
K03 Liftgate
K04 –
K05 Logistics
Circuit
Breakers Usage
CB1 –
CB2 Auxiliary power outlet console
Page 306 of 415
Chevrolet Equinox Owner Manual (GMNA-Localizing-U.S./Canada/Mexico-
13555863) - 2020 - CRC - 8/2/19
Vehicle Care 305
Rear Compartment Fuse
Block
The rear compartment fuse block is
behind a trim panel on the side of
the rear compartment.
Remove the trim plate to access the
fuse block.
The vehicle may not be equipped
with all of the fuses and relays
shown.
Page 324 of 415

Chevrolet Equinox Owner Manual (GMNA-Localizing-U.S./Canada/Mexico-
13555863) - 2020 - CRC - 8/2/19
Vehicle Care 323
necessary to replace only one
axle set of worn tires, place the
new tires on the rear axle.
Winter tires with the same speed
rating as the original equipment
tires may not be available for H,
V, W, Y and ZR speed rated
tires. Never exceed the winter
tires’maximum speed capability
when using winter tires with a
lower speed rating.
{Warning
Tires could explode during
improper service. Attempting
to mount or dismount a tire
could cause injury or death.
Only your dealer or authorized
tire service center should
mount or dismount the tires.
{Warning
Mixing tires of different sizes,
tread patterns, or types on the
same axle may cause loss of
control of the vehicle, resulting
in a crash or other vehicle
damage. Use the same size,
load range, and type of tires
as the original tires.
{Warning
Using bias-ply tires on the
vehicle may cause the wheel
rim flanges to develop cracks
after many miles of driving.
A tire and/or wheel could fail
suddenly and cause a crash.
Use only radial-ply tires with
the wheels on the vehicle.
If the vehicle tires must be
replaced with a tire that does not
have a TPC Spec number, make sure they are the same size,
load range, speed rating, and
construction (radial) as the
original tires.
Vehicles that have a tire
pressure monitoring system
could give an inaccurate
low-pressure warning if non-TPC
Spec rated tires are installed.
See
Tire Pressure Monitor
System 0315.
The Tire and Loading
Information label indicates the
original equipment tires on the
vehicle. See Vehicle Load Limits
0 176.
Different Size Tires and
Wheels
If wheels or tires are installed that
are a different size than the original
equipment wheels and tires, vehicle
performance, including its braking,
ride and handling characteristics,
stability, and resistance to rollover
may be affected. If the vehicle has
electronic systems such as antilock
Page 329 of 415

Chevrolet Equinox Owner Manual (GMNA-Localizing-U.S./Canada/Mexico-
13555863) - 2020 - CRC - 8/2/19
328 Vehicle Care
{Warning
Changing a tire can be
dangerous. The vehicle can slip
off the jack and roll over or fall
causing injury or death. Find a
level place to change the tire. To
help prevent the vehicle from
moving:1. Set the parking brake firmly.
2. Put an automatictransmission in P (Park) or a
manual transmission in
1 (First) or R (Reverse).
3. Turn off the engine and do not restart while the vehicle
is raised.
4. Do not allow passengers to remain in the vehicle.
5. Place wheel blocks, if equipped, on both sides of
the tire at the opposite
corner of the tire being
changed. This vehicle may come with a jack
and spare tire or a tire sealant and
compressor kit. To use the jacking
equipment to change a spare tire
safely, follow the instructions below.
Then see
Tire Changing 0335. To
use the tire sealant and compressor
kit, see Tire Sealant and
Compressor Kit 0328.
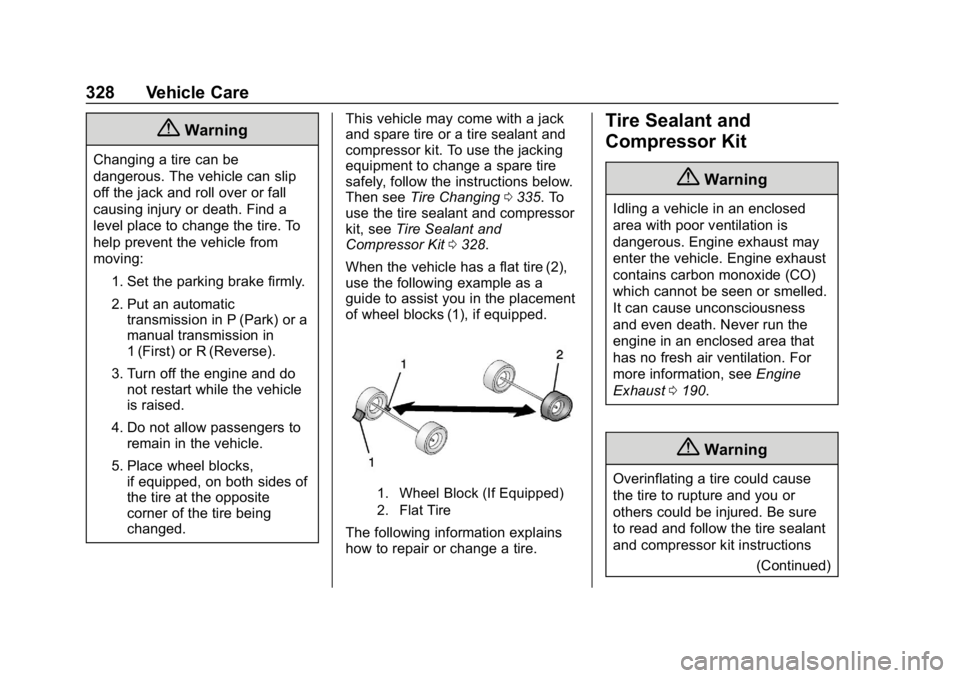
When the vehicle has a flat tire (2),
use the following example as a
guide to assist you in the placement
of wheel blocks (1), if equipped.
1. Wheel Block (If Equipped)
2. Flat Tire
The following information explains
how to repair or change a tire.
Tire Sealant and
Compressor Kit
{Warning
Idling a vehicle in an enclosed
area with poor ventilation is
dangerous. Engine exhaust may
enter the vehicle. Engine exhaust
contains carbon monoxide (CO)
which cannot be seen or smelled.
It can cause unconsciousness
and even death. Never run the
engine in an enclosed area that
has no fresh air ventilation. For
more information, see Engine
Exhaust 0190.
{Warning
Overinflating a tire could cause
the tire to rupture and you or
others could be injured. Be sure
to read and follow the tire sealant
and compressor kit instructions
(Continued)
Page 331 of 415

Chevrolet Equinox Owner Manual (GMNA-Localizing-U.S./Canada/Mexico-
13555863) - 2020 - CRC - 8/2/19
330 Vehicle Care
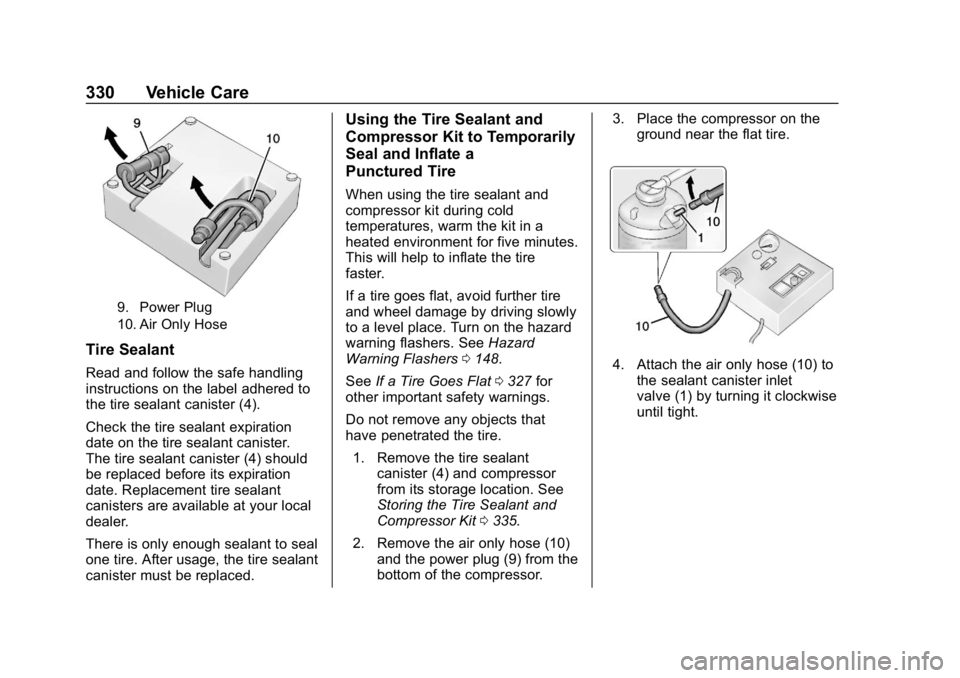
9. Power Plug
10. Air Only Hose
Tire Sealant
Read and follow the safe handling
instructions on the label adhered to
the tire sealant canister (4).
Check the tire sealant expiration
date on the tire sealant canister.
The tire sealant canister (4) should
be replaced before its expiration
date. Replacement tire sealant
canisters are available at your local
dealer.
There is only enough sealant to seal
one tire. After usage, the tire sealant
canister must be replaced.
Using the Tire Sealant and
Compressor Kit to Temporarily
Seal and Inflate a
Punctured Tire
When using the tire sealant and
compressor kit during cold
temperatures, warm the kit in a
heated environment for five minutes.
This will help to inflate the tire
faster.
If a tire goes flat, avoid further tire
and wheel damage by driving slowly
to a level place. Turn on the hazard
warning flashers. SeeHazard
Warning Flashers 0148.
See If a Tire Goes Flat 0327 for
other important safety warnings.
Do not remove any objects that
have penetrated the tire.
1. Remove the tire sealant canister (4) and compressor
from its storage location. See
Storing the Tire Sealant and
Compressor Kit 0335.
2. Remove the air only hose (10) and the power plug (9) from the
bottom of the compressor. 3. Place the compressor on the
ground near the flat tire.
4. Attach the air only hose (10) tothe sealant canister inlet
valve (1) by turning it clockwise
until tight.