2020 CHEVROLET BOLT EV clock
[x] Cancel search: clockPage 249 of 347
Chevrolet BOLT EV Owner Manual (GMNA-Localizing-U.S./Canada/Mexico-
13556250) - 2020 - CRC - 2/11/20
248 Vehicle Care
High Intensity Discharge
(HID) Lighting
{Warning
The High Intensity Discharge
(HID) lighting system operates at
a very high voltage. If you try to
service any of the system
components, you could be
seriously injured. Have your
dealer or a qualified technician
service them.
This vehicle has several HID lamps.
For replacement of any HID lighting
assembly, contact your dealer.
After an HID headlamp bulb has
been replaced, the beam might be a
slightly different shade than it was
originally. This is normal.
LED Lighting
This vehicle has several LED lamps.
For replacement of any LED lighting
assembly, contact your dealer.
Taillamps, Turn Signal,
Stoplamps, and Back-Up
Lamps
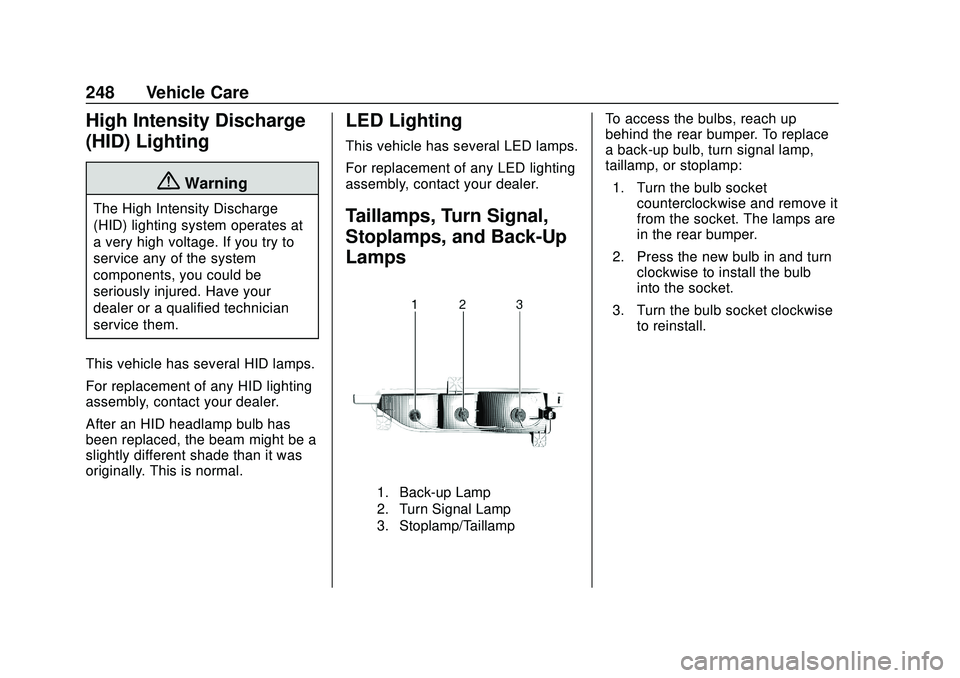
1. Back-up Lamp
2. Turn Signal Lamp
3. Stoplamp/Taillamp
To access the bulbs, reach up
behind the rear bumper. To replace
a back-up bulb, turn signal lamp,
taillamp, or stoplamp: 1. Turn the bulb socket counterclockwise and remove it
from the socket. The lamps are
in the rear bumper.
2. Press the new bulb in and turn clockwise to install the bulb
into the socket.
3. Turn the bulb socket clockwise to reinstall.
Page 250 of 347
Chevrolet BOLT EV Owner Manual (GMNA-Localizing-U.S./Canada/Mexico-
13556250) - 2020 - CRC - 2/11/20
Vehicle Care 249
License Plate Lamp
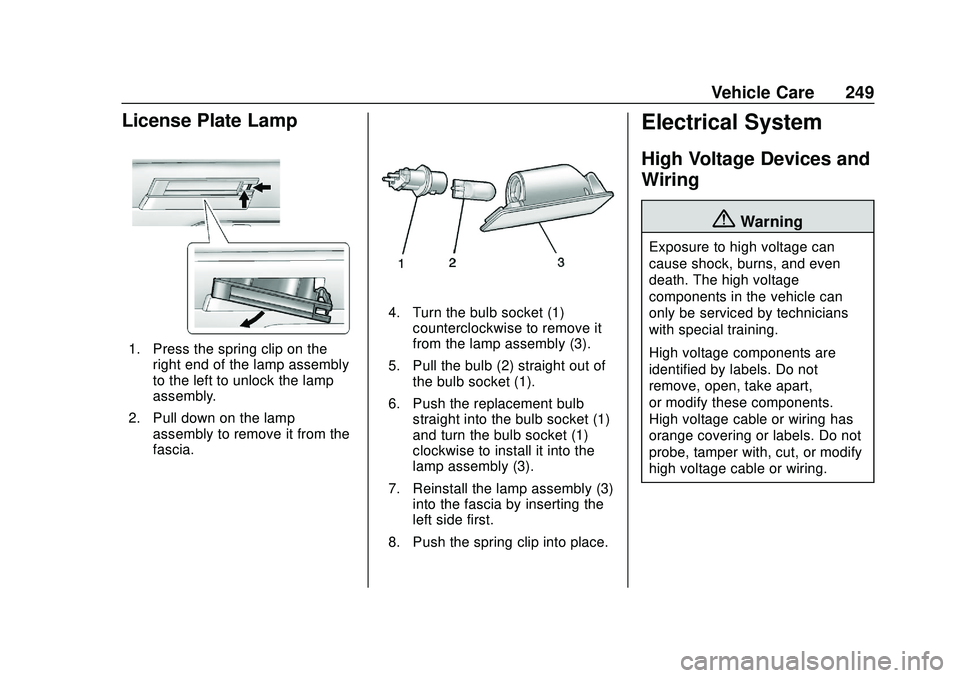
1. Press the spring clip on theright end of the lamp assembly
to the left to unlock the lamp
assembly.
2. Pull down on the lamp assembly to remove it from the
fascia.
4. Turn the bulb socket (1)counterclockwise to remove it
from the lamp assembly (3).
5. Pull the bulb (2) straight out of the bulb socket (1).
6. Push the replacement bulb straight into the bulb socket (1)
and turn the bulb socket (1)
clockwise to install it into the
lamp assembly (3).
7. Reinstall the lamp assembly (3) into the fascia by inserting the
left side first.
8. Push the spring clip into place.
Electrical System
High Voltage Devices and
Wiring
{Warning
Exposure to high voltage can
cause shock, burns, and even
death. The high voltage
components in the vehicle can
only be serviced by technicians
with special training.
High voltage components are
identified by labels. Do not
remove, open, take apart,
or modify these components.
High voltage cable or wiring has
orange covering or labels. Do not
probe, tamper with, cut, or modify
high voltage cable or wiring.
Page 280 of 347
Chevrolet BOLT EV Owner Manual (GMNA-Localizing-U.S./Canada/Mexico-
13556250) - 2020 - CRC - 2/11/20
Vehicle Care 279
Do not remove any objects that
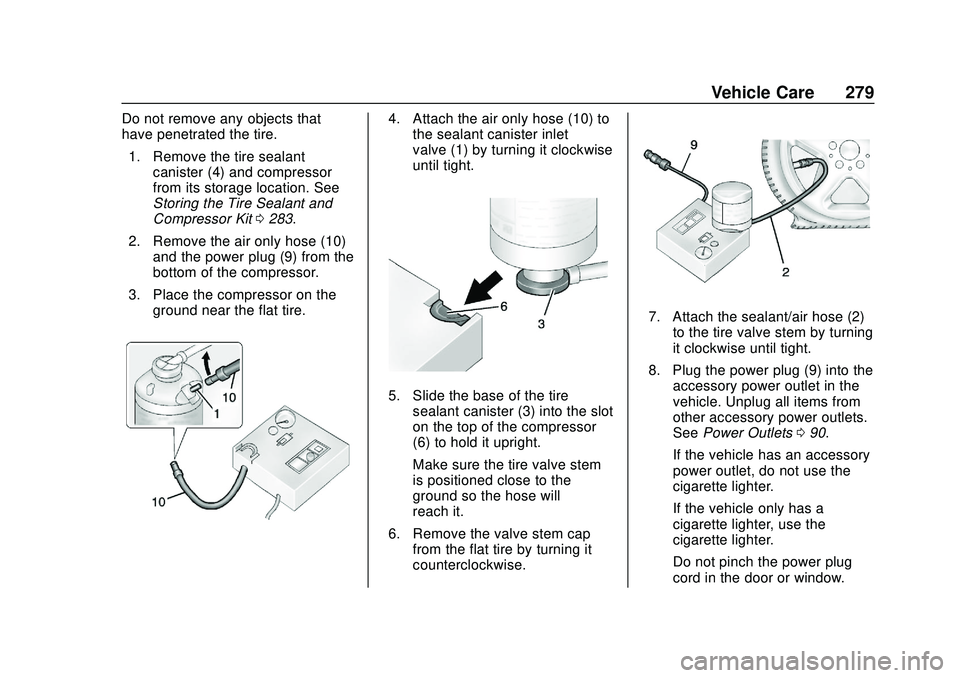
have penetrated the tire.1. Remove the tire sealant canister (4) and compressor
from its storage location. See
Storing the Tire Sealant and
Compressor Kit 0283.
2. Remove the air only hose (10) and the power plug (9) from the
bottom of the compressor.
3. Place the compressor on the ground near the flat tire.4. Attach the air only hose (10) tothe sealant canister inlet
valve (1) by turning it clockwise
until tight.
5. Slide the base of the tiresealant canister (3) into the slot
on the top of the compressor
(6) to hold it upright.
Make sure the tire valve stem
is positioned close to the
ground so the hose will
reach it.
6. Remove the valve stem cap from the flat tire by turning it
counterclockwise.
7. Attach the sealant/air hose (2)to the tire valve stem by turning
it clockwise until tight.
8. Plug the power plug (9) into the accessory power outlet in the
vehicle. Unplug all items from
other accessory power outlets.
See Power Outlets 090.
If the vehicle has an accessory
power outlet, do not use the
cigarette lighter.
If the vehicle only has a
cigarette lighter, use the
cigarette lighter.
Do not pinch the power plug
cord in the door or window.
Page 281 of 347
Chevrolet BOLT EV Owner Manual (GMNA-Localizing-U.S./Canada/Mexico-
13556250) - 2020 - CRC - 2/11/20
280 Vehicle Care
9. Start the vehicle. The vehiclemust be running while using
the air compressor.
10. Press the on/off button (5) to turn the tire sealant and
compressor kit on.
The compressor will inject
sealant and air into the tire.
The pressure gauge (8) will
initially show a high pressure
while the compressor pushes
the sealant into the tire. Once
the sealant is completely
dispersed into the tire, the
pressure will quickly drop and
start to rise again as the tire
inflates with air only.
11. Inflate the tire to the recommended inflation
pressure using the pressure
gauge (8). The recommended
inflation pressure can be found
on the Tire and Loading
Information label. See Tire
Pressure 0263.
The pressure gauge (8) may
read higher than the actual tire
pressure while the compressor is on. Turn the compressor off
to get an accurate pressure
reading. The compressor may
be turned on/off until the
correct pressure is reached.
Caution
If the recommended pressure
cannot be reached after
approximately 25 minutes, the
vehicle should not be driven
farther. The tire is too severely
damaged and the tire sealant and
compressor kit cannot inflate the
tire. Remove the power plug from
the accessory power outlet and
unscrew the inflating hose from
the tire valve. See
Roadside
Assistance Program 0316.
12. Press the on/off button (5) to turn the tire sealant and
compressor kit off.
The tire is not sealed and will
continue to leak air until the
vehicle is driven and the
sealant is distributed in the tire. Therefore, Steps 13–21 must
be done immediately after
Step 12.
Be careful while handling the
tire sealant and compressor kit
as it could be warm after
usage.
13. Unplug the power plug (9) from the accessory power outlet in
the vehicle.
14. Turn the sealant/air hose (2) counterclockwise to remove it
from the tire valve stem.
15. Replace the tire valve stem cap.
16. Remove the tire sealant canister (4) from the slot on top
of the compressor (6).
17. Turn the air only hose (10) counterclockwise to remove it
from the tire sealant canister
inlet valve (1).
18. Turn the sealant/air hose (2) clockwise onto the sealant
canister inlet valve (1) to
prevent sealant leakage.
Page 283 of 347
Chevrolet BOLT EV Owner Manual (GMNA-Localizing-U.S./Canada/Mexico-
13556250) - 2020 - CRC - 2/11/20
282 Vehicle Care
6. Slot on Top of Compressor
7. Pressure Deflation Button
8. Pressure Gauge
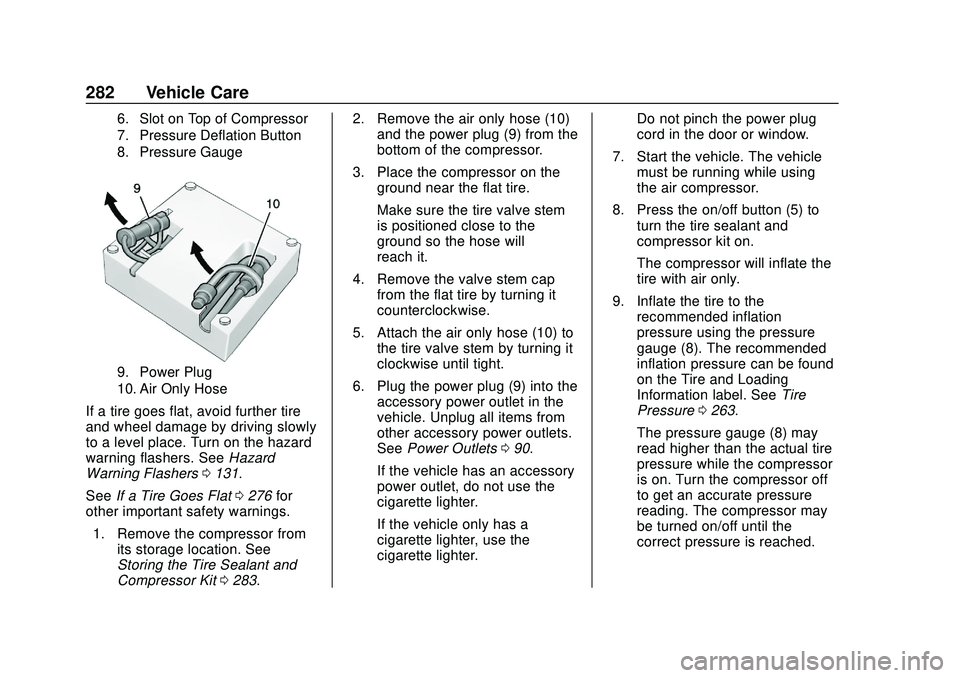
9. Power Plug
10. Air Only Hose
If a tire goes flat, avoid further tire
and wheel damage by driving slowly
to a level place. Turn on the hazard
warning flashers. SeeHazard
Warning Flashers 0131.
See If a Tire Goes Flat 0276 for
other important safety warnings.
1. Remove the compressor from its storage location. See
Storing the Tire Sealant and
Compressor Kit 0283. 2. Remove the air only hose (10)
and the power plug (9) from the
bottom of the compressor.
3. Place the compressor on the ground near the flat tire.
Make sure the tire valve stem
is positioned close to the
ground so the hose will
reach it.
4. Remove the valve stem cap from the flat tire by turning it
counterclockwise.
5. Attach the air only hose (10) to the tire valve stem by turning it
clockwise until tight.
6. Plug the power plug (9) into the accessory power outlet in the
vehicle. Unplug all items from
other accessory power outlets.
See Power Outlets 090.
If the vehicle has an accessory
power outlet, do not use the
cigarette lighter.
If the vehicle only has a
cigarette lighter, use the
cigarette lighter. Do not pinch the power plug
cord in the door or window.
7. Start the vehicle. The vehicle must be running while using
the air compressor.
8. Press the on/off button (5) to turn the tire sealant and
compressor kit on.
The compressor will inflate the
tire with air only.
9. Inflate the tire to the recommended inflation
pressure using the pressure
gauge (8). The recommended
inflation pressure can be found
on the Tire and Loading
Information label. See Tire
Pressure 0263.
The pressure gauge (8) may
read higher than the actual tire
pressure while the compressor
is on. Turn the compressor off
to get an accurate pressure
reading. The compressor may
be turned on/off until the
correct pressure is reached.
Page 284 of 347
Chevrolet BOLT EV Owner Manual (GMNA-Localizing-U.S./Canada/Mexico-
13556250) - 2020 - CRC - 2/11/20
Vehicle Care 283
Caution
If the recommended pressure
cannot be reached after
approximately 25 minutes, the
vehicle should not be driven
farther. The tire is too severely
damaged and the tire sealant and
compressor kit cannot inflate the
tire. Remove the power plug from
the accessory power outlet and
unscrew the inflating hose from
the tire valve. SeeRoadside
Assistance Program 0316.
10. Press the on/off button (5) to turn the tire sealant and
compressor kit off.
Be careful while handling the
compressor as it could be
warm after usage.
11. Unplug the power plug (9) from the accessory power outlet in
the vehicle.
12. Turn the air only hose (10) counterclockwise to remove it
from the tire valve stem. 13. Replace the tire valve
stem cap.
14. Return the air only hose (10) and power plug (9) back to
their original storage location.
15. Return the equipment to its original storage location in the
vehicle.
The tire sealant and compressor kit
has accessory adapters located in a
compartment on the bottom of its
housing that can be used to inflate
air mattresses, balls, etc.
Storing the Tire Sealant
and Compressor Kit
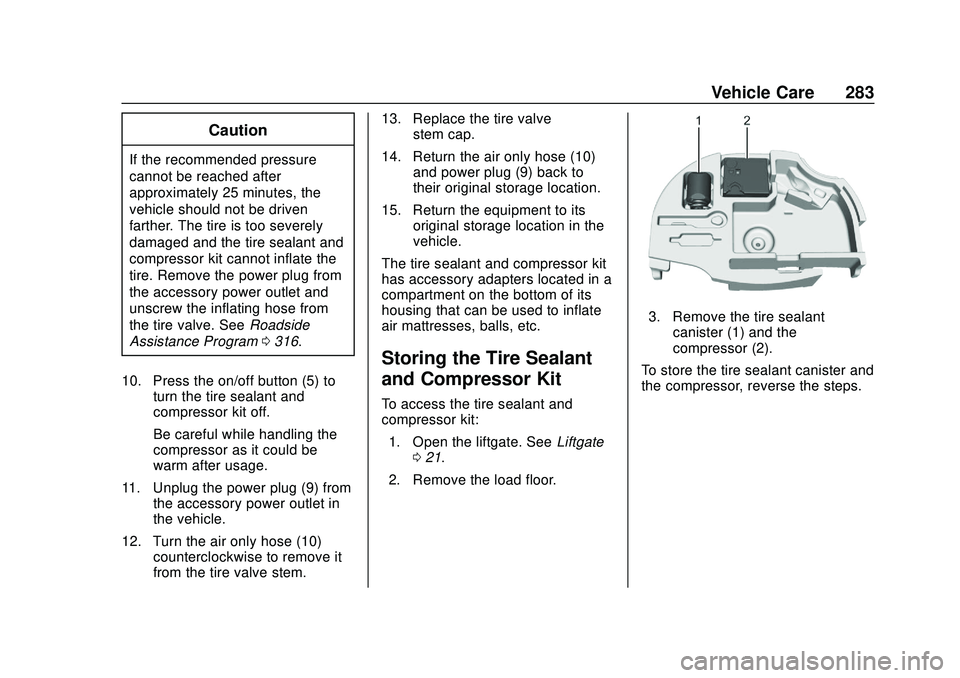
To access the tire sealant and
compressor kit: 1. Open the liftgate. See Liftgate
0 21.
2. Remove the load floor.
3. Remove the tire sealant canister (1) and the
compressor (2).
To store the tire sealant canister and
the compressor, reverse the steps.
Page 338 of 347
Chevrolet BOLT EV Owner Manual (GMNA-Localizing-U.S./Canada/Mexico-
13556250) - 2020 - CRC - 2/11/20
Index 337
Charging (cont'd)Wireless . . . . . . . . . . . . . . . . . . . . . . . . 91
Charging Options . . . . . . . . . . . . . . . 117
Charging Status Screens . . . . . . . 218
Charging System Light . . . . . . . . . 101
Child Restraints Infants and Young Children . . . . . 61
Lower Anchors and Tethers
for Children . . . . . . . . . . . . . . . . . . . 66
Older Children . . . . . . . . . . . . . . . . . . 59
Securing . . . . . . . . . . . . . . . . . . . . 76, 78
Systems . . . . . . . . . . . . . . . . . . . . . . . . 63
Circuit Breakers . . . . . . . . . . . . . . . . 250
Cleaning Exterior Care . . . . . . . . . . . . . . . . . 291
Interior Care . . . . . . . . . . . . . . . . . . 295
Climate Control Systems Automatic . . . . . . . . . . . . . . . . . . . . . 163
Clock . . . . . . . . . . . . . . . . . . . . . . . . . . . . 90
Cluster, Instrument . . . . . . . . . . . . . . 94
Collision Damage Repair . . . . . . . 319
Compartment Underhood . . . . . . . . . . . . . . . . . . . 237
Compartments Storage . . . . . . . . . . . . . . . . . . . . . . . . . 81
Compass . . . . . . . . . . . . . . . . . . . . . . . . 89
Compressor Kit, Tire Sealant . . . 277 Connected Services
Connections . . . . . . . . . . . . . . . . . . 333
Diagnostics . . . . . . . . . . . . . . . . . . . 334
Navigation . . . . . . . . . . . . . . . . . . . . 332
Connections Connected Services . . . . . . . . . . 333
Control
Traction and ElectronicStability . . . . . . . . . . . . . . . . . . . . . 194
Control of a Vehicle . . . . . . . . . . . . . 173
Convex Mirrors . . . . . . . . . . . . . . . . . . 24
Cooling . . . . . . . . . . . . . . . . . . . . . . . . . 163
Cooling System . . . . . . . . . . . . . . . . . 238
Courtesy Lamps . . . . . . . . . . . . . . . . 132
Courtesy Transportation Program . . . . . . . . . . . . . . . . . . . . . . . 318
Cover Cargo . . . . . . . . . . . . . . . . . . . . . . . . . . . 82
Cruise Control . . . . . . . . . . . . . . . . . . 196 Light . . . . . . . . . . . . . . . . . . . . . . . . . . 107
Cupholders . . . . . . . . . . . . . . . . . . . . . . 81
Customer Assistance . . . . . . . . . . . 315
Offices . . . . . . . . . . . . . . . . . . . . . . . . 314
Text Telephone (TTY)Users . . . . . . . . . . . . . . . . . . . . . . . 315
Customer Information Publications OrderingInformation . . . . . . . . . . . . . . . . . . 321 Customer Satisfaction
Procedure . . . . . . . . . . . . . . . . . . . . . 312
Cybersecurity . . . . . . . . . . . . . . . . . . . 324
D
Damage Repair, Collision . . . . . . . 319
Danger, Warning, and Caution . . . . 2
Data Collection OnStar . . . . . . . . . . . . . . . . . . . . . . . 325
Data Recorders, Event . . . . . . . . . 324
Daytime Running Lamps (DRL) . . . . . . . . . . . . . . . . . . 130
Defensive Driving . . . . . . . . . . . . . . . 173
Delayed Charging Override . . . . . 217
Delayed Locking . . . . . . . . . . . . . . . . . 19
Devices Auxiliary . . . . . . . . . . . . . . . . . . . . . . 149
Diagnostics Connected Services . . . . . . . . . . 334
Distracted Driving . . . . . . . . . . . . . . . 172
Dome Lamps . . . . . . . . . . . . . . . . . . . 133
Door Ajar Light . . . . . . . . . . . . . . . . . . . . . 107
Delayed Locking . . . . . . . . . . . . . . . . 19
Locks . . . . . . . . . . . . . . . . . . . . . . . . . . . 17
Power Locks . . . . . . . . . . . . . . . . . . . . 19
Drive Unit Electric . . . . . . . . . . . . . . . . . . . . . . . 187