2020 CHEVROLET BLAZER Cargo
[x] Cancel search: CargoPage 238 of 390
Chevrolet Blazer Owner Manual (GMNA-Localizing-U.S./Canada/Mexico-
13557845) - 2020 - CRC - 3/24/20
Driving and Operating 237
Trailer Load Balance
The correct trailer load balance
must be maintained to ensure trailer
stability. Incorrect load balance is a
leading cause of trailer sway.
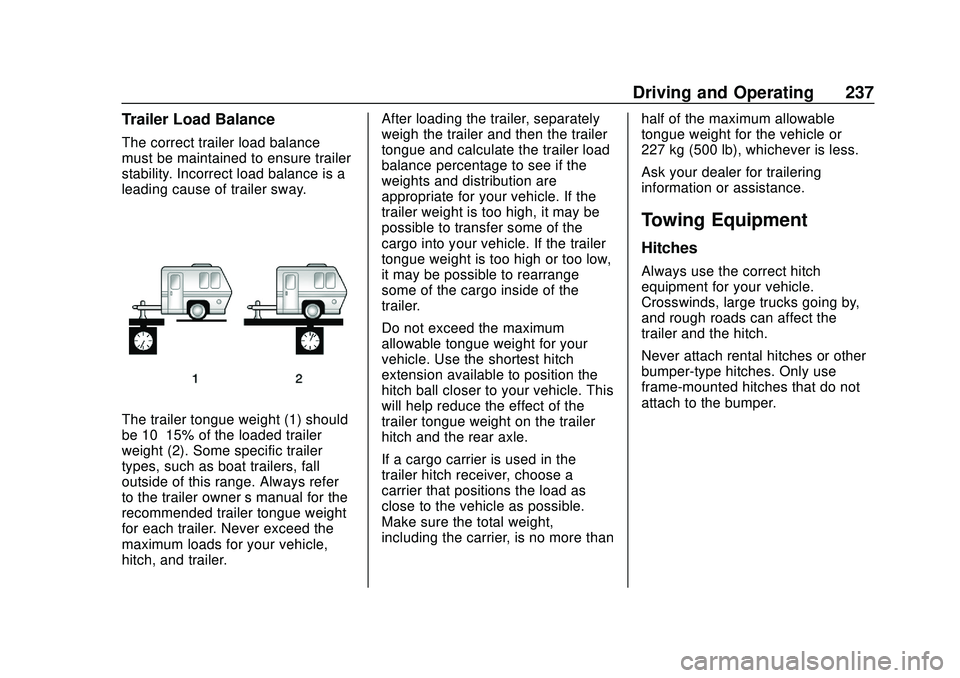
The trailer tongue weight (1) should
be 10–15% of the loaded trailer
weight (2). Some specific trailer
types, such as boat trailers, fall
outside of this range. Always refer
to the trailer owner’s manual for the
recommended trailer tongue weight
for each trailer. Never exceed the
maximum loads for your vehicle,
hitch, and trailer. After loading the trailer, separately
weigh the trailer and then the trailer
tongue and calculate the trailer load
balance percentage to see if the
weights and distribution are
appropriate for your vehicle. If the
trailer weight is too high, it may be
possible to transfer some of the
cargo into your vehicle. If the trailer
tongue weight is too high or too low,
it may be possible to rearrange
some of the cargo inside of the
trailer.
Do not exceed the maximum
allowable tongue weight for your
vehicle. Use the shortest hitch
extension available to position the
hitch ball closer to your vehicle. This
will help reduce the effect of the
trailer tongue weight on the trailer
hitch and the rear axle.
If a cargo carrier is used in the
trailer hitch receiver, choose a
carrier that positions the load as
close to the vehicle as possible.
Make sure the total weight,
including the carrier, is no more than
half of the maximum allowable
tongue weight for the vehicle or
227 kg (500 lb), whichever is less.
Ask your dealer for trailering
information or assistance.
Towing Equipment
Hitches
Always use the correct hitch
equipment for your vehicle.
Crosswinds, large trucks going by,
and rough roads can affect the
trailer and the hitch.
Never attach rental hitches or other
bumper-type hitches. Only use
frame-mounted hitches that do not
attach to the bumper.
Page 242 of 390

Chevrolet Blazer Owner Manual (GMNA-Localizing-U.S./Canada/Mexico-
13557845) - 2020 - CRC - 3/24/20
Driving and Operating 241
may result in unpleasant engine and
transmission driving characteristics
and reduced fuel economy.
Trailer Sway
Control (TSC)
Vehicles with StabiliTrak/Electronic
Stability Control (ESC) have a
Trailer Sway Control (TSC) feature.
Trailer sway is unintended
side-to-side motion of a trailer while
towing. If the vehicle is towing a
trailer and the TSC detects that
sway is increasing, the vehicle
brakes are selectively applied at
each wheel, to help reduce
excessive trailer sway. If equipped
with the Integrated Trailer Brake
Control (ITBC) system, and the
trailer has an electric brake system,
StabiliTrak/ESC may also apply the
trailer brakes.
If TSC is enabled, the Traction
Control System (TCS)/StabiliTrak
light will flash on the instrument
cluster. Reduce vehicle speed by
gradually removing your foot from
the accelerator. If trailer sway
continues, StabiliTrak/ESC can
reduce engine torque to help slow
the vehicle. TSC will not function if
StabiliTrak/ESC is turned off. See
Traction Control/Electronic Stability
Control0194.
{Warning
Trailer sway can result in a crash
and in serious injury or death,
even if the vehicle is equipped
with TSC.
If the trailer begins to sway,
reduce vehicle speed by
gradually removing your foot from
the accelerator. Then pull over to
check the trailer and vehicle to
help correct possible causes,
including an improperly or
overloaded trailer, unrestrained
(Continued)
Warning (Continued)
cargo, improper trailer hitch
configuration, or improperly
inflated or incorrect vehicle or
trailer tires. SeeTowing
Equipment 0237 for trailer ratings
and hitch setup
recommendations.
Trailer Tires
Special Trailer (ST) tires differ from
vehicle tires. Trailer tires are
designed with stiff sidewalls to help
prevent sway and to support heavy
loads. These features can make it
difficult to determine if the trailer tire
pressures are low only based on a
visual inspection.
Always check all trailer tire
pressures before each trip when the
tires are cool. Low trailer tire
pressure is a leading cause of trailer
tire blowouts.
Trailer tires deteriorate over time.
The trailer tire sidewall will show the
week and year the tire was
Page 290 of 390

Chevrolet Blazer Owner Manual (GMNA-Localizing-U.S./Canada/Mexico-
13557845) - 2020 - CRC - 3/24/20
Vehicle Care 289
For example, if the tire size
aspect ratio is 60, as shown in
item (3) of the illustration, it
would mean that the tire's
sidewall is 60 percent as high as
it is wide.
(4) Construction Code
:A letter
code is used to indicate the type
of ply construction in the tire.
The letter “R”means radial ply
construction; the letter “D”
means diagonal or bias ply
construction.
(5) Rim Diameter
:Diameter of
the wheel in inches.
(6) Service Description
:These
characters represent the load
index and speed rating of the
tire. The load index represents
the load carrying capacity a tire
is certified to carry. The speed
rating is the maximum speed a
tire is certified to carry a load.
Tire Terminology and
Definitions
Air Pressure:The amount of
air inside the tire pressing
outward on each square inch of
the tire. Air pressure is
expressed in kPa (kilopascal)
or psi (pounds per square inch).
Accessory Weight
:The
combined weight of optional
accessories. Some examples of
optional accessories are
automatic transmission, power
windows, power seats, and air
conditioning.
Aspect Ratio
:The relationship
of a tire's height to its width.
Belt
:A rubber coated layer of
cords between the plies and the
tread. Cords may be made from
steel or other reinforcing
materials. Bead
:The tire bead contains
steel wires wrapped by steel
cords that hold the tire onto
the rim.
Bias Ply Tire
:A pneumatic tire
in which the plies are laid at
alternate angles less than
90 degrees to the centerline of
the tread.
Cold Tire Pressure
:The
amount of air pressure in a tire,
measured in kPa (kilopascal)
or psi (pounds per square inch)
before a tire has built up heat
from driving. See Tire Pressure
0 291.
Curb Weight
:The weight of a
motor vehicle with standard and
optional equipment including the
maximum capacity of fuel, oil,
and coolant, but without
passengers and cargo.
DOT Markings
:A code molded
into the sidewall of a tire
signifying that the tire is in
compliance with the U.S.
Page 292 of 390
Chevrolet Blazer Owner Manual (GMNA-Localizing-U.S./Canada/Mexico-
13557845) - 2020 - CRC - 3/24/20
Vehicle Care 291
Recommended Inflation
Pressure
:Vehicle
manufacturer's recommended
tire inflation pressure as shown
on the tire placard. See Tire
Pressure 0291 and
Vehicle Load Limits 0174.
Radial Ply Tire
:A pneumatic
tire in which the ply cords that
extend to the beads are laid at
90 degrees to the centerline of
the tread.
Rim
:A metal support for a tire
and upon which the tire beads
are seated.
Sidewall
:The portion of a tire
between the tread and the bead.
Speed Rating
:An
alphanumeric code assigned to
a tire indicating the maximum
speed at which a tire can
operate.
Traction
:The friction between
the tire and the road surface.
The amount of grip provided. Tread
:The portion of a tire that
comes into contact with
the road.
Treadwear Indicators
:Narrow
bands, sometimes called wear
bars, that show across the tread
of a tire when only 1.6 mm
(1/16 in) of tread remains. See
When It Is Time for New Tires
0 300.
UTQGS (Uniform Tire Quality
Grading Standards)
:A tire
information system that provides
consumers with ratings for a
tire's traction, temperature, and
treadwear. Ratings are
determined by tire
manufacturers using
government testing procedures.
The ratings are molded into the
sidewall of the tire. See Uniform
Tire Quality Grading 0302.
Vehicle Capacity Weight
:The
number of designated seating
positions multiplied by 68 kg (150 lb) plus the rated
cargo load. See
Vehicle Load
Limits 0174.
Vehicle Maximum Load on the
Tire
:Load on an individual tire
due to curb weight, accessory
weight, occupant weight, and
cargo weight.
Vehicle Placard
:A label
permanently attached to a
vehicle showing the vehicle
capacity weight and the original
equipment tire size and
recommended inflation pressure.
See “Tire and Loading
Information Label” underVehicle
Load Limits 0174.
Tire Pressure
Tires need the correct amount of
air pressure to operate
effectively.
Page 309 of 390

Chevrolet Blazer Owner Manual (GMNA-Localizing-U.S./Canada/Mexico-
13557845) - 2020 - CRC - 3/24/20
308 Vehicle Care
Warning (Continued)
engine in an enclosed area that
has no fresh air ventilation. For
more information, seeEngine
Exhaust 0186.
{Warning
Overinflating a tire could cause
the tire to rupture and you or
others could be injured. Be sure
to read and follow the tire sealant
and compressor kit instructions
and inflate the tire to its
recommended pressure. Do not
exceed the recommended
pressure.
{Warning
Storing the tire sealant and
compressor kit or other
equipment in the passenger
(Continued)
Warning (Continued)
compartment of the vehicle could
cause injury. In a sudden stop or
collision, loose equipment could
strike someone. Store the tire
sealant and compressor kit in its
original location.
If this vehicle has a tire sealant and
compressor kit, there may not be a
spare tire or tire changing
equipment, and on some vehicles
there may not be a place to store
a tire.
The tire sealant and compressor
can be used to temporarily seal
punctures up to 6 mm (0.25 in) in
the tread area of the tire. It can also
be used to inflate an
underinflated tire.
If the tire has been separated from
the wheel, has damaged sidewalls,
or has a large puncture, the tire is
too severely damaged for the tire
sealant and compressor kit to be
effective. See Roadside Assistance
Program 0359. Removing the Tire Sealant and
Compressor Kit
The tire sealant and compressor kit
is in a bag in the rear compartment
storage area.
1. Open the liftgate. See Liftgate
0 21.
2. Remove the cargo management system divider,
if equipped. See “Rail and
Divider Option” underCargo
Management System 094.
3. Lift the load floor. Use the hook to hold the load floor open. See
Cargo Management System
094.
Page 316 of 390
Chevrolet Blazer Owner Manual (GMNA-Localizing-U.S./Canada/Mexico-
13557845) - 2020 - CRC - 3/24/20
Vehicle Care 315
2. Remove the cargomanagement system divider,
if equipped. See “Rail and
Divider Option” underCargo
Management System 094.
3. Lift the load floor. Use the hook to hold the load floor open. See
Cargo Management System
094.
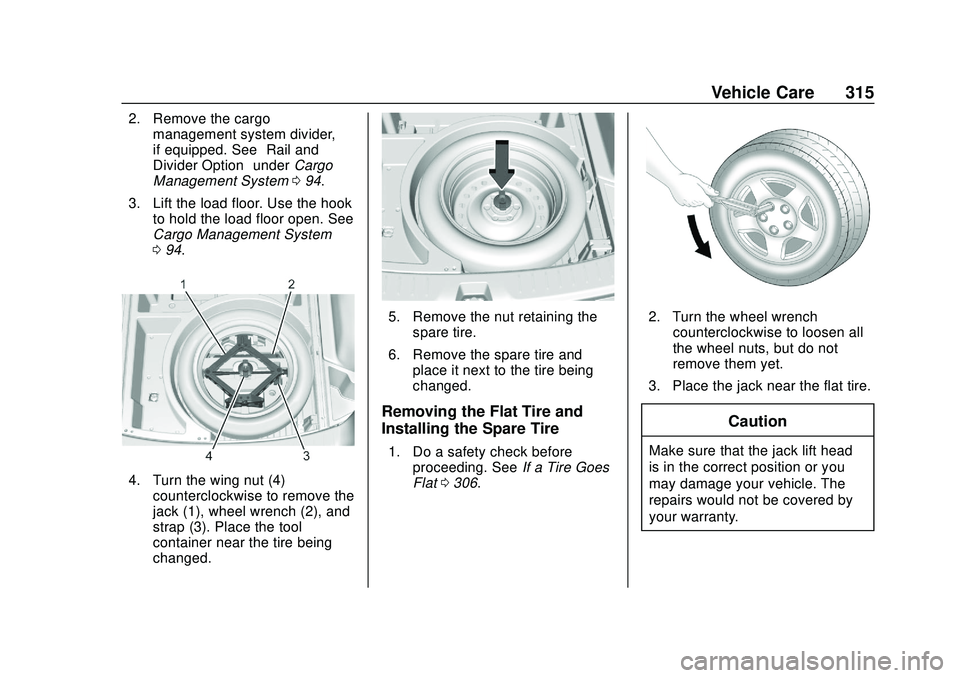
4. Turn the wing nut (4)
counterclockwise to remove the
jack (1), wheel wrench (2), and
strap (3). Place the tool
container near the tire being
changed.
5. Remove the nut retaining thespare tire.
6. Remove the spare tire and place it next to the tire being
changed.
Removing the Flat Tire and
Installing the Spare Tire
1. Do a safety check beforeproceeding. See If a Tire Goes
Flat 0306.
2. Turn the wheel wrench
counterclockwise to loosen all
the wheel nuts, but do not
remove them yet.
3. Place the jack near the flat tire.
Caution
Make sure that the jack lift head
is in the correct position or you
may damage your vehicle. The
repairs would not be covered by
your warranty.
Page 320 of 390
Chevrolet Blazer Owner Manual (GMNA-Localizing-U.S./Canada/Mexico-
13557845) - 2020 - CRC - 3/24/20
Vehicle Care 319
Caution
Wheel covers will not fit on the
vehicle's compact spare. If you try
to put a wheel cover on the
compact spare, the cover or the
spare could be damaged.
Storing a Flat or Spare Tire
and Tools
{Warning
Storing a jack, a tire, or other
equipment in the passenger
compartment of the vehicle could
cause injury. In a sudden stop or
collision, loose equipment could
strike someone. Store all these in
the proper place.
To store the flat or spare tire and
tools: 1. Open the liftgate. See Liftgate
0 21. 2. Put back all tools as they were
stored in the rear storage
compartment and put the
compartment cover back on.
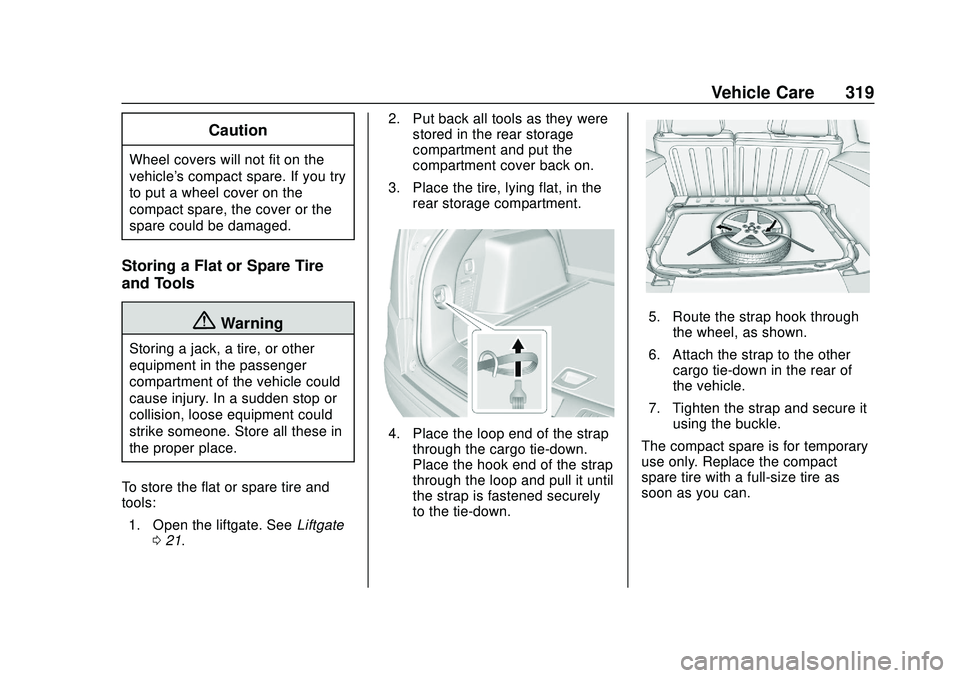
3. Place the tire, lying flat, in the rear storage compartment.
4. Place the loop end of the strapthrough the cargo tie-down.
Place the hook end of the strap
through the loop and pull it until
the strap is fastened securely
to the tie-down.
5. Route the strap hook throughthe wheel, as shown.
6. Attach the strap to the other cargo tie-down in the rear of
the vehicle.
7. Tighten the strap and secure it using the buckle.
The compact spare is for temporary
use only. Replace the compact
spare tire with a full-size tire as
soon as you can.
Page 336 of 390
Chevrolet Blazer Owner Manual (GMNA-Localizing-U.S./Canada/Mexico-
13557845) - 2020 - CRC - 3/24/20
Vehicle Care 335
Cargo Cover and
Convenience Net
If equipped, wash with warm water
and mild detergent. Do not use
chlorine bleach. Rinse with cold
water, and then dry completely.
Care of Seat Belts
Keep belts clean and dry.
{Warning
Do not bleach or dye seat belt
webbing. It may severely weaken
the webbing. In a crash, they
might not be able to provide
adequate protection. Clean and
rinse seat belt webbing only with
mild soap and lukewarm water.
Allow the webbing to dry.
Floor Mats
{Warning
If a floor mat is the wrong size or
is not properly installed, it can
interfere with the pedals.
Interference with the pedals can
cause unintended acceleration
and/or increased stopping
distance which can cause a crash
and injury. Make sure the floor
mat does not interfere with the
pedals.
Use the following guidelines for
proper floor mat usage.
. The original equipment floor
mats were designed for your
vehicle. If the floor mats need
replacing, it is recommended
that GM certified floor mats be
purchased. Non-GM floor mats
may not fit properly and may
interfere with the accelerator or
brake pedal. Always check that
the floor mats do not interfere
with the pedals. .
Do not use a floor mat if the
vehicle is not equipped with a
floor mat retainer on the driver
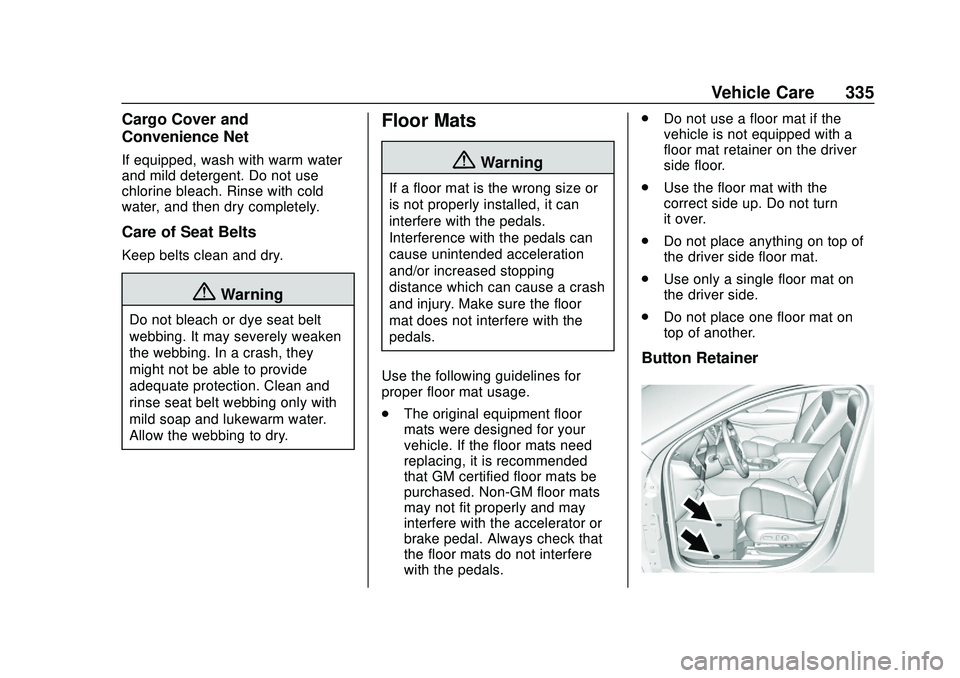
side floor.
. Use the floor mat with the
correct side up. Do not turn
it over.
. Do not place anything on top of
the driver side floor mat.
. Use only a single floor mat on
the driver side.
. Do not place one floor mat on
top of another.
Button Retainer