2020 CADILLAC CT5 mirror controls
[x] Cancel search: mirror controlsPage 2 of 20

2
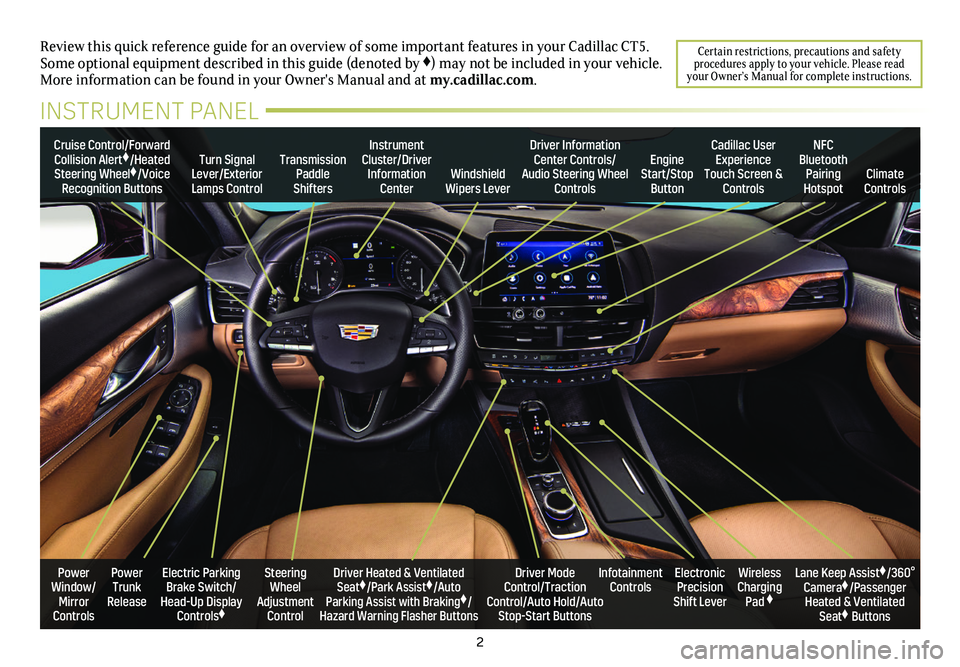
Review this quick reference guide for an overview of some important feat\
ures in your Cadillac CT5. Some optional equipment described in this guide (denoted by ♦) may not be included in your vehicle. More information can be found in your Owner's Manual and at my.cadillac.com.
Certain restrictions, precautions and safety procedures apply to your vehicle. Please read your Owner’s Manual for complete instructions.
INSTRUMENT PANEL
Cruise Control/Forward Collision Alert♦/Heated Steering Wheel♦/Voice Recognition Buttons
Instrument Cluster/Driver Information CenterWindshield Wipers Lever
Transmission Paddle Shifters
Driver Information Center Controls/Audio Steering Wheel Controls
Turn Signal Lever/Exterior Lamps Control
Cadillac User Experience Touch Screen & Controls
Engine Start/Stop Button
NFC Bluetooth Pairing HotspotClimate Controls
Power Trunk Release
Steering Wheel Adjustment Control
Driver Heated & Ventilated Seat♦/Park Assist♦/Auto Parking Assist with Braking♦/Hazard Warning Flasher Buttons
Electric Parking Brake Switch/ Head-Up Display Controls♦
Infotainment ControlsWireless Charging Pad ♦
Electronic Precision Shift Lever
Lane Keep Assist♦/360° Camera♦/Passenger Heated & Ventilated Seat♦ Buttons
Driver Mode Control/Traction Control/Auto Hold/Auto Stop-Start Buttons
Power Window/ Mirror Controls
Page 15 of 20

15
FRONT SEAT FEATURES
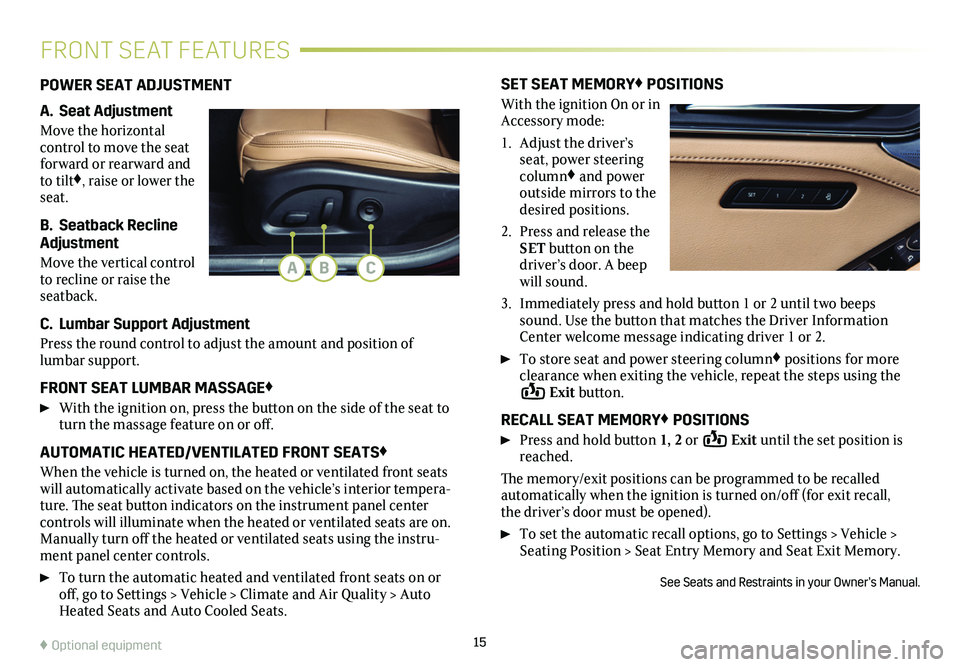
POWER SEAT ADJUSTMENT
A. Seat Adjustment
Move the horizontal control to move the seat forward or rearward and to tilt♦, raise or lower the seat.
B. Seatback Recline Adjustment
Move the vertical control to recline or raise the seatback.
C. Lumbar Support Adjustment
Press the round control to adjust the amount and position of lumbar support.
FRONT SEAT LUMBAR MASSAGE♦
With the ignition on, press the button on the side of the seat to turn the massage feature on or off.
AUTOMATIC HEATED/VENTILATED FRONT SEATS♦
When the vehicle is turned on, the heated or ventilated front seats will automatically activate based on the vehicle’s interior tempera-ture. The seat button indicators on the instrument panel center controls will illuminate when the heated or ventilated seats are on. Manually turn off the heated or ventilated seats using the instru-ment panel center controls.
To turn the automatic heated and ventilated front seats on or off, go to Settings > Vehicle > Climate and Air Quality > Auto Heated Seats and Auto Cooled Seats.
SET SEAT MEMORY♦ POSITIONS
With the ignition On or in Accessory mode:
1. Adjust the driver’s seat, power steering column♦ and power outside mirrors to the desired positions.
2. Press and release the SET button on the driver’s door. A beep will sound.
3. Immediately press and hold button 1 or 2 until two beeps sound. Use the button that matches the Driver Information Center welcome message
indicating driver 1 or 2.
To store seat and power steering column♦ positions for more clearance when exiting the vehicle, repeat the steps using the Exit button.
RECALL SEAT MEMORY♦ POSITIONS
Press and hold button 1, 2 or Exit until the set position is reached.
The memory/exit positions can be programmed to be recalled automatically when the ignition is turned on/off (for exit recall, the driver’s door must be opened).
To set the automatic recall options, go to Settings > Vehicle > Seating Position > Seat Entry Memory and Seat Exit Memory.
See Seats and Restraints in your Owner’s Manual.
ABC
♦ Optional equipment
Page 16 of 20

16
DRIVER ASSISTANCE SYSTEMS
Safety or driver assistance features are no substitute for the driver’s responsibility to operate the vehicle in a safe manner. The driver should remain attentive to traffic, surroundings and road conditions at all times. Read your Owner’s Manual for important feature limitations and information\
.
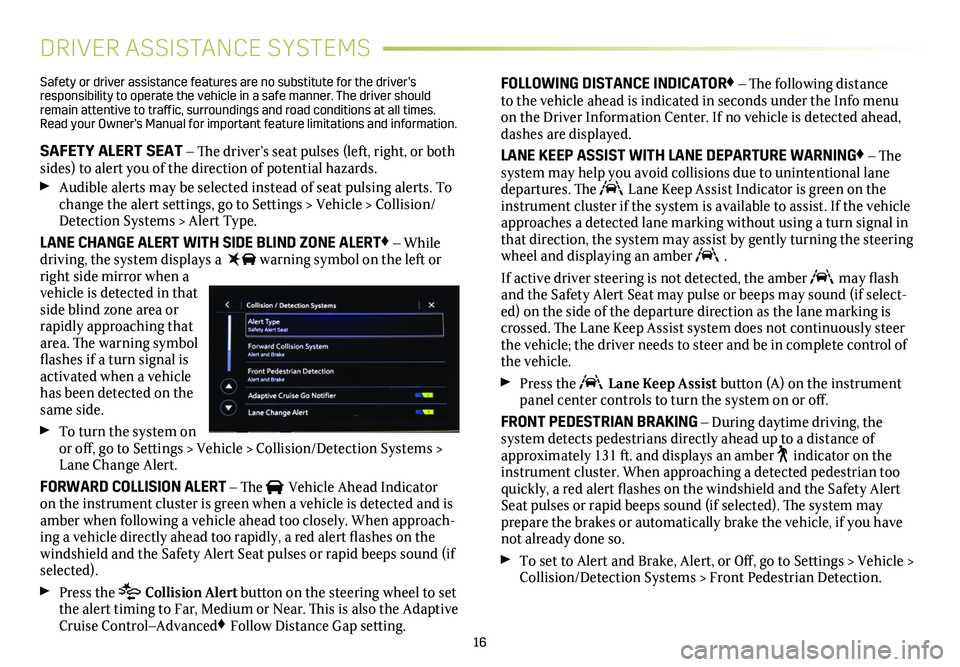
SAFETY ALERT SEAT – The driver’s seat pulses (left, right, or both sides) to alert you of the direction of potential hazards.
Audible alerts may be selected instead of seat pulsing alerts. To change the alert settings, go to Settings > Vehicle > Collision/Detection Systems > Alert Type.
LANE CHANGE ALERT WITH SIDE BLIND ZONE ALERT♦ – While driving, the system displays a warning symbol on the left or right side mirror when a vehicle is detected in that side blind zone area or rapidly approaching that area. The warning symbol flashes if a turn signal is activated when a vehicle has been detected on the same side.
To turn the system on or off, go to Settings > Vehicle > Collision/Detection Systems > Lane Change Alert.
FORWARD COLLISION ALERT – The Vehicle Ahead Indicator on the instrument cluster is green when a vehicle is detected and is amber when following a vehicle ahead too closely. When approach-ing a vehicle directly ahead too rapidly, a red alert flashes on the windshield and the Safety Alert Seat pulses or rapid beeps sound (if selected).
Press the Collision Alert button on the steering wheel to set the alert timing to Far, Medium or Near. This is also the Adaptive Cruise Control–Advanced♦ Follow Distance Gap setting.
FOLLOWING DISTANCE INDICATOR♦ – The following distance to the vehicle ahead is indicated in seconds under the Info menu on the Driver Information Center. If no vehicle is detected ahead, dashes are displayed.
LANE KEEP ASSIST WITH LANE DEPARTURE WARNING♦ – The system may help you avoid collisions due to unintentional lane departures. The Lane Keep Assist Indicator is green on the instrument cluster if the system is available to assist. If the vehicle approaches a detected lane marking without using a turn signal in that direction, the system may assist by gently turning the steering wheel and displaying an amber .
If active driver steering is not detected, the amber may flash and the Safety Alert Seat may pulse or beeps may sound (if select-ed) on the side of the departure direction as the lane marking is crossed. The Lane Keep Assist system does not continuously steer the vehicle; the driver needs to steer and be in complete control of the vehicle.
Press the Lane Keep Assist button (A) on the instrument panel center controls to turn the system on or off.
FRONT PEDESTRIAN BRAKING – During daytime driving, the
system detects pedestrians directly ahead up to a distance of approximately 131 ft. and displays an amber indicator on the instrument cluster. When approaching a detected pedestrian too quickly, a red alert flashes on the windshield and the Safety Alert Seat pulses or rapid beeps sound (if selected). The system may
prepare the brakes or automatically brake the vehicle, if you have not already done so.
To set to Alert and Brake, Alert, or Off, go to Settings > Vehicle > Collision/Detection Systems > Front Pedestrian Detection.
Page 18 of 20

18
DRIVER ASSISTANCE SYSTEMS
AUTOMATIC PARKING ASSIST WITH BRAKING♦
The Automatic Parking Assist with Braking system steers the
vehicle at idle speed and applies the brakes to help you park the vehicle while you follow commands and control the gear selection.
1. While driving below 18 mph, press the Park Assist button on the instrument panel center controls. A parking assist dis-play is shown on the infotainment screen. The system will begin searching for a large enough parking space.
2. To switch between parallel and perpen-dicular parking, touch the Parking Type screen button. To search for a parking spot to the right or left, touch the Parking Side screen button.
3. Once a space is found, shift the vehicle into Reverse or Drive as directed and follow the instructions on the infotainment screen. The vehicle automatically steers and brakes, moving at idle speed into a detected parking space. The driver must follow the instructions, select gears, and override braking and acceleration as needed. Parking Complete will be displayed and a beep will sound when the parking maneuver is complete.
TRACTION CONTROL
The traction control system limits wheelspin in difficult driving conditions. The system turns on automatically every time the vehi-cle is started. Turn off traction control if the vehicle is stuck and rocking the vehicle is required.
Press the Traction Control button at the front of the center console to turn the system off or on again. The Traction Control Off light will illuminate on the instrument cluster when the system is off.
See Driving and Operating in your Owner’s Manual.
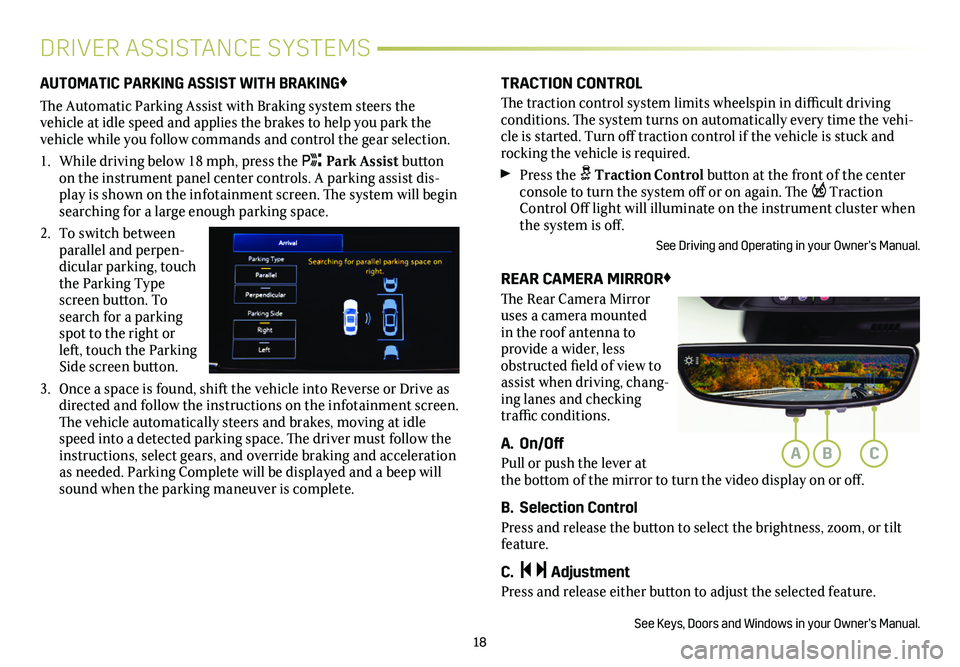
REAR CAMERA MIRROR♦
The Rear Camera Mirror uses a camera mounted in the roof antenna to
provide a wider, less obstructed field of view to assist when driving, chang-ing lanes and checking traffic conditions.
A. On/Off
Pull or push the lever at the bottom of the mirror to turn the video display on or off.
B. Selection Control
Press and release the button to select the brightness, zoom, or tilt feature.
C. Adjustment
Press and release either button to adjust the selected feature.
See Keys, Doors and Windows in your Owner’s Manual.
ABC