2020 AUDI TT COUPE warning
[x] Cancel search: warningPage 85 of 280

8S1012721BB
Driving
— If the engine must run while you are work-
ing in the engine compartment with the
hood open, make sure a gear is not engaged.
The selector lever must be firmly in the
P position and locked in place and the park-
ing brake must be set > page 200. Other-
wise, the vehicle could begin moving when
increasing the engine speed, even with the
parking brake set.
() Note
— If you have to stop on an incline, always
press the brake pedal to hold the vehicle in
place to reduce the risk of the vehicle rolling
backward. Do not try to hold the vehicle in
place by pressing and holding the accelera-
tor pedal. The transmission can overheat,
which increases the risk of damage.
— Allowing the vehicle to roll when the engine
is stopped and the selector lever is in the N
position will damage the automatic trans-
mission because it is not lubricated under
those circumstances.
— The transmission can overheat and be dam-
aged under certain driving and traffic condi-
tions such as frequent starts, creeping for a
long time, or stop-and-go traffic. When the
i or ij indicator light turns on, stop the
vehicle at the next opportunity and let the
transmission cool > page 85.
— Allowing the vehicle to roll when the engine
is stopped will damage the S tronic trans-
mission because it is not lubricated
=> page 249, Towing.
@® Tips
For safety reasons, the parking brake is re-
leased automatically only when the driver's
safety belt is fastened.
Hill descent control
The hill descent control system assists the driver
when driving down hills.
Hill descent control is activated when the selec-
tor lever is in the "D" or "S" position and you
press the brake pedal. The transmission automat-
ically selects a gear that is suitable for the hill.
Hill descent control tries to maintain the speed
that was selected at the time of braking, within
physical and technical limitations. If may still be
necessary to adjust the speed with the brakes.
Because hill descent control cannot shift down
farther than 3rd gear, it may be necessary to shift
into tiptronic mode in very steep areas. In this
case, shift manually into 1st or 2nd gear in tip-
tronic mode to use the engine's braking force to
relieve the brakes.
Hill descent control switches off once the hill lev-
els
out or if you press the accelerator pedal.
On vehicles with a cruise control system*
= page 87, hill descent control is also activated
when the speed is set.
ZX WARNING
Hill descent control may not be able to main-
tain a constant speed under all conditions. Al-
ways be ready to apply the brakes.
Shifting manually (tiptronic mode)
The tiptronic mode allows the driver to shift the
gears manually.
| 8Fv-0114]
Fig. 88 Center console: shifting manually with the selector
lever
Fig. 89 Steering wheel: shift paddles*
83
Page 86 of 280

Driving
You can shift the gears manually when in “D”
mode. The transmission must be in tiptronic
mode.
Shifting with the selector lever
You can shift into manual shifting mode while the
vehicle is stationary or while driving.
> To switch to manual shifting mode, tilt the se-
lector lever toward the front passenger's side
=> fig. 88. “M” will be displayed in the instru-
ment cluster.
> Upshifting: push the selector lever forward ().
> Downshifting: push the selector lever toward
the rear ().
> To switch back to automatic mode, tilt the se-
lector lever toward the driver's side.
Shifting with the shift paddles
Applies to: vehicles with shift paddles
> Upshifting: press the @) shift paddle > fig. 89.
> Downshifting: press the ©) shift paddle.
> Applies to: RS models: To select the lowest/
highest possible gear, press and hold down the
shift paddle @)/@).
If the shift paddles are tapped while in the D/S
selector lever position, automatic mode switches
off briefly. To switch from manually shifting back
to automatic shifting immediately, tap the shift
paddle @) © fig. 89 for 1 second.
To keep shifting manually, tilt the selector lever
toward the front passenger's side.
@ Tips
— The transmission only allows manual shift-
ing when the engine speed is within the per-
mitted range.
— The transmission automatically shifts up or
down before critical engine speed is
reached.
— Applies to: RS models: When accelerating,
the transmission will not automatically shift
to the next gear shortly before the maxi-
mum permitted engine RPM is reached.
Shift to the next highest gear at the right
time.
84
Kick-down enables maximum acceleration.
When you press the accelerator pedal down be-
yond the resistance point, the automatic trans-
mission downshifts into a lower gear and the en-
gine utilizes its full power, if the vehicle speed
and engine RPM permit. It shifts up into the next
higher gear once the maximum permitted engine
RPM is reached.
ZX WARNING
Please note that the wheels could spin on
slick or slippery roads when kick-down is ac-
tive.
Launch Control
Launch Control provides the best possible accel-
eration when starting from a stop.
Requirements
— The engine must be at operating temperature.
— The steering wheel must not be turned.
— ESC must be limited > page 106.
— Driving program “S” > page 80 or the Audi
drive select* Dynamic mode must be selected
=> page 96.
Using Launch Control
— Press the brake pedal with your left foot and
hold it all the way down for at least one second.
— With the brake pedal pressed, press the accel-
erator pedal all the way down with your right
foot at the same time.
— Once the engine reaches a constant speed, re-
move your foot from the brake pedal.
Once the vehicle has started moving, reactivate
the ESC so that it is fully functional.
Z\ WARNING
Only use Launch Control when road and traffic
conditions allow it and other road users will
not be endangered or impacted by your driv-
ing and the vehicle's acceleration. The driving
wheels could spin and the vehicle could
swerve, especially on slick or slippery road
Page 88 of 280
![AUDI TT COUPE 2020 Owners Manual Driving
Selector lever emergency release
|
BFV-0266]
Fig. 91 Selector lever: using the emergency release to
move out of the Park position
The emergency release mechanism is located in
AUDI TT COUPE 2020 Owners Manual Driving
Selector lever emergency release
|
BFV-0266]
Fig. 91 Selector lever: using the emergency release to
move out of the Park position
The emergency release mechanism is located in](/manual-img/6/57658/w960_57658-87.png)
Driving
Selector lever emergency release
|
BFV-0266]
Fig. 91 Selector lever: using the emergency release to
move out of the Park position
The emergency release mechanism is located in
the right area under the selector lever shift gate.
Using the emergency release can be complicated.
See an authorized Audi dealer or authorized Audi
Service Facility for assistance.
You will need the screwdriver from the vehicle
tool kit to release it > page 241. Use the flat side
of the reversible screwdriver blade.
Removing the cover
> Set the parking brake to secure your vehicle
from rolling away. If this is not possible, secure
your vehicle from rolling using another meth-
od.
> Switch the ignition off.
> To loosen the shifter boot, carefully insert the
flat side of the screwdriver sideways into the
slit near the shifter boot > fig. 90.
> Carefully pry the shifter boot out with the
screwdriver while gripping the boot at the fold
and pulling it upward and out of the opening
> fig. 91.
> Fold the shifter boot up around the shifter
knob.
86
Selector lever emergency release
> Press and hold the yellow release button with
the screwdriver.
> At the same time, press the release button on
the selector lever (2) and move the selector lev-
er to the “N” position.
Reattaching the cover
> Clip the shift cover back into the shift gate.
ZA\ WARNING
— The parking lock may only be released using
the emergency release if the parking brake
is set. If it is not working, secure the vehicle
from rolling using the brake pedal or other
suitable means, such as blocking a front and
a rear wheel. An unsecured vehicle may roll
away, which increases the risk of an acci-
dent.
— Only activate the emergency release while
ona level surface or a slight slope.
—To reduce the risk of an accident, you must
not drive when the emergency release is ac-
tivated.
Page 89 of 280
8S1012721BB
Assist systems
Assist systems
Speed warning system
Applies to: vehicles with speed warning system
The speed warning system helps you to stay be-
low a specified maximum speed that can be set,
changed or deleted in the Infotainment system.
The speed warning system warns you if you are
exceeding the maximum speed that you have set.
A warning tone will sound as soon as your speed
exceeds the stored value slightly. The ow in-
dicator light and a message will appear in the in-
strument cluster display at the same time. The
Ge) indicator light and the message turn off if
the speed falls back below the stored maximum
speed.
Setting a threshold is recommended if you would
like to be reminded when you reach a certain
maximum speed. Situations where you may want
to do so include driving in a country with a gener-
al speed limit or if there is a specified maximum
speed for winter tires.
Setting the warning threshold
> Select in the Infotainment system: [MENU] but-
ton > Vehicle > left control button > Driver as-
sistance > Speed warning > Manual.
G) Tips
Regardless of the speed warning system, you
should always monitor your speed using the
speedometer and make sure you are following
the legal speed limit.
Messages
Applies to: vehicles with speed warning system
Manually set speed limit XX exceeded
The stored speed was exceeded.
Cruise control system
Applies to: vehicles with cruise control system
The cruise control system assists the driver in
maintaining a constant speed above approxi-
mately 15 mph (20 km/h). The system maintains
the desired speed by braking and accelerating.
ZA WARNING
— Always pay attention to the traffic around
your vehicle when the cruise control system
is in operation. As the driver, you are always
responsible for controlling your vehicle
speed and the distance between your vehicle
and
other vehicles.
— For safety reasons, cruise control should not
be used in the city, in stop-and-go traffic, on
winding roads, and when road conditions are
poor (such as ice, fog, gravel, heavy rain,
and conditions that could lead to hydroplan-
ing), because this increases the risk of an ac-
cident.
— Switch the cruise control off temporarily
when driving in turning lanes, highway exits,
or in construction zones.
—To reduce the risk of an accident, you should
only resume the stored speed if it is suitable
for the current traffic conditions.
@) Note
Before driving downhill a long distance ona
steep hill, decrease your speed and select a
lower gear. This makes use of the engine brak-
ing effect and reduces the load placed on the
brakes.
@) Tips
The brake lights turn on when the brakes are
applied automatically.
87
Page 90 of 280
Assist systems
Switching the system on
Applies to: vehicles with cruise control system
@ #
©
f°
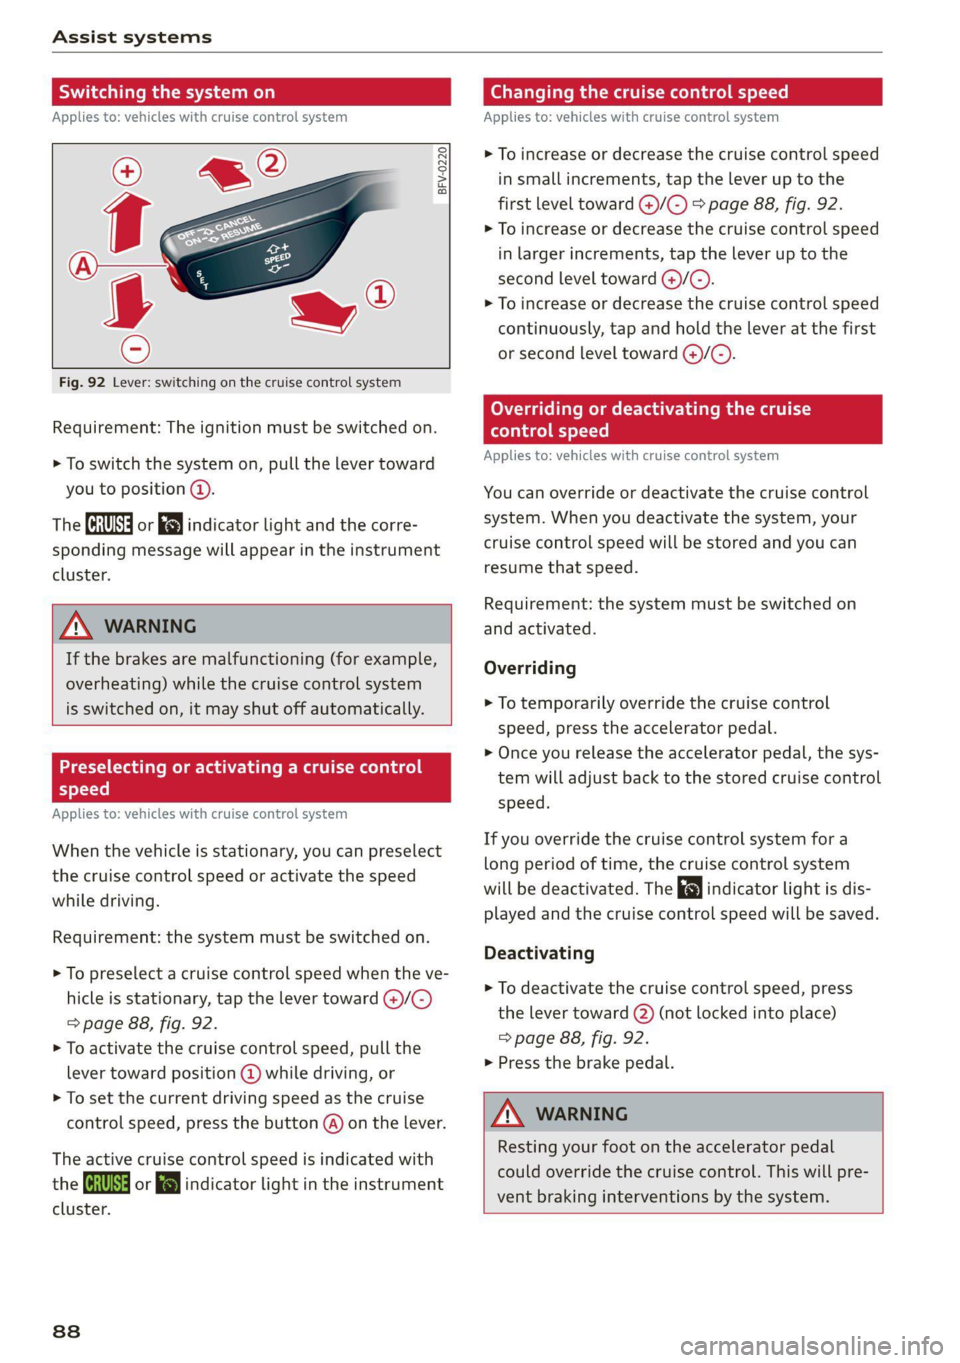
Fig. 92 Lever: switching on the cruise control system
Requirement: The ignition must be switched on.
> To switch the system on, pull the lever toward
you to position @).
The (a or 8] indicator light and the corre-
sponding message will appear in the instrument
cluster.
ZA WARNING
If the brakes are malfunctioning (for example,
overheating) while the cruise control system
is switched on, it may shut off automatically.
Preselecting or activating a cruise control
Cy ey-t-te)
Applies to: vehicles with cruise control system
When the vehicle is stationary, you can preselect
the cruise control speed or activate the speed
while driving.
Requirement: the system must be switched on.
> To preselect a cruise control speed when the ve-
hicle is stationary, tap the lever toward @)/G)
=> page 88, fig. 92.
> To activate the cruise control speed, pull the
lever toward position @ while driving, or
> To set the current driving speed as the cruise
control speed, press the button @) on the lever.
The active cruise control speed is indicated with
the ICRUISE| or i=} indicator light in the instrument
cluster.
838
Changing the cruise control speed
Applies to: vehicles with cruise control system
> To increase or decrease the cruise control speed
in small increments, tap the lever up to the
first level toward @)/G) > page 88, fig. 92.
> To increase or decrease the cruise control speed
in larger increments, tap the lever up to the
second level toward ()/C).
> To increase or decrease the cruise control speed
continuously, tap and hold the lever at the first
or second level toward @/G).
Overriding or deactivating the cruise
control speed
Applies to: vehicles with cruise control system
You can override or deactivate the cruise control
system. When you deactivate the system, your
cruise control speed will be stored and you can
resume that speed.
Requirement: the system must be switched on
and activated.
Overriding
> To temporarily override the cruise control
speed, press the accelerator pedal.
> Once you release the accelerator pedal, the sys-
tem will adjust back to the stored cruise control
speed.
If you override the cruise control system for a
long period of time, the cruise control system
will be deactivated. The indicator light is dis-
played and the cruise control speed will be saved.
Deactivating
> To deactivate the cruise control speed, press
the lever toward (2) (not locked into place)
=> page 88, fig. 92.
> Press the brake pedal.
A WARNING
Resting your foot on the accelerator pedal
could override the cruise control. This will pre-
vent braking interventions by the system.
Page 91 of 280
8S1012721BB
Assist systems
Switching the system off
Applies to: vehicles with cruise control system
When you switch the system off completely, the
cruise control speed will be deleted.
Requirement: the system must be switched on.
> To switch the system off, press the lever toward
@ (locked into place) > page 88, fig. 92, or
> Switch the ignition off.
Applies to: vehicles with cruise control system
ICRUISE| / 3) Speed control system: currently un-
available. See owner's manual
If the indicator light turns on and this message
appears, the cruise control system has been deac-
tivated. There is a temporary malfunction, for ex-
ample the brakes are overheating. Switch the
cruise control system on again later.
Audi active lane assist
Applies to: vehicles with Audi active lane assist
Active lane assist detects lane marker lines with-
in the limits of the system using a camera in the
windshield. If you are approaching a detected
lane marker line and it appears likely that you
will leave the lane, the system will warn you with
corrective steering. You can override this steering
at any time. If you pass over a line, the steering
wheel will vibrate lightly. In order for this warn-
ing vibration to occur, it must first be switched
on in the Infotainment system. Active lane assist
is ready for operation when the lane marker line
is detected on at least one side of the vehicle.
The system is designed for driving on express-
ways and highways and so it only activates at
speeds above approximately 40 mph (65 km/h)
(depending on the market).
Applies to vehicles with side assist*: If you acti-
vate a turn signal when active lane assist is ready
and it classifies a lane change as critical because
D_ The corrective steering function is not available in all mar-
kets.
of vehicles traveling alongside you or approach-
ing you, there will be noticeable corrective steer-
ing shortly before you leave the lane. This will at-
tempt to keep your vehicle in the lane.
Applies to vehicles without side assist*: When
the system is ready, it will not warn you if you ac-
tivate the turn signal before crossing the lane
marker line. In this case, it assumes that you are
changing lanes intentionally.
Z\ WARNING
— The system warns the driver that the vehicle
is leaving the lane using corrective steering.
The
driver is always responsible for keeping
the vehicle within the lane.
— The system can assist the driver in keeping
the vehicle in the lane, but it does not drive
by itself. Always keep your hands on the
steering wheel.
— Corrective steering may not occur in certain
situations, such as during heavy braking.
— There may be cases where the camera does
not recognize all lane marker lines. Correc-
tive steering can only take place on the side
of the vehicle where lane marker lines are
detected.
— Other road structures or objects could possi-
bly be identified unintentionally as lane
marker lines. As a result, corrective steering
may be unexpected or may not occur.
— The camera view can be restricted, for exam-
ple by vehicles driving ahead or by rain,
snow, heavy spray light shining into the
camera or by dirt on the window. This can
result in active lane assist not detecting the
lane marker lines or detecting them incor-
rectly.
— In certain situations where visibility is low,
the vehicle may switch internally from “ear-
ly” to “late” steering correction )).
— Under certain conditions such as ruts in the
road, an inclined roadway or crosswinds, the
corrective steering alone may not be enough
to keep the vehicle in the middle of the lane.
89
Page 92 of 280
Assist systems
— For safety reasons, active lane assist must
not be used when there are poor road and/or
weather conditions such as slippery roads,
fog, gravel, heavy rain, snow and the poten-
tial for hydroplaning. Using active lane as-
sist under these conditions may increase the
risk of a crash.
Switching on/off
Applies to: vehicles with Audi active lane assist
B8V-0692
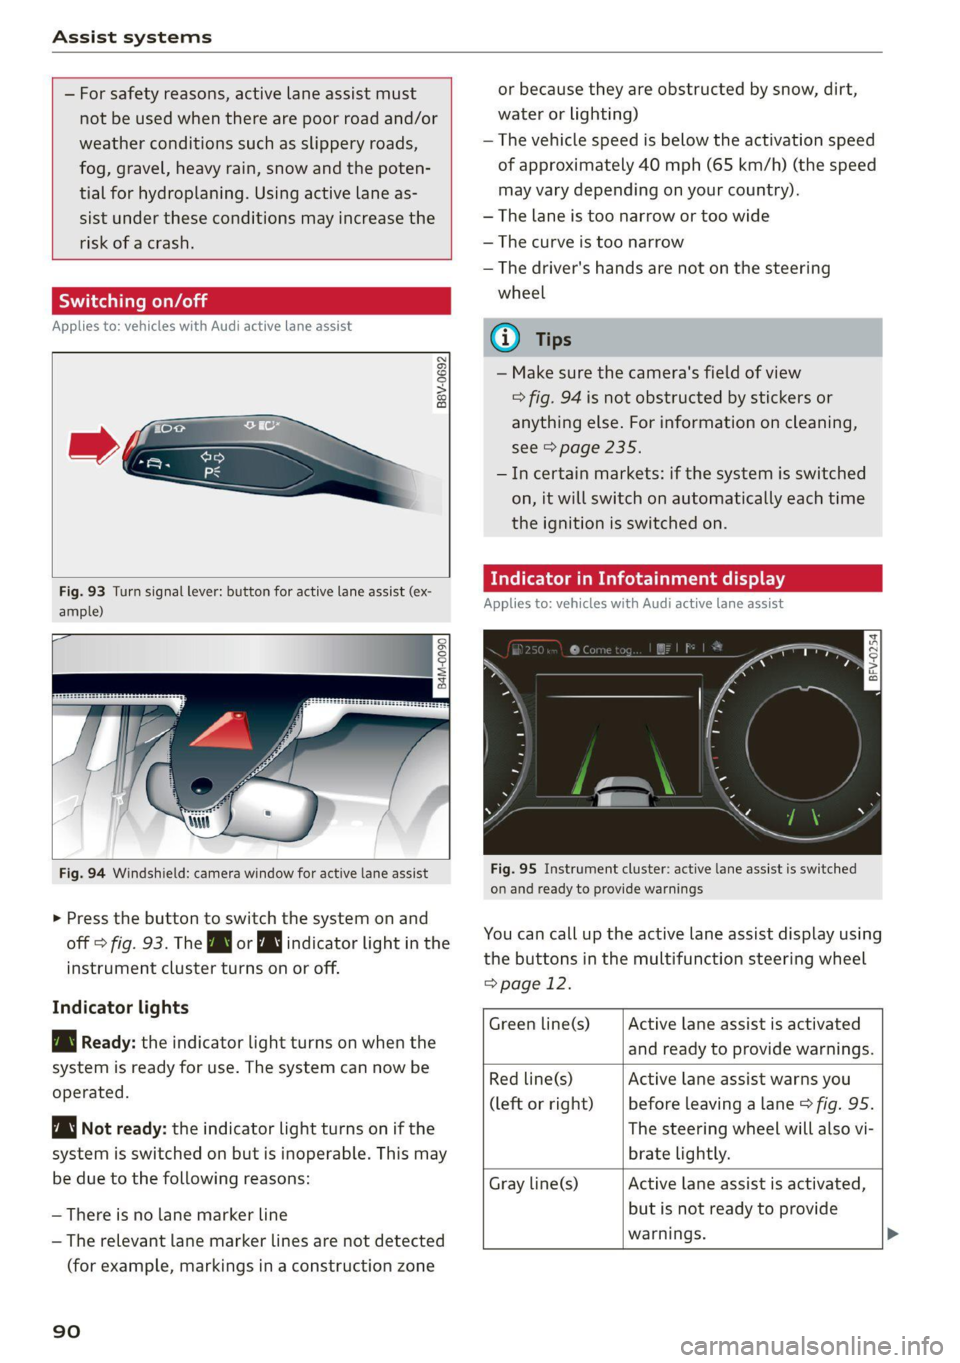
Fig. 93 Turn signal lever: button for active lane assist (ex-
ample)
ig
84M-0090
Fig. 94 Windshield: camera window for active lane assist
> Press the button to switch the system on and
off > fig. 93. The Bg or WJ indicator light in the
instrument cluster turns on or off.
Indicator lights
B Ready: the indicator light turns on when the
system is ready for use. The system can now be
operated.
Not ready: the indicator light turns on if the
system is switched on but is inoperable. This may
be due to the following reasons:
— There is no lane marker line
— The relevant lane marker lines are not detected
(for example, markings in a construction zone
90
or because they are obstructed by snow, dirt,
water or lighting)
— The vehicle speed is below the activation speed
of approximately 40 mph (65 km/h) (the speed
may vary depending on your country).
— The lane is too narrow or too wide
— The curve is too narrow
— The driver's hands are not on the steering
wheel
@) Tips
— Make sure the camera's field of view
=> fig. 94 is not obstructed by stickers or
anything else. For information on cleaning,
see > page 235.
—Incertain markets: if the system is switched
on, it will switch on automatically each time
the ignition is switched on.
dicator in Infotainment display
Applies to: vehicles with Audi active lane assist
Fig. 95 Instrument cluster: active lane assist is switched
on and ready to provide warnings
You can call up the active lane assist display using
the buttons in the multifunction steering wheel
=> page 12.
Active lane assist is activated
and ready to provide warnings.
Green line(s)
Red line(s)
(left or right)
Active lane assist warns you
before leaving a lane > fig. 95.
The steering wheel will also vi-
brate lightly.
Active lane assist is activated,
but is not ready to provide
warnings. >
Gray line(s)
Page 93 of 280
8S1012721BB
Assist systems
Messages in Infotainment display
If the active lane assist switches off automatical-
ly, the indicator light in the display turns off and
one
of the following messages appears:
Audi active lane assist: currently unavailable.
Camera view restricted due to surroundings.
See owner's manual
This message appears if the camera is unable to
detect the lines. This could happen if:
—The camera field of view > page 90, fig. 94 is
dirty or covered in ice. Clean this area on the
windshield.
— The camera field of view is fogged over. Wait
until the fog has cleared before switching the
active lane assist on again.
— The system has been unable to detect the lanes
for an extended period of time due to road con-
ditions. Switch active lane assist back on when
the lines are more visible.
Audi active lane assist: currently unavailable.
See owner's manual
There is a temporary malfunction that may pre-
vent the active lane assist from switching on. Try
switching the active lane assist on again later.
Audi active lane assist: malfunction! See own-
er's manual
Drive to an authorized Audi dealer or authorized
Audi Service Facility immediately to have the
malfunction corrected.
Audi active lane assist: Please take over steer-
ing!
This message appears if you are not steering by
yourself. If this is the case, active lane assist does
not switch off, but it is “not ready” to provide a
warning. The system can help you keep the vehi-
cle in the lane. However, you are responsible for
driving the vehicle and must steer it yourself.
ZA\ WARNING
Note that messages may be delayed or not
displayed on vehicles with accessories mount-
D_ The corrective steering function is not available in all mar-
kets.
ed on the steering wheel, such as a steering
wheel spinner knob. Always keep your hands
on the steering wheel.
Adjusting the steering time and vibration
warning
Applies to: vehicles with Audi active lane assist
You can adjust individual active lane assist set-
tings in the Infotainment system.
Select in the Infotainment system: [MENU] but-
ton > Vehicle > left control button > Driver assis-
tance > Audi active lane assist
Steering time!)
Early: in this setting, the corrective steering hap-
pens continuously to help keep the vehicle in the
center of the lane.
Late: in this setting, the system provides correc-
tive steering just before a vehicle wheel touches a
detected lane marker line.
Vibration warning
You can switch the additional vibration warning
in the steering wheel on or off.
G) Tips
In certain markets: your settings are stored
automatically and assigned to the remote
control key in use.
Lap timer
Introduction
Applies to: vehicles with lap timer
Lap timer
You can measure and analyze lap times with the
lap timer in the display. The time is measured in
minutes, seconds and 1/10 seconds. With lap
times longer than 60 minutes, the hour is also
shown and the display of 1/10 seconds is re-
moved.
91