2020 AUDI A8 steering
[x] Cancel search: steeringPage 228 of 360
Navigation
— Applies to: Audi tablet: Follow the safety
precautions > page 29, Rear Seat Entertain-
ment (Audi tablet).
@) Note
Read the information about Audi connect, and
be sure to note the connectivity costs section
>@ in General information on page 216.
G) Tips
— Snow and obstructions on the GPS antenna
or trees and large buildings can impair sat-
ellite reception and affect the system's abil-
ity to determine the vehicle position. Sever-
al deactivated or malfunctioning satellites
can also interrupt GPS reception and affect
the system's ability to determine the vehicle
position.
— Because street names sometimes change,
the names stored in the MMI may in rare
cases differ from the actual street name.
— Applies to: Multifunction steering wheel:
Depending on the selected function, it may
be necessary to use the upper display.
— Applies to: vehicles with Audi connect Info-
tainment: Other services may be available
depending on the country and vehicle equip-
ment.
— An additional indicator will appear in the
head-up display.
myAudi navigation
Applies to: vehicles with Audi connect Infotainment
MMI navigation works seamlessly with the myAu-
di app.
Your destinations (favorites, last destinations)
are synchronized through your myAudi account.
All top destinations are available in the vehicle
and in the myAudi app.
To download the destinations automatically into
the vehicle, we recommend linking the access da-
ta from your myAudi account to your personal
profile > page 41.
226
myAudi navigation functions:
— You can send destinations and routes from the
myAudi app to the vehicle > page 229.
— Active route guidance in the myAudi app can be
continued in the MMI.
— Depending on the situation, it may be possible
to continue active route guidance from the MMI
in the myAudi app to continue navigating to the
destination after leaving the vehicle.
@) Note
Read the information about Audi connect, and
be sure to note the connectivity costs section
=@ in General information on page 216.
Entering a destination
Select destination
Applies to: vehicles with navigation system
Select destination
a ©)
Intelligent Last
Pec eerie Cesc
Yee
fp |
ees
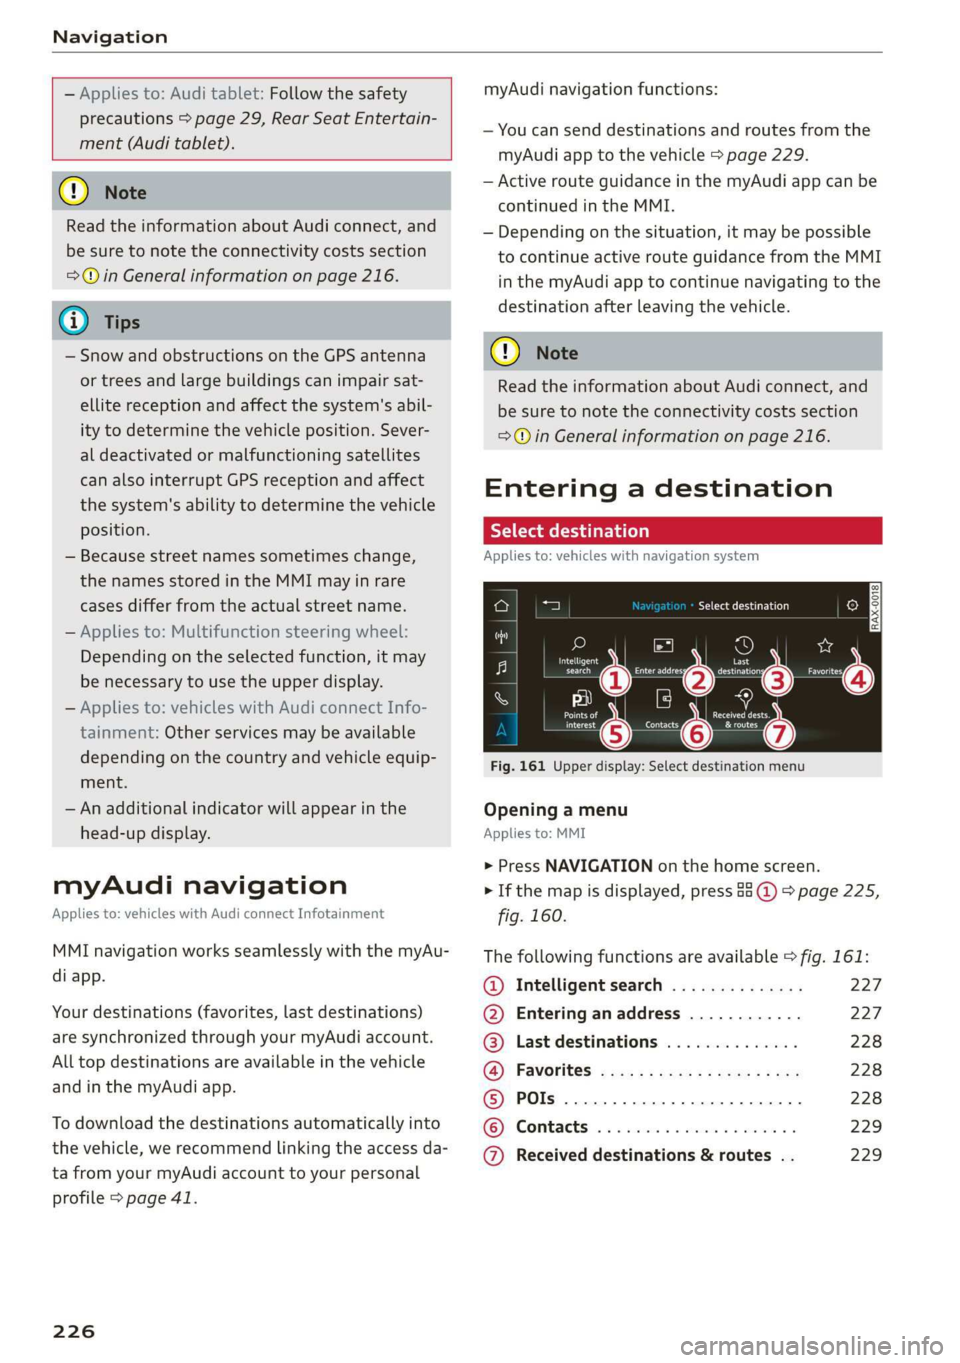
Fig. 161 Upper display: Select destination menu
o
a a
C.
Opening a menu
Applies to: MMI
> Press NAVIGATION on the home screen.
> If the map is displayed, press 88 @) > page 225,
fig. 160.
The following functions are available > fig. 161:
@ Intelligent search .............. 227
@ Entering anaddress ............ 227
@® Last destinations .............. 228
(@)i Favorites! «cox « : cacy ss ewe 2 2 ee 228
© POs... 22... 228
KG): Contacts: cs sees ss sues v2 woo os 229
@ Received destinations & routes . . 229
Page 230 of 360
Navigation
Route guidance will be activated and the map will
be displayed > page 231, fig. 163.
Destination entry for a street intersection
> Select: Intersection > enter a street > Start.
Loading previous destinations
Applies to: vehicles with navigation system
Your last destinations and routes can be loaded
directly as a navigation destination.
As soon as you start route guidance, the destina-
tion is automatically saved in the last destina-
tions. Your previous destinations are marked with
the © symbol.
If you have met the requirements for myAudi
navigation, your previous destinations will be
synchronized with your myAudi account
=> page 226.
Accessing previous destinations
» Applies to: MMI: Select on the home screen:
NAVIGATION > (&5) > Last destinations > select
the desired destination > Start.
> Applies to: multifunction steering wheel: Select
in the instrument cluster: Navigation tab >
button > Last destinations > desired destina-
tion.
Changing and loading a previous destination
> Applies to: MMI: Select on the home screen:
NAVIGATION > (G2) > Last destinations > Z >
>
change the address > Use address > Start.
Restore last tour
Requirement: a route with at least two stopovers
must have already been canceled.
Your last route is labeled with the © symbol.
> Applies to: MMI: Select on the home screen:
NAVIGATION > (G5) > Last destinations > Re-
store last tour. Route guidance will start imme-
diately.
Deleting previous destinations
> Applies to: MMI: Select on the home screen:
NAVIGATION > (88) > Last destinations > Z >
228
select one or more entries or Select all > Delete
> (Done).
@) Tips
The last route will be automatically deleted
from the list if you start a new route guidance
after canceling the route.
Setting a favorite as the destination
Applies to: vehicles with navigation system
You can access frequent destinations in the fa-
vorites. You can quickly and easily start route
guidance using the home address or business ad-
dress function.
Requirement: a favorite must be stored
> page 234.
> Applies to: MMI: Select on the home screen:
NAVIGATION > (68) > Favorites > select a de-
sired destination > Start. Or
> Applies to: multifunction steering wheel: Select
in the instrument cluster: Navigation tab >
button > Favorites > desired destination.
POIs (Online Points of Interest)
Applies to: vehicles with a navigation system and Audi con-
nect Infotainment
Search for points of interest such as restaurants.
If the MMI is connected to the Internet, points of
interest will be automatically included in the
search.
> Applies to: MMI: Select on the home screen:
NAVIGATION > (éa) > Points of interest.
The system always searches in the search area
that is currently selected > table on page 229.
> Searching for points of interest: enter the
name of a POI.
> Searching for a point of interest in a specific
category: Select: a category (for example, res-
taurants) > a point of interest.
> Changing the search area: Requirement: route
guidance must be active. Press (a)/2:9/B! repeat-
edly until the desired search area > table on
page 229 is selected.
Sorting points of interest
Page 233 of 360

4N0012721BD
Navigation
Stopovers and route plan
Applies to: vehicles with navigation system
You can enter additional destinations during ac-
tive route guidance.
Entering a stopover
Requirement: route guidance must be active.
> Enter a destination > page 227.
Displaying stopovers or the route plan
All destinations are listed in the route plan.
> Press on 2) > page 231, fig. 163 on the map.
Editing stopovers
> Press on) > page 231, fig. 163 on the map.
> Adding a stopover: Select: Add destination >
select a destination > Add.
> Moving a stopover: press Z. Touch the $ sym-
bol and move the entry to the desired position.
Press Done.
> Deleting a stopover: Select: Z > one or more
entries or Select all > Delete > (Done).
Stopping route guidance
Applies to: vehicles with navigation system
Requirement: route guidance must be active and
the map must be displayed.
> Applies to: MMI: Press ® @ > page 231,
fig. 163.00
> Applies to: multifunction steering wheel: Select
in the instrument cluster: Navigation tab >
button > Cancel route guidance.
Map
Map functions
Applies to: vehicles with navigation system
map)
WES
ray 23] 13 A irae
Fig. 164 Upper display: marked map item (standard map)
Opening the map
Applies to: MMI
> Press NAVIGATION on the home screen.
> If necessary, press A to display the map.
The following list gives an overview of the infor-
mation displayed on the map. Press on any func-
tion (for example, alternative routes) to show ad-
ditional options.
Destination input > page 226
Intelligent search > page 227
Cancel route guidance > page 231
Current route
Request spoken prompt
Alternative routes > page 234
QOOOOLOHO Display active destinations, stopovers, or
route plan. The distance to the destination
including the calculated arrival time is dis-
played > page 231.
© For vehicles with trailer mode, the symbol in-
dicates that the function is switched on.
=> page 240
231
Page 241 of 360
4N0012721BD
Navigation
@) Tips
— Having the online traffic information func-
tion switched on provides the most accurate
reports of traffic situations and traffic fore-
casting. Your vehicle transmits and process-
es its anonymous, encrypted position infor-
mation at regular intervals to the traffic da-
ta provider. You can switch off data transfer
at any time > page 333.
— The online traffic information network is
not available in all countries, and the cover-
age is not nationwide.
Options and settings
Applies to: vehicles with navigation system
Context-specific functions and settings may be
available depending on the vehicle equipment.
> Press More, or
> Open a list with navigation destinations (such
as recent destinations) and press and hold an
item until the Options menu is displayed.
Storing a favorite
See > page 234.
Edit address
You can edit an address for the next destination
entry and navigate to the destination. Select: Ed-
it address > enter a street > Use address > Start.
If the address is permanently stored (for exam-
ple, in the favorites), the stored entry will not be
changed.
Change address
See > page 234, Favorites.
Entering an address
See > page 235, Contacts as navigation destina-
tions.
Change name
See > page 234, Favorites.
Weather
See > page 218, Services.
Save as a shortcut
See > page 23, Shortcuts.
Applies to: vehicles with navigation system
You can adjust the navigation system settings in
the instrument cluster and in the MMI display
separately. The settings depend on the country
and vehicle equipment.
Accessing settings
> Applies to: MMI: Select on the home screen:
NAVIGATION > ©
Accessing settings using the multifunction
steering wheel
>» Applies to: multifunction steering wheel: Select
in the instrument cluster: Navigation tab >
button.
Please note that a setting applied to the multi-
function steering wheel is only valid for the in-
strument cluster map.
Map settings
Satellite map: see > page 236.
Show range: See > page 236.
Traffic: you can display current traffic informa-
tion on the map. See > page 232, Traffic infor-
mation display on the map or map preview
— Free flow of traffic
— Traffic obstructions
— Traffic information
Map colors
— Automatic: the map display adapts to the light-
ing conditions (for example, by changing from
day to night when driving through a tunnel).
— Day or Night
Map orientation
— 2D map or 2D north: the current vehicle posi-
tion is displayed. The map is oriented in the di-
rection of travel or to the north.
— 3D map: the current vehicle position is shown
on a three-dimensional map and is oriented in
the direction of travel.
239
>
Page 244 of 360
![AUDI A8 2020 Owners Manual Radio
Radio
Opening the radio
Cet Sted
7 a P Leh
M
Cues ae} HD2
ee ci
Cees GE)
Se ea
Ce Cite
S S|
7 | Ba ce| Coleen y-\>) (0119)
(ole) Me ar aT]
Pea
The Rock Band - Numero uno
(ole AUDI A8 2020 Owners Manual Radio
Radio
Opening the radio
Cet Sted
7 a P Leh
M
Cues ae} HD2
ee ci
Cees GE)
Se ea
Ce Cite
S S|
7 | Ba ce| Coleen y-\>) (0119)
(ole) Me ar aT]
Pea
The Rock Band - Numero uno
(ole](/manual-img/6/57606/w960_57606-243.png)
Radio
Radio
Opening the radio
Cet Sted
7 a P Leh
M
Cues ae} HD2
ee ci
Cees GE)
Se ea
Ce Cite
S S|
7 | Ba ce| Coleen y-\>) (0119)
(ole) Me ar aT]
Pea
The Rock Band - Numero uno
(ole IT
Cece
(ley a Os
Fig. 170 Upper display: SiriusXM channel list
Depending on the vehicle equipment, the radio
may support the FM, AM, and SiriusXM (satellite
radio) frequency bands. Using the HD Radio re-
ceiver also allows you to receive radio stations on
the FM and AM bands in digital format.
Depending on the station list, the following in-
formation may be displayed:
@ Station list
Shows the station that is currently playing.
The station list updates automatically.
@ Stations
Depending on availability, the station name
as well as program information, for example,
may
be displayed.
@ HD Radio technology
FM/AM stations that can be received by digi-
tal radio are marked with the HD Radio tech-
nology symbol H).
If reception quality declines, the radio auto-
matically switches to the analog FM/AM sta-
tion depending on availability.
@ Additional stations
Digital HD Radio stations may contain multi-
ple additional stations. If you lose reception,
the additional stations will be muted since
they can no longer be received.
242
© Radio ID
Your radio ID and contact data for your satel-
lite radio provider are displayed.
© Channel number
@ Smart Favorite
See > page 245.
Adjusting the radio using the MMI
> Applies to: MMI: To set a frequency band, select
on the home screen: RADIO > Source a fre-
quency band.
> Applies to: MMI: To set a station, select on the
home screen: RADIO > Source > select a sta-
tion list > select a station.
> To select a frequency, follow the instructions
under > page 244, Free text search.
Adjusting the radio using the multifunction
steering wheel
Requirement: radio mode must be on.
> Select the Radio/Media tab using the multi-
function steering wheel.
> To switch between radio and media, select the
EE] button > Switch to radio/Switch to media.
> Turn the left thumbwheel to display the station
list.
> To switch to a different source, press the
button.
> To select a station or a source, turn and press
the left thumbwheel.
Adjusting the radio using the Rear Seat
Remote
Applies to: vehicles with Rear Seat Remote
Requirement: the Rear Seat Remote must be con-
nected to the MMI > page 27.
> Applies to: Rear Seat Remote: Press RADIO on
the home screen.
Operation of the available radio functions using
the Rear Seat Remote is very similar to operation
in the MMI > page 243.
Adjusting the radio using the Audi tablet
Applies to: Vehicles with Audi tablet
Requirement: the Audi tablet must be connected
to the MMI 5 page 34.
Page 245 of 360
4N0012721BD
Radio
» Applies to: Audi tablet: Press RADIO on the — Buildings, tunnels, bridges, open areas, oth-
home screen. er vehicles or objects on the vehicle roof can
affect reception.
— Satellite radio is not available in Alaska and
Hawaii.
Operation of the available radio functions in the
Audi tablet is very similar to operation in the
MMI & page 243.
— Applies to: Multifunction steering wheel:
Depending on the selected function, it may
be necessary to use the MMI.
ZA WARNING
Note the safety precautions > page 25, Rear
Seat Remote and > page 29, Rear Seat Enter-
tainment (Audi tablet).
@ Tips
— Contact the SiriusXM* provider if you would
like to receive satellite programming.
Radio functions
Lea TN]
RAX-0097
ac)
Search and
manual tuning Last stations fed
\/ Eo]
reer
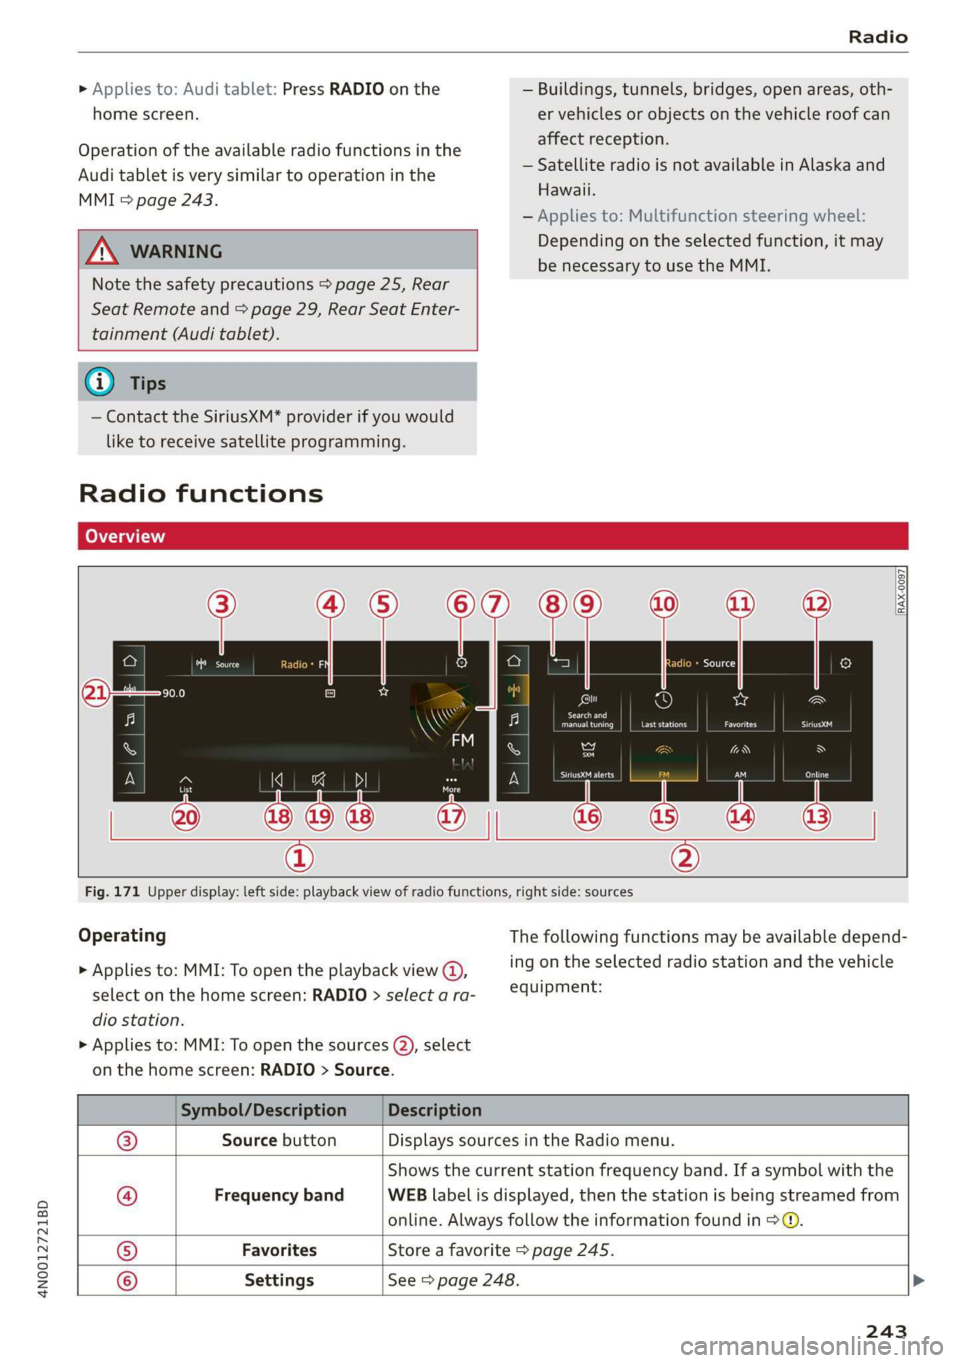
Fig. 171 Upper display: left side: playback view of radio functions, right side: sources
Operating The following functions may be available depend-
> Applies to: MMI: To open the playback view @), ing on the selected radio station and the vehicle
select on the home screen: RADIO > select a ra- equipment:
dio station.
> Applies to: MMI: To open the sources (2), select
on the home screen: RADIO > Source.
Symbol/Description Description
Source button Displays sources in the Radio menu.
Shows the current station frequency band. If a symbol with the
Frequency band WEB label is displayed, then the station is being streamed from
online. Always follow the information found in >@.
Favorites ‘Store a favorite > page 245.
@|©|
© ©
Settings See > page 248.
243
Page 257 of 360
4N0012721BD
Media
— For more information about the Audi music
interface and supported devices, check the
Audi database for mobile devices at www.
audi.com/mp3 or contact an authorized
Audi dealer or authorized Audi Service Fa-
cility.
Playing media
The following sources can be selected depending
on the vehicle equipment:
— Amazon Alexa > page 253.
-SD card > page 250.
— USB > page 254.
— DVD drive > page 251.
— Connect external device: you can connect ex-
ternal devices via Bluetooth and use the Blue-
tooth audio player > page 252, or you can con-
nect
an external device directly to the Audi mu-
sic interface > page 254.
— Connect online media > page 252.
— DVD changer > page 251.
Accessing media
Playing media files using the MMI
> Applies to: MMI: Select on the home screen:
MEDIA > Source > a source. Depending on the
connected device or online media service*, the
symbol for a source may change. The device
name may be displayed (for example: my-
Phone).
> Select a track from the categories in the media
center > page 256.
Playing media files using the multifunction
steering wheel
Requirement: a media drive must contain media
files > page 255.
> Select the Radio/Media tab using the multi-
function steering wheel.
> Turn the left thumbwheel to display the play-
list.
> To switch to a different source, press the
button.
> To select a media file or a source, turn and
press the left thumbwheel.
> To switch between radio and media, select the
button > Switch to radio/Switch to media.
Playing media files using the Rear Seat
Remote
Applies to: vehicles with Rear Seat Remote
Requirement: the Rear Seat Remote must be con-
nected to the MMI > page 27.
> Applies to: Rear Seat Remote: Press MEDIA on
the home screen.
Operation of the available media functions with
the Rear Seat Remote is very similar to operation
in the MMI > page 258.
Playing media files using the Audi tablet
Applies to: Vehicles with Audi tablet
Requirement: the Audi tablet must be connected
to the MMI & page 34.
> Applies to: Audi tablet: Press MEDIA on the
home screen.
If a media source is available in the MMI and is
supported by the Audi tablet, it can be selected
as the media source. Operation of available me-
dia functions in the Audi tablet is very similar to
operation in the MMI => page 258.
Audi tablet media source
Requirement: media files must be stored on the
SD card in the Audi tablet or on the internal flash
drive.
> Applies to: Audi tablet: Select on the home
screen: MEDIA > Source > Local media source.
> Select a title from the media center
=> page 256.
Playlists in the Audi tablet media source
> Applies to: Audi tablet: Select on the home
screen: MEDIA > Source > Local media source >
Playlists.
> Creating a new playlist: select: Z > Create
new playlist > enter a name > Create.
> Renaming a playlist: select: Z > 7 > entera
name > Save.
> Deleting a playlist: select: Z > (I.
255
Page 258 of 360
Media
> Adding files to a playlist: press on a song or an
album until the Options menu is displayed. Se-
lect: Add to playlist > select a list > Add.
> Playing a playlist: select: a playlist > a song.
ZX WARNING
Note the safety precautions > page 25, Rear
Seat Remote and > page 29, Rear Seat Enter-
tainment (Audi tablet).
@) Tips
— For safety reasons, the video image is only
displayed when the vehicle is stationary. On-
ly the sound from the video plays while driv-
ing.
— Applies to: Multifunction steering wheel:
Depending on the selected function, it may
be necessary to use the MMI.
— Applies to: Audi tablet
— Transferring video files from the MMI to
the Audi tablet is not available in all coun-
tries.
— Transferring video files from MMI to the
Audi tablet is only possible under the fol-
lowing circumstances for vehicles without
a navigation system: The embedded SIM
card in the vehicle must be registered in
the mobile phone network > page 216.
Make sure the function > page 211, Turn
on car phone or data module is switched
on.
— The file formats supported by the Audi
tablet may differ from the MMI. A mes-
sage will appear if you attempt to play a
file format that is not supported.
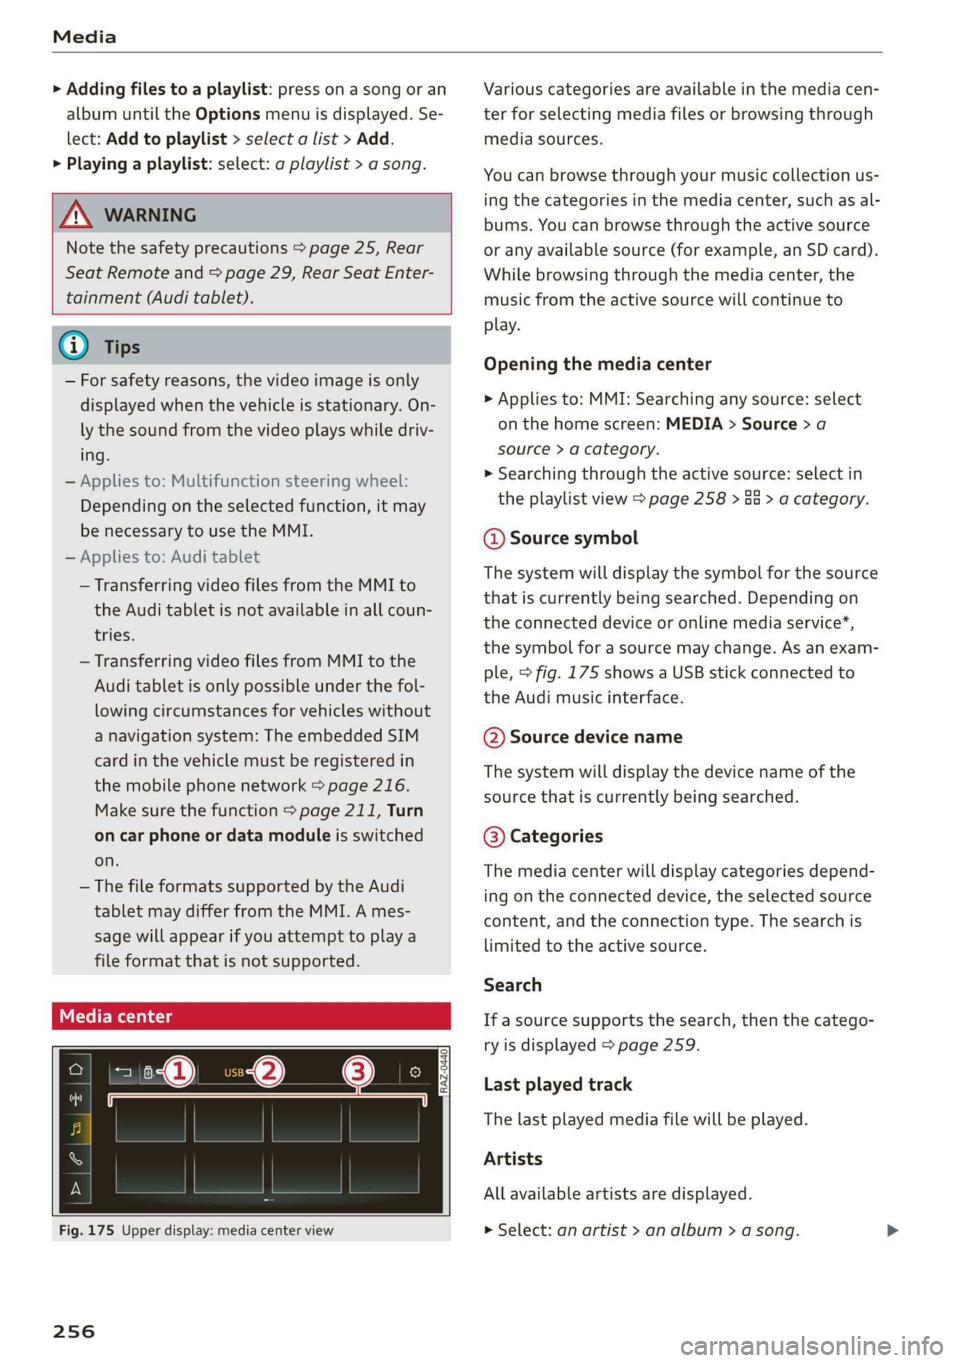
Fig. 175 Upper display: media center view
256
Various categories are available in the media cen-
ter for selecting media files or browsing through
media sources.
You can browse through your music collection us-
ing the categories in the media center, such as al-
bums. You can browse through the active source
or any available source (for example, an SD card).
While browsing through the media center, the
music from the active source will continue to
play.
Opening the media center
> Applies to: MMI: Searching any source: select
on the home screen: MEDIA > Source > a
source > a category.
» Searching through the active source: select in
the playlist view > page 258 > Ga > a category.
@ Source symbol
The system will display the symbol for the source
that is currently being searched. Depending on
the connected device or online media service*,
the symbol for a source may change. As an exam-
ple, > fig. 175 shows a USB stick connected to
the Audi music interface.
©@ Source device name
The system will display the device name of the
source that is currently being searched.
@® Categories
The media center will display categories depend-
ing on the connected device, the selected source
content, and the connection type. The search is
limited to the active source.
Search
If a source supports the search, then the catego-
ry is displayed > page 259.
Last played track
The last played media file will be played.
Artists
All available artists are displayed.
> Select: an artist > an album > a song.