2020 AUDI A8 display
[x] Cancel search: displayPage 26 of 360
Touch displays
acalileltia
ieee ye ell
aie
les, CA, 90012
Pei
les, Los Feliz, CA, 90027
Prot)
(eer com es
Pera
(eee a l¢y 2)
[RAZ-0711
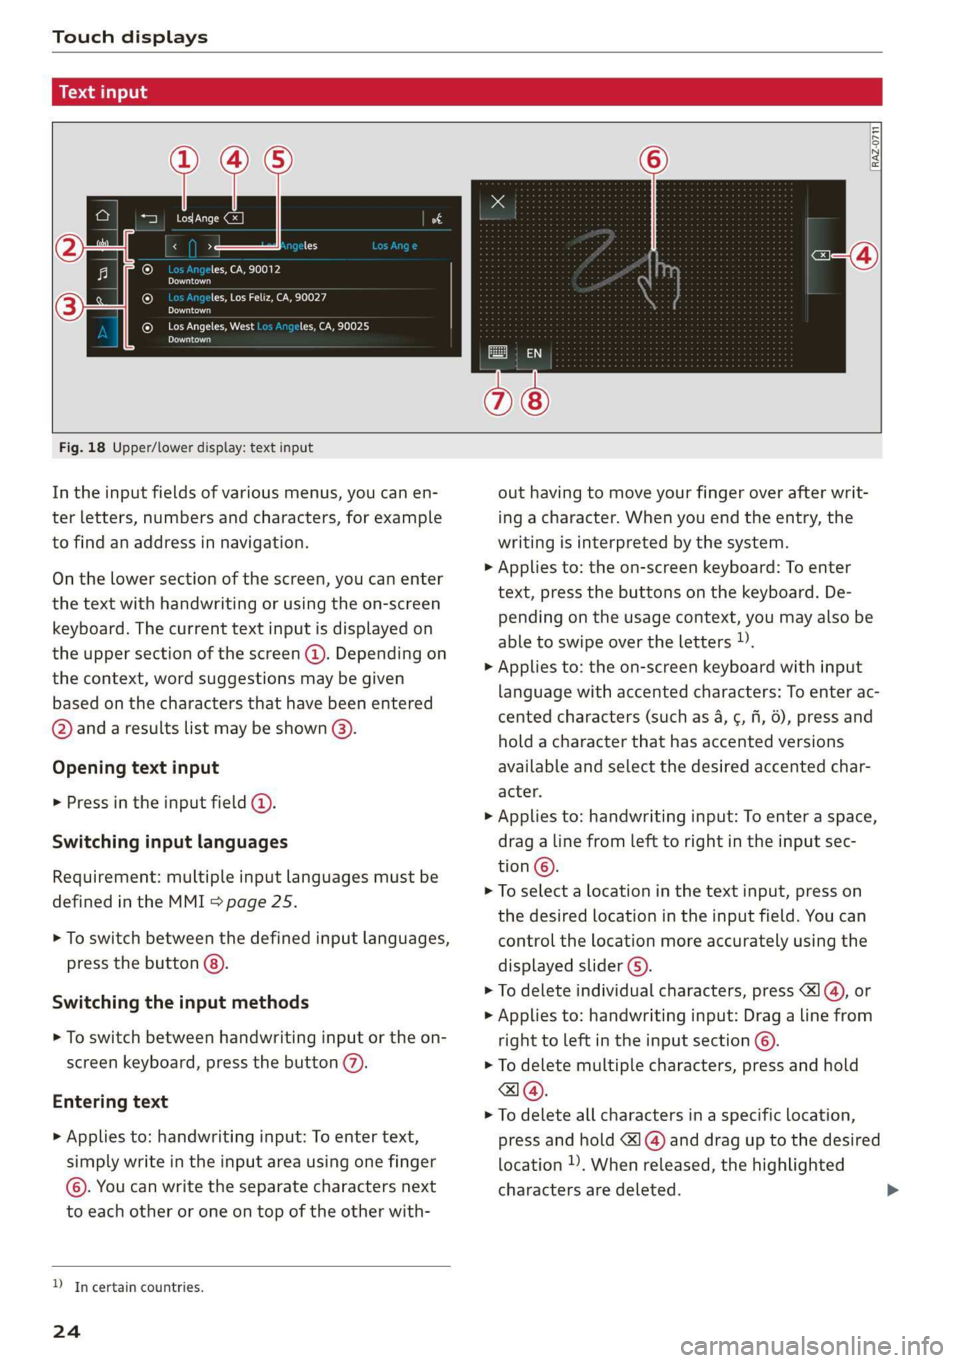
Fig. 18 Upper/lower display: text input
In the input fields of various menus, you can en-
ter letters, numbers and characters, for example
to find an address in navigation.
On the lower section of the screen, you can enter
the text with handwriting or using the on-screen
keyboard. The current text input is displayed on
the upper section of the screen @). Depending on
the context, word suggestions may be given
based on the characters that have been entered
@ and a results list may be shown @).
Opening text input
> Press in the input field @.
Switching input languages
Requirement: multiple input languages must be
defined in the MMI > page 25.
> To switch between the defined input languages,
press the button @).
Switching the input methods
> To switch between handwriting input or the on-
screen keyboard, press the button (7).
Entering text
> Applies to: handwriting input: To enter text,
simply write in the input area using one finger
©. You can write the separate characters next
to each other or one on top of the other with-
D_ In certain countries.
24
out having to move your finger over after writ-
ing a character. When you end the entry, the
writing is interpreted by the system.
> Applies to: the on-screen keyboard: To enter
text, press the buttons on the keyboard. De-
pending on the usage context, you may also be
able to swipe over the letters )).
> Applies to: the on-screen keyboard with input
language with accented characters: To enter ac-
cented characters (such as 4, ¢, fi, 6), press and
hold a character that has accented versions
available and select the desired accented char-
acter.
> Applies to: handwriting input: To enter a space,
drag a line from left to right in the input sec-
tion ©.
> To select a location in the text input, press on
the desired location in the input field. You can
control the location more accurately using the
displayed slider ©).
> To delete individual characters, press
> Applies to: handwriting input: Drag a line from
right to left in the input section ©.
> To delete multiple characters, press and hold
> To delete all characters in a specific location,
press and hold <1 @) and drag up to the desired
location )), When released, the highlighted
characters are deleted.
Page 27 of 360
4N0012721BD
Touch displays
Accepting suggested words or selecting
entries from the results list
> To accept a suggested word (2) or select an en-
try from the results list @), press on it.
> To display more content in the results list, drag
your finger upward or downward on the screen.
Setting the input language or keyboard
layout
> Applies to MMI: Select on the home screen:
SETTINGS > Language & keyboard > Keyboard.
> To define additional input languages, press the
© button.
> To change the keyboard layout for an input lan-
guage, press >. For example, you can select be-
tween QWERTZ and QWERTY.
Rear Seat Remote
Applies to: vehicles with Rear Seat Remote
With Rear Seat Remote, you can control conven-
ience and Infotainment system functions in the
rear of the vehicle, such as the climate control
system or the media playback in the vehicle.
ZA WARNING
— As the driver, do not allow usage of the Rear
Seat Remote to distract you from driving, as
this could increase the risk of an accident.
For example, do not reach behind you while
driving to operate the Rear Seat Remote.
— The Rear Seat Remote can only be operated
when the vehicle is stationary or when the
remote is securely positioned in the desig-
nated holder in the vehicle. Like all loose ob-
jects, it could be thrown through the vehicle
and
cause serious injuries in a collision. If
the Rear Seat Remote is not in the designat-
ed holder, it must always be securely stowed
while driving.
— Do not use any wireless devices on the front
seats within range of the airbags while driv-
ing. Also read the warnings in the chapter
> page 86.
— The Rear Seat Remote can become hot while
charging. Pay attention to the housing and
display temperature, and be careful when
removing the Rear Seat Remote from the
holder.
— There are magnets located on the back of
the Rear Seat Remote and in the designated
holder. For people with pacemakers, the
electromagnetic radiation may impair pace-
maker function. Always maintain a mini-
mum distance of approximately 6 in (15 cm)
from the magnets.
CG) Note
— Always follow the information found in 9®
in General information on page 216.
— Protect the Rear Seat Remote against pro-
longed exposure to direct sunlight.
— Extremely high or low temperatures that
can occur inside vehicles can damage the
Rear Seat Remote and/or impair the device
performance. Never leave your Rear Seat
Remote in the vehicle in extremely high or
low temperatures.
— Protect the Rear Seat Remote from coming
into contact with any fluids.
G) Tips
— Please note that the Rear Seat Remote can
be used only when the ignition is switched
on and within range of your vehicle's active
Wi-Fi hotspot.
— Please note that a Wi-Fi connection does
not automatically make it possible to use
the
Internet. For additional information,
see the chapter > page 216.
— When playing online media sources, there
may be longer loading times or restrictions
on media playback, depending on the Inter-
net connection or the Wi-Fi usage (for ex-
ample, if there is intensive usage by multi-
ple devices on the hotspot).
— Signals from Bluetooth devices and Wi-Fi
hotspots within range of the vehicle may
impair the vehicle Wi-Fi services. If multiple
Bluetooth devices and Wi-Fi hotspots are
within range of the vehicle, it may cause re-
duced data transfer rates, connection inter-
ruptions, or limitations when streaming me-
dia.
25
Page 28 of 360
![AUDI A8 2020 Owners Manual Touch displays
Lea TN]
Applies to: vehicles with Rear Seat Remote
Lt
=.
S
Fig. 19 Rear Seat Remote: overview
[RAH-9143]
@ Microphone
@ Volume button (decrease/mute)
@® Volu AUDI A8 2020 Owners Manual Touch displays
Lea TN]
Applies to: vehicles with Rear Seat Remote
Lt
=.
S
Fig. 19 Rear Seat Remote: overview
[RAH-9143]
@ Microphone
@ Volume button (decrease/mute)
@® Volu](/manual-img/6/57606/w960_57606-27.png)
Touch displays
Lea TN]
Applies to: vehicles with Rear Seat Remote
Lt
=.
S
Fig. 19 Rear Seat Remote: overview
[RAH-9143]
@ Microphone
@ Volume button (decrease/mute)
@® Volume button (increase)
@ Speaker
©) Display
Using the holder
Applies to: vehicles with Rear Seat Remote
[RAH-9144)
Fig. 20 Rear center armrest/full-length center console:
Rear Seat Remote holder
Depending on the equipment, the Rear Seat Re-
mote may be located in the rear center armrest
or on the full-length center console.
Removing the Rear Seat Remote
> To release the Rear Seat Remote, press the A
button @.
26
>» Remove the Rear Seat Remote from the holder
using both hands > A\ in Introduction on
page 25.
Securing the Rear Seat Remote
> Hold the Rear Seat Remote in both hands so
that the volume buttons @) and @) > page 26,
fig. 19 face upward.
> Carefully press the Rear Seat Remote toward
the holder until the Rear Seat Remote locks in-
to place.
Charging the battery
Applies to: vehicles with Rear Seat Remote
Requirement: the ignition must be switched on.
> To charge the battery, secure the Rear Seat Re-
mote in the holder > page 26. The battery will
charge automatically.
@) Note
The Rear Seat Remote battery is permanently
installed and may only be replaced by an au-
thorized Audi dealer or authorized Audi Serv-
ice Facility. If the battery replacement is not
done correctly, it may cause malfunctions and
increase the risk of damaging the Rear Seat
Remote.
@ Tips
— Batteries have a limited service life. If the
operating time decreases significantly, the
battery should be replaced. Contact an au-
thorized Audi dealer or authorized Audi
Service Facility if you need a new battery.
— The Rear Seat Remote is equipped with an
intelligent battery management system to
provide a long battery service life. There-
fore, the battery may not be charged to its
full capacity, especially when temperatures
are high or low.
Page 29 of 360
4N0012721BD
Touch displays
Menus and symbols
Applies to: vehicles with Rear Seat Remote
RADIO c=)
RAX-0092
Smet) (7)
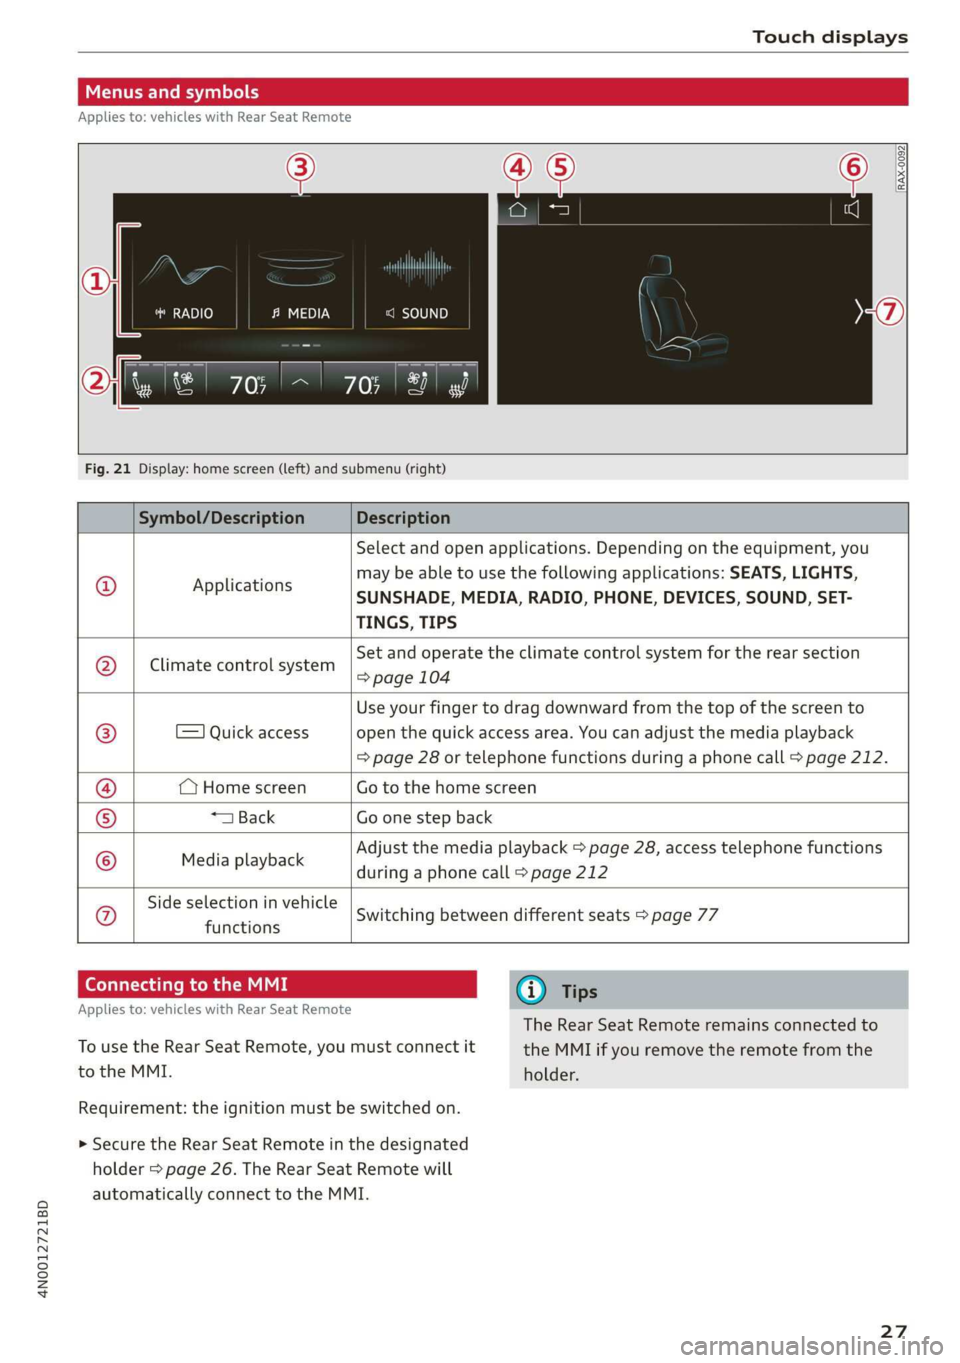
Fig. 21 Display: home screen (left) and submenu (right)
Symbol/Description Description
© Applications
Select and open applications. Depending on the equipment, you
may be able to use the following applications: SEATS, LIGHTS,
SUNSHADE, MEDIA, RADIO, PHONE, DEVICES, SOUND, SET-
TINGS, TIPS
Climate control system
Set and operate the climate control system for the rear section
=> page 104
=) Quick access
Use your finger to drag downward from the top of the screen to
open the quick access area. You can adjust the media playback
=> page 28 or telephone functions during a phone call > page 212.
(Home screen Go to the home screen
*1 Back Go one step back
Media playback
Adjust the media playback > page 28, access telephone functions
during a phone call > page 212
Side selection in vehicle
functions Q}]e
|@Oe|
©
|
0
Switching between different seats > page 77
Connecting to the MMI G@) Tips
Applies to: vehicles with Rear Seat Remote
The Rear Seat Remote remains connected to
To use the Rear Seat Remote, you must connect it the MMI if you remove the remote from the
to the MMI. holder.
Requirement: the ignition must be switched on.
> Secure the Rear Seat Remote in the designated
holder > page 26. The Rear Seat Remote will
automatically connect to the MMI.
27
Page 30 of 360
Touch displays
Adjusting media playback
Applies to: vehicles with Rear Seat Remote
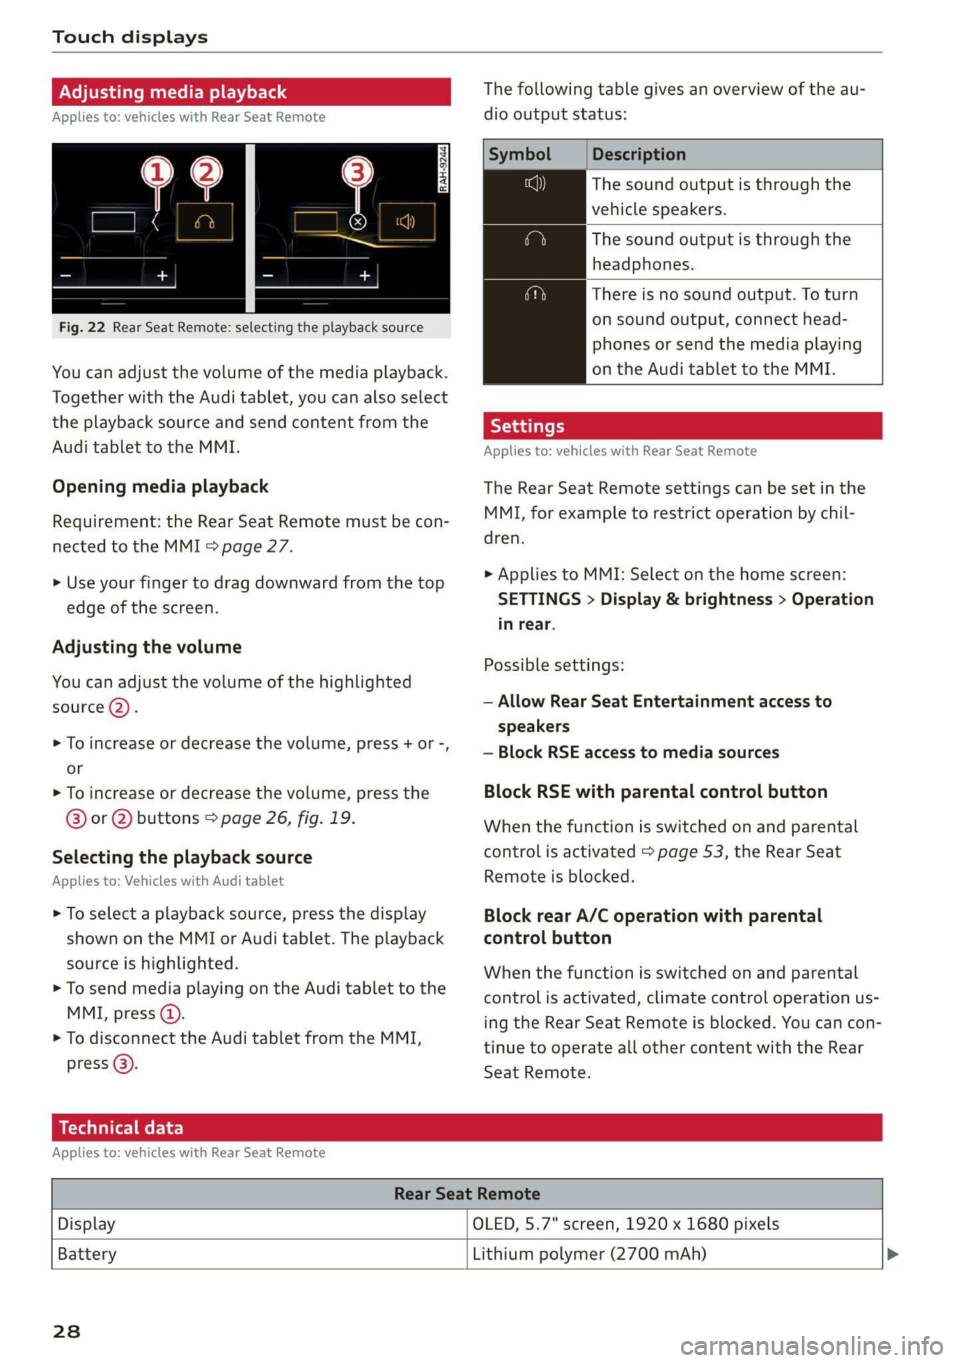
Fig. 22 Rear Seat Remote: selecting the playback source
You can adjust the volume of the media playback.
Together with the Audi tablet, you can also select
the playback source and send content from the
Audi tablet to the MMI.
Opening media playback
Requirement: the Rear Seat Remote must be con-
nected to the MMI > page 27.
> Use your finger to drag downward from the top
edge of the screen.
Adjusting the volume
You can adjust the volume of the highlighted
source (2).
>» To increase or decrease the volume, press + or -,
or
> To increase or decrease the volume, press the
@® or @ buttons > page 26, fig. 19.
Selecting the playback source
Applies to: Vehicles with Audi tablet
> To select a playback source, press the display
shown on the MMI or Audi tablet. The playback
source is highlighted.
> To send media playing on the Audi tablet to the
MMI, press @).
> To disconnect the Audi tablet from the MMI,
press @).
The following table gives an overview of the au-
dio output status:
Description
The sound output is through the
vehicle speakers.
The sound output is through the
headphones.
There is no sound output. To turn
on sound output, connect head-
phones or send the media playing
on the Audi tablet to the MMI.
Applies to: vehicles with Rear Seat Remote
The Rear Seat Remote settings can be set in the
MMI, for example to restrict operation by chil-
dren.
> Applies to MMI: Select on the home screen:
SETTINGS > Display & brightness > Operation
in rear.
Possible settings:
— Allow Rear Seat Entertainment access to
speakers
— Block RSE access to media sources
Block RSE with parental control button
When the function is switched on and parental
control is activated > page 53, the Rear Seat
Remote is blocked.
Block rear A/C operation with parental
control button
When the function is switched on and parental
control is activated, climate control operation us-
ing the Rear Seat Remote is blocked. You can con-
tinue to operate all other content with the Rear
Seat
Remote.
Technical data
Applies to: vehicles with Rear Seat Remote
Rear Seat Remote
Display OLED, 5.7" screen, 1920 x 1680 pixels
Battery
Lithium polymer (2700 mAh) >
238
Page 31 of 360
4N0012721BD
Touch displays
Rear Seat Remote
Dimensions (height x width x depth) 3.39 in x 6.38 in x 0.43 in (86 mm x 162 mmx
11 mm)
Weight
0.58 lbs (261 g)
Rear Seat Entertainment
(Audi tablet)
Introduction
Applies to: vehicles with Audi tablet
You can control available sources in the vehicle
(such as the radio) using the Audi tablet and lis-
ten to them through the vehicle speakers or
headphones. You can also display vehicle infor-
mation (such as the next oil change service). The
Audi tablet also has applications and functions
that are not related to the vehicle.
ZA WARNING
— As the driver, do not allow usage of the Audi
tablet to distract you from driving, as this
could increase the risk of an accident. For
example, do not reach behind you while
driving to operate the Audi tablet.
— Children in rear-facing child safety seats in
the rear: remove the Audi tablet from the
backrest on the front seat to reduce the risk
of
injury. Read the instructions in the chap-
ter > page 91.
— The Audi tablet can only be operated when
the vehicle is stationary or when it is secure-
ly positioned in the designated holder in the
vehicle. Like all loose objects, it could be
thrown through the vehicle and cause seri-
ous injuries in a collision. If the Audi tablet
is not in the designated holder, it must al-
ways be securely stowed while driving.
— Do not use any wireless devices on the front
seats within range of the airbags while driv-
ing. Also read the warnings in the chapter
=> page 86.
— The back of the Audi tablet can become hot
while charging. Pay attention to the housing
temperature, and be careful when removing
the Audi tablet from the holder.
@) Note
— Always follow the information found in >®
in General information on page 216.
— Protect the Audi tablet against prolonged
exposure to direct sunlight.
— Extremely high or low temperatures that
can occur inside vehicles may damage the
Audi tablet or impair its performance. Never
leave your Audi tablet in the vehicle in ex-
tremely high or low temperatures.
— Protect the Audi tablet from coming into
contact with any fluids.
G) Tips
— If the Audi tablet is used when the ignition
is switched off or outside of the range of the
MMI, then only the non-vehicle applications
and functions will be available.
— Vehicle settings are only possible through
the MMI.
— Please note that a Wi-Fi connection does
not automatically make it possible to use
the
Internet. For additional information,
see the chapter > page 216.
— The Audi tablet makes it possible to access
services from external providers. Permanent
availability cannot be guaranteed, because
that depends on the service provider.
— When playing online media sources, there
may be longer loading times or restrictions
on media playback, depending on the Inter-
net connection or the Wi-Fi usage (for ex-
ample, if there is intensive usage by multi-
ple devices on the hotspot, such as tablets
or laptops).
— The Audi tablet has an anti-theft protection
feature: it can only connect to the MMI of
the associated vehicle. Also, the Audi tablet
will be disabled if it has not been connected
to the MMI for longer than 30 days. To ena-
ble it again, connect the Audi tablet to the
29
>
Page 32 of 360
Touch displays
MMI by securing it in the holder
=> page 30.
— When streaming media, the following situa-
tions may cause reduced data transfer rates,
interrupted connections, or restrictions:
—If there are multiple Wi-Fi hotspots or de-
vices connected to Wi-Fi and Bluetooth
within range of the vehicle
— If multiple devices are connected to the
vehicle Wi-Fi hotspot and in use at the
same time
— The Audi tablet has been tested with many
of the products available on the market.
However, there may be cases where individ-
ual devices are not recognized, or where us-
age may be restricted or impossible.
Lea TN]
Applies to: vehicles with Audi tablet
[RAZ-0110
|
a
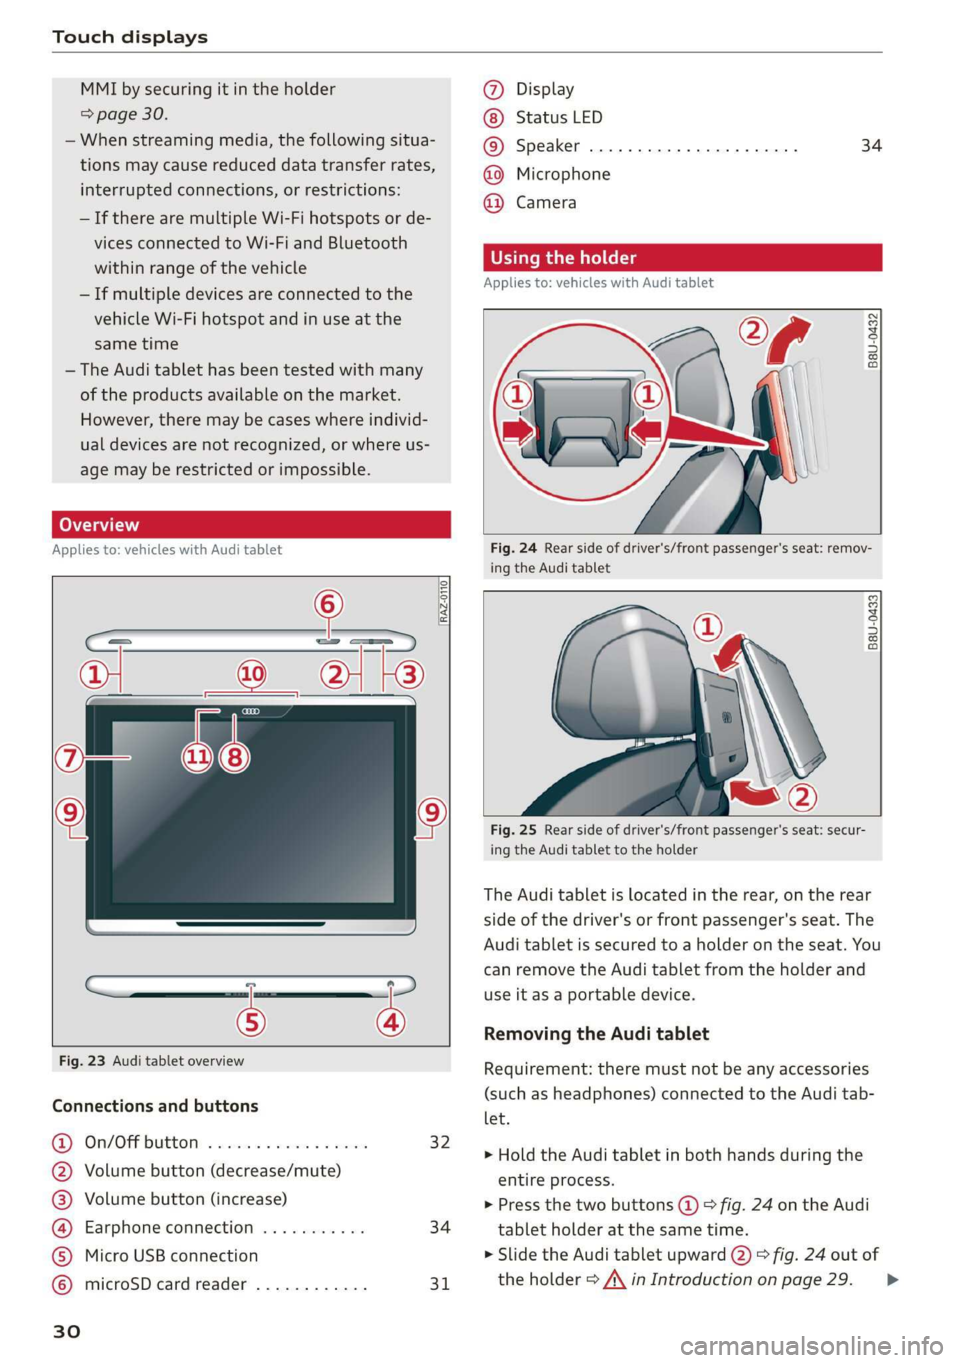
Fig. 23 Audi tablet overview
Connections and buttons
@) On/OFPbuttOM: » cso ee css ov eeceeee 32
@ Volume button (decrease/mute)
@® Volume button (increase)
@ Earphone connection ........... 34
© Micro USB connection
© microSD card reader ............ 31
Ww °o
@ Display
Status LED
© Speaker
@ Microphone
@ Camera
34
Using the holder
Applies to: vehicles with Audi tablet
B8U-0432
VA
Fig. 24 Rear side of driver's/front passenger's seat: remov-
ing the Audi tablet
B8U-0433
Fig. 25 Rear side of driver's/front passenger's seat: secur-
ing the Audi tablet to the holder
The Audi tablet is located in the rear, on the rear
side of the driver's or front passenger's seat. The
Audi tablet is secured to a holder on the seat. You
can remove the Audi tablet from the holder and
use it as a portable device.
Removing the Audi tablet
Requirement: there must not be any accessories
(such as headphones) connected to the Audi tab-
let.
> Hold the Audi tablet in both hands during the
entire process.
> Press the two buttons (@) > fig. 24 on the Audi
tablet holder at the same time.
> Slide the Audi tablet upward @) > fig. 24 out of
the holder > A\ in Introduction on page 29. >
Page 33 of 360
4N0012721BD
Touch displays
Securing the Audi tablet
Requirement: the two buttons @) ° fig. 24 must
be in the retracted position.
> Hold the Audi tablet in both hands during the
entire process.
» Engage the Audi tablet at the contact strip @
> fig. 25.
> Carefully press the Audi tablet toward the Audi
tablet holder @) > fig. 25 until the Audi tablet
locks into place audibly.
@ Tips
If the Audi tablet is not in its holder and is ex-
posed to extremely high or low temperatures,
it may turn off automatically for safety rea-
sons.
Tilting the holder
Applies to: vehicles with Audi tablet
wy
RAH-8642|
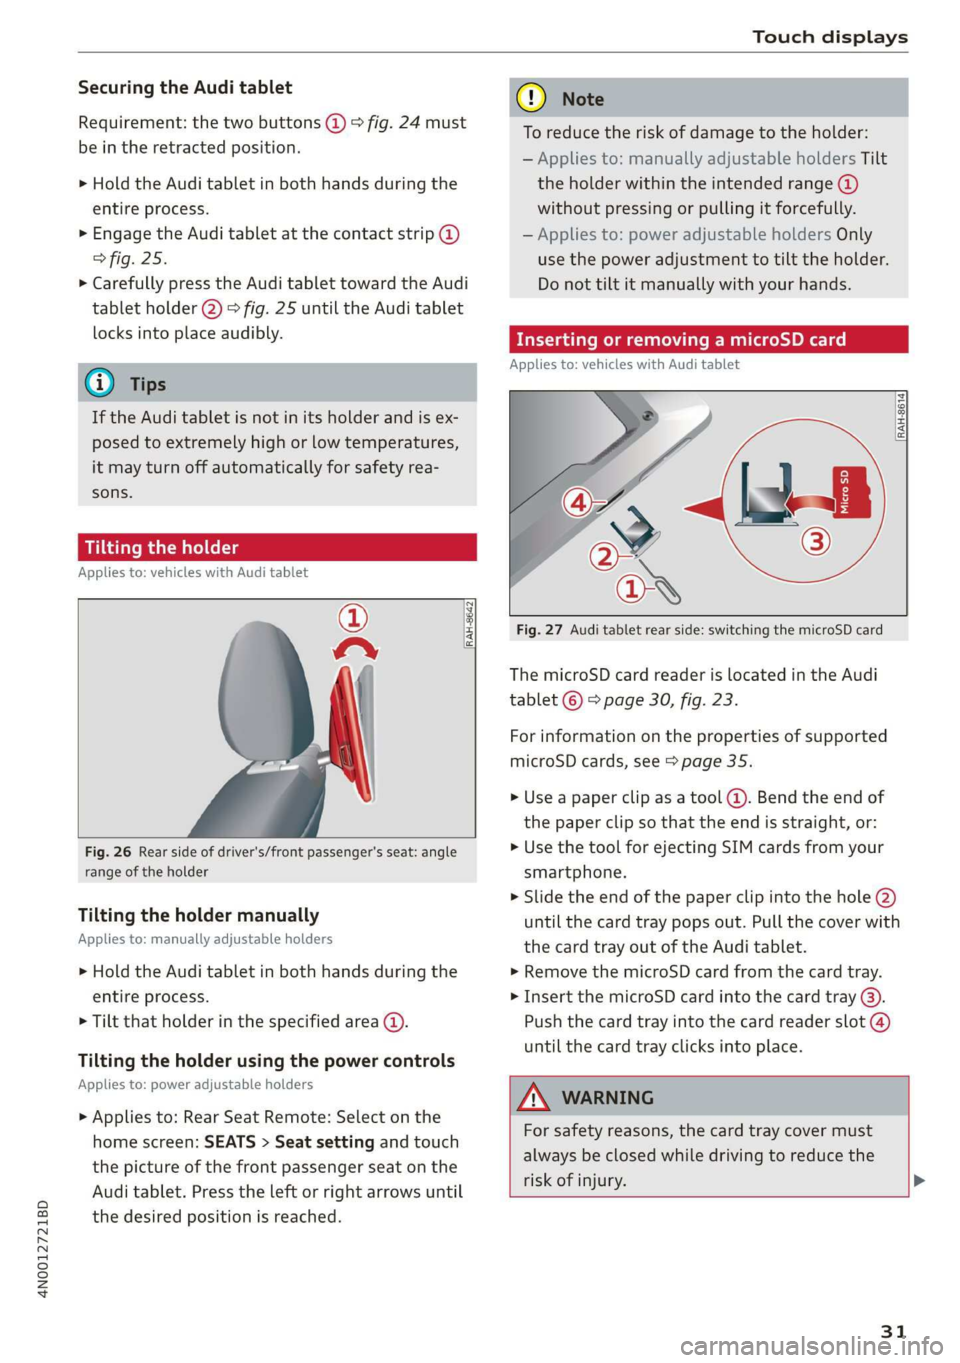
Fig. 26 Rear side of driver's/front passenger's seat: angle
range of the holder
Tilting the holder manually
Applies to: manually adjustable holders
> Hold the Audi tablet in both hands during the
entire process.
> Tilt that holder in the specified area @).
Tilting the holder using the power controls
Applies to: power adjustable holders
> Applies to: Rear Seat Remote: Select on the
home screen: SEATS > Seat setting and touch
the picture of the front passenger seat on the
Audi tablet. Press the left or right arrows until
the desired position is reached.
® Note
To reduce the risk of damage to the holder:
— Applies to: manually adjustable holders Tilt
the holder within the intended range @)
without pressing or pulling it forcefully.
— Applies to: power adjustable holders Only
use the power adjustment to tilt the holder.
Do not tilt it manually with your hands.
Inserting or removing a microSD card
Applies to: vehicles with Audi tablet
RAH-8614 fi
Fig. 27 Audi tablet rear side: switching the microSD card
The microSD card reader is located in the Audi
tablet © > page 30, fig. 23.
For information on the properties of supported
microSD cards, see > page 35.
» Use a paper clip as a tool (@). Bend the end of
the paper clip so that the end is straight, or:
> Use the tool for ejecting SIM cards from your
smartphone.
> Slide the end of the paper clip into the hole @)
until the card tray pops out. Pull the cover with
the card tray out of the Audi tablet.
» Remove the microSD card from the card tray.
> Insert the microSD card into the card tray @).
Push the card tray into the card reader slot @)
until the card tray clicks into place.
AN WARNING
For safety reasons, the card tray cover must
always be closed while driving to reduce the
risk of injury. >
31