Page 146 of 657
145
uuClock uAdjusting the Clock
Controls
To adjust date:
8. Select Set Date .
9. Select
(+/(-.
10. Press the (back) button to set the
date.
1Adjusting the Time
You can customize the clock display to show the 12
hour clock or 24 hour clock.
2 Customized Features P. 335
20 ACURA RDX-31TJB6111.book 145 ページ 2020年2月11日 火曜日 午後2時6分
Page 185 of 657

uuOperating the Switches Around the Steering Wheel uENGINE START/STOP Button
184
Controls
Warning buzzers may sound from inside
and/or outside the vehicle to remind you that
the keyless access remote is out of the vehicle.
If the buzzer continues even after the remote
is put back inside, place it to be within its
operational range.
■When the power mode is in ON
If the keyless access remote is taken out of the
vehicle, and all doors are closed, a warning
buzzer sounds from both inside and outside
the vehicle. A warning message on the multi-
information display notifies the driver inside
that the remote is outside of the vehicle.
■When the power mode is in
ACCESSORY
If the keyless access remote is taken out of the
vehicle, and all doors are closed, a warning
buzzer sounds from outside the vehicle.
■Keyless Access Remote Reminder1 Keyless Access Remote Reminder
When the keyless access remote is within the
system’s operational range, and the driver’s door is
closed, the warni ng function cancels.
If the keyless access remote is taken out of the vehicle
after the engine has been started, you can no longer
change the ENGINE START/STOP button mode or
restart the engine. Always make sure if the remote is
in your vehicle when you operate the ENGINE
START/STOP button.
Removing the keyless access remote from the vehicle
through a window does not activate the warning
buzzer.
Do not put the keyless access remote on the
dashboard or in the glove box. It may cause the
warning buzzer to go off. Under some other
conditions that can prevent the vehicle from locating
the remote, the warning buzzer may also go off even
if the remote is within the system’s operational
range.
20 ACURA RDX-31TJB6111.book 184 ページ 2020年2月11日 火曜日 午後2時6分
Page 199 of 657

198
uuOperating the Switches Around the Steering Wheel uBrightness Control
Controls
Brightness Control
When the parking lights are turned on and the
power mode is in ON, you can use the
(+ or
(- button to adjust instrument panel
brightness.
Brighten: Press the
(+ button.
Dim: Press the
(- button.
You will hear a beep when the brightness
reaches minimum or maximum. Several
seconds after adjusting the brightness, you
will be returned to the previous display.
■Brightness level indicator
The brightness level is shown on the display
while you are adjusting it.
■Adjusting the Instrument Panel Brightness1 Brightness Control
Instrument panel brightne ss varies, depending on
whether the exterior lights are on or off. The
instrument panel dims to reduce glare when they are
on.
When it is bright out side and the headlight
integration with the wi per is activated, the
instrument panel bri ghtness does not change.
To cancel the reduced in strument panel brightness
when the exterior lights are on, press the
( + button
until the brightness display is up to max, the beeper
sounds.
The brightness can be set differently for when the
exterior lights are on, and when they are off.
( - Button
(+ Button
20 ACURA RDX-31TJB6111.book 198 ページ 2020年2月11日 火曜日 午後2時6分
Page 200 of 657
199
uuOperating the Switches Around the Steering Wheel uBrightness Control
Controls
When the power mode is in ON, you can use
the
(+/(- button to adjust head-up display
brightness.
Brighten: Press the
(+ button.
Dim: Press the
(- button.
The head-up display will return to its original
state several seconds after adjusting the
brightness.
■Brightness level indicator
The brightness level is shown on the display
while you are adjusting it.
■Adjusting the Head-Up Display Brightness*
( +/(- Button
* Not available on all models
20 ACURA RDX-31TJB6111.book 199 ページ 2020年2月11日 火曜日 午後2時6分
Page 210 of 657

Continued209
uuAdjusting the Seats uFront Seats
Controls
Press the mode selector up or down to display seat adjustment information on the
audio/information screen, and then use the ad justment switch to adjust the lumbar
support, bolster supp ort or thigh support.
1. Press the mode selector up or down to select the lumbar support adjustment
mode, bolster support adjustment mode or thigh support adjustment mode.
2. Press the adjustment switch as follow.
To adjust the lumbar support:
Press the top: To move the lumbar support
up.
Press the bottom: To move the lumbar
support down.
Press the front: To increase the entire
lumbar support.
Press the rear: To decrease the entire lumbar
support.
■Seat Control Interface*1 Seat Control Interface*
The image of each adjustment mode displayed on the
audio/information screen:
Lumbar support
Bolster support
Thigh support
Adjustment Switch
Mode Selector
* Not available on all models
20 ACURA RDX-31TJB6111.book 209 ページ 2020年2月11日 火曜日 午後2時6分
Page 211 of 657

uuAdjusting the Seats uFront Seats
210
Controls
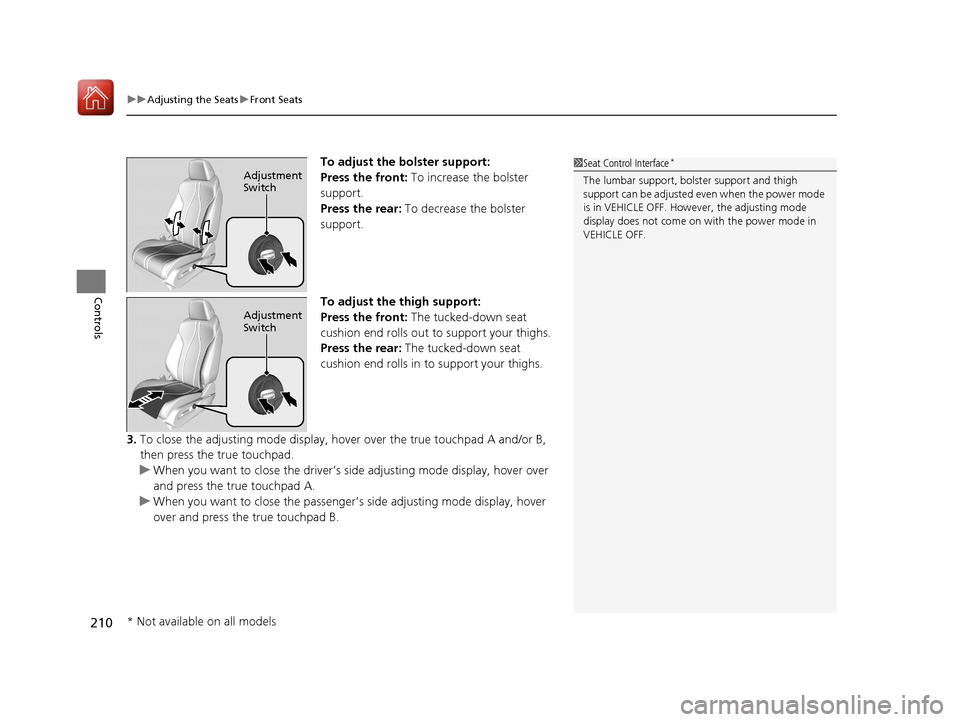
To adjust the bolster support:
Press the front: To increase the bolster
support.
Press the rear: To decrease the bolster
support.
To adjust the thigh support:
Press the front: The tucked-down seat
cushion end rolls out to support your thighs.
Press the rear: The tucked-down seat
cushion end rolls in to support your thighs.
3. To close the adjusting mode display, hover over the true touchpad A and/or B,
then press the true touchpad.
u When you want to close the driver’s side adjusting mode display, hover over
and press the true touchpad A.
u When you want to close the passenger’s side adjusting mode display, hover
over and press the true touchpad B.1 Seat Control Interface*
The lumbar support, bolster support and thigh
support can be adjusted even when the power mode
is in VEHICLE OFF. However, the adjusting mode
display does not come on with the power mode in
VEHICLE OFF.Adjustment
Switch
Adjustment
Switch
* Not available on all models
20 ACURA RDX-31TJB6111.book 210 ページ 2020年2月11日 火曜日 午後2時6分
Page 231 of 657

230
Controls
Climate Control System
Using Automatic Climate Control
The automatic climate control system maintains the interior temperature you select.
The system also selects the proper mix of heated or cooled air that raises or lowers
the interior temperature to your preference as quickly as possible.
Use the system when the engine is running.
1. Press the AUTO button.
2. Adjust the interior temperature using the driver’s side or passenger’s side
temperature control buttons.
3. Press the (ON/OFF) button to cancel.1Using Automatic Climate Control
If any buttons are presse d while using the climate
control system in auto, the function of the button
that was pressed will take priority.
The AUTO indicator will go off, but functions
unrelated to the button th at was pressed will be
controlled automatically.
During idle-stops, air-conditioning is suspended, and
only the blower remains active.
If you do not want air-cond itioning suspended, press
the Auto Idle Stop OFF button to cancel idle-stop.
To prevent cold air from bl owing in from outside, the
fan may not start i mmediately when the AUTO
button is pressed.
If the interior is very warm, you can cool it down
more rapidly by partial ly opening the windows,
turning the system on auto, and setting the
temperature to low. Change the fresh air mode to
recirculation mode until the temperature cools down.
When you set the temperat ure to the lower or upper
limit, Lo or Hi is displayed.
Pressing the button switches the climate
control system between on and off. When turned on,
the system returns to your last selection.
Floor and
defroster
vents
Floor
vents
Dashboard and floor
vents, and back of
the center console
Dashboard vents
and back of the
center console
AUTO Button
Driver’s Side
Temperature
Control Buttons Passenger’s Side
Temperature
Control Buttons
A/C (Air Conditioning) Button (ON/OFF) Button
Fan Control Button SYNC
(Synchronization) Button
(Recirculation) Button
20 ACURA RDX-31TJB6111.book 230 ページ 2020年2月11日 火曜日 午後2時6分
Page 238 of 657

237
Features
This chapter describes how to operate technology features.
Audio SystemAbout Your Audio System ................ 238
USB Ports ......................................... 239
Auxiliary Input Jack .......................... 241
Audio System Theft Protection ......... 242
Audio Remote Controls .................... 243
Audio System Basic Operation ........ 245
True Touchpad Operation ................ 246
Audio/Information Screen ................ 249
System Updates ............................... 262
Adjusting the Sound ........................ 268
Display Setup ................................... 269 Voice Control Operation .................. 270
Playing AM/FM Radio ....................... 273
Playing SiriusXM
® Radio ................... 277
Playing an iPod ................................ 290
Playing a USB Flash Drive ................. 293
Playing Bluetooth ® Audio................. 296
Wi-Fi Connection ............................. 299
Siri Eyes Free .................................... 301
Apple CarPlay .................................. 302
Android Auto................................... 306
Audio Error Messages ...................... 310 General Information on the Audio
System ............................................. 313
Customized Features ........................ 335
HomeLink ® Universal Transceiver ... 358
Bluetooth® HandsFreeLink® ............. 361
AcuraLink® ........................................ 390
20 ACURA RDX-31TJB6111.book 237 ページ 2020年2月11日 火曜日 午後2時6分