Page 250 of 685

249
uuAudio System Basic Operation uInformation Screen
Continued
Features
■Navigation
Shows the navigation screen.
2 Refer to the Navigation System Manual
■Phone
Shows the HFL information.
2 Bluetooth ® HandsFreeLink ® P. 397
■Info
Shows the AcuraLink/Messages , Trip Computer , Clock , Traffic Incidents ,
Power Distribution Monitor or Voice Recognition Guide . Press or INFO
button to display the Information Menu screen.
AcuraLink/Messages :
Shows a AcuraLink ® message menu list.
2 AcuraLink Message P. 442
Trip Computer:
Current Drive
Shows the range, instant and average fuel economy, and EV/total drive of the
current trip, as well as the average fuel economy from your last trip.
History of Trip A
Shows the range, average fuel economy and distances traveled for the current trip,
as well as the average fuel economy and distances traveled during the last three
driving cycles.
Each time you reset the trip meter A, th e information on the display updates. The
history of the previous three driving cycles is kept.
20 ACURA MDX E-AWD-31TRX6302.book 249 ページ 2020年2月11日 火曜日 午後1時 45分
Page 251 of 685
250
uuAudio System Basic Operation uInformation Screen
Features
Deleting the history manually
1. Press on the History of Trip A screen to select Delete History.
2. A confirmation message appears on the screen. Rotate to select Yes, then
press .
Clock :
Shows a clock screen and an image you import.
Traffic Incidents :
Shows a traffic incidents list.
2 Refer to the Navigation System Manual
Power Distribu tion Monitor:
Displays the powe r flow monitor.
2Power Distribution Monitor P. 251
Voice Recognition Guide:
Shows a voice recognition guide screen.
■Smartphone
Displays the Apple CarPlay or Android Auto.
2 Apple CarPlay P. 306
2 Android Auto P. 310
20 ACURA MDX E-AWD-31TRX6302.book 250 ページ 2020年2月11日 火曜日 午後1時 45分
Page 255 of 685

uuAudio System Basic Operation uInformation Screen
254
Features
You can change, store, and delete the wallpaper on the information screen.
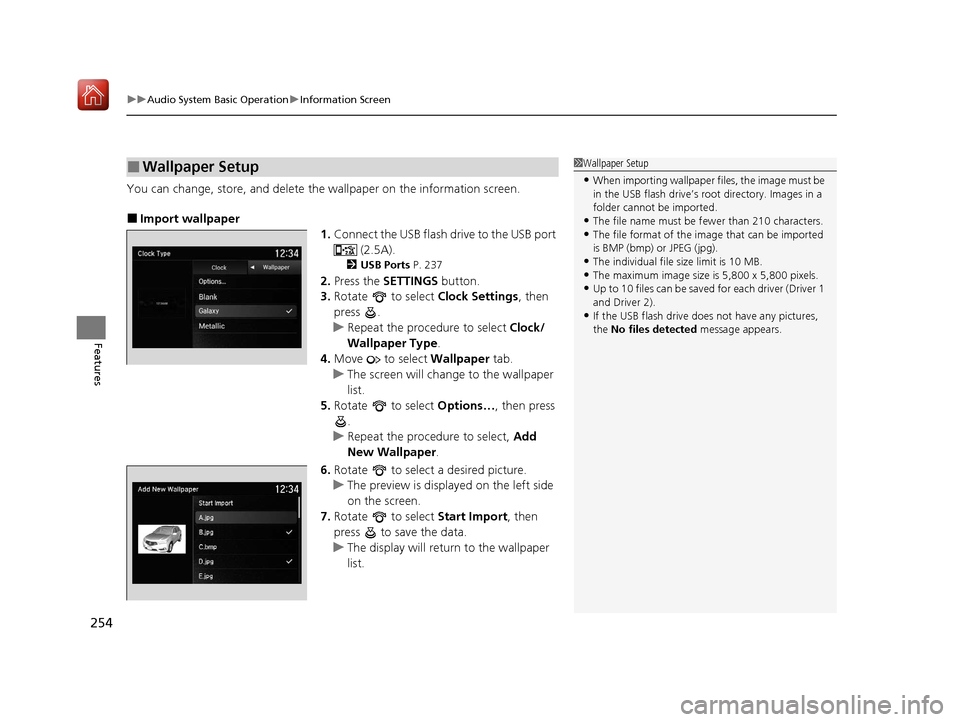
■Import wallpaper
1.Connect the USB flash drive to the USB port
(2.5A).
2USB Ports P. 237
2.Press the SETTINGS button.
3. Rotate to select Clock Settings, then
press .
u Repeat the procedure to select Clock/
Wallpaper Type .
4. Move to select Wallpaper tab.
u The screen will change to the wallpaper
list.
5. Rotate to select Options…, then press
.
u Repeat the procedure to select, Add
New Wallpaper .
6. Rotate to select a desired picture.
u The preview is displayed on the left side
on the screen.
7. Rotate to select Start Import, then
press to save the data.
u The display will return to the wallpaper
list.
■Wallpaper Setup1Wallpaper Setup
•When importing wallpaper files, the image must be
in the USB flash drive’s root directory. Images in a
folder cannot be imported.
•The file name must be fewer than 210 characters.•The file format of the im age that can be imported
is BMP (bmp) or JPEG (jpg).
•The individual file size limit is 10 MB.•The maximum image size is 5,800 x 5,800 pixels.
•Up to 10 files can be saved for each driver (Driver 1
and Driver 2).
•If the USB flash drive doe s not have any pictures,
the No files detected message appears.
20 ACURA MDX E-AWD-31TRX6302.book 254 ページ 2020年2月11日 火曜日 午後1時 45分
Page 256 of 685

255
uuAudio System Basic Operation uInformation Screen
Features
■Select wallpaper
1. Press the SETTINGS button.
2. Rotate to select Clock Settings, then press .
u Repeat the procedure to select Clock/Wallpaper Type .
3. Move to select Wallpaper.
u The screen changes to the wallpaper list.
4. Rotate to select a desired wallpaper, then press .
u The preview is displayed on the left side on the screen.
u The pop-up menu appears on the screen.
5. Rotate to select Set, then press .
u The display will return to the Clock Settings screen.
■Delete wallpaper
1. Press the SETTINGS button.
2. Rotate to select Clock Settings, then press .
u Repeat the procedure to select Clock/Wallpaper Type .
3. Move to select Wallpaper.
u The screen changes to the wallpaper list.
4. Rotate to select a wallpaper that you want to delete, then press .
u The preview is displayed on the left side on the screen.
u The pop-up menu appears on the screen.
5. Rotate to select Delete, then press .
u The confirmation me ssage will appear.
6. Rotate to select Yes, then press to delete completely.
u The display will return to the wallpaper list.
20 ACURA MDX E-AWD-31TRX6302.book 255 ページ 2020年2月11日 火曜日 午後1時 45分
Page 258 of 685
257
uuAudio System Basic Operation uDisplay Setup
Features
Display Setup
You can change the brightness of the information screen and On Demand Multi-Use
DisplayTM.
1.Press the SETTINGS button.
2. Rotate to select System Settings, then
press .
3. Rotate to select Brightness, then press
.
4. Rotate to adjust the setting.
5. Press .
u The display will return to the System
Settings screen.
1. Select Audio Menu , then select Screen
Settings .
2. Use
(+, (- to adjust the setting.
■Changing the Screen Brightness1Changing the Screen Brightness
You can change the Contrast and Black Level
settings in the same manner.
Information Screen
On Demand Multi-Use DisplayTM
20 ACURA MDX E-AWD-31TRX6302.book 257 ページ 2020年2月11日 火曜日 午後1時 45分
Page 262 of 685
261
uuAudio System Basic Operation uPlaying AM/FM Radio
Continued
Features
Playing AM/FM Radio
On Demand Multi-Use DisplayTM
VOL/ (Volume/Power) Knob
Press to turn the audio system on
and off.
Turn to adjust the volume.
Skip/Seek Icons
Select or to search up and
down the selected band for a
station with a strong signal.
Audio Menu
Select to display the menu items.
Source
Select to change a band or
change an audio source. (Information) Icon
Select to display the current station
details.
Select to display the previous
screen.
Preset Icons
Tune the preset radio frequency. Select and
hold the preset icon to store that station.
Select or to display preset 6 onwards.
Tune
Select to display the manual input
screen of radio frequency.
Stations
Select to display the station list
screen.
HD Radio List
Select to display the sub-channel
list screen.
Models with HD RadioTM feature
20 ACURA MDX E-AWD-31TRX6302.book 261 ページ 2020年2月11日 火曜日 午後1時 45分
Page 263 of 685

uuAudio System Basic Operation uPlaying AM/FM Radio
262
Features
To store a station:
1. Tune to the selected station.
2. Select and hold the preset number you want to store that station.
Provides text data information related to your selected RDS-capable FM station.
■To find an RDS station from Station List
1. Select Stations .
2. Select station on the list.
■Manual update
Updates your available station list at any time.
1. Select Stations .
2. Select Refresh on the list.
■Preset Memory
■Radio Data System (RDS)
1Playing AM/FM Radio
You can control the AM/FM radio using voice
commands.
2 Voice Control Operation P. 258
The ST indicator appears on the display indicating
stereo FM broadcasts.
Stereo reproduction in AM is not available.
Switching the Audio Mode
Press the SOURCE button on the steering wheel.
2 Audio Remote Controls P. 241
You can store 6 AM stations and 12 FM stations into
the preset memory.
HD Radio Technology manufactured under license
from iBiquity Digital Cor poration. U.S. and Foreign
Patents. HD Radio
TM and the HD, HD Radio, and
“Arc” logos are proprietary trademarks of iBiquity
Digital Corp.
Models with HD RadioTM feature
20 ACURA MDX E-AWD-31TRX6302.book 262 ページ 2020年2月11日 火曜日 午後1時 45分
Page 264 of 685

263
uuAudio System Basic Operation uPlaying AM/FM Radio
Features
■Radio frequency manual tune screen
1.Select Tune.
2. Enter the desired radio frequency using the
numeric keypad.
3. Select OK to tune into the frequency.
You can also tune into the radio frequency of
your choice following the procedures below
instead of inputting its frequency value.
1. Touch the desired frequency value on the
frequency bar.
2. Select and hold the frequency indicator,
then slide it to the desired frequency value
on the frequency bar.
■Radio text
Display the radio text information of the selected RDS station.
1. Select Audio Menu .
2. Select Radio Text .
■Scan
Samples each of the strongest stations on the selected band for 10 seconds.
Select SCAN.
To turn off scan, select Stop Scan.
1Radio frequency manual tune screen
You can tune the range of FM frequency between
87.7 to 107.9MHz and range of AM frequency
between 530 to 1710kHz.
Tune icons:
Select or to tune the radio frequency.
Seek icons:
Select or to search the selected band up
or down for a station with a strong signal.
Frequency
Indicator Frequency Bar
Numeric Keypad
1 Radio text
The text indicator comes on when you received a text
message. The indicator stays on until you read the
message.
The radio text inform ation is not updated
automatically. If you want to display the latest
information, return to the previous screen and select
Radio Text again.
20 ACURA MDX E-AWD-31TRX6302.book 263 ページ 2020年2月11日 火曜日 午後1時 45分