2019 YAMAHA YZF-R125 clutch
[x] Cancel search: clutchPage 41 of 96

Operation and important riding points
5-3
5
EAU16674
Shifting
Shifting gears lets you control the
amount of engine power available for
starting off, accelerating, climbing hills,
etc.
The gear positions are shown in the il-
lustration.
TIP
To shift the transmission into the neu-
tral position ( ), press the shift pedal
down repeatedly until it reaches the
end of its travel, and then slightly raise
it.
NOTICE
ECA10261
Even with the transmission in
the neutral position, do not
coast for long periods of time
with the engine off, and do not
tow the motorcycle for long dis-
tances. The transmission is
properly lubricated only when
the engine is running. Inade-
quate lubrication may damage
the transmission.
Always use the clutch while
changing gears to avoid dam-
aging the engine, transmission,and drive train, which are not
designed to withstand the
shock of forced shifting.
1. Neutral position
2. Shift pedal
ZAUM1592
1 2 3 4 5
6
1
2 N
UB5GE0E0.book Page 3 Thursday, August 23, 2018 10:05 AM
Page 47 of 96
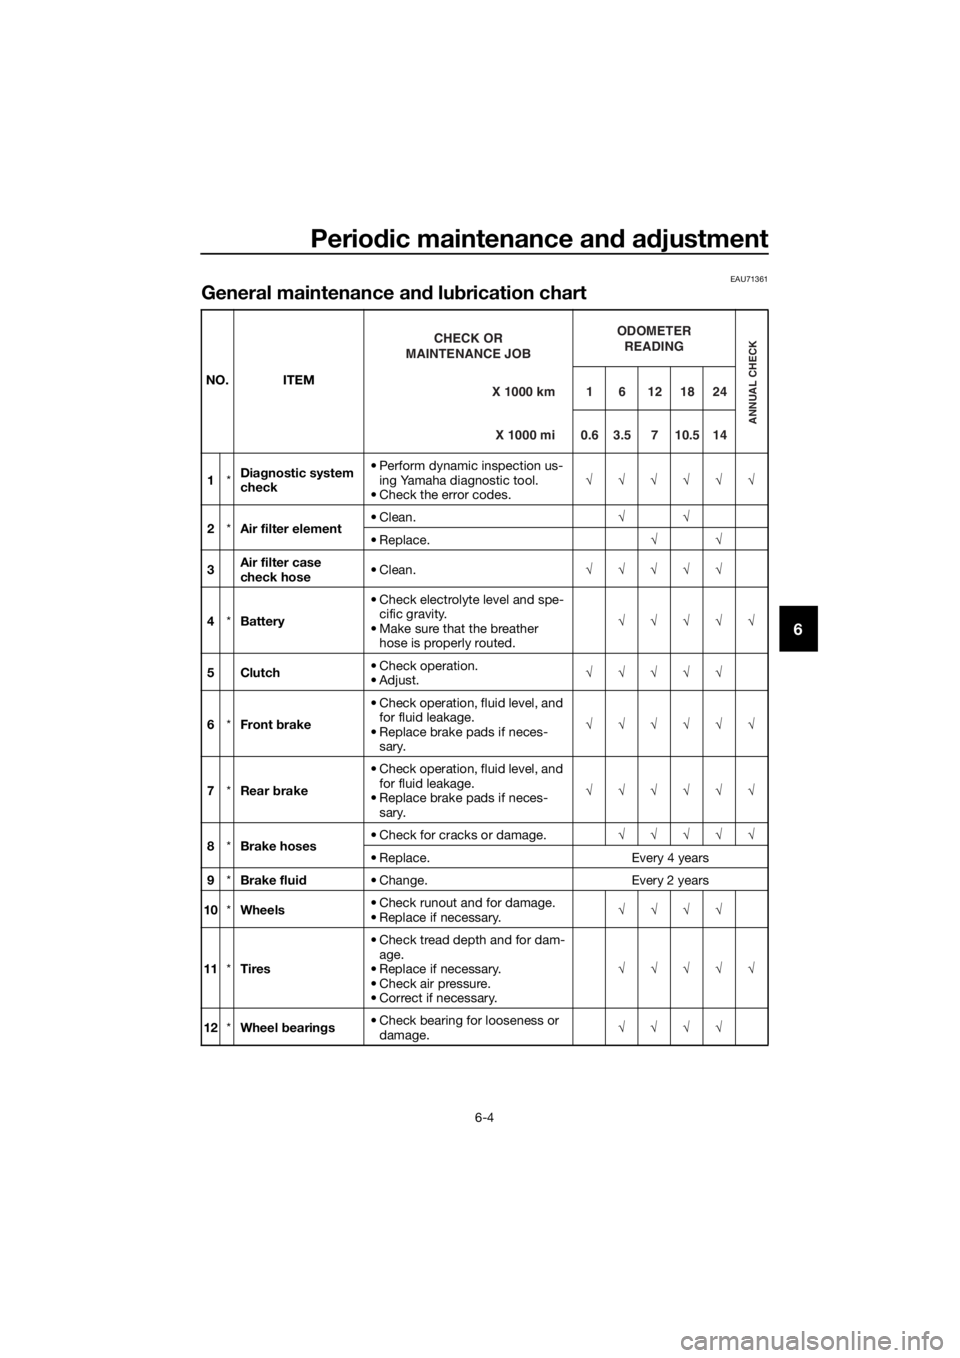
Periodic maintenance and adjustment
6-4
6
EAU71361
General maintenance and lubrication chart
NO. ITEM
1*Diagnostic system
check• Perform dynamic inspection us-
ing Yamaha diagnostic tool.
• Check the error codes.√√√√√√
2*Air filter element• Clean.√√
• Replace.√√
3Air filter case
check hose• Clean.√√√√√
4*Battery• Check electrolyte level and spe-
cific gravity.
• Make sure that the breather
hose is properly routed.√√√√√
5Clutch• Check operation.
•Adjust.√√√√√
6*Front brake• Check operation, fluid level, and
for fluid leakage.
• Replace brake pads if neces-
sary.√√√√√√
7*Rear brake• Check operation, fluid level, and
for fluid leakage.
• Replace brake pads if neces-
sary.√√√√√√
8*Brake hoses• Check for cracks or damage.√√√√√
• Replace. Every 4 years
9*Brake fluid• Change. Every 2 years
10*Wheels• Check runout and for damage.
• Replace if necessary.√√√√
11*Tires• Check tread depth and for dam-
age.
• Replace if necessary.
• Check air pressure.
• Correct if necessary.√√√√√
12*Wheel bearings• Check bearing for looseness or
damage.√√√√X 1000 km CHECK OR
MAINTENANCE JOB
X 1000 mi
ODOMETER
READING
ANNUAL CHECK
16121824
0.63.5710.514
UB5GE0E0.book Page 4 Thursday, August 23, 2018 10:05 AM
Page 48 of 96

Periodic maintenance and adjustment
6-5
6
13*Swingarm pivot
bearings• Check operation and for exces-
sive play.√√√√
• Lubricate with lithium-soap-
based grease.Every 24000 km (14000 mi)
14 Drive chain• Check chain slack, alignment
and condition.
• Adjust and lubricate chain with a
special O-ring chain lubricant
thoroughly.Every 1000 km (600 mi) and af-
ter washing the motorcycle, rid-
ing in the rain or riding in wet
areas
15*Steering bearings• Check bearing assemblies for
looseness.√√√√
• Moderately repack with lithium-
soap-based grease.√
16*Chassis fasteners• Make sure that all nuts, bolts
and screws are properly tight-
ened.√√√√√
17Brake lever pivot
shaft• Lubricate with silicone grease.√√√√√
18Brake pedal pivot
shaft• Lubricate with lithium-soap-
based grease.√√√√√
19Clutch lever pivot
shaft• Lubricate with lithium-soap-
based grease.√√√√√
20Shift pedal pivot
shaft• Lubricate with lithium-soap-
based grease.√√√√√
21 Sidestand• Check operation.
• Lubricate with lithium-soap-
based grease.√√√√√
22*Sidestand switch• Check operation and replace if
necessary.√√√√√√
23*Front fork• Check operation and for oil leak-
age.
• Replace if necessary.√√√√
24*Shock ab
sorber
assembly• Check operation and for oil leak-
age.
• Replace if necessary.√√√√ NO. ITEM
X 1000 km CHECK OR
MAINTENANCE JOB
X 1000 miODOMETER
READING
ANNUAL CHECK
16121824
0.6 3.5 7 10.5 14
UB5GE0E0.book Page 5 Thursday, August 23, 2018 10:05 AM
Page 55 of 96

Periodic maintenance and adjustment
6-12
6
NOTICE
ECA11621
In order to prevent clutch slip-
page (since the engine oil also
lubricates the clutch), do not
mix any chemical additives. Do
not use oils with a diesel speci-
fication of “CD” or oils of a high-
er quality than specified. In
addition, do not use oils labeled
“ENERGY CONSERVING II” or
higher.
Make sure that no foreign mate-
rial enters the crankcase.
11. Start the engine, and then let it idle
for several minutes while checking
it for oil leakage. If oil is leaking,
immediately turn the engine off
and check for the cause.
12. Turn the engine off, and then
check the oil level and correct it if
necessary.
EAU85450
Why Yamalube
YAMALUBE oil is a Genuine YAMAHA
Part born of the engineers’ passion
and belief that engine oil is an impor-
tant liquid engine component. We form
teams of specialists in the fields of me-
chanical engineering, chemistry, elec-
tronics and track testing, and have
them develop the engine together with
the oil it will use. Yamalube oils take full
advantage of the base oil’s qualities
and blend in the ideal balance of addi-
tives to make sure the final oil clears
our performance standards. Thus,
Yamalube mineral, semisynthetic and
synthetic oils have their own distinct
characters and value. Yamaha’s expe-
rience gained over many years of re-
search and development into oil since
the 1960’s helps make Yamalube the
best choice for your Yamaha engine.
Recommended engine oil:
See page 8-1.
Oil quantity:
Oil change:
0.85 L (0.90 US qt, 0.75 Imp.qt)
With oil filter removal:
0.95 L (1.00 US qt, 0.84 Imp.qt)
UB5GE0E0.book Page 12 Thursday, August 23, 2018 10:05 AM
Page 63 of 96

Periodic maintenance and adjustment
6-20
6
EAU33893
Adjusting the clutch lever free
play
Measure the clutch lever free play as
shown.
Periodically check the clutch lever free
play and, if necessary, adjust it as fol-
lows.
To increase the clutch lever free play,
turn the clutch lever free play adjusting
bolt at the clutch lever in direction (a).
To decrease the clutch lever free play,
turn the adjusting bolt in direction (b).
TIP
If the specified clutch lever free play
cannot be obtained as described
above, proceed as follows.
1. Fully turn the adjusting bolt at the
clutch lever in direction (a) to loos-
en the clutch cable.
2. Loosen the locknut at the crank-
case.3. To increase the clutch lever free
play, turn the clutch lever free play
adjusting nut in direction (a). To
decrease the clutch lever free
play, turn the adjusting nut in di-
rection (b).
4. Tighten the locknut.
1. Clutch lever free play
2. Locknut
3. Clutch lever free play adjusting bolt
Clutch lever free play:
10.0–15.0 mm (0.39–0.59 in)
ZAUM1597
)
)3
2
1(a
(b
1. Clutch lever free play adjusting nut (crank-
case)
2. Locknut
ZAUM1598
2
(a)
(b)
1
UB5GE0E0.book Page 20 Thursday, August 23, 2018 10:05 AM
Page 71 of 96

Periodic maintenance and adjustment
6-28
6
EAU44276
Checking and lubricating the
brake and shift pedals
The operation of the brake and shift
pedals should be checked before each
ride, and the pedal pivots should be lu-
bricated if necessary.
Brake pedal
Shift pedal
EAU23144
Checking and lubricating the
brake and clutch levers
The operation of the brake and clutch
levers should be checked before each
ride, and the lever pivots should be lu-
bricated if necessary.
Brake lever
Clutch lever
Recommended lubricant:
Lithium-soap-based grease
ZAUM1606
ZAUM1607
Recommended lubricants:
Brake lever:
Silicone grease
Clutch lever:
Lithium-soap-based grease
ZAUM1608
UB5GE0E0.book Page 28 Thursday, August 23, 2018 10:05 AM
Page 92 of 96

10-1
10
Index
A
ABS ....................................................... 3-15
ABS warning light ................................... 3-3
Air filter element and check hose,
replacing and cleaning ....................... 6-14
B
Battery .................................................. 6-31
Brake and clutch levers, checking and
lubricating ........................................... 6-28
Brake and shift pedals, checking and
lubricating ........................................... 6-28
Brake fluid, changing ............................ 6-24
Brake fluid level, checking .................... 6-23
Brake lever ............................................ 3-14
Brake light switches.............................. 6-22
Brake pedal........................................... 3-14
Brake pedal free play, adjusting ........... 6-21
C
Cables, checking and lubricating ......... 6-27
Care ........................................................ 7-1
Catalytic converter ................................ 3-18
Clutch lever ........................................... 3-13
Clutch lever free play, adjusting ........... 6-20
Coolant ................................................. 6-13
Coolant temperature warning light ......... 3-2
Cowlings, removing and installing .......... 6-7
D
Data recording, vehicle ........................... 9-3
Diagnostic connectors ............................ 9-2
Dimmer/Pass switch ............................. 3-12
Drive chain, cleaning and lubricating .... 6-26
Drive chain slack................................... 6-25
E
Engine break-in....................................... 5-4
Engine idling speed .............................. 6-15
Engine oil and oil filter element ............. 6-10
Engine serial number .............................. 9-1
Engine stop switch ............................... 3-12
Engine trouble warning light ................... 3-3
F
Front and rear brake pads, checking.... 6-22
Front brake lever free play, checking ... 6-21
Front fork, checking .............................. 6-30
Fuel ....................................................... 3-16
Fuel consumption, tips for reducing ....... 5-4
Fuel tank cap ........................................ 3-16
Fuel tank overflow hose ........................ 3-18
Fuses, replacing.................................... 6-33
H
Handlebar switches .............................. 3-12High beam indicator light ....................... 3-2
Horn switch .......................................... 3-12
I
Identification numbers ............................ 9-1
Ignition circuit cut-off system............... 3-21
Indicator lights and warning lights ......... 3-2
L
License plate light bulb, replacing........ 6-35
M
Main switch/steering lock....................... 3-1
Maintenance and lubrication, periodic ... 6-4
Maintenance, emission control
system.................................................. 6-3
Matte color, caution ............................... 7-1
Model label ............................................. 9-1
Multi-function meter unit ........................ 3-4
N
Neutral indicator light ............................. 3-2
P
Parking ................................................... 5-5
Part locations ......................................... 2-1
S
Safety information .................................. 1-1
Seats .................................................... 3-19
Shifting ................................................... 5-3
Shift pedal ............................................ 3-13
Shift timing indicator light....................... 3-3
Sidestand ............................................. 3-20
Sidestand, checking and lubricating .... 6-29
Spark plug, checking ............................. 6-9
Specifications ......................................... 8-1
Starting the engine ................................. 5-2
Start switch .......................................... 3-12
Steering, checking................................ 6-30
Storage ................................................... 7-4
Supporting the motorcycle................... 6-36
Swingarm pivots, lubricating ................ 6-29
T
Tail/brake light ...................................... 6-34
Throttle grip and cable, checking and
lubricating .......................................... 6-27
Throttle grip free play, adjusting........... 6-15
Tires ...................................................... 6-17
Tool kit.................................................... 6-2
Troubleshooting ................................... 6-36
Troubleshooting charts ........................ 6-37
Turn signal indicator light ....................... 3-2
Turn signal light bulb, replacing ........... 6-35
Turn signal switch ................................ 3-12
UB5GE0E0.book Page 1 Thursday, August 23, 2018 10:05 AM