Page 85 of 118

Periodic maintenance an d a djustment
6-22
6
EAU49713
Spoke wheels
To maximize the performance, durabil-
ity, and safe operation of your vehicle,
note the following points.
Check each wheel for cracks, de-
formation and other damage. If
any damage is found, have the
wheel inspected by your Yamaha
dealer. Do not attempt to repair or
straighten a bent or damaged
wheel.
Check the spokes for looseness. If
any loose spokes are found, have
the wheel adjusted by your
Yamaha dealer. Improperly tight-
ened spokes can cause wheel
misalignment.
Have the wheel balanced whenev-
er the tire or tube has been re-
placed. An unbalanced wheel can
result in adverse handling charac-
teristics and shortened tire life.
EAU42851
Clutch lever
Since this model is equipped with a hy-
draulic clutch, adjusting the clutch le-
ver free play is not needed. However, it
is necessary to check the hydraulic
system for leakage before each ride. If
the clutch lever free play does become
excessive, and shifting becomes rough
or clutch slippage occurs, causing
poor acceleration, there may be air in
the clutch system. If there is air in the
hydraulic system, have a Yamaha deal-
er bleed the system before operating
the motorcycle.
UBP8E1E0.book Page 22 Friday, September 14, 2018 11:35 AM
Page 86 of 118
Periodic maintenance an d a djustment
6-23
6
EAU37914
Checkin g the brake lever free
play
There should be no free play at the
brake lever end. If there is free play,
have a Yamaha dealer inspect the
brake system.
WARNING
EWA14212
A soft or spon gy feelin g in the b rake
lever can in dicate the presence of
air in the hy draulic system. If there is
air in the hy draulic system, have a
Yamaha dealer blee d the system be-
fore operatin g the vehicle. Air in the
hy draulic system will diminish the
b rakin g performance, which may re-
sult in loss of control and an acci-
d ent.
EAU36505
Brake li ght switches
The brake light should come on just
before braking takes effect. The brake
light is activated by switches connect-
ed to the brake lever and brake pedal.
Since the brake light switches are
components of the anti-lock brake sys-
tem, they should only be serviced by a
Yamaha dealer.
1. No brake lever free play
1
UBP8E1E0.book Page 23 Friday, September 14, 2018 11:35 AM
Page 87 of 118

Periodic maintenance an d a djustment
6-24
6
EAU22393
Checkin g the front an d rear
b rake pa ds
The front and rear brake pads must be
checked for wear at the intervals spec-
ified in the periodic maintenance and
lubrication chart.
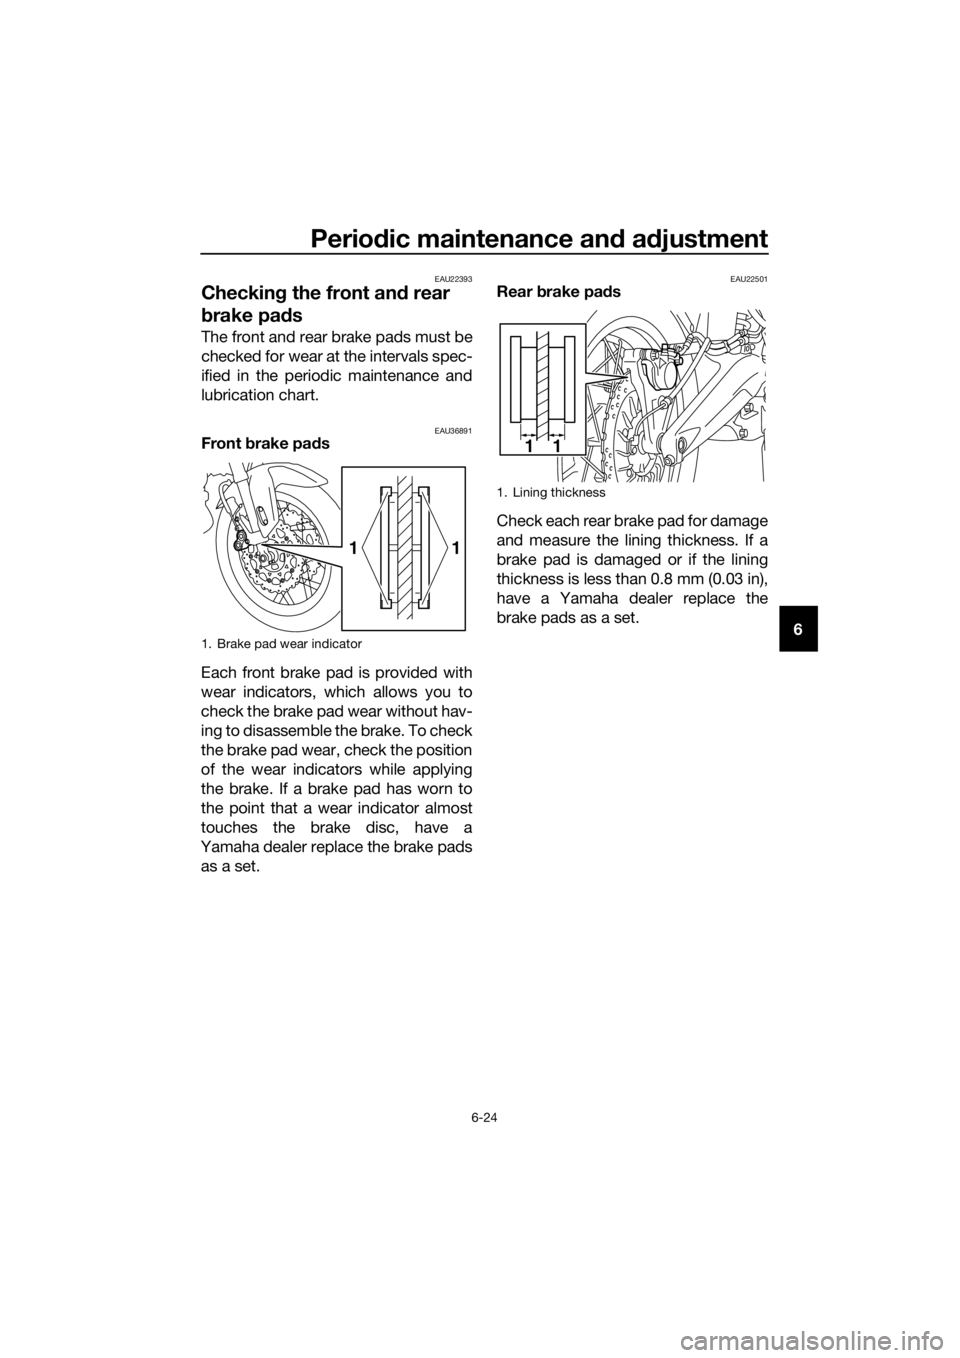
EAU36891Front brake pa ds
Each front brake pad is provided with
wear indicators, which allows you to
check the brake pad wear without hav-
ing to disassemble the brake. To check
the brake pad wear, check the position
of the wear indicators while applying
the brake. If a brake pad has worn to
the point that a wear indicator almost
touches the brake disc, have a
Yamaha dealer replace the brake pads as a set.
EAU22501Rear brake pa ds
Check each rear brake pad for damage
and measure the lining thickness. If a
brake pad is damaged or if the lining
thickness is less than 0.8 mm (0.03 in),
have a Yamaha dealer replace the
brake pads as a set.
1. Brake pad wear indicator
11
1. Lining thickness
11
UBP8E1E0.book Page 24 Friday, September 14, 2018 11:35 AM
Page 88 of 118

Periodic maintenance an d a djustment
6-25
6
EAU40262
Checkin g the brake flui d level
Before riding, check that the brake fluid
is above the minimum level mark.
Check the brake fluid level with the top
of the reservoir level. Replenish the
brake fluid if necessary.
Front brake
Rear brake
WARNING
EWA16011
Improper maintenance can result in
loss of b raking a bility. O bserve
these precautions: Insufficient brake flui d may al-
low air to enter the brake sys-
tem, re ducing brakin g
performance.
Clean the filler cap before re-
moving . Use only DOT 4 brake
flui d from a seale d container.
Use only the specified b rake flu-
i d ; otherwise, the ru bber seals
may deteriorate, causin g leak-
a g e.
Refill with the same type of
brake flui d. A ddin g a brake flui d
other than DOT 4 may result in a
harmful chemical reaction.
Be careful that water or dust
d oes not enter the brake flui d
reservoir when refillin g. Water
will si gnificantly lower the boil-
in g point of the flui d an d may re-
sult in vapor lock, an d d ir
t may
clo g the ABS hy draulic unit
valves.
NOTICE
ECA17641
Brake flui d may damag e painte d
surfaces or plastic parts. Always
clean up spille d flui d imme diately.
As the brake pads wear, it is normal for
the brake fluid level to gradually go
down. A low brake fluid level may indi-
cate worn brake pads and/or brake
system leakage; therefore, be sure to
check the brake pads for wear and the
brake system for leakage. If the brake
fluid level goes down suddenly, have a
Yamaha dealer check the cause before further riding.
1. Minimum level mark
1. Minimum level mark
Specifie d b rake flui d:
DOT 4
LOWER1
UPPER
LOWER
1
UBP8E1E0.book Page 25 Friday, September 14, 2018 11:35 AM
Page 89 of 118

Periodic maintenance an d a djustment
6-26
6
EAU22754
Chan gin g the brake an d
clutch flui ds
Have a Yamaha dealer change the
brake and clutch fluids at the intervals
specified in the periodic maintenance
and lubrication chart. In addition, have
the oil seals of the brake and clutch
master cylinders and calipers as well
as the brake and clutch hoses replaced
at the intervals listed below or whenev-
er they are damaged or leaking.
Oil seals: Replace every two
years.
Brake and clutch hoses: Replace
every four years.
EAU23115
Checkin g an d lu bricatin g the
throttle grip an d ca ble
The operation of the throttle grip
should be checked before each ride. In
addition, the cable should be lubricat-
ed by a Yamaha dealer at the intervals
specified in the periodic maintenance
chart.
The throttle cable is equipped with a
rubber cover. Make sure that the cover
is securely installed. Even though the
cover is installed correctly, it does not
completely protect the cable from wa-
ter entry. Therefore, use care not to
pour water directly onto the cover or
cable when washing the vehicle. If the
cable or cover becomes dirty, wipe
clean with a moist cloth.
UBP8E1E0.book Page 26 Friday, September 14, 2018 11:35 AM
Page 90 of 118
Periodic maintenance an d a djustment
6-27
6
EAU44276
Checkin g an d lu bricatin g the
b rake an d shift pe dals
The operation of the brake and shift
pedals should be checked before each
ride, and the pedal pivots should be lu-
bricated if necessary.
Brake ped al
Shift pe dal
EAU43602
Checkin g an d lu bricatin g the
b rake an d clutch levers
The operation of the brake and clutch
levers should be checked before each
ride, and the lever pivots should be lu-
bricated if necessary.
Brake lever
Clutch lever
Recommen ded lu bricant:
Lithium-soap-based greaseRecommen ded lu bricant:
Silicone grease
UBP8E1E0.book Page 27 Friday, September 14, 2018 11:35 AM
Page 91 of 118
Periodic maintenance an d a djustment
6-28
6
EAU23203
Checkin g an d lu bricatin g the
si destan d
The operation of the sidestand should
be checked before each ride, and the
sidestand pivot and metal-to-metal
contact surfaces should be lubricated
if necessary.
WARNING
EWA10732
If the si destan d d oes not move up
an d d own smoothly, have a Yamaha
d ealer check or repair it. Otherwise,
the si destan d coul d contact the
g roun d an d d istract the operator, re-
sultin g in a possi ble loss of control.
EAUM1653
Lu bricatin g the swin garm piv-
ots
The swingarm pivots must be lubricat-
ed by a Yamaha dealer at the intervals
specified in the periodic maintenance
and lubrication chart.
Recommen ded lu bricant:
Lithium-soap-based grease
Recommen ded lu bricant:
Lithium-soap-based grease
UBP8E1E0.book Page 28 Friday, September 14, 2018 11:35 AM
Page 92 of 118

Periodic maintenance an d a djustment
6-29
6
EAU23273
Checkin g the front fork
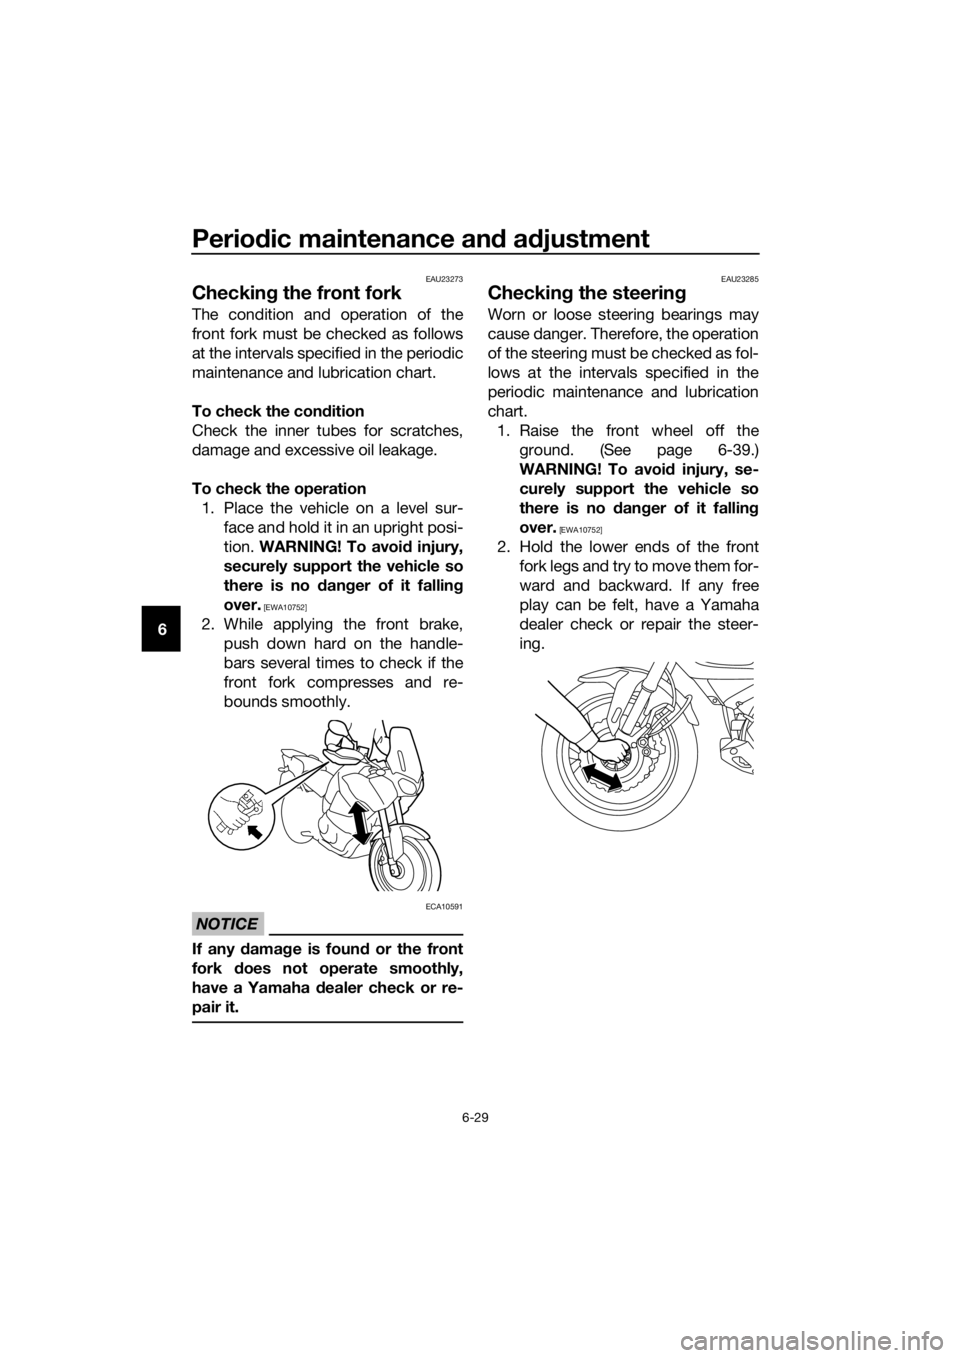
The condition and operation of the
front fork must be checked as follows
at the intervals specified in the periodic
maintenance and lubrication chart.
To check the con dition
Check the inner tubes for scratches,
damage and excessive oil leakage.
To check the operation 1. Place the vehicle on a level sur- face and hold it in an upright posi-
tion. WARNING! To avoi d injury,
securely support the vehicle so
there is no dan ger of it fallin g
over.
[EWA10752]
2. While applying the front brake, push down hard on the handle-
bars several times to check if the
front fork compresses and re-
bounds smoothly.
NOTICE
ECA10591
If any d amage is foun d or the front
fork does not operate smoothly,
have a Yamaha dealer check or re-
pair it.
EAU23285
Checkin g the steerin g
Worn or loose steering bearings may
cause danger. Therefore, the operation
of the steering must be checked as fol-
lows at the intervals specified in the
periodic maintenance and lubrication
chart.
1. Raise the front wheel off the ground. (See page 6-39.)
WARNING! To avoi d injury, se-
curely support the vehicle so
there is no dan ger of it fallin g
over.
[EWA10752]
2. Hold the lower ends of the front fork legs and try to move them for-
ward and backward. If any free
play can be felt, have a Yamaha
dealer check or repair the steer-
ing.
UBP8E1E0.book Page 29 Friday, September 14, 2018 11:35 AM