2019 YAMAHA XT1200Z brake
[x] Cancel search: brakePage 90 of 118

Periodic maintenance an d a djustment
6-27
6
EAU44276
Checkin g an d lu bricatin g the
b rake an d shift pe dals
The operation of the brake and shift
pedals should be checked before each
ride, and the pedal pivots should be lu-
bricated if necessary.
Brake ped al
Shift pe dal
EAU43602
Checkin g an d lu bricatin g the
b rake an d clutch levers
The operation of the brake and clutch
levers should be checked before each
ride, and the lever pivots should be lu-
bricated if necessary.
Brake lever
Clutch lever
Recommen ded lu bricant:
Lithium-soap-based greaseRecommen ded lu bricant:
Silicone grease
UBP8E1E0.book Page 27 Friday, September 14, 2018 11:35 AM
Page 92 of 118
Periodic maintenance an d a djustment
6-29
6
EAU23273
Checkin g the front fork
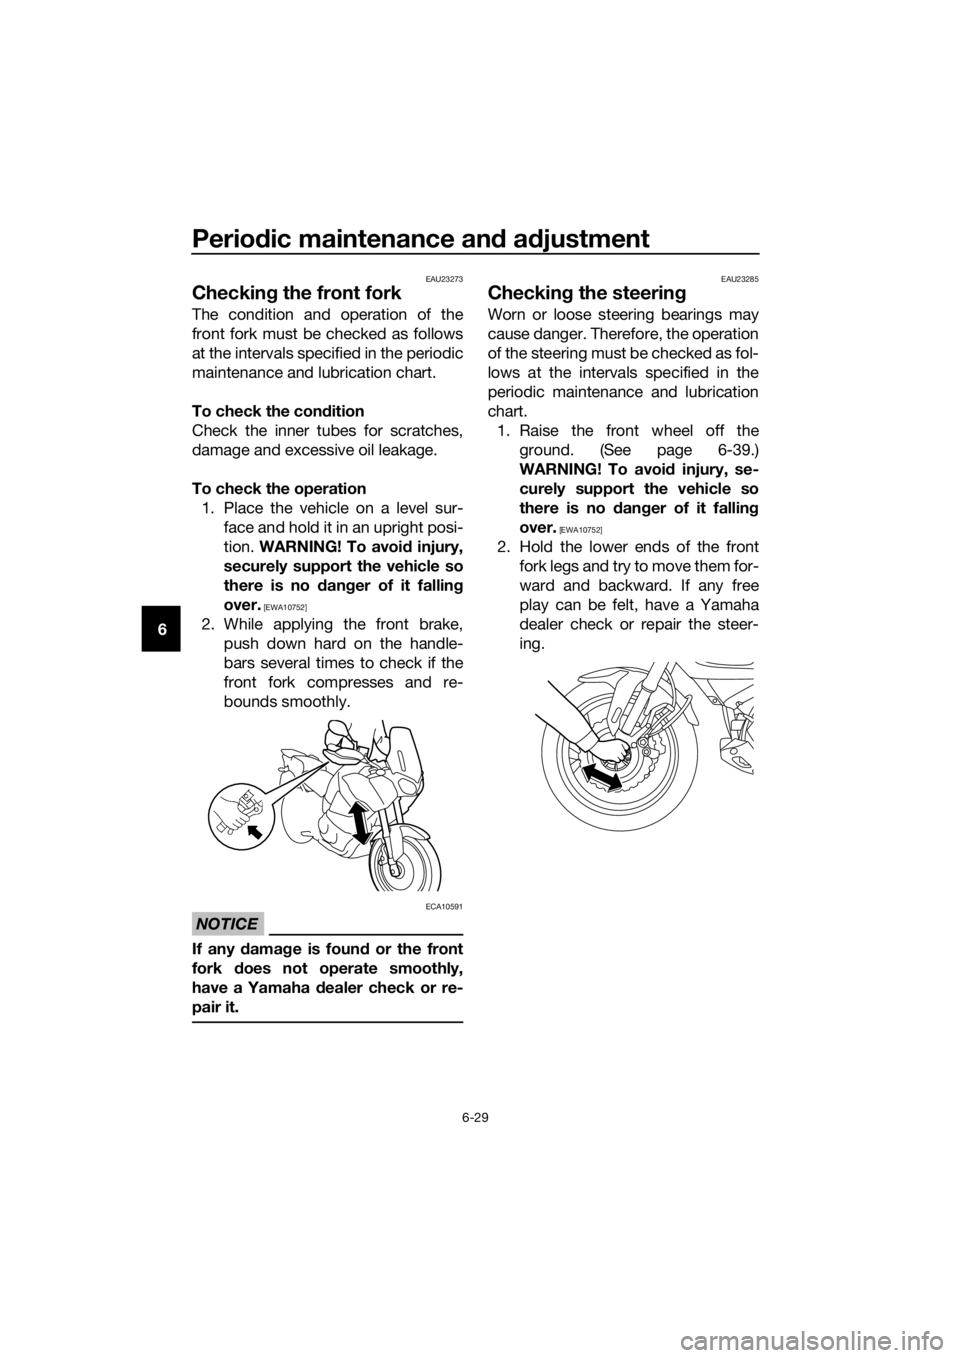
The condition and operation of the
front fork must be checked as follows
at the intervals specified in the periodic
maintenance and lubrication chart.
To check the con dition
Check the inner tubes for scratches,
damage and excessive oil leakage.
To check the operation 1. Place the vehicle on a level sur- face and hold it in an upright posi-
tion. WARNING! To avoi d injury,
securely support the vehicle so
there is no dan ger of it fallin g
over.
[EWA10752]
2. While applying the front brake, push down hard on the handle-
bars several times to check if the
front fork compresses and re-
bounds smoothly.
NOTICE
ECA10591
If any d amage is foun d or the front
fork does not operate smoothly,
have a Yamaha dealer check or re-
pair it.
EAU23285
Checkin g the steerin g
Worn or loose steering bearings may
cause danger. Therefore, the operation
of the steering must be checked as fol-
lows at the intervals specified in the
periodic maintenance and lubrication
chart.
1. Raise the front wheel off the ground. (See page 6-39.)
WARNING! To avoi d injury, se-
curely support the vehicle so
there is no dan ger of it fallin g
over.
[EWA10752]
2. Hold the lower ends of the front fork legs and try to move them for-
ward and backward. If any free
play can be felt, have a Yamaha
dealer check or repair the steer-
ing.
UBP8E1E0.book Page 29 Friday, September 14, 2018 11:35 AM
Page 95 of 118

Periodic maintenance an d a djustment
6-32
6
EAU58963
Replacin g the fuses
The fuse boxes and the ABS motor
fuse are located behind cowling A, and
the main fuse, the cruise control fuse
and the brake light fuse are located be-
hind cowling B. (See page 6-7.)
If a fuse is blown, replace it as follows.1. Turn the key to “OFF” and turn off the electrical circuit in question.
2. Remove the blown fuse, and then install a new fuse of the specified
amperage. WARNING! Do not
use a fuse of a hi gher ampera ge
ratin g than recommen ded to
avoi d causin g extensive dam-
a g e to the electrical system an d
possi bly a fire.
[EWA15132]
1. ABS motor fuse
2. ABS motor spare fuse
3. Main fuse
4. Spare fuse
5. Cruise control fuse
6. Brake light fuse
7. Fuse box
1
2
354
6
7
1. Headlight fuse
2. ABS solenoid fuse
3. Electronic throttle valve fuse
4. Fuel injection system fuse
5. Backup fuse (for clock and immobilizer sys-
tem)
6. Radiator fan motor fuse
7. Ignition fuse
8. Signaling system fuse
9. ABS control unit fuse
10.Terminal fuse 1 (for auxiliary DC jack)
11.Parking lighting fuse
12.O/P (option) fuse
13.Spare fuse
1
3
4
5
6
2789
10
1311
1213
UBP8E1E0.book Page 32 Friday, September 14, 2018 11:35 AM
Page 96 of 118

Periodic maintenance an d a djustment
6-33
6
3. Turn the key to “ON” and turn onthe electrical circuit in question to
check if the device operates.
4. If the fuse immediately blows again, have a Yamaha dealer
check the electrical system.
EAU39014
Replacin g a hea dlig ht bul b
This model is equipped with halogen
bulb headlights. If a headlight bulb
burns out, replace it as follows.
NOTICE
ECA10651
Take care not to damag e the follow-
in g parts:
Hea dlig ht bul b
Do not touch the glass part of
the hea dlig ht bul b to keep it free
from oil, otherwise the transpar-
ency of the glass, the luminosity
of the b ulb, an d the bul b life will
b e ad versely affected . Thor-
ou ghly clean off any d irt and fin-
g erprints on the hea dlig ht bul b
usin g a cloth moistene d with al-
cohol or thinner.
Hea dlig ht lens
Do not affix any type of tinted
film or stickers to the head light
lens.
Do not use a hea dlig ht bul b of a
watta ge hi gher than specifie d.
1. Remove the headlight bulb cover
by turning it counterclockwise.
Specifie d fuses:
Main fuse: 50.0 A
Te r m i n a l f u s e 1 :
3.0 A
Headlight fuse: 20.0 A
Brake light fuse: 1.0 A
Parking lighting fuse:
7.5 A
Signaling system fuse: 7.5 A
Ignition fuse: 20.0 A
Radiator fan motor fuse:
20.0 A
Backup fuse: 7.5 A
Electronic throttle valve fuse: 7.5 A
Fuel injection system fuse:
20.0 A
ABS solenoid fuse: 20.0 A
ABS control unit fuse: 7.5 A
ABS motor fuse:
30.0 A
Cruise control fuse: 1.0 A
O/P (option) fuse: 20.0 A
1. Do not touch the glass part of the bulb.
UBP8E1E0.book Page 33 Friday, September 14, 2018 11:35 AM
Page 100 of 118

Periodic maintenance an d a djustment
6-37
6 coul
d cause an acci dent. Be
sure to ti ghten the screws to the
specifie d torque.
[EWA15511] EAU70570
Turn si
gnal li ght and b rake/tail
li g ht
This model is equipped with LED-type
turn signal lights and an LED-type
brake/tail light.
If a turn signal light or the brake/tail
light does not come on, have a
Yamaha dealer check it.
Ti ghtenin g torque:
Windshield screw: 0.5 N·m (0.05 kgf·m, 0.37 lb·ft)
UBP8E1E0.book Page 37 Friday, September 14, 2018 11:35 AM
Page 105 of 118

Motorcycle care and stora ge
7-1
7
EAU37834
Matte color caution
NOTICE
ECA15193
Some mo dels are equipped with
matte colored finished parts. Be
sure to consult a Yamaha dealer for
a d vice on what pro ducts to use be-
fore cleanin g the vehicle. Usin g a
b rush, harsh chemical prod ucts or
cleanin g compoun ds when cleanin g
these parts will scratch or damag e
their surface. Wax also shoul d not
b e applie d to any matte colored fin-
ishe d parts.
EAU83443
Care
Frequent, thorough cleaning of the ve-
hicle will not only enhance its appear-
ance but also will improve its general
performance and extend the useful life
of many components. Washing, clean-
ing, and polishing will also give you a
chance to inspect the condition of the
vehicle more frequently. Be sure to
wash the vehicle after riding in the rain
or near the sea, because salt is corro-
sive to metals.
TIP
The roads of heavy snowfall areas
may be sprayed with salt as a de-
icing method. This salt can stay on
the roads well into spring, so be
sure to wash the underside and
chassis parts after riding in such
areas.
Genuine Yamaha care and main-
tenance products are sold under
the YAMALUBE brand in many
markets worldwide.
See your Yamaha dealer for addi-
tional cleaning tips.
NOTICE
ECA26280
Improper cleanin g can cause cos-
metic an d mechanical damag e. Do
not use: high-pressure washers or
steam-jet cleaners. Excessive
water pressure may cause wa-
ter seepag e and d eterioration of
wheel bearin gs, brakes, trans-
mission seals an d electrical de-
vices. Avoi d hi gh-pressure
d eter gent applications such as
those availa ble in coin-operate d
car washers.
UBP8E1E0.book Page 1 Friday, September 14, 2018 11:35 AM
Page 106 of 118
Motorcycle care and stora ge
7-2
7
harsh chemicals, inclu din g
stron g aci dic wheel cleaners,
especially on spoke or mag ne-
sium wheels.
harsh chemicals, a brasive
cleanin g compoun ds, or wax on
matte-finishe d parts. Brushes
can scratch an d damag e the
matte-finish, use soft spon ge or
towel only.
towels, spon ges, or brushes
contaminated with abrasive
cleanin g pro ducts or stron g
chemicals such as, solvents,
g asoline, rust removers, brake
flui d, or antifreeze, etc.
Before washin g
1. Park the vehicle out of direct sun- light and allow it to cool. This will
help avoid water spots.
2. Make sure all caps, covers, elec- trical couplers and connectors are
tightly installed.
3. Cover the muffler end with a plas- tic bag and a strong rubber band.
4. Pre-soak stubborn stains like in- sects or bird droppings with a wet
towel for a few minutes.
5. Remove road grime and oil stains with a quality degreasing agent
and a plastic-bristle brush or
sponge. NOTICE: Do not use
d eg reasin g a gent on areas re-
quirin g lu brication such as
seals, gaskets, an d wheel axles.
Follow prod uct instructions.
[ECA26290]
Washing
1. Rinse off any degreaser and spray down the vehicle with a garden
hose. Use only enough pressure
to do the job. Avoid spraying wa-
ter directly into the muffler, instru-
ment panel, air inlet, or other inner
areas such as underseat storage
compartments.
2. Wash the vehicle with a quality au- tomotive-type detergent mixed
with cool water and a soft, clean
towel or sponge. Use an old tooth-
brush or plastic-bristle brush for
hard-to-reach places. NOTICE:
Use col d water if the vehicle has
b een exposed to salt. Warm wa-
ter will increase salt’s corrosive
properties.
[ECA26301]
3. For windshield-equipped vehicles: Clean the windshield with a soft
towel or sponge dampened with
water and a pH neutral detergent.
If necessary, use a high-quality
windshield cleaner or polish for
motorcycles. NOTICE: Never use
any stron g chemicals to clean
the win dshield . Additionally,
some cleanin g compoun ds for
plastic may scratch the win d-
shield , so be sure to test all
cleanin g prod ucts before gen-
eral application.
[ECA26310]
4. Rinse off thoroughly with clean water. Be sure to remove all deter-
gent residues, as they can be
harmful to plastic parts.
After washin g
1. Dry the vehicle with a chamois or absorbent towel, preferably mi-
crofiber terrycloth.
UBP8E1E0.book Page 2 Friday, September 14, 2018 11:35 AM
Page 107 of 118
Motorcycle care and stora ge
7-3
7
2. For drive chain-equipped models:
Dry and then lubricate the drive
chain to prevent rust.
3. Use a chrome polish to shine chrome, aluminum, and stainless
steel parts. Often the thermally in-
duced discoloring of stainless
steel exhaust systems can be re-
moved through polishing.
4. Apply a corrosion protection spray on all metal parts including
chrome or nickel-plated surfaces.
WARNING! Do not apply silicone
or oil spray to seats, han d g rips,
ru bber foot pe gs or tire tread s.
Otherwise these parts will b e-
come slippery, which coul d
cause loss of control. Thor-
ou ghly clean the surfaces of
these parts before operatin g the
vehicle. [EWA20650]
5. Treat rubber, vinyl, and unpainted plastic parts with a suitable care
product.
6. Touch up minor paint damage caused by stones, etc.
7. Wax all painted surfaces using a non-abrasive wax or use a detail
spray for motorcycles.
8. When finished cleaning, start the engine and let it idle for several
minutes to help dry any remaining
moisture.
9. If the headlight lens has fogged up, start the engine and turn on
the headlight to help remove the
moisture.
10. Let the vehicle dry completely be- fore storing or covering it.
NOTICE
ECA26320
Do not apply wax to ru bber or
unpainte d plastic parts.
Do not use a brasive polishin g
compoun ds as they will wear
away the paint.
Apply sprays an d wax sparin gly.
Wipe off excess afterwar ds.
WARNING
EWA20660
Contaminants left on the brakes or
tires can cause loss of control. Make sure there is no lu bricant
or wax on the brakes or tires.
If necessary, wash the tires with
warm water an d a mil d d eter-
g ent.
If necessary, clean the brake
d iscs an d pa ds with b rake
cleaner or acetone.
Before ri din g at hi gher spee ds,
test the vehicle’s brakin g per-
formance an d cornerin g b ehav-
ior.
UBP8E1E0.book Page 3 Friday, September 14, 2018 11:35 AM