Page 54 of 180
4-23
4For Europe
TIPConfirm the gasoline pump nozzle has the same
fuel identification mark.
About the recommended fuel
If knocking or pinging occurs, try a different brand
or higher octane gasoline.
For Europe, use RON 95 octane or higher.
For Oceania, use RON 91 octane or higher.TIPGasoline containing ethanol can be used if the
ethanol content does not exceed 10% (E10). Gas-
oline containing methanol is not recommended
because it can cause damage to the fuel system
or vehicle performance problems. NOTICEECB00071Use only unleaded gasoline. The use of leaded
gasoline will cause severe damage to internal
engine parts, such as the valves and piston
rings, as well as to the exhaust system.
Recommended fuel:
Regular unleaded gasoline only
Fuel tank capacity: 18 L (4.8 US gal, 4.0 Imp.gal)
Fuel reserve amount: 4.0 L (1.06 US gal, 0.88 Imp.gal)1. EN228 fuel identification mark
1
E5
E10
UB5K60E0.book Page 23 Monday, May 28, 2018 11:35 AM
Page 62 of 180

5-1
5
EBU19203
PRE-OPERATION CHECKS
EBU19226Inspect your vehicle each time you use it to make sure the vehicle is in safe operating condition. Always
follow the inspection and maintenance procedures and schedules described in the Owner’s Manual.
WARNING
EWB00482Failure to inspect or maintain the vehicle properly increases the possibility of an accident or equip-
ment damage. Do not operate the vehicle if you find any problem. If a problem cannot be corrected
by the procedures provided in this manual, have the vehicle inspected by a Yamaha dealer. Before using this vehicle, check the following points:
ITEMROUTINE PAGE
Fuel • Check fuel level in fuel tank,
and add recommended fuel if neces-
sary.
• Check fuel line for leakage. Correct if necessary. 4-22, 5-3
Engine oil • Check oil level in engine, and add recommended oil to specified
level if necessary.
• Check ATV for oil leakage. Correct if necessary. 5-3, 8-19
Final gear oil • Check ATV for oil leakage. Correct if necessary. 5-3, 8-24
Differential gear oil • Check ATV for oil leakage. Correct if necessary. 5-3, 8-26
Coolant • Check coolant level in reservoir, and add recommended coolant to
specified level if necessary.
• Check cooling system for leakage. Correct if necessary. 5-3, 8-28
UB5K60E0.book Page 1 Monday, May 28, 2018 11:35 AM
Page 64 of 180

5-3
5
EBU38000FuelMake sure there is sufficient gasoline in the tank
before starting off. Refuel if necessary. (See page
4-22.)EBU19561Engine oilMake sure that the engine oil is at the specified
level. Add oil as necessary. (See page 8-19.)EBU19591Final gear oilMake sure that the final gear oil is at the specified
level. Add oil as necessary. (See page 8-24.)EBU19601Differential gear oilMake sure that the differential gear oil is at the
specified level. Add oil as necessary. (See page
8-26.)EBU19632CoolantMake sure that the coolant is at the specified level.
Add coolant as necessary. (See page 8-28.)
TIPThe coolant level must be checked on a cold en-
gine since the level varies with engine tempera-
ture. EBU28533Front and rear brakesBrake levers and brake pedal
Check that there is no free play in the front
brake lever. If there is free play, have a Yamaha
dealer check the brake system.
Check for correct free play in the rear brake le-
ver and brake pedal. If the free play is incorrect,
adjust it. (See page 8-44.)
Check operation of the levers and pedal. They
should move smoothly and there should be a
firm feeling when the brake is applied. If not,
have a Yamaha dealer check them.
Brake fluid level (front brake)
Check the brake fluid level. Add fluid if necessary.
(See page 8-43.)
Specified brake fluid:DOT 4
UB5K60E0.book Page 3 Monday, May 28, 2018 11:35 AM
Page 69 of 180

6-1
6
EBU19882
OPERATION
EBU19902Read the Owner’s Manual carefully before riding
the ATV. If there is a control or function you do not
understand, ask your Yamaha dealer.
WARNING
EWB00632Read the Owner’s Manual carefully to become
familiar with all controls in order to help pre-
vent any loss of control, which could cause an
accident or injury. EBU38301Starting the engineThis model is equipped with an ignition circuit cut-
off system. To enable starting one of the following
conditions must be met:
The drive select lever is in the neutral or park po-
sition.
The rear brake lever or brake pedal is applied.TIPIt is recommended to shift into neutral or park and
apply the rear brake when starting the engine.
NOTICEECB00151See the “Engine break-in” section on page 6-4
prior to operating the engine for the first time. To start the engine
1. Turn the key to “ ” (on) and the engine stop switch to “ ” (run).
YFM70KDXK / YFM70KDHK
The coolant temperature warning light, the
engine trouble warning light, and the fuel level
warning light should come on for a few sec-
onds, then go off.
YFM70KPXK / YFM70KPAK /
YFM70KPHK / YFM70KPSK / YFM70KPLK
The battery voltage warning light, the cool-
ant temperature warning light, and the en-
gine trouble warning light should come on
for a few seconds, then go off.
The electric power steering warning light
should come on and stay on until the en-
gine is started.
UB5K60E0.book Page 1 Monday, May 28, 2018 11:35 AM
Page 101 of 180

8-3
8
EBU36872Periodic maintenance chart: Emission control systemTIPFor ATVs not equipped with an odometer or an hour meter, follow the month maintenance intervals in-
stead.
For odometer or hour meter-equipped vehicles, follow the month maintenance interval if the ATV isn’t
ridden for the stated distance or engine operating hours.
Items marked with an asterisk should be performed by a Yamaha dealer as they require special tools,
data and technical skills. NO. ITEM CHECK OR MAINTENANCE
JOB INITIAL
EVERY
Whichev- er comes first month136612
km (mi) 240
(150) 1300
(800) 2500
(1600) 2500
(1600) 5000
(3200)
hours 20 80 160 160 320
1 *Fuel line • Check fuel hoses for cracks or other damage, and
replace if necessary. √√√
2Spark plug • Check condition and clean, regap, or replace if
necessary. √√√√√
3 *Va l v e s • Check valve clearance and adjust if necessary. √ √√√
4 *Crankcase breath-
er system • Check breather hose for cracks or other damage,
and replace if necessary. √√√
5 *Exhaust system • Check for leakage and replace gasket(s) if neces-
sary.
• Check for looseness and tighten all screw clamps and joints if necessary. √√√
UB5K60E0.book Page 3 Monday, May 28, 2018 11:35 AM
Page 137 of 180

8-39
8
case. Never operate the engine with the air
filter element removed. Doing so would al-
low unfiltered air to enter the engine, caus-
ing rapid engine wear and possible engine
damage. Additionally, the fuel injection
system would be affected resulting in poor
engine performance and possible over-
heating.
[ECB00763]
12. Install the seat.TIPEach time the air filter element maintenance is
performed, check the air inlet of the air filter case
for obstructions. Check the air filter case rubber
joint to the throttle body and the rubber joint man-
ifold fittings for an air-tight seal. Tighten all fittings
securely to avoid the possibility of unfiltered air
entering the engine. EBU28905Cleaning the spark arresterBe sure the exhaust pipe and muffler are cool be-
fore cleaning the spark arrester.
WARNING
EWB02342Always let the exhaust system cool prior to
touching exhaust components.
Do not start the engine with the spark arrester
removed. Sparks or exhaust particulate can
cause eye injury, burns, or start a fire. 1. Remove the tailpipe bolts.
2. Remove the tailpipe by pulling it out of the
muffler, and then remove the gasket.1. Gasket
2. Spark arrester
3. Tailpipe
4. Tailpipe bolt
3
2
4
1
4
UB5K60E0.book Page 39 Monday, May 28, 2018 11:35 AM
Page 139 of 180
8-41
8
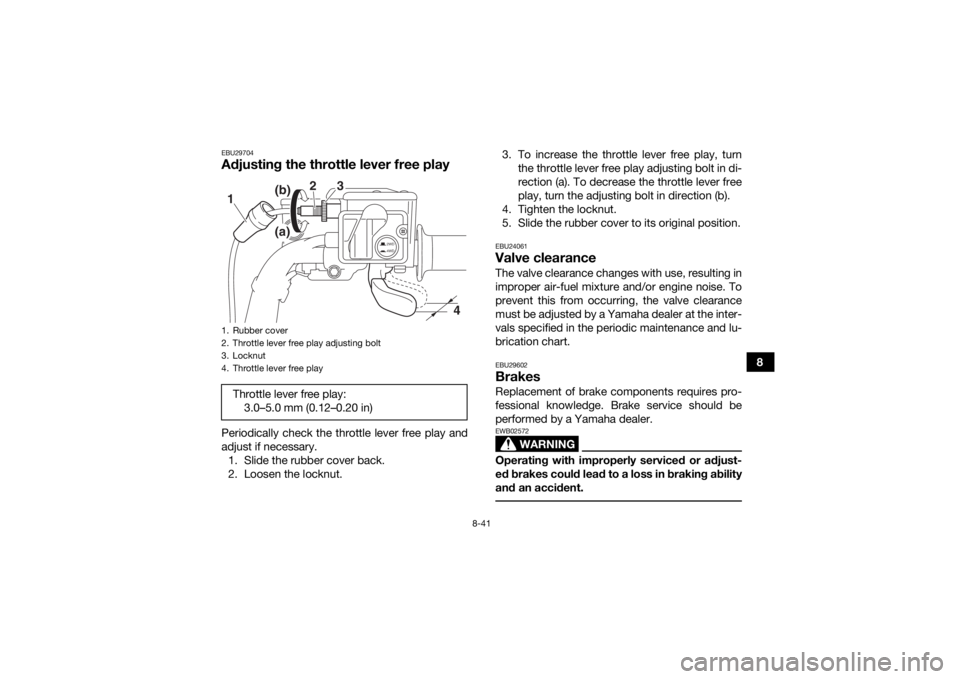
EBU29704Adjusting the throttle lever free playPeriodically check the throttle lever free play and
adjust if necessary.1. Slide the rubber cover back.
2. Loosen the locknut. 3. To increase the throttle lever free play, turn
the throttle lever free play adjusting bolt in di-
rection (a). To decrease the throttle lever free
play, turn the adjusting bolt in direction (b).
4. Tighten the locknut.
5. Slide the rubber cover to its original position.
EBU24061Valve clearanceThe valve clearance changes with use, resulting in
improper air-fuel mixture and/or engine noise. To
prevent this from occurring, the valve clearance
must be adjusted by a Yamaha dealer at the inter-
vals specified in the periodic maintenance and lu-
brication chart.EBU29602BrakesReplacement of brake components requires pro-
fessional knowledge. Brake service should be
performed by a Yamaha dealer.
WARNING
EWB02572Operating with improperly serviced or adjust-
ed brakes could lead to a loss in braking ability
and an accident.
1. Rubber cover
2. Throttle lever free play adjusting bolt
3. Locknut
4. Throttle lever free playThrottle lever free play: 3.0–5.0 mm (0.12–0.20 in)
2WD
4WD
3
2
1
4
(b)
(a)
UB5K60E0.book Page 41 Monday, May 28, 2018 11:35 AM
Page 154 of 180
8-56
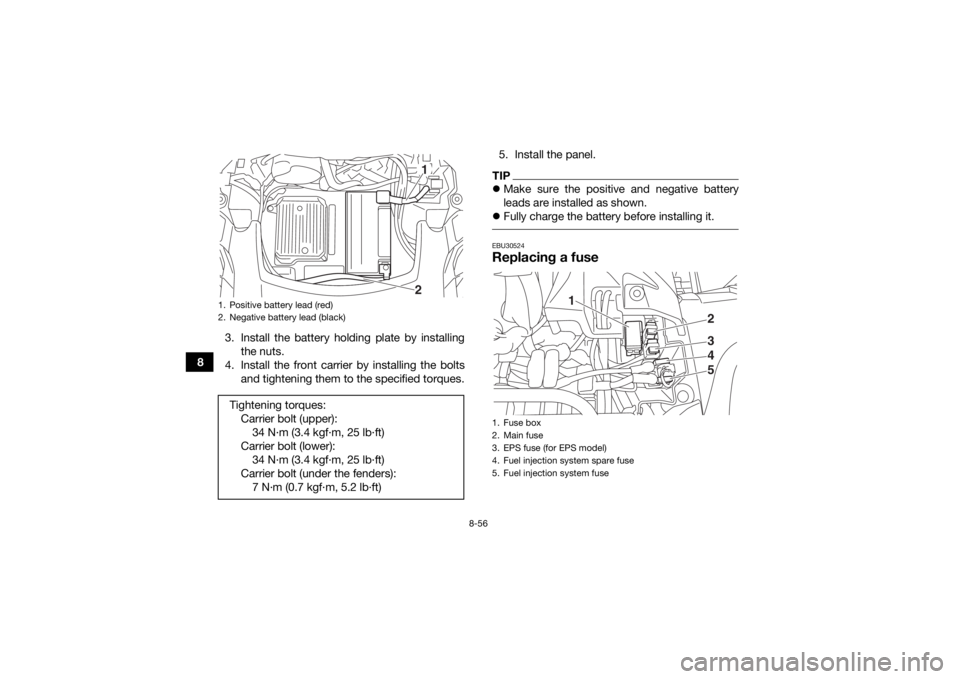
83. Install the battery holding plate by installing
the nuts.
4. Install the front carrier by installing the bolts and tightening them to the specified torques. 5. Install the panel.
TIP
Make sure the positive and negative battery
leads are installed as shown.
Fully charge the battery before installing it. EBU30524Replacing a fuse
1. Positive battery lead (red)
2. Negative battery lead (black)Tightening torques:
Carrier bolt (upper):34 N·m (3.4 kgf·m, 25 lb·ft)
Carrier bolt (lower): 34 N·m (3.4 kgf·m, 25 lb·ft)
Carrier bolt (under the fenders): 7 N·m (0.7 kgf·m, 5.2 lb·ft)
12
1. Fuse box
2. Main fuse
3. EPS fuse (for EPS model)
4. Fuel injection system spare fuse
5. Fuel injection system fuse
2345
1
UB5K60E0.book Page 56 Monday, May 28, 2018 11:35 AM