Page 25 of 47

PASSENGER COMPARTMENT CLIMATE Climate system functions for the front and rear sections of the passen- ger compartment are controlled from the center display and from the buttons on the center console and the rear side of the tunnel console*.
Some functions can also be controlled using voice commands.
The icon for opening Climate view is located at the center of the climate bar at the bottom of the center display. When the
Clean Zone text is BLUE, this indicates that the conditions for
good air quality in the passenger compartment have been met.
–Tap AUTO in climate view for automatic control of several climate
system functions. Tap for automatic control of air recirculation, air conditioning and air distribution. Press and hold for automatic control of air recirculation, air condition- ing and air distribution and to change temperature and blower speedto standard settings: 22 °C (72 °F) and speed
3. It is possible to
change the temperature and blower speed without deactivating auto- matic climate control.
–Tap any of the icons in the climate bar at the bottom of the center display to set temperature, seat heating * and blower speed.
To synchronize the temperature for all of the vehicle's zones with the driver side's temperature, tap the driver side's temperature icon andthen tap
Synchronize temperature .
Preconditioning Preconditioning can be set in the vehicle's center display and with the Volvo On Call app. Preconditioning heats * or cools the passenger compartment before
driving. Preconditioning can be started directly from the vehicle or set to start automatically using a timer.
Preconditioning direct start
1. Open Climate view in the center display.
2. Tap the
Parking climate tab, check the boxes for the desired options
and then tap Preconditioning.
Setting a preconditioning timer
1. Open Climate view in the center display.
2. Select the
Parking climateAdd timer tab and set a date/day/
time.
For preconditioning to have full functionality, the vehicle must be con- nected to an electrical outlet. Interior Air Quality System IAQS *
IAQS is part of the Clean Zone Interior Package * and is a fully auto-
matic system that filters passenger compartment air to help remove air contaminants such as particulates, hydrocarbons, nitric oxides and ground-level ozone. Tap
SettingsClimateAir Quality Sensor in
the center display's top view to activate the function.
03
Page 26 of 47

CONNECTIONS The vehicle's various types of connections can be used to play or voice- control media, send or receive text messages, make or receive phonecalls, connect to the Internet, etc. from an external device such as asmartphone. In order to connect your devices to the vehicle, the ignition must be in at least mode I.
Vehicle's modem 4
The easiest and most efficient way to connect the vehicle to the Inter- net is to use its own modem. This provides the highest performance, isactivated automatically each time the engine is started and does notrequire the use of a smartphone.
1. Insert a personal SIM card in the holder in the passenger-side floor- well. 2. Tap
SettingsCommunicationVehicle Modem Internet in
top view.
3. Activate by checking the box for
Vehicle modem Internet.
Sharing Internet connection (tethering) When the vehicle is connected to the Internet via the vehicle's modem, you can share the vehicle's Internet connection (Wi-Fi hotspot) with other devices under
Settings in top view. Tap Communication
Vehicle Wi-Fi Hotspot.
Bluetooth Use Bluetooth as first choice for handling phone calls, text messages and media from your phone to the vehicle's systems. Bluetooth canalso be used to connect the vehicle to the Internet. Two Bluetooth devi-ces can be connected at the same time but only one of them can be
03
Page 27 of 47
. Up to 20 devices are saved")
used to stream media. The two most recently connected phones will connect automatically when the ignition is switched on (if the phone'sBluetooth function is activated). Up to 20 devices are saved in a list tofacilitate connection at a later time.
1. Activate Bluetooth in the phone. Also activate tethering/personalhotspot if you would like to connect to the Internet.
2. Open the phone tile in the center display.
3. Tap
Add phone or, if a phone is already connected, tap Change and
then Add phone.
4. Select the phone to be connected and then follow the steps on the center display and in the phone. Note that in certain phones, the message function is activated.
Wi-Fi Wi-Fi connections can be used to connect the vehicle to the Internet at greater speeds than are possible using Bluetooth to stream onlineservices such as web radio and music via apps in the vehicle, down-load/upload software, etc. A Wi-Fi connection from a smartphone actsas a hotspot for the vehicle and any external devices that may be in thevehicle.
1. Activate tethering in the phone.
2. Tap
Settings in the center display's top view.
3. Tap
CommunicationWi-Fi and activate by checking the box for
Wi-Fi connection.
Please note that in certain phones, tethering is closed after contact with the vehicle has been broken. The phone's tethering function willthen need to be reactivated before it can be used again. USB The USB ports can be used to connect an external device to e.g. play music. You can also use the USB port for Apple CarPlay * and Android
Auto *. If there are two USB ports, use the one with the white frame. The
external device will also be recharged while it is connected to the vehi- cle.
USB ports (type A) are provided in the armrest storage compart- ment between the seats.
Electrical sockets Your vehicle contains the following electrical sockets:
12-volt electrical socket.
12-volt electrical socket and 120-volt electrical socket *. There is
also a 12-volt socket * in the trunk/cargo compartment.
4
Only vehicles with P-SIM. Vehicles equipped with Volvo On Call will use the vehicle modem Inter- net connection for the services.
03
Page 28 of 47

5For information about which phones are compatible with the vehicle, go to support.volvocars.com.
USING CONNECTED DEVICES External devices can be connected to e.g. handle phone calls and play media in the vehicle's audio and media systems. Handling phone calls
5
You can make and receive calls from a Bluetooth-connected phone.
Making calls using the center display
1. Open the Phone tile in home view. Select to make a call using the
list of recent calls or your list of contacts, or enter a number using the keypad.
2. Tap
.
Making a call using the right-side steering wheel keypad
1. Tap and navigate to Phone by tapping or .
2. Scroll through the list of calls using
and select using .
You can also handle calls using voice commands. Tap the voice control button (
) in the right-side steering wheel keypad. For voice com-
mands, see the "Voice control" chapter in this Quick Guide. Playing media In order to listen to audio content from an external device, connect it to the vehicle using the connection of your choice; see the previous sec-tion for connection options.
Bluetooth-connected device
1. Start playback in the connected device.
2. Open the
Bluetooth app in App view in the center dis-
play. Playback will begin.
USB-connected device
1. Start the
USB app in app view.
2. Select a song, track, etc. Playback will begin.
03
Page 29 of 47

6Apple and CarPlay are registered trademarks of Apple Inc.
MP3 player or iPod
1. Start playback in the device.
2. Open the
iPod or USB app, depending on connection
method. For playback from iPod, select the iPod app
regardless of connection method. Playback will begin.
Apple
® CarPlay®*6
and Android Auto *
CarPlay and Android Auto make it possible to use certain apps in your iOS or Android device via the vehicle to e.g. play music or listen to pod-casts. This interaction takes place via the vehicle's center display oryour device. To use CarPlay, Siri must be activated on the iOS device. The device must also be connected to the Internet via Wi-Fi or a mobile network.
1. Connect the phone to the USB port with a white frame.
2. Tap
Apple CarPlay or Android Auto in app view to acti-
vate.
Activate voice control with CarPlay and Android Auto by pressing and holding the
button in the right-side steering wheel keypad. Pressing
this button briefly will instead activate the vehicle's own voice control system. Bluetooth is deactivated when CarPlay is used. Use Wi-Fi or the vehi- cle's modem if you would like to connect the vehicle to the Internet.
03
Page 30 of 47
Page 31 of 47

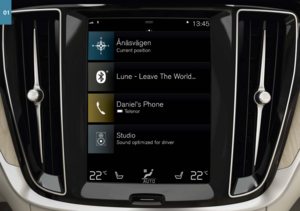
HOME VIEWWhen the center display starts it shows the Home view. From here, you can access the tiles for Navigation, Media and Phone, as well as thelast used app or vehicle function.
Navigation – Tap to access Sensus Navigation *.
Entering a destination with a free text search - Expand the tool-
bar using the down arrow on the left side and tap
. The map dis-
play will change to a screen where you can search by entering text. Enter a search word/phrase. Entering a destination on the map – Tap
to maximize the
map. Press and hold the location you want to go to and select Go
here.
Deleting a destination - Tap
to open the itinerary. Tap the
recycling bin to delete an intermediate destination (waypoint) in the itinerary or tap
Clear itinerary to delete the entire itinerary.
Map updates 7
- Tap
Download Center in app view. Maps shows
the number of available map updates. Tap
MapsInstall to
update maps or install a selected map. Maps can also be downloa- ded from support.volvocars.com to a USB flash drive and thentransferred to the vehicle.
Media - this shows e.g. your music on an external device or FM
radio if you have selected that in app view. Tap the tile to access
settings. From here, you can see your music libraries, radio stations, etc.
Phone - this provides access to phone functions. Tap the tile to
expand it. From here, you can make calls using your list of recent calls or your contact list, or by entering a number using the keypad. When you have selected a number, tap
.
Last used app or vehicle function - here you can see the last
used app or vehicle function that is not shown in any of the other tiles, e.g.
Car status or Driver performance. You can also access a
recently used function by tapping its tile.
7 The function's availability may vary from market to market.
04
Page 32 of 47