Page 9 of 47

LOCKING/UNLOCKING
Remote key
Press briefly to lock doors, trunk lid and fuel filler door and arm the alarm. A long press closes all side windows simultaneously.
Press briefly to unlock doors and trunk lid and disarm the alarm. Press and hold to open all door windows at the same time.
Press briefly to unlock and disarm only the trunk lid. Press and hold to mechanically open the trunk lid.
The panic alarm activates the turn signals and horn to attract atten- tion in emergency situations. To activate, press and hold the buttonfor at least three seconds or press the button twice within threeseconds. The function can be switched off using the same buttonafter it has been activated for at least five seconds. Otherwise, it willswitch off automatically after three minutes.
Charger door Make sure the vehicle is unlocked and the ignition is off before con- necting or disconnecting the charging cable.
1. Press the rear section of the door and release.
2. Open the charger door. The charging cable's coupler will lock into the charging socket when charging has started. Charging is interrupted if the vehicle is unlockedbut will restart after a short time if the cable is not disconnected. Private (valet) locking Private locking locks the trunk lid and the rear seat backrest, which can be practical when, for example, the vehicle is taken in for service or at ahotel.
–In the center display's Function view, tap Private Lockingto activate/deactivate the function. A pop-up window will appear showing whether the func- tion is activated or deactivated. A four-digit code must beselected each time the function is activated. The firsttime the function is used, an extra security code must beselected.
Locking * the glove compartment is performed manually using the
enclosed key which is located inside the glove compartment.
01
Page 10 of 47
Page 11 of 47

INTERIOR OVERVIEW
Center display is used to control many of the vehicle's main func-
tions, e.g. media, navigation *, climate control, driver support systems
and in-vehicle apps.
The instrument panel displays information about driving, e.g.
speed, rpm, navigation * and active driver support. You can select
which information should be shown in the instrument panel in the app menu, which is opened using the right-hand steering wheel keypad. Settings can also be made via
SettingsMy Car
Displays in the center display's top view.
The head-up display * supplements the vehicle's instrument panel
and projects information on the windshield. It can be activated in the center display's Function view.
Start knob is used to start the vehicle. Turn clockwise and release
into the ignition position I. Hold the brake pedal depressed and turn
the start knob clockwise to start the vehicle. Switch off the vehicle by turning the start knob clockwise.
Drive modes * are selected using the control in the tunnel console.
Press the control and roll it to choose between Hybrid, Pure,Constant AWD, Power and Individual in the center display. Con-
firm by pressing the control. Individual drive mode enables you to
customize a drive mode's characteristics to your preferences. To activate individual drive mode, tap
SettingsMy Car
Individual Drive Mode in the center display's Top view.
The parking brake is activated by pulling up the control. A
symbol will appear in the instrument panel. Release it manually by pressing the control down while depressing the brake pedal. Auto- hold brakes (
) keep the vehicle stationary when it is stopped, e.g.
at a traffic light, even if the brake pedal is not depressed. Before driving the vehicle into a car wash, deactivate the Automatic Braking and Automatic Parking Brake Application functions. Deac-tivate Automatic Parking Brake Application in the center display's Top view by tapping
SettingsMy CarParking Brake and
Suspension
.
Passenger airbag : A sensor system determines what is occupying
the front passenger seat and activates/deactivates the front pas- senger side's airbag. See the Owner's Manual for important safety-related information regarding this.
01
Page 12 of 47
Page 13 of 47

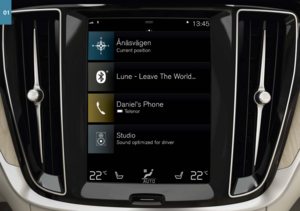
CENTER DISPLAYThe center display is used to adjust settings and control most of the
vehicle's functions. The center display has three main views: home view, function view and app view. You can reach the function view and appview from the home view by swiping right or left. There is also a topview that you can access by swiping down from the top section of thedisplay. Change the appearance of the center display and the instrument panel by choosing a theme in
SettingsMy CarDisplays in top
view. You can also select a dark or light background for the center dis- play. Return to the home view from another view by means of a short
press on the physical home button under the display. The last mode used for the home view will then be shown. A further short press on thehome button sets all of the home view's tiles in standard mode. To clean the center display, press and hold the home button under the
display to lock the touchscreen function. Press the home button briefly to reactivate the display. The status bar at the top of the display shows the status of current
vehicle activities and functions. Shown on the left is network and con- nection information, with media-related information; the time and back-ground activity indicator shown on the right. In the climate row at the bottom you can set temperature and seat
comfort by tapping on the respective icon. Open the climate view by tapping on the center button in the climate row.
01
Page 14 of 47
Page 15 of 47

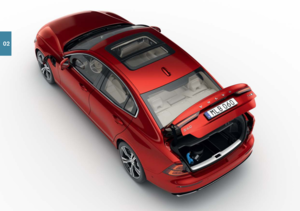
CHARGING THE HYBRID BATTERY
Your Volvo is equipped with an electric motor that primarily powers the vehicle at low speeds and a combustion engine that powers the vehicleat higher speeds and during more active driving. The time required tocharge the hybrid battery depends on the charging current the wallsocket can supply. The hybrid battery is also recharged during light
braking or engine braking, e.g. on a downslope. All types of chargingare indicated in the instrument panel. Storing the charging cable The charging cable is located under the trunk floor. Starting charging The start battery is charged while the hybrid battery is charging and will stop charging when the hybrid battery is fully charged.
1. Connect the charging cable to a wall socket. Never use an extension cord.
2. Open the charger door by pressing it lightly.
3. Push the charging handle all the way into the vehicle's socket. The charging cable will automatically lock into the charging socket and charging will begin within approximately 5 seconds.
Stopping charging
1. Press the
2 button on the remote key to unlock the vehicle. Charg-
ing will stop.
2. Press the lock button on the charging socket and then remove the charging cable from the vehicle.
3. Close the charger door.
4. Disconnect the charging cable from the wall socket.
5. Replace the charging cable under the trunk floor. If the charging cable is not removed from the socket it will automatically relock into place after a short period after unlocking in order to helpmaximize charging and driving range and to enable preconditioning of the vehicle before driving. The charging cable can be released from thesocket again if the vehicle is unlocked using the remote key. For vehi- cles with keyless locking/unlocking
*, the vehicle can be locked and
unlocked using the door handle.
2 This must be done even if the vehicle's doors are already unlocked. If the vehicle is not unlocked using the unlock button, the charging cable or the system could be damaged.
02
Page 16 of 47

HYBRID BATTERY CHARGE STATUS The hybrid battery's charge status can be checked in the charging socket, via the charge module, in the instrument panel and in the Volvo On Call app. Indicator lamps in the charging module When the charging cable is plugged into a wall socket, the indicator light on the charge module (the device connected to the wall socket) will flash red once. A safety check will be performed. When the charg-ing cable is ready to be used, the indicator light will glow steadily blue.The light will flash blue while charging is in progress. When the lightglows steadily blue, charging is complete. Flashing/steady red – a faulthas been detected. Charging socket indicator lights
White - courtesy light.
Yellow - standby mode (waiting for charging to begin).
Blue – timer set.
Flashing green - charging is in progress.
Steady green - charging completed (the light will go out after a short time).
Steady red - a fault has been detected.
Instrument panel The symbol's color indicates the hybrid battery's charging status.
Blue light - charging is in progress. Green light - the battery is fully charged.Red light - a fault has occurred. Check that the charging cable is properly connected to the vehicle's charging socket and tothe 120/240-volt wall socket.
02