2019 VOLVO S60 TWIN ENGINE lock
[x] Cancel search: lockPage 128 of 645
||
DISPLAYS AND VOICE CONTROL
126
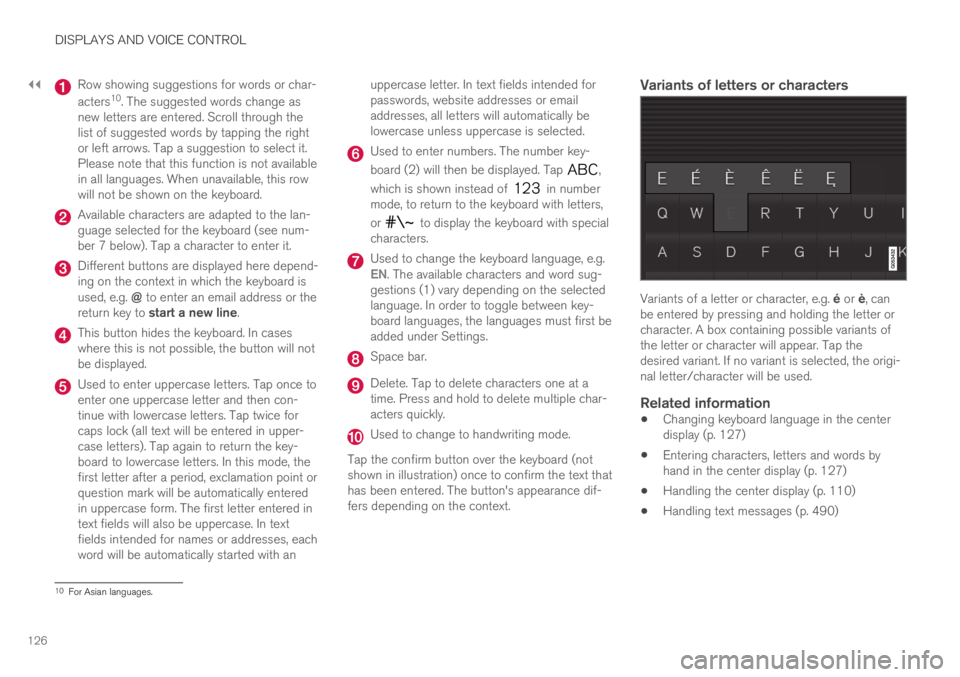
Row showing suggestions for words or char-
acters10. The suggested words change asnew letters are entered. Scroll through thelist of suggested words by tapping the rightor left arrows. Tap a suggestion to select it.Please note that this function is not availablein all languages. When unavailable, this rowwill not be shown on the keyboard.
Available characters are adapted to the lan-guage selected for the keyboard (see num-ber 7 below). Tap a character to enter it.
Different buttons are displayed here depend-ing on the context in which the keyboard isused, e.g. @ to enter an email address or thereturn key to start a new line.
This button hides the keyboard. In caseswhere this is not possible, the button will notbe displayed.
Used to enter uppercase letters. Tap once toenter one uppercase letter and then con-tinue with lowercase letters. Tap twice forcaps lock (all text will be entered in upper-case letters). Tap again to return the key-board to lowercase letters. In this mode, thefirst letter after a period, exclamation point orquestion mark will be automatically enteredin uppercase form. The first letter entered intext fields will also be uppercase. In textfields intended for names or addresses, eachword will be automatically started with an
uppercase letter. In text fields intended forpasswords, website addresses or emailaddresses, all letters will automatically belowercase unless uppercase is selected.
Used to enter numbers. The number key-
board (2) will then be displayed. Tap ,
which is shown instead of in numbermode, to return to the keyboard with letters,
or to display the keyboard with specialcharacters.
Used to change the keyboard language, e.g.EN. The available characters and word sug-gestions (1) vary depending on the selectedlanguage. In order to toggle between key-board languages, the languages must first beadded under Settings.
Space bar.
Delete. Tap to delete characters one at atime. Press and hold to delete multiple char-acters quickly.
Used to change to handwriting mode.
Tap the confirm button over the keyboard (notshown in illustration) once to confirm the text thathas been entered. The button's appearance dif-fers depending on the context.
Variants of letters or characters
Variants of a letter or character, e.g. é or è, canbe entered by pressing and holding the letter orcharacter. A box containing possible variants ofthe letter or character will appear. Tap thedesired variant. If no variant is selected, the origi-nal letter/character will be used.
Related information
Changing keyboard language in the centerdisplay (p. 127)
Entering characters, letters and words byhand in the center display (p. 127)
Handling the center display (p. 110)
Handling text messages (p. 490)
10For Asian languages.
Page 135 of 645
DISPLAYS AND VOICE CONTROL
}}
* Option/accessory.133
Table of settings in the centerdisplay
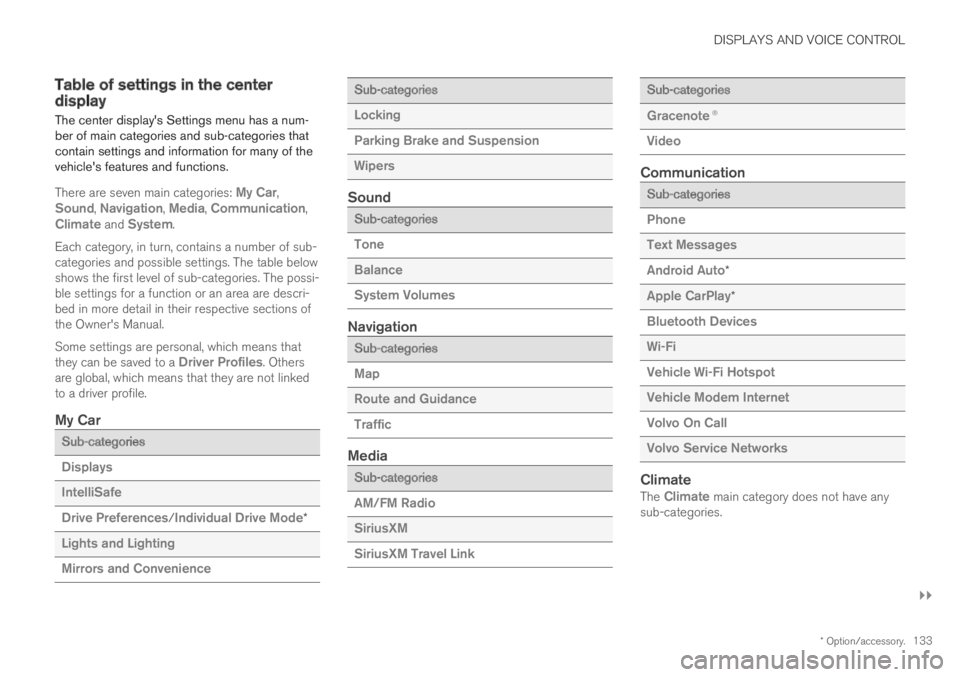
The center display's Settings menu has a num-ber of main categories and sub-categories thatcontain settings and information for many of thevehicle's features and functions.
There are seven main categories: My Car,Sound, Navigation, Media, Communication,Climate and System.
Each category, in turn, contains a number of sub-categories and possible settings. The table belowshows the first level of sub-categories. The possi-ble settings for a function or an area are descri-bed in more detail in their respective sections ofthe Owner's Manual.
Some settings are personal, which means thatthey can be saved to a Driver Profiles. Othersare global, which means that they are not linkedto a driver profile.
My Car
Sub-categories
Displays
IntelliSafe
Drive Preferences/Individual Drive Mode*
Lights and Lighting
Mirrors and Convenience
Sub-categories
Locking
Parking Brake and Suspension
Wipers
Sound
Sub-categories
Tone
Balance
System Volumes
Navigation
Sub-categories
Map
Route and Guidance
Traffic
Media
Sub-categories
AM/FM Radio
SiriusXM
SiriusXM Travel Link
Sub-categories
Gracenote®
Video
Communication
Sub-categories
Phone
Text Messages
Android Auto*
Apple CarPlay*
Bluetooth Devices
Wi-Fi
Vehicle Wi-Fi Hotspot
Vehicle Modem Internet
Volvo On Call
Volvo Service Networks
Climate
The Climate main category does not have anysub-categories.
Page 137 of 645
DISPLAYS AND VOICE CONTROL
135
Selecting a driver profile
When the center display starts up, the selecteddriver profile will be shown at the top of thescreen. The most recently used driver profile willbe active the next time the vehicle is unlocked. Adifferent driver profile can be selected once thevehicle has been unlocked. However, if theremote key has been linked to a driver profile,this profile will be used instead.
There are two options for switching betweendriver profiles.
Option 1:
1.Tap the name of the driver profile shown atthe top of the center display when the dis-play starts up.
> A list will appear, showing driver profilesthat can be selected.
2. Select desired driver profile.
3.Tap Confirm.
>The driver profile has now been selectedand the system will load the settingsstored in that profile.
Option 2:
1. Pull down Top view in the center display.
2.Tap Profile.
>The same list as in option 1 will be dis-played.
3. Select desired driver profile.
4.Tap Confirm.
>The driver profile has now been selectedand the system will load the settingsstored in that profile.
Option 3:
1. Pull down Top view in the center display.
2.Tap Settings in the Top view in the centerdisplay.
3.Tap SystemDriver Profiles.
> A list will appear, showing driver profilesthat can be selected.
4. Select desired driver profile.
5.Tap Confirm.
>The driver profile has now been selectedand the system will load the settingsstored in that profile.
Related information
Driver profiles (p. 134)
Navigating in the center display's views(p. 113)
Changing a driver profile's name (p. 135)
Linking a remote key to a driver profile(p. 136)
Changing a driver profile's name
It is possible to change the names of the differ-ent driver profiles used in the vehicle.
1.Tap Settings in the Top view in the centerdisplay.
2.Tap SystemDriver Profiles.
3.Select Edit Profile.
>A menu will open in which the driver pro-file can be changed.
4.Tap the Profile Name box.
>A keyboard will be displayed and can be
used to change the name. Tap toclose the keyboard.
5.Save the name change by pressing Back orClose.
>The name has now been changed.
NOTE
Profile names may not begin with a space. If aspace is entered first, the profile name will notbe saved.
Related information
Selecting a driver profile (p. 135)
Using the center display keyboard (p. 124)
Page 138 of 645
DISPLAYS AND VOICE CONTROL
136
Protecting a driver profile
It may not always be desirable to store settingsmade in the vehicle to the active driver profile. Inthese instances, the driver profile can be protec-ted.
NOTE
Protecting a driver profile is only possiblewhen the vehicle is stationary.
To protect a driver profile:
1.Tap Settings in the Top view in the centerdisplay.
2.Tap SystemDriver Profiles.
3.Select Edit Profile.
>A menu will open in which the driver pro-file can be changed.
4.Tap Protect Profile to protect the profile.
5.Confirm your selection to protect the profileby tapping Back/Close.
>When the profile is protected, settingsmade in the vehicle will not be automati-cally stored to the profile. The changesmust instead be saved manually under
SettingsSystemDriver Profiles
Edit Profile by tapping Save currentsettings to the profile. If the profile isnot protected, the settings will be auto-matically stored to the profile.
Related information
Driver profiles (p. 134)Linking a remote key to a driverprofile
A remote key can be linked to a driver profile.This driver profile and all of its settings will thenautomatically be selected every time the vehicleis used with that particular remote key.
The first time the remote key is used, it is notlinked to any specific driver profile. The Guestprofile is automatically activated when the ignitionis switched on.
A driver profile can also be selected manuallywithout linking it to any key. When the vehicle isunlocked, the last active driver profile will be acti-vated. If the key has ever been linked to a driverprofile, it is not necessary to manually select adriver profile when using that particular key.
Linking a remote key to a specific driver
profile
NOTE
A remote key can only be connected to adriver profile when the vehicle is stationary.
First select the profile you would like to link tothe key (if that profile is not already active). Theactive profile can then be linked to the key.
1.Tap Settings in the Top view in the centerdisplay.
Page 145 of 645

DISPLAYS AND VOICE CONTROL
}}
* Option/accessory.143
Calibrating the horizontal position
If the windshield or display unit has beenreplaced, the head-up display's horizontal posi-tion may need to be calibrated. Calibration meansthat the projected image is rotated clockwise orcounterclockwise.
1.Tap Settings in the center display's Topview.
2.Select My CarDisplaysHead-Up
Display OptionsHead-Up DisplayCalibration.
3.Calibrate the horizontal position of the imageusing the right-side steering wheel keypad.
Rotate counterclockwise
Rotate clockwise
Confirm
Related information
Head-up display* (p. 140)
Activating and deactivating the head-up dis-play* (p. 141)
Driver profiles (p. 134)
Storing positions for seats, mirrors and head-up display* (p. 182)
Voice control15
The driver can use voice commands to controlcertain functions in the media player, aBluetooth-connected phone, the climate systemand the Volvo navigation system*.
Voice commands offer extra convenience andhelp minimize distractions so drivers can concen-trate on driving and keep their attention on theroad and traffic situation.
WARNING
The driver is always responsible for ensuringthat the vehicle is operated in a safe mannerand that all applicable traffic regulations arefollowed.
Voice control microphone
Voice control is carried out as a dialog, with spo-ken commands from the user and verbal respon-
Page 157 of 645

LIGHTING
}}
155
High beams
The high beams can be activated when the
lighting ring is in mode 2 or .Activate high beams by moving the steeringwheel lever forward. Deactivate by movingthe steering wheel lever backward.
When the high beams are activated, the symbol will be illuminated in the instrument panel.
Related information
Lighting control and panel (p. 150)
Active high beam (p. 155)
Active high beam
Active high beams is a function that uses cam-era sensors in the upper edge of the windshieldto detect the headlights of approaching vehiclesor the taillights of the vehicle directly ahead.When either of these is detected, the vehicle'sheadlights will automatically switch from highbeams to low beams.
Active high beams is indicated by the symbol.
This function can be used in dark conditionswhen the vehicle's speed is approx. 20 km/h(approx. 12 mph) or higher. The function can alsodetect street lighting. When the camera sensorno longer detects an approaching vehicle or avehicle ahead, the headlights will return to highbeams after a second or two.
Activating active high beams
Active high beams can be activated and deacti-vated by turning the lighting ring on the right-side
steering wheel lever to position . The light-
ing ring will then return to . When active
high beams are activated, a white symbolwill be displayed in the instrument panel. Whenhigh beams are on, the symbol will be blue.
If active high beams are deactivated when thehigh beams are on, the headlights will automati-cally switch to low beams.
Limitations for active high beams
The camera sensor on which the function isbased has limitations.
If this symbol and the message ActiveHigh Beam Temporarilyunavailable is displayed in the instru-ment panel, switching between highand low beams must be done manually. The
symbol will go out when the message isdisplayed.
The same applies if this symbol alongwith the message Windscreensensor Sensor blocked, seeOwner's manual is displayed.
Active high beams may be temporarily unavailablein certain situations, e.g. heavy fog or rain. When
2When the low beams are on.
Page 158 of 645
||
LIGHTING
156
active high beams become available again, or thewindshield sensors are no longer blocked, the
message will disappear and the symbol willbe displayed.
WARNING
Automatic high beam is an aid in using thebest possible light based on prevailing condi-tions.
The driver is always responsible for manuallyswitching between high and low beam whentraffic situations or weather conditions requirethis.
Related information
Lighting control and panel (p. 150)
Using high beam (p. 154)
Camera/radar sensor limitations (p. 300)
Using turn signals
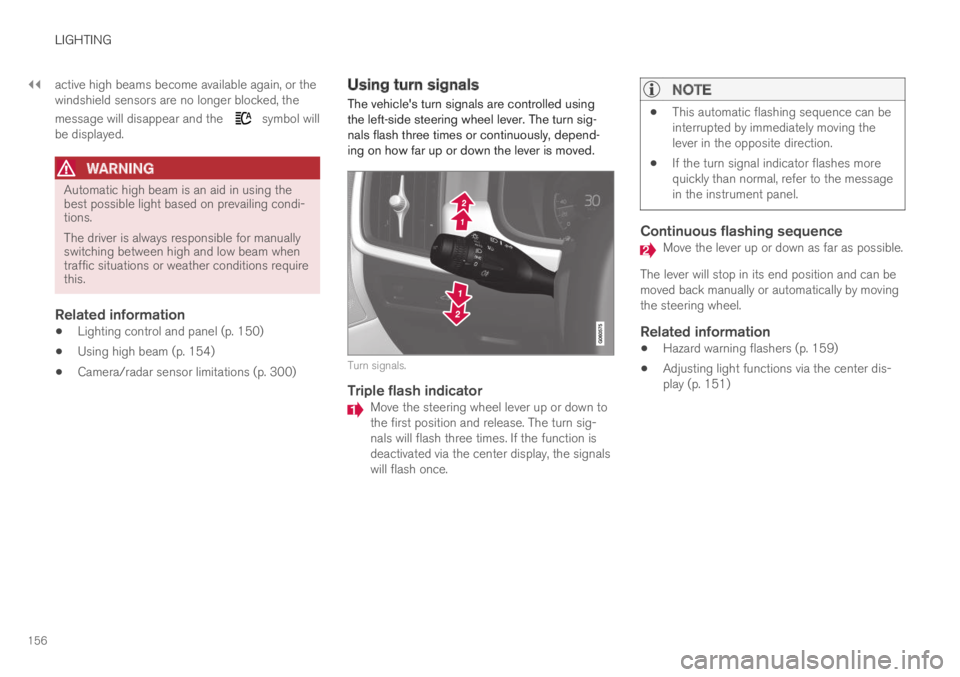
The vehicle's turn signals are controlled usingthe left-side steering wheel lever. The turn sig-nals flash three times or continuously, depend-ing on how far up or down the lever is moved.
Turn signals.
Triple flash indicator
Move the steering wheel lever up or down tothe first position and release. The turn sig-nals will flash three times. If the function isdeactivated via the center display, the signalswill flash once.
NOTE
This automatic flashing sequence can beinterrupted by immediately moving thelever in the opposite direction.
If the turn signal indicator flashes morequickly than normal, refer to the messagein the instrument panel.
Continuous flashing sequence
Move the lever up or down as far as possible.
The lever will stop in its end position and can bemoved back manually or automatically by movingthe steering wheel.
Related information
Hazard warning flashers (p. 159)
Adjusting light functions via the center dis-play (p. 151)
Page 162 of 645

LIGHTING
* Option/accessory.160
Using home safe lighting
Some of the exterior lights remain on to illumi-nate the area around the vehicle. This is calledhome safe lighting.
To activate home safe lighting:
1.Switch off the ignition.
2. Push the left-side steering wheel levertoward the dashboard and release.
3. Exit the vehicle and lock the doors.
When the function is activated, a symbol will beshown in the instrument panel and the parkinglights, outer door handle lights* and the licenseplate lights will be illuminated.
The length of time home safe lighting remainsilluminated can be set in the center display.
Related information
Adjusting light functions via the center dis-play (p. 151)
Welcome Light (p. 160)
Welcome Light
Approach lighting is activated when the vehicleis unlocked and can be used to provide light asyou walk toward the vehicle.
The function is activated when the remote key isused for unlocking. The parking lights, outer doorhandle lights*, license plate lights, interior ceilinglights, footwell lighting and trunk/cargo compart-ment lighting will be illuminated. If a door isopened while the function is activated, the light-ing in the outer door handle* and the interiorlighting will remain illuminated for a longer periodof time.
This function can be activated and deactivated inthe center display.
Related information
Adjusting light functions via the center dis-play (p. 151)
Using home safe lighting (p. 160)
Remote key (p. 230)
Interior Lighting
The interior is equipped with several differenttypes of lighting to improve the experience. Thisincludes reading lamps, glove box lighting andground lighting.
All lighting in the passenger compartment can beturned on and off manually within 5 minutesafter:
the engine has been switched off and theignition is in mode 0.
the vehicle is unlocked but the engine hasnot been started.
Front ceiling lighting
The controls in the ceiling console for the front readinglights and courtesy lighting.
Reading light left side
Passenger compartment lighting