2019 VOLKSWAGEN E-GOLF Power
[x] Cancel search: PowerPage 256 of 394
Charging at J1772 public AC charging stations or with the Wallbox (AC charging)
Charging the high-voltage battery at an AC charging station or with the Wallbox: The high-voltage battery is charged at a rate of up to 7.2 kW. The charging process for a completely discharged high-voltage battery lasts about 4 hours.
The charging connector has to be connected to the upper part of the charging socket (3). Leave the lower part covered.
The Wallbox is available as an accessory. An authorized Volkswagen dealer can provide you with information on the Wallbox.
Make sure that the Wallbox is installed by a qualified expert and that your house’s electrical system is also checked before installation.
It is not possible to feed energy back into the power grid.
Supplementary charging cable
Connect the charging connector on the supplied charging cable to a properly functioning 110 Volt Ground Fault Circuit (GFI) outlet with a 15 amp fuse. The outlet must be properly protected from
water, moisture, and other fluids ⇒
Charging for the first time and charging after long standing periods
If the high-voltage battery is charged for the first time or charged after the vehicle has been standing for a long period, it is possible that the maximum charging level of the high-voltage battery cannot be reached. This is for technical reasons and does not necessarily mean a vehicle malfunction. If the maximum charge level is not reached even after several charging procedures, have the high-voltage battery checked by an authorized Volkswagen dealer or authorized Volkswagen service facility.
If the vehicle is not used for a long period, the high-voltage battery must be charged after 4 months at
the latest ⇒ .
WARNING
If you are not familiar with the socket or the electrical installation or it has not been checked by qualified experts, never use it for charging. Even very low charging currents can cause serious damage and in particular fires if the socket or electrical installation is in bad condi-tion. If necessary, get expert assistance from a qualified electrical installation specialist.
NOTICE
Frequently charging the vehicle with a high charging power, particularly with a direct current (DC charging), can lead to a permanent reduction of the charging capacity of the high-voltage battery. If possible, charge the vehicle with low charging power, like with a home-charging station or with the supplementary charging cable.
NOTICE
Not using the vehicle for long periods can cause damage to the high-voltage battery. Charge the high-voltage battery after 4 months at the latest.
The vehicle can be charged on charging stations that comply with the J1772 standard.
Page 264 of 394

Temperature monitoring
During the charging process the charging cable can become slightly warmer. This is normal and no cause for concern
If the control unit or the charging cable becomes too hot, the charging current will automatically be reduced If the control unit or the charging cable continues to get hot even at the lowest charging current, the protection unit will be switched off, and will remain switched off until it has cooled down sufficiently.
If no other sources of heat, such as direct sunlight, can be identified as relevant, have the outlet checked by properly qualified and trained experts.
Charging cable for charging at charging stations (if equipped)
Keep the charging cable for charging at a charging station safely in its bag in the luggage compart-ment. Follow the operating manual for the charging station. Before using the charging cable, read the procedure for charging with alternating current
WARNING
Charging the high-voltage battery improperly, using improper or damaged outlets and charg-ing cables, improper handling of the high-voltage battery or failure to follow safe charging procedures can cause short circuits, electric shock, explosions, fire, burns, injuries and death.
�x Always connect the charging cable to a properly functioning 110 Volt Ground Fault Circuit (GFI) wall outlet. The outlet must be properly protected from water, moisture and other fluids.
�x Always check the fuse protection of the GFI outlet before connecting the charging cable.
�x Never connect the charging cable to a conventional power outlet, regardless of whether the outlet is protected or not.
�x Never use the charging cable with an extension cord of any kind.
�x Never let plugs or connectors come into contact with water, moisture, or any other fluids.
�x Never use any charging cable if it is damaged and never use the charging cable with a damaged GFI outlet.
�x Never attempt to alter or repair cables or other electrical components.
�x Never let anybody stay in the vehicle while the high-voltage battery is charging.
�x Never do any kind of work on the outside or inside of the vehicle while the high-voltage battery is charging.
�x Always disconnect the charging cable completely from the vehicle before starting the motor.
WARNING
If you are not familiar with the outlet or the electrical installation or it has not been checked by qualified experts, never use it for charging. Even very low charging currents can cause serious damage and in particular fires if the socket or electrical installation is in bad condi-tion. If necessary, get expert assistance from a qualified electrical installation specialist.
WARNING
If a 110 Volt outlet is being used for charging, never charge 2 or more vehicles on outlets of the same fuse at the same time. Use a different fuse circuit for charging another vehicle. Al-ways comply with the maximum load for the fuse circuit used. If necessary, get expert assis-tance.
Page 269 of 394

Charging pro-
cess indicator
light ⇒ fig. 137
(1)
Meaning Proper re-
sponse
(1) Lights up green
permanently.
High-voltage
battery charging
process has
been completed.
Disconnect the
charging con-
nector and close
the charging
socket flap.
(2) Flashes green
permanently.
High-voltage
battery is being
charged.
-
(3) Lights up yellow
briefly.
Charging cable
is connected and
has been detect-
ed by the vehi-
cle.
-
Lights up yellow
permanently.
The charging
cable is con-
nected but there
is no current.
Have the power
supply or the
outlet checked. If
necessary, seek
expert help.
OR: The vehicle
has automatical-
ly unlocked the
charging cable
connector.
Remove the
charging cable
connector.
(4) Flashes yellow. The selector
lever is not in
position P (Park).
Place the selec-
tor lever in posi-
tion P (Park)
Page 285 of 394
detected. This is especially true for low or high objects. The system will no longer sound warn-ings about these objects. Ignoring signals from the Park Distance Control system could result in serious damage to the vehicle.
�x The sensors in the bumpers can be damaged or become misaligned in low speed impacts and parking maneuvers. Damaged or misaligned sensors cannot accurately detect or report objects that might be within range of the PDC system.
�x To help make sure that the system works properly, always keep the sensors in the bumpers clean and free of snow and ice; do not cover the sensors with stickers or other objects.
�x When cleaning the sensors with power washers or steam cleaners, only spray the sensors directly for a very short time, and always keep the washer nozzle at least 4 inches (10 cm) from the sensors.
�x Noise from rough roads, cobblestones, other vehicles and the surrounding area, for exam-ple, can prevent the Park Distance Control system from accurately detecting and reporting people and objects that may be within range of the sensors.
�x Aftermarket components such as bicycle racks can impair the function of the Park Distance Control system.
Volkswagen recommends practicing with the Park Distance Control system in a location or parking space with no traffic in order to become familiar with the system and how it works.
Operation
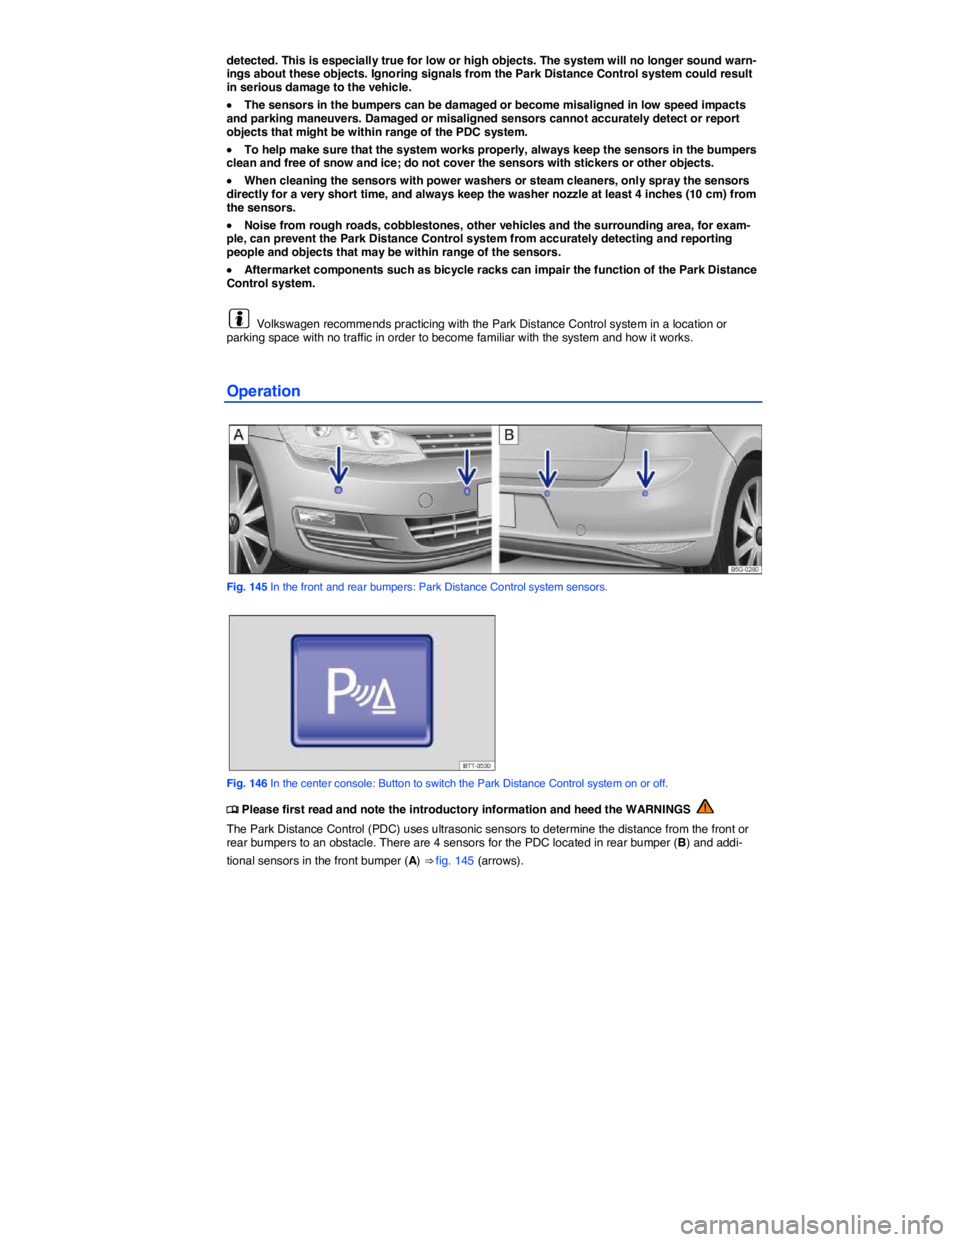
Fig. 145 In the front and rear bumpers: Park Distance Control system sensors.
Fig. 146 In the center console: Button to switch the Park Distance Control system on or off.
�
Page 317 of 394

should always be replaced by a qualified technician, since the vehicle's onboard electrical system management has to be reset after replacing the battery. Only a qualified service facility is able to perform this necessary adjustment. Therefore, Volkswagen recommends to always have the 12 volt vehicle battery replaced by an authorized Volkswagen dealer or an authorized Volkswagen Service Facility.
Only use maintenance-free vehicle batteries meeting standards TL 825 06 and VW 7 50 73. These standards must date from July 2012 or later.
Disconnecting the 12 Volt vehicle battery
If the battery must be disconnected from the vehicle's electrical system, note the following:
�x Switch off all electrical systems and devices and the ignition.
�x Unlock the vehicle before disconnecting the battery; otherwise the alarm system will go off.
�x First disconnect the negative cable (-) and then the positive cable (+) ⇒ .
Connecting the 12 volt vehicle battery
�x Prior to reconnecting the battery, switch off all electrical systems and devices and the ignition.
�x Connect the positive cable (+) first and then the negative cable (-) ⇒ .
After the battery is connected and the ignition is switched on, different indicator lights may light up. They should go out after you drive a short distance at 10–12 mph (15–20 km/h). If the indicator lights do not go out, contact an authorized Volkswagen dealer or an authorized Volkswagen Service Facility and have the vehicle checked.
If the battery was disconnected for a long time, the next scheduled service may not be correctly calcu-
lated and displayed ⇒ Instrument cluster. The maximum permissible service and maintenance inter-
vals are shown in the ⇒ Booklet Warranty and Maintenance.
Vehicles with Keyless Access
If the ignition will not start after reconnecting the vehicle battery, lock the vehicle from the outside and
unlock it again ⇒ Unlocking or locking the vehicle with Keyless Access. Then try to start the ignition again. If the ignition cannot be switched on, contact an authorized Volkswagen dealer, an authorized Volkswagen Service Facility, or another qualified workshop for assistance.
Automatic electrical load deactivation
If the vehicle battery drain is high, the intelligent onboard electrical system management automatically takes steps to help prevent battery drain.
�x The idle speed is increased so that the alternator provides more power.
�x The power to devices that consume a lot of electricity is cut back or switched off completely.
The onboard electrical system management cannot always keep the battery from being drained. For example, the battery will drain if the electric motor is not activated, but the ignition is switched on or the parking lights are left on for a long time when parked.
What drains the vehicle battery?
�x Long periods when the electric motor is not activated, especially when the ignition is on.
�x Using electrical systems or devices when the electric motor is switched off.
�x Leaving the vehicle unlocked for several days when not in use.
�x The selector lever is left for a long period of time in any position other than Park (P) when the
ignition is switched off ⇒ Selector lever.
Page 318 of 394
WARNING
Failure to use the proper battery with proper mounting and connections may cause short circuits, fires, and serious personal injuries.
�x Always use only maintenance-free or cycle-free, leak-proof batteries with the same speci-fications and dimensions as the original equipment battery. Specifications are listed on the battery housing.
WARNING
When the vehicle battery is charged, it produces highly explosive hydrogen gas.
�x Charge vehicle batteries only in well-ventilated areas.
�x Never charge a frozen or thawed battery. A dead battery can freeze at temperatures around +32 °F (0 °C).
�x You must replace the vehicle battery if it was frozen.
�x Incorrectly connected cables can cause a short-circuit. First connect the positive cable (+) and then the negative cable (-).
NOTICE
�x Never disconnect the vehicle battery or connect 2 vehicle batteries to each other when the ignition is switched on or the electric motor is activated. Doing this may damage the electrical system or electronic components.
�x Never use a vehicle battery that does not meet the specifications for the vehicle battery for your vehicle. Using the wrong battery can damage the electrical system or electronic compo-nents and cause electrical malfunctions.
�x Never connect power generating equipment, such as a solar panel or battery charger, to the 12 Volt socket in order to charge the vehicle battery. This can damage the vehicle's electrical system.
Dispose of the vehicle battery according to regulations. Vehicle batteries contain poisonous substances such as sulfuric acid and lead.
Battery acid can pollute the environment. Catch leaking operating fluids and dispose of them properly.
Page 321 of 394
WARNING
After the vehicle has been washed, the wet brakes or, in winter, brake discs or pads coated with ice, react slower and need longer stopping distances.
�x Always dry the brakes and clean off any ice coatings with a few careful applications of the brake. Make sure not to endanger other motorists or cyclists or disobey legal requirements.
CAUTION
Sharp edges under the vehicle can cut exposed skin.
�x Always protect your hands and arms from cuts on sharp metal edges when cleaning the underbody, the inside of the wheel housings, etc.
NOTICE
�x The water temperature must not be more than +140 °F (+60 °C).
�x To help prevent damage to the paint, do not wash the vehicle in direct sunlight.
�x Do not use insect sponges, abrasive kitchen sponges or similar things to clean the vehicle. These can damage the paint finish.
�x Never clean headlights with a dry cloth or sponge. Always use a wet cloth or sponge. For best results use soapy water.
�x When washing or rinsing the vehicle in cold weather, do not let water get into the lock cylinders or point the hose at gaps around the doors, hood, or rear hatch. The water could freeze on the locks and seals and make it difficult to open the vehicle!
�x When outside temperatures are low, wipe the rubber seals and their contact surfaces dry to help prevent freezing.
NOTICE
To help prevent vehicle damage in a car wash:
�x Compare the vehicle track width with the dimensions of the guide rails in the car wash to help prevent damage to wheel rims and tires!
�x Switch off the rain sensor before driving the vehicle through a car wash ⇒ page 127, Rain sensor.
�x Make sure there is enough clearance for the height and width of the vehicle.
�x To help prevent paint damage to the electric motor hood, place wiper blades against the windshield after they have dried. Do not let them snap back into place.
�x Fold the outside mirrors toward the vehicle body.
�x Lock the rear hatch to help prevent unintentional opening in the car wash.
Washing with a power washer
�
Page 322 of 394
Make sure there is enough distance to soft materials such as rubber hoses or insulating material as well as the sensors of the Park Distance Control system (if equipped). The Park Distance Control
system sensors can be found in the rear and, if applicable, front bumper ⇒ .
Make sure there is enough distance to soft materials such as rubber hoses or insulating material.
Never use concentrated jet nozzles or so-called dirt blasters ⇒ .
Never use a power washer to clean the electric motor compartment ⇒ Cleaning the electric motor compartment.
WARNING
Improper use of power washers can cause serious invisible permanent damage leading to tire failure and loss of vehicle control. This can cause accidents and severe personal injury.
�x Keep sufficient distance between water jet and tires. Never wash tires with a nozzle that sprays the water out in a direct stream regardless of the distance to the tire and even for a very short time.
�x Never use “dirt blasters” to clean tires. Even spraying from a relatively long distance for a very short time can do visible or invisible damage to tires.
WARNING
After the vehicle has been washed, the wet brakes or, in winter, brake discs or pads coated with ice, react slower and need longer stopping distances.
�x Always dry the brakes and clean off any ice coatings with a few careful applications of the brake. Make sure not to endanger other motorists or cyclists or disobey legal requirements.
NOTICE
�x Water temperature should not be more than +140 °F (+60 °C).
�x To help prevent damage to the paint, do not wash the vehicle in direct sunlight.
�x In order for Park Distance Control to work correctly, the sensors in the rear bumper must be kept clean and clear of snow and ice.
�x When using a power washer or steam cleaner, only spray the sensors directly for a short period of time and always keep the nozzle at least 4 inches (10 cm) from the sensor.
�x Do not clean icy or snow-covered windows with a power washer.
�x When washing or rinsing the vehicle in cold weather, do not let water get into the lock cylinders or point the hose at gaps around the doors, hood, or rear hatch. The water could freeze on the locks and seals and make it difficult to open the vehicle!
Cleaning windows and outside mirrors
�