Page 116 of 261
114LightingRear fog light
Operated by pressing ø.
Light switch in position AUTO:
switching on rear fog light will switch
headlights on automatically.
Light switch in position 8: rear fog
light can only be switched on with
front fog lights.
The vehicle rear fog light is
deactivated when towing a trailer or a
plug is connected with the socket,
e.g. when a bicycle carrier is used.
Parking lights
When the vehicle is parked, the
parking lights on one side can be
activated:
1. Switch off ignition.
2. Move the stalk all the way up (right
parking lights) or down (left
parking lights).
Confirmed by a signal and the
corresponding turn light control
indicator.
Reversing lights
The reversing light comes on when
the ignition is on and reverse gear is
selected.
Misted light covers
The inside of the light housing may
mist up briefly in poor, wet and cold weather conditions, in heavy rain or
after washing. The mist disappears
quickly by itself. To help, switch on the
headlights.
Page 118 of 261

116Lighting
Illustration shows rear courtesy lights.
Sunvisor lights Illuminates when the cover is opened.
Lighting features
Centre console lighting A spotlight integrated in the overheadconsole illuminates the centre
console when headlights are
switched on.
Entry lighting
Welcome lighting Some or all of the following lights are
switched on for a short time by
unlocking the vehicle with the radio
remote control:
● headlights
● tail lights
● number plate lights
● instrument panel light
● interior lights
The number of activated lights
depends on the surrounding light
conditions.
The lighting switches off immediately
when the ignition is switched on.
Starting off 3 16.This function can be activated or
deactivated in the vehicle
personalisation.
Vehicle personalisation 3 101.
The following lights will additionally
switch on when the driver's door is
opened:
● illumination of some switches
● Driver Information Centre
● door pocket lights
Exit lighting The following lights are switched on if
the key is removed from the ignition
switch:
● interior lights
● instrument panel light
They will switch off automatically after
a delay. This function works only in
the dark.
Page 175 of 261

Driving and operating173parking assist sensors, e.g. below
the bumper or underneath the
vehicle, are not displayed.
Do not reverse or park the vehicle using only the rear view camera.
Always check the surrounding of
the vehicle before driving.
Switching on
Rear view camera is automatically
activated when reverse gear is
engaged.
Functionality
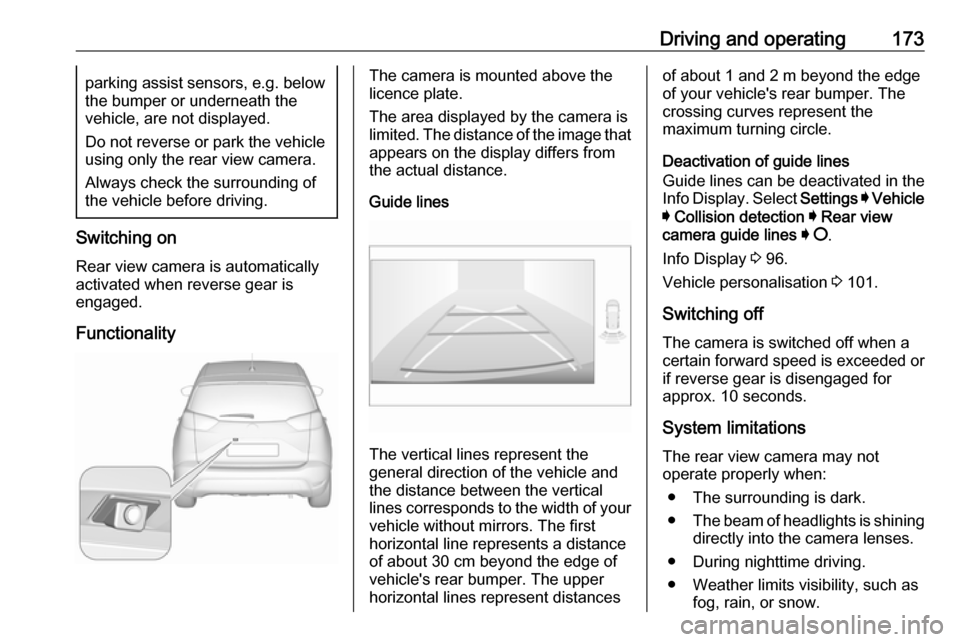
The camera is mounted above the
licence plate.
The area displayed by the camera is
limited. The distance of the image that
appears on the display differs from
the actual distance.
Guide lines
The vertical lines represent the
general direction of the vehicle and
the distance between the vertical
lines corresponds to the width of your vehicle without mirrors. The first
horizontal line represents a distance
of about 30 cm beyond the edge of
vehicle's rear bumper. The upper
horizontal lines represent distances
of about 1 and 2 m beyond the edge
of your vehicle's rear bumper. The
crossing curves represent the
maximum turning circle.
Deactivation of guide lines
Guide lines can be deactivated in the Info Display. Select Settings I Vehicle
I Collision detection I Rear view
camera guide lines I § .
Info Display 3 96.
Vehicle personalisation 3 101.
Switching off
The camera is switched off when a
certain forward speed is exceeded or
if reverse gear is disengaged for
approx. 10 seconds.
System limitationsThe rear view camera may not
operate properly when:
● The surrounding is dark.
● The beam of headlights is shining
directly into the camera lenses.
● During nighttime driving.
● Weather limits visibility, such as fog, rain, or snow.
Page 222 of 261

220Vehicle care● The vehicles must not come intocontact with each other during
the jump starting process.
● Apply the parking brake, transmission in neutral,
automatic transmission in P.
Open the positive terminal protection
caps of both vehicle batteries.
Lead connection order: 1. Connect the red lead to the positive terminal of the booster
battery.
2. Connect the other end of the red lead to the positive terminal of the
discharged battery.
3. Connect the black lead to the negative terminal of the boosterbattery.
4. Connect the other end of the black
lead to a vehicle grounding point
of your vehicle in the engine
compartment.
Route the leads so that they cannot
catch on rotating parts in the engine
compartment.
To start the engine: 1. Start the engine of the vehicle providing the jump.
2. After 5 minutes, start the other engine. Start attempts should be
made for no longer than
15 seconds at an interval of
1 minute.
3. Allow both engines to idle for approx. 3 minutes with the leads
connected.
4. Switch on electrical consumers (e.g. headlights, heated rear
window) of the vehicle receiving
the jump start.
5. Reverse above sequence exactly when removing leads.Towing
Towing the vehicle
Wrap a cloth around the tip of a flat
screwdriver to prevent paint damage.
Insert a screwdriver in the slot at the
bottom of the cap. Release the cap by carefully moving the screwdriver
downwards.
The towing eye is stowed with the vehicle tools 3 206.