Page 587 of 700
5878-2. Steps to take in an emergency
8
When trouble arises
YARIS_F_OM_Europe_OM52K19E
If a warning message is displayed (vehicles
with color display)
Master warning light
The master warning light also
comes on or flashes in order to
indicate that a message is
currently being displayed on the
multi-information display*.
Multi-information display
If any of the warning messages are shown again after the following
actions have been performed, contact any authorized Toyota retailer
or Toyota authorized repairer, or any reliable repairer.
*: The master warning light may not come on or flash when a warning mes-
sage is displayed.
The multi-information display shows warnings of system mal-
functions, incorrectly performed operations, and messages that
indicate a need for maintenance. When a message is shown,
perform the correction procedure appropriate to the message.
1
2
Page 588 of 700

5888-2. Steps to take in an emergency
YARIS_F_OM_Europe_OM52K19E
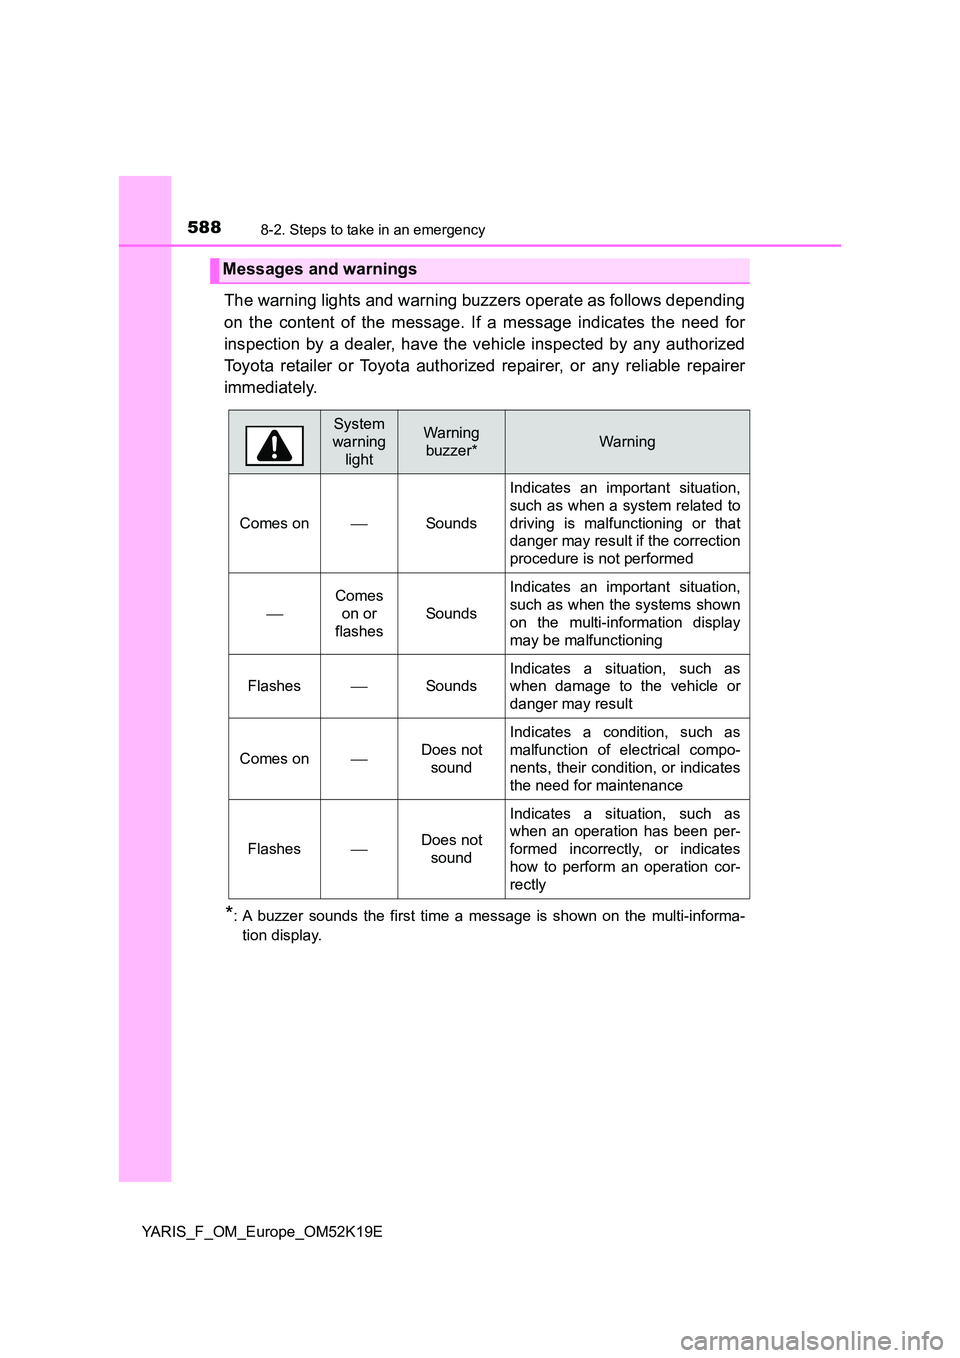
The warning lights and warning buzzers operate as follows depending
on the content of the message. If a message indicates the need for
inspection by a dealer, have the vehicle inspected by any authorized
Toyota retailer or Toyota authorized repairer, or any reliable repairer
immediately.
*: A buzzer sounds the first time a message is shown on the multi-informa-
tion display.
Messages and warnings
System
warning
light
Warning
buzzer*Warning
Comes on Sounds
Indicates an important situation,
such as when a system related to
driving is malfunctioning or that
danger may result if the correction
procedure is not performed
Comes
on or
flashes
Sounds
Indicates an important situation,
such as when the systems shown
on the multi-information display
may be malfunctioning
FlashesSounds
Indicates a situation, such as
when damage to the vehicle or
danger may result
Comes onDoes not
sound
Indicates a condition, such as
malfunction of electrical compo-
nents, their condition, or indicates
the need for maintenance
FlashesDoes not
sound
Indicates a situation, such as
when an operation has been per-
formed incorrectly, or indicates
how to perform an operation cor-
rectly
Page 589 of 700

5898-2. Steps to take in an emergency
8
When trouble arises
YARIS_F_OM_Europe_OM52K19E
■Warning messages
The warning messages explained below may differ from the actual
messages according to operation conditions and vehicle specifica-
tions.
■If “Visit your dealer” is shown
The system or part shown on the multi-information display is mal-
functioning.
Have the vehicle inspected by any authorized Toyota retailer or
Toyota authorized repairer, or any reliable repairer.
■If a message about an operation is shown
● If a message about an operation of the engine switch is shown
An instruction for operation of the engine switch is shown when the
incorrect procedure for starting the engine is performed or the
engine switch is operated incorrectly. Follow the instructions shown
on the multi-information display to operate the engine switch again.
● If a message about a shift lever operation is shown
To prevent the shift lever from being operated incorrectly or the
vehicle from moving unexpectedly, a message that requires shifting
the shift lever may be shown on the multi-information display. In
that case, follow the instruction of the message and shift the shift
lever.
● If a message or image about an open/close state of a part or
replenishment of a consumable is shown
Confirm the part indicated by the multi-information display or a
warning light, and then perform the coping method such as closing
the open door or replenishing a consumable.
Page 600 of 700
6008-2. Steps to take in an emergency
YARIS_F_OM_Europe_OM52K19E
Make sure that the compressor
switch is off.
Remove the power plug from
the compressor.
Connect the power plug to the
power outlet socket or cigarette
lighter socket. ( P. 465, 466)
Check the specified tire inflation
pressure.
Tire inflation pressure is specified
on the label in the glove box.
( P. 663)
Start the engine.
9
10
11
12
13
Page 602 of 700
6028-2. Steps to take in an emergency
YARIS_F_OM_Europe_OM52K19E
Turn the compressor off
Disconnect the nozzle from the valve on the tire and then pull out
the power plug from the power outlet socket or cigarette lighter.
Some sealant may leak when the nozzle is removed.
Press the button to release
pressure from the bottle.
Attach the cap to the nozzle.
Install the valve cap onto the valve of the emergency repaired tire.
Disconnect the hose from the
bottle and attach the cap to the
bottle.
Place the bottle in the original bag
and zip it.
16
17
Page 604 of 700

6048-2. Steps to take in an emergency
YARIS_F_OM_Europe_OM52K19E
Turn the compressor switch on to inflate the tire until the specified
air pressure is reached. Drive for about 5 km (3 miles) and then
perform .
Store the compressor in the luggage compartment.
Taking precautions to avoid sudden braking, sudden acceleration
and sharp turns, drive carefully at under 80 km/h (50 mph) to the
nearest authorized Toyota retailer or Toyota authorized repairer, or
any reliable repairer for tire repair or replacement.
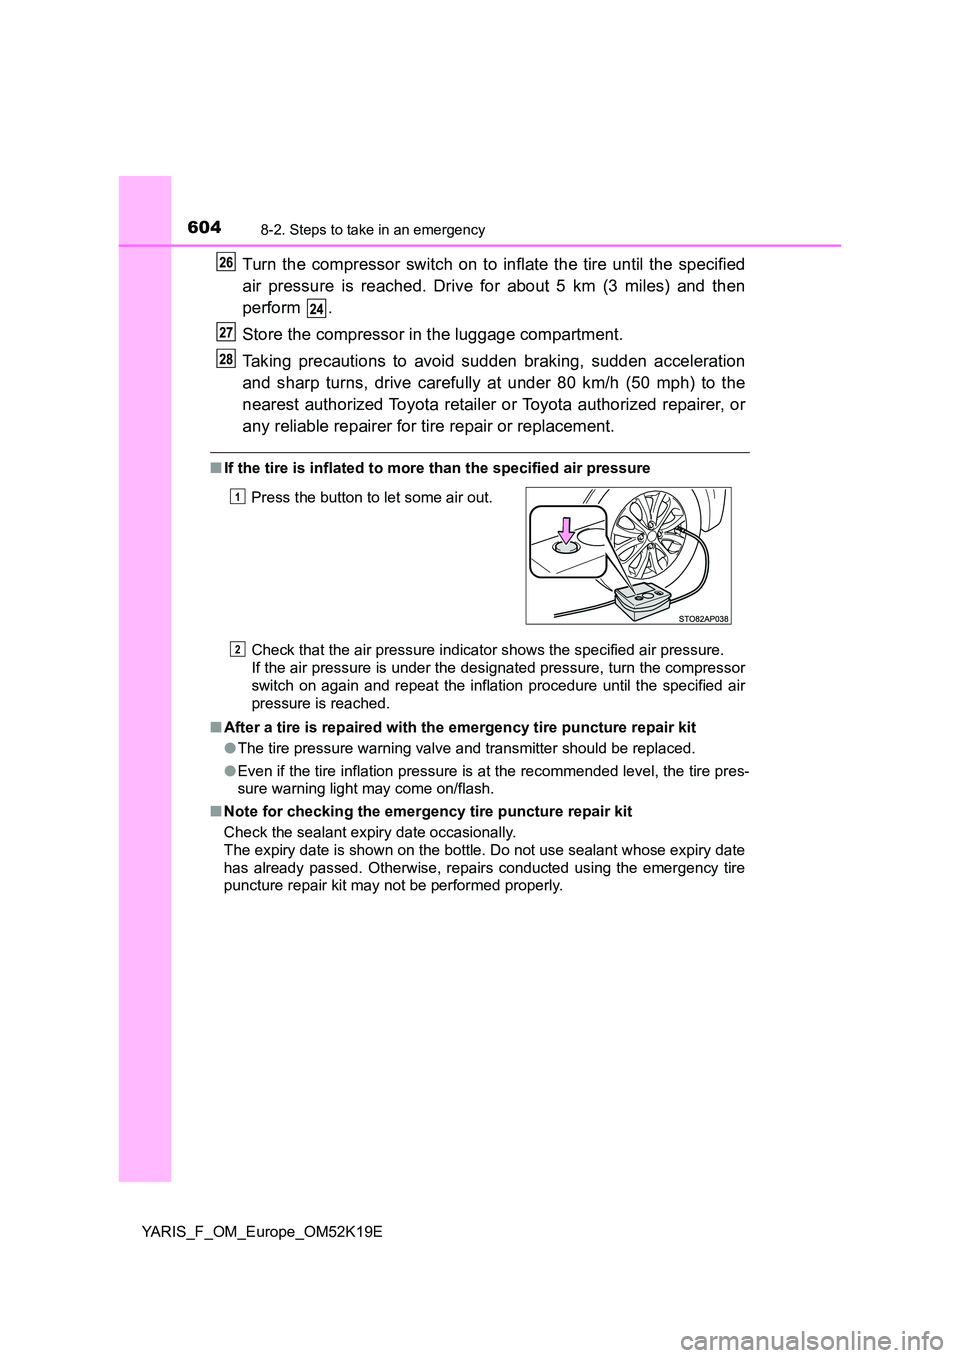
■ If the tire is inflated to more than the specified air pressure
Check that the air pressure indicator shows the specified air pressure.
If the air pressure is under the designated pressure, turn the compressor
switch on again and repeat the inflation procedure until the specified air
pressure is reached.
■ After a tire is repaired with the emergency tire puncture repair kit
● The tire pressure warning valve and transmitter should be replaced.
● Even if the tire inflation pressure is at the recommended level, the tire pres-
sure warning light may come on/flash.
■ Note for checking the emergency tire puncture repair kit
Check the sealant expiry date occasionally.
The expiry date is shown on the bottle. Do not use sealant whose expiry date
has already passed. Otherwise, repairs conducted using the emergency tire
puncture repair kit may not be performed properly.
Press the button to let some air out.1
2
Page 615 of 700
6158-2. Steps to take in an emergency
8
When trouble arises
YARIS_F_OM_Europe_OM52K19E
Chock the tires.
For vehicles with steel wheels,
remove the wheel ornament
using the wrench.
To protect the wheel ornament,
place a rag between the wrench
and the wheel ornament.
If the wheel ornament has notches,
insert the wrench into the notch
and remove the wheel ornament.
Slightly loosen the wheel nuts
(one turn).
Replacing a flat tire
1
Flat tireWheel chock positions
FrontLeft-hand sideBehind the rear right-hand side tire
Right-hand sideBehind the rear left-hand side tire
RearLeft-hand sideIn front of the front right-hand side tire
Right-hand sideIn front of the front left-hand side tire
2
3
Page 616 of 700
6168-2. Steps to take in an emergency
YARIS_F_OM_Europe_OM52K19E
Turn the tire jack portion by
hand until the notch of the jack
is in contact with the jack point.
The jack point guides are located
under the rocker panel. They indi-
cate the jack point positions.
Raise the vehicle until the tire is
slightly raised off the ground.
Remove all the wheel nuts and
the tire.
When resting the tire on the
ground, place the tire so that the
wheel design faces up to avoid
scratching the wheel surface.
4
5
6