2019 TOYOTA LAND CRUISER lights
[x] Cancel search: lightsPage 275 of 624
LC200_OM_OM60Q99U_(U)
2754-5. Using the driving support systems
4
Driving
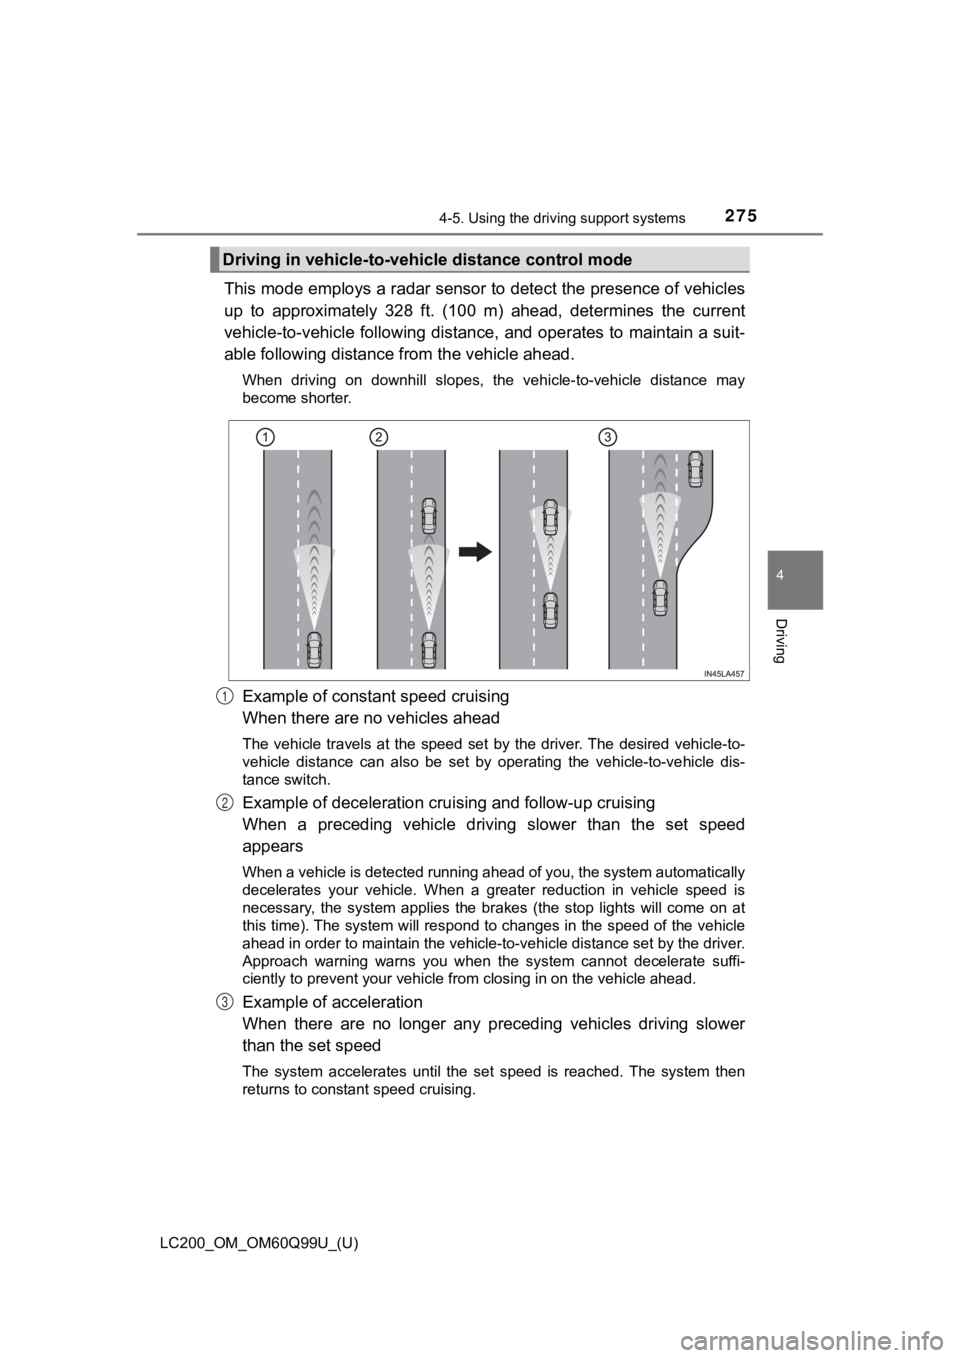
This mode employs a radar sensor to detect the presence of vehi cles
up to approximately 328 ft. (100 m) ahead, determines the curre nt
vehicle-to-vehicle following distance, and operates to maintain a suit-
able following distance from the vehicle ahead.
When driving on downhill slopes, the vehicle-to-vehicle distance may
become shorter.
Example of constant speed cruising
When there are no vehicles ahead
The vehicle travels at the speed set by the driver. The desired vehicle-to-
vehicle distance can also be set by operating the vehicle-to-ve hicle dis-
tance switch.
Example of deceleration crui sing and follow-up cruising
When a preceding vehicle driving slower than the set speed
appears
When a vehicle is detected running ahead of you, the system automatically
decelerates your vehicle. When a greater reduction in vehicle s peed is
necessary, the system applies the brakes (the stop lights will come on at
this time). The system will respond to changes in the speed of the vehicle
ahead in order to maintain the vehicle-to-vehicle distance set by the driver.
Approach warning warns you when the system cannot decelerate su ffi-
ciently to prevent your vehicle fr om closing in on the vehicle ahead.
Example of acceleration
When there are no longer any preceding vehicles driving slower
than the set speed
The system accelerates until the set speed is reached. The syst em then
returns to constant speed cruising.
Driving in vehicle-to-vehi cle distance control mode
1
2
3
Page 297 of 624

LC200_OM_OM60Q99U_(U)
2974-5. Using the driving support systems
4
Driving
■The four-wheel drive control sw itch can be operated when
● The engine switch is in IGNITION ON mode.
● The shift lever is in the N position.
● The vehicle is stopped completely.
■ The low speed four-whee l drive indicator light
The indicator light blinks while shifting between H4 and L4.
■ Advice for driving on slippery roads
●If you shift the four-wheel drive control switch to L4 and the shift lever to the
2 range of S while driving in steep off-road areas, the output of the brake
can be controlled effectively by the Active TRAC, which assists the driver to
control the driving power of 4 wheels.
● Use the 1 range of S of the shift lever for maximum power and t raction when
your wheels get stuck or when driving down a steep incline.
■ The center differential lock indicator light
The indicator light blinks while locking/unlocking the center differential.
■ The center differential lock/unlock switch can be operated when
●The engine switch is in IGNITION ON mode.
● The vehicle speed is less than 62 mph (100 km/h).
■ Locking/unlocking the center differential
●When the four-wheel drive control switch is in L4 with the cent er differential
locked, VSC is automatically turned off. (The center differential lock and
VSC OFF indicator lights come on.)
● If the operation is not completed, the center differential lock indicator blinks.
If the indicator light does not turn off when unlocking the center differential,
drive straight ahead while accelerating or decelerating, or dri ve in reverse.
● If the center differential lock/unlock is not completed within 5 seconds while
the cruise control system is on, cancel the cruise control system.
■ If the low speed four-wheel drive indicator light or the center differential
lock indicator light blinks
● If the low speed four-wheel drive indicator light continues to blink when
using the four-wheel drive control switch, stop the vehicle com pletely, move
the shift lever to N and operate the switch again.
● If the shift lever is moved before the low speed four-wheel dri ve indicator
turns on/off, the transfer mode may not be shifted completely. The transfer
mode disengages both the front and rear driveshafts from the po wertrain
and allows the vehicle to move regardless of the shift position. (At this time,
the indicator blinks and the buzzer sounds.)
Therefore, the vehicle is free to roll even if the automatic tr ansmission is in
P. You or someone else could be seriously injured. You must com plete the
shifting of the transfer mode.
To complete the shifting, stop the vehicle completely, return the shift lever to
N, and confirm that the shift was completed (the indicator turn s on/off).
Page 303 of 624

LC200_OM_OM60Q99U_(U)
3034-5. Using the driving support systems
4
Driving
■When depressing the accelerator pedal while the Crawl Control is oper-
ating
Multi-terrain Select operates in AUTO mode. ( P. 305)
■ Sounds and vibrations caused by the Crawl Control system
● A sound may be heard from the engine compartment when the engin e is
started or just after the vehicle begins to move. This sound do es not indicate
that a malfunction has occurred in Crawl Control system.
● Either of the following conditions may occur when the Crawl Con trol system
is operating. None of these are indicators that a malfunction h as occurred.
• Vibrations may be felt through the vehicle body and steering.
• A motor sound may be heard after the vehicle comes to a stop.
■ When there is a malfunction in the system
Warning lights and/or warning messages will turn on. ( P. 521, 530)
WARNING
■When using Crawl Control
Do not rely solely on the Crawl Control. This function does not extend the
vehicle’s performance limitations. Always thoroughly check the road condi-
tions, and drive safely.
■ These conditions may cause the sy stem not to operate properly
When driving on the following surfaces, the system may not be a ble to
maintain a fixed low speed, which may result in an accident:
● Extremely steep inclines.
● Extremely uneven surfaces.
● Snow-covered roads, or other slippery surfaces.
NOTICE
■When using Turn Assist function
The Turn Assist function is a function to assist turning perfor mance when
driving off road. The function may be less effective on paved r oad surfaces.
Page 355 of 624
LC200_OM_OM60Q99U_(U)
3554-5. Using the driving support systems
4
Driving
■If you notice any symptoms
If you notice any of the followi ng symptoms, refer to the likel y cause
and the solution, and re-check.
If the symptom is not resolved by the solution, have the vehicl e
inspected by your Toyota dealer.
Likely causeSolution
The image is difficult to see
• The vehicle is in a dark area
• The temperature around the lens
is either high or low
• The outside temperature is low
• There are water droplets on the camera
• It is raining or humid
• Foreign matter (mud etc.) is adhering to the camera
• Sunlight or headlights are shining directly into the camera
• The vehicle is under fluorescent
lights, sodium lights, mercury
lights, etc.
Drive while visually checking the
vehicle’s surroundings. (Use the
Multi-terrain Monitor again once
conditions have been improved.)
The image on the rear view monitor
system screen can be adjusted,
refer to the “NAVIGATION SYSTEM
OWNER’S MANUAL”.
The image is blurry
Dirt or foreign matter (such as water
droplets, snow, mud, etc.) is adher-
ing to the cameraFlush the camera with a large quan-
tity of water and wipe the camera
lens with a soft and wet cloth.
The image is out of alignment
The camera or surrounding area has
received a strong impactHave the vehicle inspected by your
Toyota dealer.
The guide lines are very far out of alignment
The camera position is out of align-
mentHave the vehicle inspected at your
Toyota dealer.
• The vehicle is tilted (there is a
heavy load on the vehicle, tire
pressure is low due to a tire punc-
ture, etc.)
• The vehicle is used on an inclineIf this happens due to these causes,
it does not indicate a malfunction.
Drive while visually checking the
vehicle’s surroundings.
Page 357 of 624
LC200_OM_OM60Q99U_(U)
3574-5. Using the driving support systems
4
Driving
NOTICE
■How to use the camera
● The Multi-terrain Monitor system may not operate properly in th e following
cases.
• If the front or the rear of the vehicle or the outside rear vi ew mirror has
been hit, the camera’s position and mounting angle may have cha nged.
• As the camera has a water proof construction, do not detach, disassem- ble or modify it. This may cause incorrect operation.
• When cleaning the camera lens, flush the camera with a large quantity of water and wipe it with a soft and wet cloth. Strongly rubbin g the cam-
era lens may cause the camera lens to be scratched and unable t o
transmit a clear image.
• Do not allow organic solvent, car wax, window cleaner or glass coat to adhere to the camera. If this happens, wipe it off as soon as possible.
• If the temperature changes rapidly, such as when hot water is poured
on the vehicle in cold weather, the system may not operate norm ally.
• When washing the vehicle, do not apply intensive bursts of wat er to the
camera or camera area. Doing so may result in the camera malfun c-
tioning.
• When the camera is used under fluorescent lights, sodium light or mer-
cury light etc., the lights and the illuminated areas may appea r to flicker.
• The camera can be damaged by flying rocks and other debris.
● Do not expose the camera to strong impact as this could cause a malfunc-
tion. If this happens, have the vehicle inspected by your Toyot a dealer as
soon as possible.
Page 373 of 624
LC200_OM_OM60Q99U_(U)
3734-5. Using the driving support systems
4
Driving
◆VGRS (Variable Gear Ratio Steering)
Helps to adjust the wheel turning angle in accordance with the vehicle
speed and steering wheel movement.
◆Trailer Sway Control
Helps the driver to control trailer sway by selectively applyin g brake pres-
sure for individual wheels and reducing engine torque when trai ler sway is
detected.
Trailer Sway Control is part of the VSC system and will not operate if VSC
turned off or experiences a malfunction.
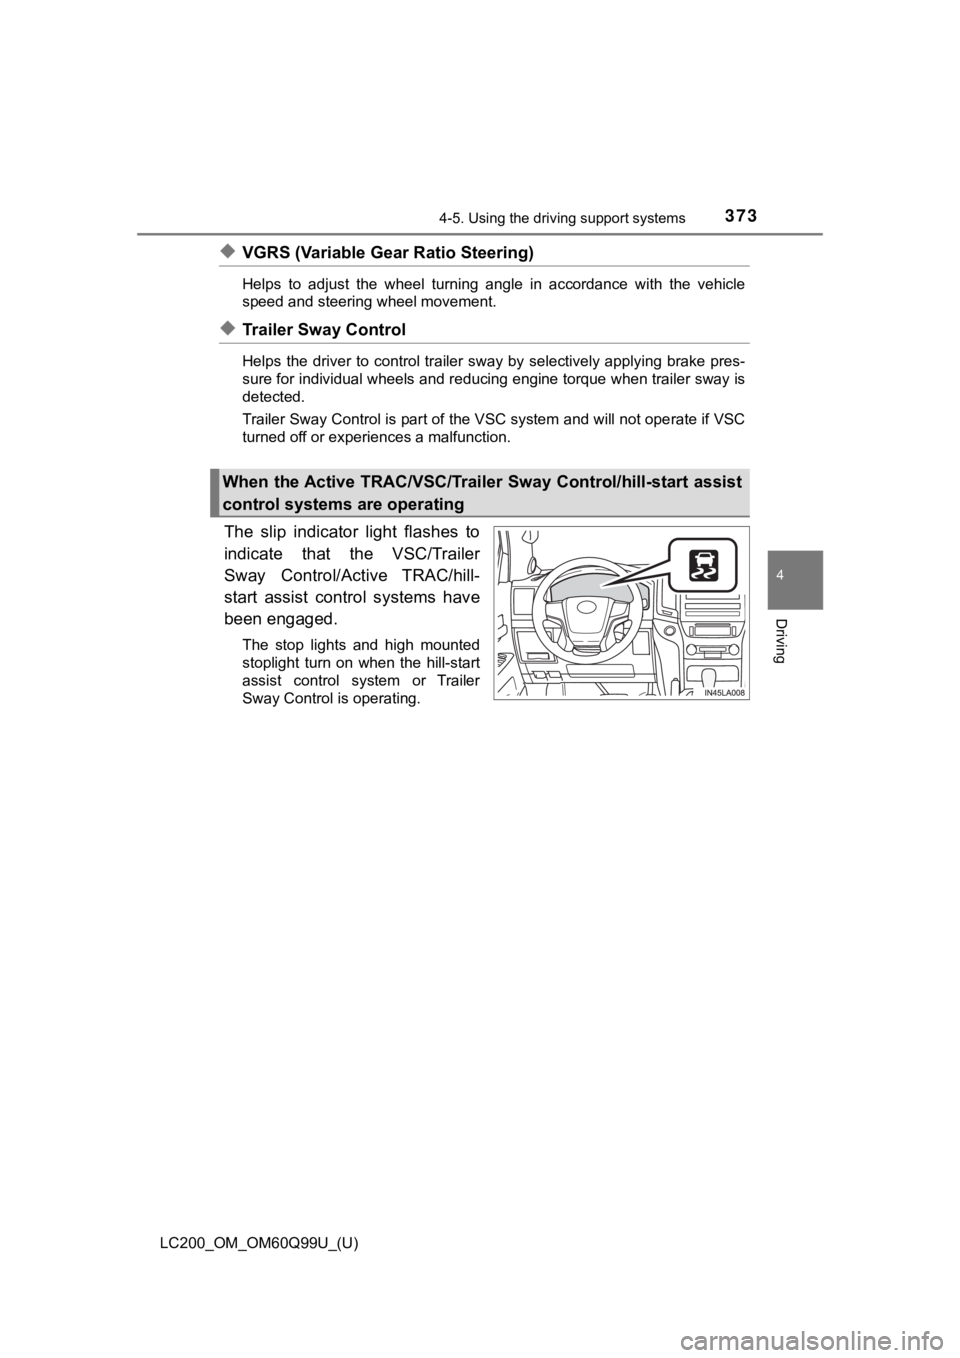
The slip indicator light flashes to
indicate that the VSC/Trailer
Sway Control/Active TRAC/hill-
start assist control systems have
been engaged.
The stop lights and high mounted
stoplight turn on when the hill-start
assist control system or Trailer
Sway Control is operating.
When the Active TRAC/VSC/Trailer Sway Control/hill-start assist
control systems are operating
Page 384 of 624
384
LC200_OM_OM60Q99U_(U)
4-6. Driving tips
Winter driving tips
●Use fluids that are appropriate t o the prevailing outside tempera-
tures. • Engine oil
• Engine coolant
• Washer fluid
● Have a service technician inspec t the condition of the battery.
● Have the vehicle fitted with four snow tires or purchase a set of tire
chains for the rear tires.
Ensure that all tires are the same size and brand, and that cha ins match
the size of the tires.
Perform the following accordi ng to the driving conditions:
● Do not try to forcibly open a window or move a wiper that is fr ozen.
Pour warm water over the frozen area to melt the ice. Wipe away
the water immediately to prevent it from freezing.
● To ensure proper operation of the climate control system fan,
remove any snow that has accumulated on the air inlet vents in
front of the windshield.
● Check for and remove any excess ic e or snow that may have accu-
mulated on the exterior lights, vehicle’s roof, chassis, around the
tires or on the brakes.
● Remove any snow or mud from the bottom of your shoes before
getting in the vehicle.
Accelerate the vehicle slowly, keep a safe distance between you and
the vehicle ahead, and drive at a reduced speed suitable to roa d con-
ditions.
Carry out the necessary preparations and inspections before
driving the vehicle in winter. Always drive the vehicle in a ma n-
ner appropriate to the prevailing weather conditions.
Pre-winter preparations
Before driving the vehicle
When driving the vehicle
Page 387 of 624

387
LC200_OM_OM60Q99U_(U)
5Interior features
5-1. Using the air conditioning system and defogger
Front automatic air conditioning system ........ 388
Rear air conditioning system............................. 399
Heated steering wheel/ seat heaters/
seat ventilators ................ 403
5-2. Using the interior lights Interior lights list ................ 407• Interior lights ................. 408
• Personal lights .............. 409 5-3. Using the storage features
List of storage features ..... 410• Glove box...................... 411
• Console box .................. 412
• Overhead console......... 413
• Cup holders .................. 414
• Bottle holders ................ 416
• Card holders ................. 417
• Auxiliary boxes.............. 417
Luggage compartment features ........................... 418
5-4. Using the other interior features
Other interior features ....... 420 • Cool box........................ 420
• Sun visors ..................... 422
• Vanity mirror ................. 422
• Clock ............................. 423
• Outside temperature display........................... 423
• Power outlets ................ 424
• Wireless charger ........... 426
• Armrest ......................... 434
• Coat hooks.................... 434
• Assist grips ................... 435
Garage door opener.......... 436