2019 SUZUKI JIMNY Sim
[x] Cancel search: SimPage 3 of 421

FOREWORD
This manual should be considered as a permanent part of the vehicle and should remain with the vehicle when resold or otherwise transferred to a new owner or operator. Please read this manual carefully before operating your new SUZUKI vehicle and review the manual from time to time. It contains important information on safety, operation and maintenance.
SUZUKI MOTOR CORPORATION
All information in this manual is based on the latest product information available at the time of publication. Due to improvements or other changes1 there may be discrepancies between information in this manual and your vehicle. SUZUKI MOTOR CORPORATION reserves the right to make production changes at any time, without notice and without incurring any obligation to make the same or similar changes to vehicles previously built or sold.
This vehicle may not comply with standards or regulations of other countries. Before attempting to register this vehicle in any other country, check all applicable regulations and make any necessary modifications.
NOTE: Please see the warning label named "Airbag symbol meaning" in "BEFORE DRIVING" section for information on front airbag
protection.
IMPORTANT
A WARNING/ A CAUTION/NOTICE/ NOTE Please read this manual and follow its instructions carefully. To emphasize special information, the symbol A and the words WARNING, CAUTION, NOTICE and NOTE have special meanings. Pay particular attention to messages highlighted by these signal words:
A WARNING
Indicates a potential hazard that could result in death or serious injury.
A CAUTION
Indicates a potential hazard that could result in minor or moderate
injury.
NOTICE
Indicates a potential hazard that could result in vehicle damage.
NOTE: Indicates special information to make maintenance easier or instructions clearer.
Page 74 of 421

BEFORE DRIVING
Central door locking system
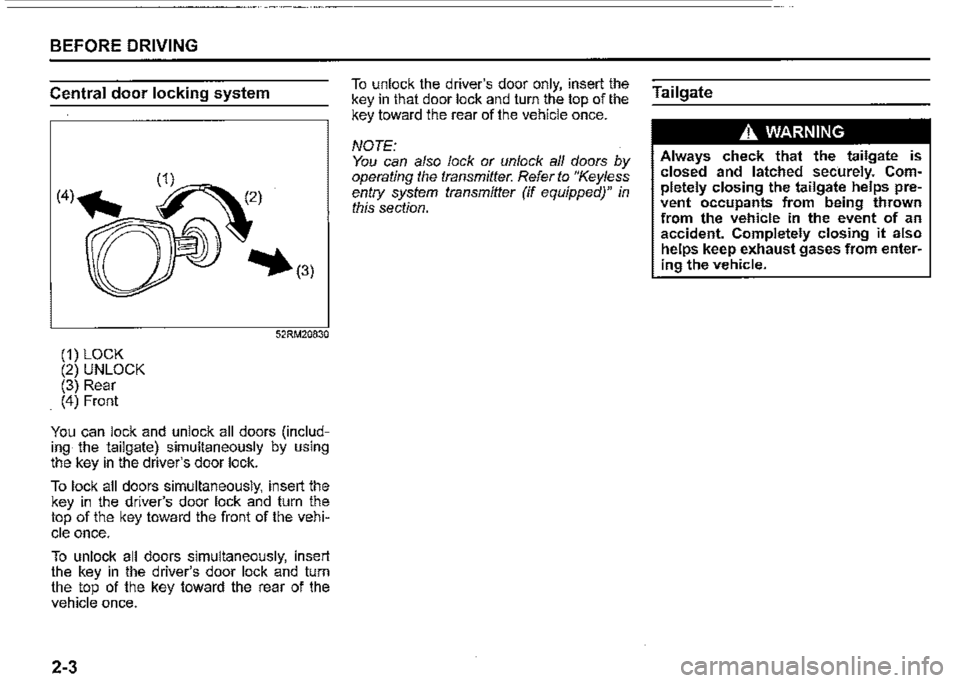
(1) LOCK (2) UNLOCK (3) Rear (4) Front
52RM20830
You can lock and unlock all doors (including the tailgate) simultaneously by using the key in the driver's door lock.
To lock all doors simultaneously, insert the key in the driver's door lock and turn the top of the key toward the front of the vehi
cle once.
To unlock all doors simultaneously, insert the key in the driver's door lock and turn the top of the key toward the rear of the vehicle once.
2-3
To unlock the driver's door only, insert the key in that door lock and turn the top of the key toward the rear of the vehicle once.
NOTE: You can also lock or unlock all doors by operating the transmitter. Refer to "Keyless entry system transmitter (if equipped)" in this section.
Tailgate
A WARNING
Always check that the tailgate is closed and latched sec·urely. Completely closing the tailgate helps prevent occupants from being thrown from the vehicle in the event of an accident. Completely closing it also helps keep exhaust gases from entering the vehicle.
Page 77 of 421

Keyless entry system
transmitter (if equipped)
(2)
79MH0237
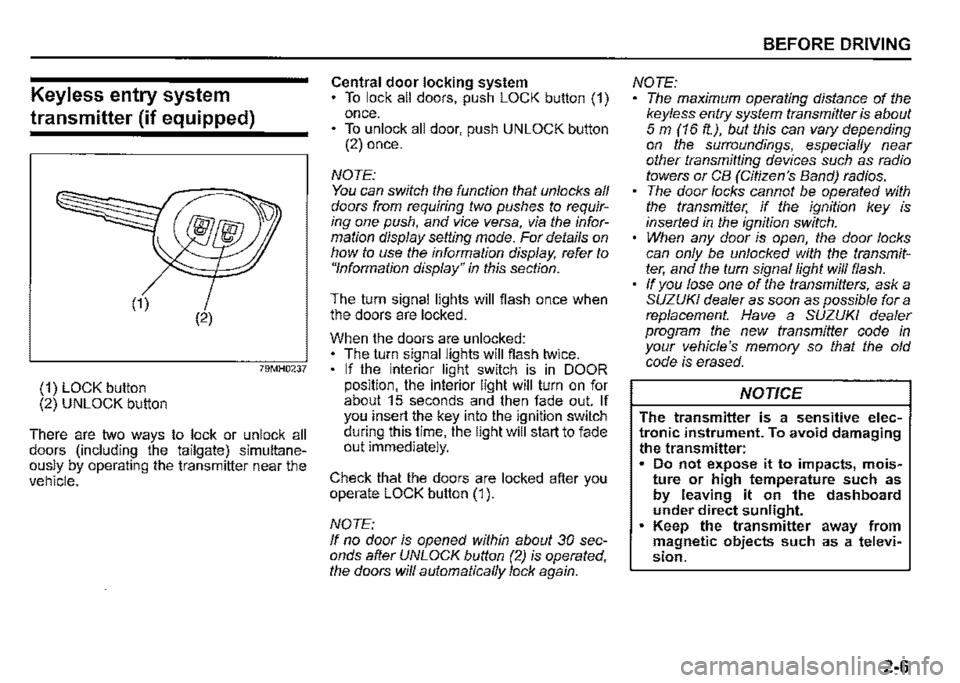
(1) LOCK button (2) UNLOCK button
There are two ways to lock or unlock all doors (including the tailgate) simultaneously by operating the transmitter near the vehicle.
Central door locking system To lock all doors, push LOCK button (1) once. • To unlock all door, push UNLOCK button (2) once.
NOTE: You can switch the function that unlocks all doors from requiring two pushes to requiring one push, and vice versa, via the information display setting mode. For details on how to use the information display, refer to "Information display" in this section.
The turn signal lights will flash once when the doors are locked.
When the doors are unlocked: The turn signal lights will flash twice. If the interior light switch is in DOOR position, the interior light will turn on for about 15 seconds and then fade out. If you insert the key into the ignition switch during this time, the light will start to fade out immediately.
Check that the doors are locked after you operate LOCK button (1 ).
NOTE: If no door is opened within about 30 seconds after UNLOCK button (2) is operated, the doors will automatically lock again.
BEFORE DRIVING
NOTE: The maximum operating distance of the keyless entry system transmitter is about 5 m (16 ft.), but this can vary depending on the surroundings, especially near other transmitting devices such as radio towers or CB (Citizen's Band) radios. The door locks cannot be operated with the transmitter, if the ignition key is inserted in the ignition switch. When any door is open, the door locks can only be unlocked with the transmitter, and the turn signal light will flash. If you lose one of the transmitters, ask a SUZUKI dealer as soon as possible for a replacement. Have a SUZUKI dealer program the new transmitter code in your vehicle's memory so that the old code is erased.
NOTICE
The transmitter is a sensitive electronic instrument. To avoid damaging the transmitter: Do not expose it to impacts, moisture or high temperature such as by leaving it on the dashboard under direct sunlight. Keep the transmitter away from magnetic objects such as a television.
2-6
Page 80 of 421

BEFORE DRIVING
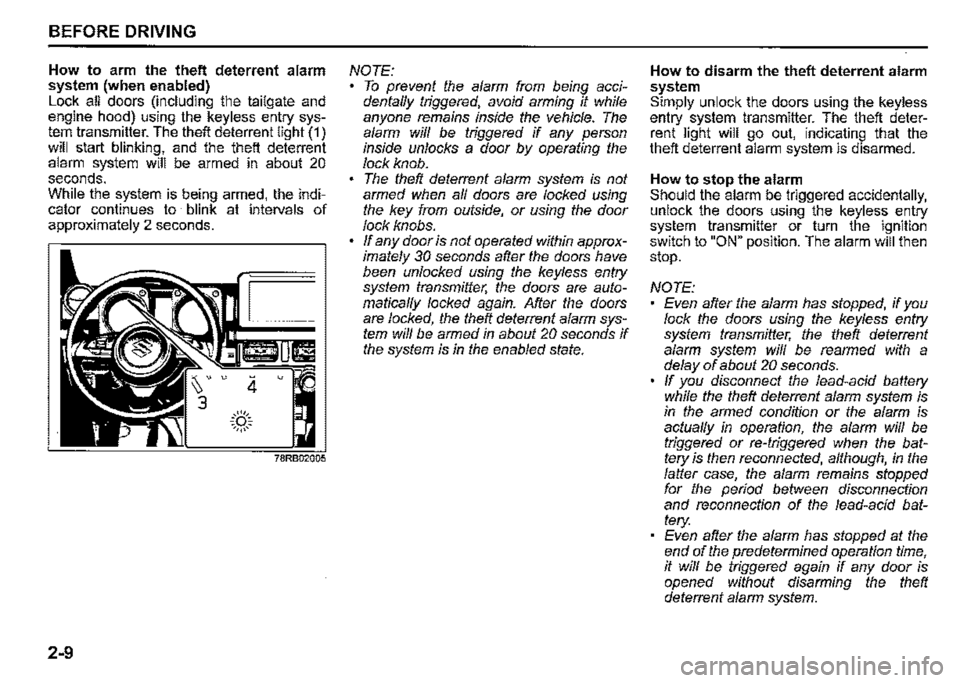
How to arm the theft deterrent alarm system (when enabled) Lock all doors (including the tailgate and engine hood) using the keyless entry system transmitter. The theft deterrent light (1) will start blinking, and the theft deterrent alarm system will be armed in about 20 seconds. While the system is being armed, the indicator continues to blink at intervals of approximately 2 seconds.
2-9
4 u
.::(')::. ~,,,,,~
NOTE: To prevent the alarm from being accidentaffy triggered, avoid arming it while anyone remains inside the vehicle. The alarm wiff be triggered if any person inside unlocks a door by operating the lock knob. The theft deterrent alarm system is not armed when af/ doors are locked using the key from outside, or using the door lock knobs. ff any door is not operated within approximately 30 seconds after the doors have been unlocked using the keyless entry system transmitter, the doors are automaticaf/y locked again. After the doors are locked, the theft deterrent alarm system wiff be armed in about 20 seconds if the system is in the enabled state.
How to disarm the theft deterrent alarm system Simply unlock the doors using the keyless entry system transmitter. The theft deterrent light will go out, indicating that the theft deterrent alarm system is disarmed.
How to stop the alarm Should the alarm be triggered accidentally, unlock the doors using the keyless entry system transmitter or turn the ignition switch to "ON" position. The alarm will then stop.
NOTE: Even after the alarm has stopped, if you lock the doors using the keyless entry system transmitter, the theft deterrent alarm system wiff be rearmed with a delay of about 20 seconds. ff you disconnect the lead-acid battery while the theft deterrent alarm system is in the armed condition or the alarm is actuaf/y in operation, the alarm will be triggered or re-triggered when the battery is then reconnected, although, in the falter case, the alarm remains stopped for the period between disconnection and reconnection of the lead-acid battery: Even after the alarm has stopped at the end of the predetermined operation time, it wiff be triggered again if any door is opened without disarming the theft deterrent alarm system.
Page 104 of 421

BEFORE DRIVING
Setting mode
When the ignition switch is "ON" and the vehicle is stationary, you can enter the setting mode of the information display by pushing and holding the indicator selector knob (3) for a while.
To select the setting that you want to change, turn the indicator selector knob (3) left or right. To change the setting, push the indicator selector knob (3). To exit the setting mode, select "Back" and push the indicator selector knob (3).
78RB02096
NOTE: The currently selected setting item is surrounded by a frame.
2-33
NOTE: If you push and hold the indicator selector knob (3) to enter the setting mode when the display (CJ shows average fuel consumption or average speed, driving time, the value will be reset simultaneously. If you do not want to reset the value, push the indicator selector knob quickly to switch the indication of the display. If you turn the ignition switch or start to move the vehicle when the display is in the setting mode, the setting mode will be canceled automatically.
Distance unit (Odometer I trip meter I driving range I average speed distance unit setting) You can change the units in which odometer I trip meter I driving range I average speed distance is displayed.
Fuel economy (Fuel consumption unit setting) You can change the units that fuel consumption is displayed in.
Language You can change the language of the information display.
Fuel reset (Average fuel consumption reset setting) You can change when the value of average fuel consumption is reset.
Temperature (Temperature unit setting) You can change the units that temperature is displayed in. To change the temperature unit, select "Temperature" in "Setting mode". Then, select "°C" or "°F".
NOTE: When you change the units that temperature is displayed in, the automatic heating and air conditioning system temperature display units will be changed automatically.
Clock setting (Adjusting the clock) • Adjust the clock by selecting "Clock setting" in "Setting mode". Then, select "Adjust clock". To change the hour indication, turn the indicator selector knob (3) left or right repeatedly when the hour indication appears as reversed color. To change the hour indication quickly, turn and hold indicator selector knob (3). To set the hour indication, push the indicator selector knob (3) and the minute indication appears as reversed color. To change the minute indication, turn the indicator selector knob (3) left or right repeatedly when the minute indication appears as reversed color. To change the minute indication quickly, turn and hold indicator selector knob (3). To set the minute indication, push the indicator selector knob (3).
Page 113 of 421

Anti-lock brake system {ABS) warn
ing light
(8)
65D529
When the ignition switch is turned "ON", this light comes on briefiy so you can check that the light is working. If the light stays on or comes on when driving, there may be something wrong with the ABS.
If this happens: 1) Pull off the road and stop carefully. 2) Turn the ignition switch to "LOCK" and then start the engine again.
If the warning light comes on briefiy and then turns off, the system is normal. If the warning light still stays on, something is wrong with the system.
If the light and the brake system warning light stay on or come on simultaneously when driving, your ABS system is equipped with the rear brake force control function (proportioning valve function) and there may be something wrong with both the rear brake force control function and the anti-lock function of the ABS system.
If one of the above occurs, have the system inspected by a SUZUKI dealer. If the ABS becomes inoperative, the brake system will function as an ordinary brake system that does not have this ABS sys
tem.
For details of ABS system, refer to "Antilock brake system (ABS)" in "OPERATING YOUR VEHICLE" section.
ESP® warning light
52KM133
ESP® is a registered trademark of Daimler
AG.
This light blinks 5 times per second when one of the following systems is activated. Stability control system • Traction control system • Hill descent control system
If this light blinks, drive carefully.
BEFORE DRIVING
When the ignition switch is turned "ON", the light comes on briefiy so you can check that the light is working. If the light stays on or comes on when driving, there may be something wrong with the ESP® systems (other than ABS). You should have the system inspected by a SUZUKI dealer.
For details of the ESP® systems, refer to "Electronic stability program (ESP®)" in "OPERATING YOUR VEHICLE" section.
The ESP® systems cannot prevent accidents. Always drive carefully.
2-42
Page 128 of 421

BEFORE DRIVING
To turn the lights on or off, twist the knob on the end of the lever. There are four positions:
OFF (1) All lights are off.
AUTO (2) This function works when the ignition switch is turned "ON". The headlights and position lights are turned on and off automatically according to the amount of outside light detected by the sensor. They go out automatically when you turn the ignition switch to "ACC" or "LOCK" position.
The light sensor (5) for sensing the amount of outside light is installed on the passenger's seat side instrument panel.
When headlights are turned on and the lighting control lever is in "AUTO" position, you can use the high beam assist (if equipped). For details, refer to "High beam assist" in "OPERATING YOUR VEHICLE" section.
2-57
A CAUTION
If the light sensor area of the windshield is covered with mud, ice1 or other similar substances, the headlights and position lights may be turned on even when it is still light outside.
NOTE: Avoid covering the light sensor area of the windshield with a sticker. The sticker may impair the performance of the sensor and make the system unable to control operation of the lights correctly. If you turned the ignition switch to "ON" position and "AUTO" position remains selected, the headlights and position lights come on automatically as it gets dark outside, even with the engine not running. Leaving the lights lit for a long time may lead to a completely discharged battery.
oOO~ (3) Front position lights, tail lights, license plate lights and instrument lights are on, but headlights are off.
~D (4) Front position lights, tail lights, license plate lights, instrument lights and headlights are on.
= IO · OFF 01
f,
68PM00230
With the headlights on, push the lever forward to switch to the high beams (main beams) or pull the lever toward you to switch to the low beams. When the high beams (main beams) are on, a light on the instrument cluster will come on. To momentarily activate the high beams (main beams) as a passing signal, pull the lever slightly toward you and release it when you have completed the signal.
Page 138 of 421

BEFORE DRIVING
NOTE: You can customize the setting for the num-Hazard warning switch ber of flashing times of the turn signal and its indicator (1 to 4 times). Ask a SUZUKI deafer for the customization.
2-67
78RB02058
Push the hazard warning switch to activate the hazard warning lights. All turn signal lights and both turn signal indicators will flash simultaneously. To turn off the lights, push the switch again. Use the hazard warning lights to warn other drivers of possible risk of traffic hazard when you park your vehicle in case of emergency.
Windshield wiper and washer
lever
650611
A WARNING
To avoid possible injury, do not operate controls by reaching through the steering wheel.