Page 141 of 607

GETTING TO KNOW YOUR INSTRUMENT PANEL 139
Settings — If Equipped
Personal Settings allows the driver to set and recall features
when the transmission is in PARK.
Push and release the up and down button until Settings
displays in the instrument cluster display.
Follow the prompts to display and set any of the following
Vehicle Settings. NOTE:
Your vehicle may be equipped with the following settings.
• If equipped with a base radio (Non-Touchscreen) Vehicle
Settings will be included in the instrument cluster display.
• If equipped with a Touchscreen radio, the Vehicle Settings
will be included in the radio head unit.
Setting Names Setting Names
Abbreviated (Left
Submenu Layer) Sub-Menus (Right Submenu Layer)
Language Select Language English, Spanish, French, Italian, German, Dutch, Arabic
Units Units U.S.; Metric
ParkSense ParkSense • Front Volume — Low; Medium; High
• Rear Volume — Low; Medium; High
Tilt Mirror in Reverse Tilt Mirror in R On; Off
Rain Sensing Wipers Auto Wipers On; Off
Hill Start Assist Hill Start Assist On; Off
Headlights Off Delay Lights Off Delay 0 seconds; 30 seconds; 60 seconds; 90 seconds
Illuminated Approach Lights w/ Unlock 0 seconds; 30 seconds; 60 seconds; 90 seconds
Headlights On with
Wipers Lights w/ Wipers On; Off 3
Page 493 of 607
MULTIMEDIA 491
Display
After pressing the “Display” button on the touchscreen, the following settings will be available.
Units — If Equipped
After pressing “Units” on the touchscreen, the following will be available: Setting Name Selectable Options
Display Mode Auto Manual
Set Language English, Français, Español
Touchscreen Beep On Off
Fuel Saver Display On Off
NOTE:
The “Fuel Saver Display” feature will allow you to enable fuel saver mode and will be displayed in the instrument cluster
display.
Setting Name Selectable Options
Units US Metric Custom
Speed MPH km/h
Distance mi km
Fuel Consumption MPG (UG) MPG (UK) L/100 km km/L
Pressure psi kPa bar 9
Page 511 of 607

MULTIMEDIA 509
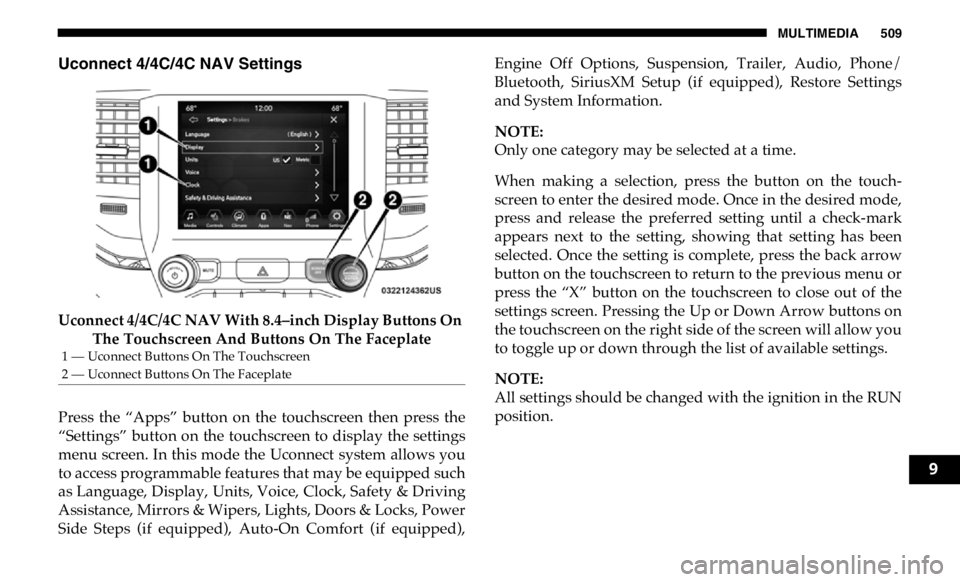
Uconnect 4/4C/4C NAV Settings
Uconnect 4/4C/4C NAV With 8.4–inch Display Buttons On
The Touchscreen And Buttons On The Faceplate
Press the “Apps” button on the touchscreen then press the
“Settings” button on the touchscreen to display the settings
menu screen. In this mode the Uconnect system allows you
to access programmable features that may be equipped such
as Language, Display, Units, Voice, Clock, Safety & Driving
Assistance, Mirrors & Wipers, Lights, Doors & Locks, Power
Side Steps (if equipped), Auto-On Comfort (if equipped), Engine Off Options, Suspension, Trailer, Audio, Phone/
Bluetooth, SiriusXM Setup (if equipped), Restore Settings
and System Information.
NOTE:
Only one category may be selected at a time.
When making a selection, press the button on the touch -
screen to enter the desired mode. Once in the desired mode,
press and release the preferred setting until a check-mark
appears next to the setting, showing that setting has been
selected. Once the setting is complete, press the back arrow
button on the touchscreen to return to the previous menu or
press the “X” button on the touchscreen to close out of the
settings screen. Pressing the Up or Down Arrow buttons on
the touchscreen on the right side of the screen will allow you
to toggle up or down through the list of available settings.
NOTE:
All settings should be changed with the ignition in the RUN
position.1 — Uconnect Buttons On The Touchscreen
2 — Uconnect Buttons On The Faceplate
9
Page 512 of 607

510 MULTIMEDIA
Language
After pressing the “Language” button on the touchscreen, the following settings will be available:
Display
After pressing the “Display” button on the touchscreen, the following settings will be available: Setting Name Selectable Options
Set Language English Français Español
NOTE:
When the “Set Language” feature is selected, you may select one of multiple languages (English / Français / Español) for all
display nomenclature, including the trip functions and the navigation system (if equipped). Press the “Set Language” button
on the touchscreen, then press the desired language button on the touchscreen until a check-mark appears next to the
language, showing that setting has been selected.
Setting Name Selectable Options
Display Mode Auto Manual
NOTE:
When Day or Night is selected for the Display Mode, the usage of the Parade Mode feature will cause the radio to activate
the Display Brightness Day control even though the headlights are on.
Display Brightness With Headlights
ON – +
NOTE:
To make changes to the "Display Brightness with Headlights ON" setting, the headlights must be on and the interior dimmer
switch must not be in the "party" or "parade" positions.
Page 531 of 607

MULTIMEDIA 529
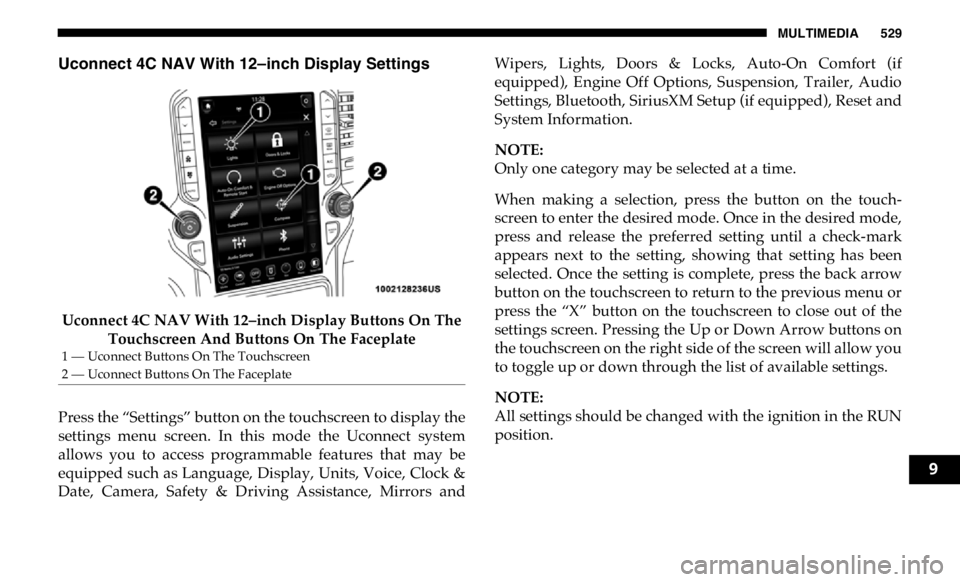
Uconnect 4C NAV With 12–inch Display Settings
Uconnect 4C NAV With 12–inch Display Buttons On The
Touchscreen And Buttons On The Faceplate
Press the “Settings” button on the touchscreen to display the
settings menu screen. In this mode the Uconnect system
allows you to access programmable features that may be
equipped such as Language, Display, Units, Voice, Clock &
Date, Camera, Safety & Driving Assistance, Mirrors and Wipers, Lights, Doors & Locks, Auto-On Comfort (if
equipped), Engine Off Options, Suspension, Trailer, Audio
Settings, Bluetooth, SiriusXM Setup (if equipped), Reset and
System Information.
NOTE:
Only one category may be selected at a time.
When making a selection, press the button on the touch -
screen to enter the desired mode. Once in the desired mode,
press and release the preferred setting until a check-mark
appears next to the setting, showing that setting has been
selected. Once the setting is complete, press the back arrow
button on the touchscreen to return to the previous menu or
press the “X” button on the touchscreen to close out of the
settings screen. Pressing the Up or Down Arrow buttons on
the touchscreen on the right side of the screen will allow you
to toggle up or down through the list of available settings.
NOTE:
All settings should be changed with the ignition in the RUN
position.1 — Uconnect Buttons On The Touchscreen
2 — Uconnect Buttons On The Faceplate
9
Page 532 of 607

530 MULTIMEDIA
Language
After pressing the “Language” button on the touchscreen, the following settings will be available:
Display
After pressing the “Display” button on the touchscreen, the following settings will be available: Setting Name Selectable Options
Language English Espanol Français
NOTE:
When the “Set Language” feature is selected, you may select one of multiple languages (English / Français / Español) for all
display nomenclature, including the trip functions and the navigation system (if equipped). Press the “Set Language” button
on the touchscreen, then press the desired language button on the touchscreen until a check-mark appears next to the
language, showing that setting has been selected.
Setting Name Selectable Options
Display Brightness Mode Auto Manual
NOTE:
Select Auto or Manual display mode and this allows adjustment of overall screen brightness.
Display Brightness Headlight ON - +
NOTE:
To make changes to the "Display Brightness with Headlights ON" setting, the headlights must be on and the interior dimmer
switch must not be in the "party" or "parade" positions.
Display Brightness Headlight OFF - +
Page 579 of 607
MULTIMEDIA 577
Uconnect 4C NAV With 12–inch Display SiriusXM Travel Link Siri Eyes Free — If Equipped
Siri lets you use your voice to send text messages, select
media, place phone calls and much more. Siri uses your
natural language to understand what you mean and
responds back to confirm your requests. The system is
designed to keep your eyes on the road and your hands on
the wheel by letting Siri help you perform useful tasks.
9
Page 581 of 607

MULTIMEDIA 579
Using Do Not Disturb
With Do Not Disturb, you can disable notifications from
incoming calls and texts, allowing you to keep your eyes on
the road and hands on the wheel. For your convenience,
there is a counter display to keep track of your missed calls
and text messages while you were using Do Not Disturb.
Do Not Disturb can automatically reply with a text message,
a call, or both, when declining an incoming call and send it
to voicemail.
Automatic reply messages can be:
• “I am driving right now, I will get back to you shortly.”
• Create a custom auto reply message up to 160 characters.
While in Do Not Disturb, Conference Call can be selected so
you can still place a second call without being interrupted by
incoming calls.
NOTE:
• Only the beginning of your custom message will be seen
on the touchscreen.
• Reply with text message is not compatible with iPhones.
• Auto reply with text message is only available on phones
that support Bluetooth MAP. Android Auto — If Equipped
NOTE:
Feature availability depends on your carrier and mobile
phone manufacturer. Some Android Auto features may or
may not be available in every region and/or language.
Android Auto allows you to use your voice to interact with
Android’s best-in-class speech technology through your
vehicle’s voice recognition system, and use your smart -
phone’s data plan to project your Android powered smart -
phone and a number of its apps onto your Uconnect
touchscreen. Connect your Android 5.0 (Lollipop), or higher,
to one of the media USB ports, using the factory-provided
USB cable, and press the new Android Auto icon that
replaces your “Phone” icon on the main menu bar to begin
Android Auto. Push and hold the VR button on the steering
wheel, or press and hold the “Microphone” icon within
9