Page 374 of 696
372 STARTING AND OPERATING
• Do not put stickers or easy passes over the camera/radarfield of view.
• Any modifications to the vehicle that may obstruct the field of view of the radar/camera are not recommended.
Cleaning Instructions
Dust and dirt can accumulate on the cover and block the
camera lens. Clean the camera lens with a soft microfiber
cloth, being careful not to damage or scratch the module.
Towing A Trailer
ACC while towing a trailer is recommended only with an
Integrated Trailer Brake Controller. Aftermarket trailer
brake controllers will not activate the trailer brakes when
ACC is braking. Offset Driving
ACC may not detect a vehicle in the same lane that is offset
from your direct line of travel, or a vehicle merging in from
a side lane. There may not be sufficient distance to the
vehicle ahead. The offset vehicle may move in and out of the
line of travel, which can cause your vehicle to brake or accel
-
erate unexpectedly.
Offset Driving Condition Example
Page 375 of 696
STARTING AND OPERATING 373
Turns And Bends
When driving on a curve with ACC engaged, the system
may decrease the vehicle speed and acceleration for stability
reasons, with no target vehicle detected. Once the vehicle is
out of the curve the system will resume your original set
speed. This is a part of normal ACC system functionality.
NOTE:
On tight turns ACC performance may be limited.Turn Or Bend Example Using ACC On Hills
When driving on hills, ACC may not detect a vehicle in your
lane. Depending on the speed, vehicle load, traffic condi
-
tions, and the steepness of the hills, ACC performance may
be limited.
ACC Hill Example
5
Page 376 of 696
374 STARTING AND OPERATING
Lane Changing
ACC may not detect a vehicle until it is completely in the
lane in which you are traveling. In the illustration shown,
ACC has not yet detected the vehicle changing lanes and it
may not detect the vehicle until it's too late for the ACC
system to take action. ACC may not detect a vehicle until it
is completely in the lane. There may not be sufficient
distance to the lane-changing vehicle. Always be attentive
and ready to apply the brakes if necessary.Lane Changing Example Narrow Vehicles
Some narrow vehicles traveling near the outer edges of the
lane or edging into the lane are not detected until they have
moved fully into the lane. There may not be sufficient
distance to the vehicle ahead.
Narrow Vehicle Example
Page 377 of 696

STARTING AND OPERATING 375
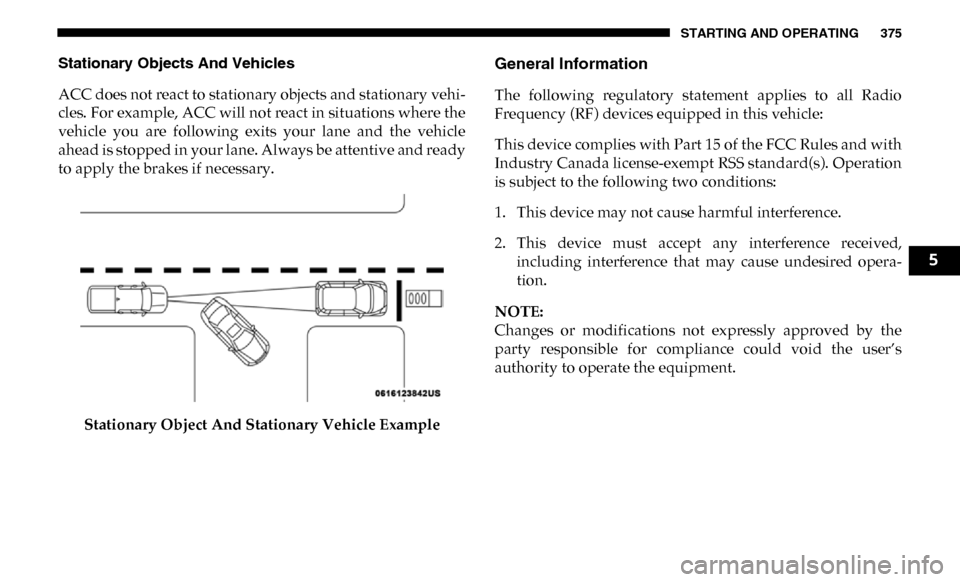
Stationary Objects And Vehicles
ACC does not react to stationary objects and stationary vehi-
cles. For example, ACC will not react in situations where the
vehicle you are following exits your lane and the vehicle
ahead is stopped in your lane. Always be attentive and ready
to apply the brakes if necessary.
Stationary Object And Stationary Vehicle ExampleGeneral Information
The following regulatory statement applies to all Radio
Frequency (RF) devices equipped in this vehicle:
This device complies with Part 15 of the FCC Rules and with
Industry Canada license-exempt RSS standard(s). Operation
is subject to the following two conditions:
1. This device may not cause harmful interference.
2. This device must accept any interference received,including interference that may cause undesired opera -
tion.
NOTE:
Changes or modifications not expressly approved by the
party responsible for compliance could void the user’s
authority to operate the equipment.
5
Page 378 of 696

376 STARTING AND OPERATING
Normal (Fixed Speed) Cruise Control Mode
In addition to Adaptive Cruise Control mode, a Normal
(Fixed Speed) Cruise Control mode is available for cruising
at fixed speeds. The Normal (Fixed Speed) Cruise Control
mode is designed to maintain a set cruising speed without
requiring the driver to operate the accelerator. Speed Control
can only be operated if the vehicle speed is above 20 mph
(32 km/h).
To change between the different control modes, push the
Adaptive Cruise Control (ACC) on/off button which turns
the ACC on and the Normal (Fixed Speed) Cruise Control
off. Pushing of the Normal (Fixed Speed) Cruise Control on/
off button will result in turning on (changing to) the Normal
(Fixed Speed) Cruise Control mode.To Set A Desired Speed
Turn the Normal (Fixed Speed) Cruise Control on.
When the vehicle has reached the desired speed,
push the RES (+) or SET (-) button and release.
Release the accelerator and the vehicle will operate at the
selected speed. Once a speed has been set a message
“CRUISE CONTROL SET TO MPH (km/h)” will appear
indicating what speed was set. This light will turn on when
the system is turned on via the on/off control. It turns green
when the cruise control is set.
To Vary The Speed Setting
To Increase Speed
When the Normal (Fixed Speed) Cruise Control is set, you
can increase speed by pushing the RES (+) button.
The driver's preferred units can be selected through the
instrument panel settings. Refer to ”Instrument Cluster
Display” in “Getting To Know Your Instrument Panel” for
more information. The speed increment shown is dependant
on the speed of U.S. (mph) or Metric (km/h) units:
WARNING!
In the Normal (Fixed Speed) Cruise Control mode, the
system will not react to vehicles ahead. In addition, the
proximity warning does not activate and no alarm will
sound even if you are too close to the vehicle ahead since
neither the presence of the vehicle ahead nor the
vehicle-to-vehicle distance is detected. Be sure to
maintain a safe distance between your vehicle and the
vehicle ahead. Always be aware which mode is selected.
Page 380 of 696

378 STARTING AND OPERATING
Metric Speed (km/h)
• Pushing the SET (-) button once will result in a 1 km/h decrease in set speed. Each subsequent tap of the button
results in a decrease of 1 km/h.
• If the button is continually pushed, the set speed will continue to decrease in 10 km/h decrements until the
button is released. The decrease in set speed is reflected in
the instrument cluster display.
To Cancel
The following conditions will cancel the Normal (Fixed
Speed) Cruise Control without clearing the memory:
• The brake pedal is applied.
• The CANC button is pushed.
• The Electronic Stability Control/Traction Control System (ESC/TCS) activates.
• The vehicle parking brake is applied.
• The braking temperature exceeds normal range (over -
heated).
• The gear selector is removed from the DRIVE position.
• The driver switches ESC to full-off mode. To Resume Speed
To resume a previously set speed, push the RES (+) button
and release. Resume can be used at any speed above 20 mph
(32 km/h).
To Turn Off
The system will turn off and erase the set speed in memory if:
• The Normal (Fixed Speed) Cruise Control on/off button is
pushed.
• The ignition is turned OFF.
• You engage Four-Wheel Drive Low.
• The Adaptive Cruise Control (ACC) on/off button is pushed.
Page 381 of 696

STARTING AND OPERATING 379
PARKSENSE REAR PARK ASSIST — IF EQUIPPED
The ParkSense Rear Park Assist system provides visual and
audible indications of the distance between the rear fascia
and a detected obstacle when backing up, e.g. during a
parking maneuver. Refer to “ParkSense System Usage
Precautions” in this section for limitations of this system and
recommendations.
ParkSense will retain the last system state (enabled or
disabled) from the last ignition cycle when the ignition is
changed to the ON/RUN position.
ParkSense can be active only when the gear selector is in
REVERSE. If ParkSense is enabled at this gear selector posi-
tion, the system will remain active until the vehicle speed is
increased to approximately 7 mph (11 km/h) or above.
When in REVERSE and above the system's operating speed,
a warning will appear within the instrument cluster display
indicating the vehicle speed is too fast. The system will
become active again if the vehicle speed is decreased to
speeds less than approximately 6 mph (9 km/h).
ParkSense Sensors
The four ParkSense sensors, located in the rear fascia/
bumper, monitor the area behind the vehicle that is within
the sensors’ field of view.
The sensors can detect obstacles from approximately
18 inches (45 cm) up to 79 inches (200 cm) from the rear
fascia/bumper in the horizontal direction, depending on the
location, type and orientation of the obstacle.
NOTE:
If equipped as a dually, the ParkSense system has six rear
sensors to assist in detection around the dually flares.
5
Page 382 of 696

380 STARTING AND OPERATING
ParkSense Warning Display
The ParkSense Warning screen is located within the instru-
ment cluster display. It provides visual warnings to indicate
the distance between the rear fascia/bumper and the
detected obstacle. Refer to “Instrument Cluster Display” in
“Getting To Know Your Instrument Panel” for further infor-
mation.
ParkSense Display
When the vehicle is in REVERSE, the warning display will
turn on indicating the system status.
The system will indicate a detected obstacle by showing a
single arc in the left and/or right rear regions based on the
object’s distance and location relative to the vehicle.
If an object is detected in the left and/or right rear region, the
display will show a single solid arc in the left and/or right
rear region and the system will produce a tone. As the
vehicle moves closer to the object, the display will show the
single arc moving closer to the vehicle and the tone will
change from a single 1/2 second tone to slow, to fast, to
continuous.