2019 Ram 3500 Chassis Cab change time
[x] Cancel search: change timePage 5 of 607

3
STEERING WHEEL ......................................................... 53
Tilt Steering Column ................................................... 53
Heated Steering Wheel — If Equipped ..................... 54
DRIVER ADJUSTABLE PEDALS — IF EQUIPPED ..... 55
MIRRORS ............................................................................ 56
Inside Day/Night Mirror — If Equipped ................. 56
Automatic Dimming Mirror — If Equipped ............ 57
Automatic Dimming Mirror With Rear View Camera
Display — If Equipped ................................................ 58
Outside Mirrors ............................................................ 58
Driver's Outside Automatic Dimming Mirror — If
Equipped......................................................................... 59
Power Mirrors — If Equipped .................................... 59
Power Convex Mirror Switch — If Equipped ........... 60
Trailer Towing Mirrors — If Equipped ..................... 61
Heated Mirrors — If Equipped ................................. 62
Tilt Side Mirrors In Reverse — If Equipped .............. 62
Power Folding Outside Mirrors For Standard And
Trailer Tow — If Equipped .......................................... 63
Illuminated Vanity Mirror — If Equipped ................ 65
EXTERIOR LIGHTS ..........................................................66
Multifunction Lever ......................................................66
Headlight Switch ...........................................................66
Daytime Running Lights (DRL) — If Equipped .....67
High/Low Beam Switch ...............................................67
Automatic High Beam Headlamp Control — If
Equipped .........................................................................67
Flash-To-Pass ................................................................68
Automatic Headlights — If Equipped ......................68
Parking Lights And Panel Lights ................................69
Headlights On With Wipers (Available With
Automatic Headlights Only)........................................69
Headlight Delay .............................................................69
Lights-On Reminder......................................................69
Front Fog Lights — If Equipped .................................70
Turn Signals ................................................................70
Lane Change Assist — If Equipped ............................70
Cargo Lights — If Equipped ........................................71
Battery Saver...................................................................71
INTERIOR LIGHTS ............................................................72
Courtesy Lights ..............................................................72
Illuminated Entry ..........................................................74
WINDSHIELD WIPERS AND WASHERS ....................74
Windshield Wipers ......................................................74
Rain Sensing Wipers — If Equipped .........................76
Page 30 of 607

28 GETTING TO KNOW YOUR VEHICLE
NOTE:
The Remote Start Comfort System can be activated and deac-
tivated through the Uconnect System. Refer to “Uconnect
Settings” in “Multimedia” for further information on
Remote Start Comfort System operation.
General Information
The following regulatory statement applies to all radio
frequency (RF) devices equipped in this vehicle:
This device complies with Part 15 of the FCC Rules and with
Industry Canada license-exempt RSS standard(s). Operation
is subject to the following two conditions:
1. This device may not cause harmful interference, and
2. This device must accept any interference received, including interference that may cause undesired opera -
tion.
NOTE:
Changes or modifications not expressly approved by the
party responsible for compliance could void the user’s
authority to operate the equipment.
SENTRY KEY
The Sentry Key Immobilizer system prevents unauthorized
vehicle operation by disabling the engine. The system does
not need to be armed or activated. Operation is automatic,
regardless of whether the vehicle is locked or unlocked.
The system uses a key fob, keyless push button ignition and
a RF receiver to prevent unauthorized vehicle operation.
Therefore, only key fobs that are programmed to the vehicle
can be used to start and operate the vehicle. The system
cannot reprogram a key fob obtained from another vehicle.
After turning the ignition switch to the ON/RUN position,
the vehicle security light will turn on for three seconds for a
bulb check. If the light remains on after the bulb check, it
indicates that there is a problem with the electronics. In addi -
tion, if the light begins to flash after the bulb check, it indi -
cates that someone attempted to start the engine with an
invalid key fob. In the event that a valid key fob is used to
start the engine but there is an issue with the vehicle elec -
tronics, the engine will start and shut off after two seconds.
Page 39 of 607

GETTING TO KNOW YOUR VEHICLE 37
NOTE:
Changes or modifications not expressly approved by the
party responsible for compliance could void the user’s
authority to operate the equipment.
Automatic Door Locks — If Equipped
The auto door lock feature default condition is enabled.
When enabled, the door locks will lock automatically when
the vehicle's speed exceeds 15 mph (24 km/h). The auto door
lock feature can be enabled or disabled by an authorized
dealer per written request of the customer. Please see an
authorized dealer for service.
Automatic Doors Unlock — If Equipped
This feature unlocks all of the doors of the vehicle when
either front door is opened. This will occur only after the
vehicle has been shifted into the PARK position after the
vehicle has been driven (shifted out of PARK and all doors
closed).Automatic Doors Unlock Programming — If Equipped
The Automatic Doors Unlock feature can be enabled or
disabled as follows:
• For vehicles not equipped with a touchscreen radio, refer
to “Instrument Cluster Display” in “Getting To Know
Your Instrument Panel” for further information.
• For vehicles equipped with a touchscreen radio, refer to “Uconnect Settings” in “Multimedia” for further informa -
tion.
NOTE:
Use the Auto Unlock Doors feature in accordance with local
laws.
2
Page 50 of 607

48 GETTING TO KNOW YOUR VEHICLE
Front Heated Seats
The heated seats control buttons are located on the center
instrument panel below the touchscreen, and are also located
within the climate or controls screen of the touchscreen.
• Push the heated seat button once to turn the HI setting on.
• Push the heated seat button a second time to turn theMED setting on.
• Push the heated seat button a third time to turn the LO setting on.
• Push the heated seat button a fourth time to turn the heating elements off.
NOTE:
• The engine must be running for the heated seats to operate.
• The level of heat selected will stay on until the operator changes it. Vehicles Equipped With Remote Start
On models that are equipped with remote start, the driver’s
seat can be programmed to come on during a remote start.
This feature can be programmed through the Uconnect
system. Refer to “Uconnect Settings” in “Multimedia” for
further information.
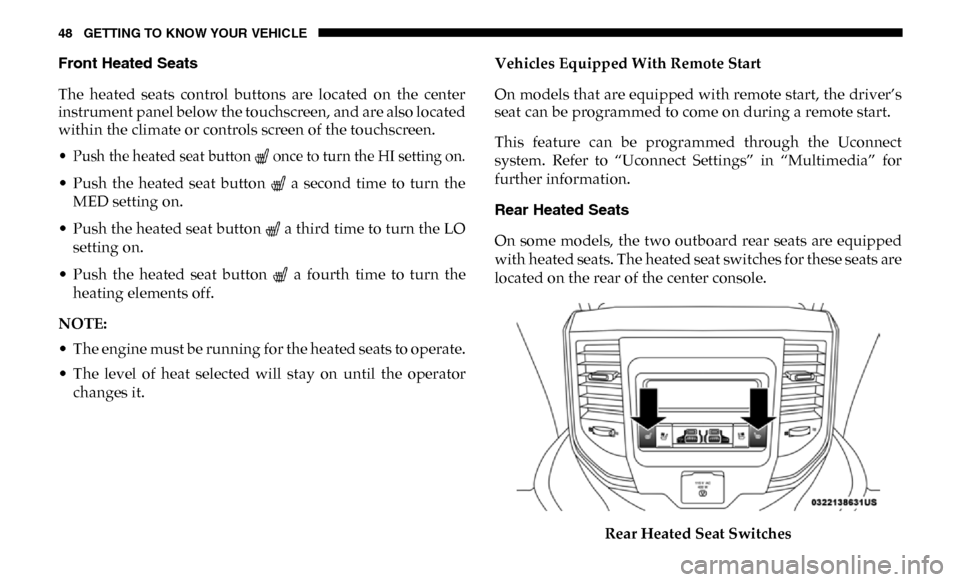
Rear Heated Seats
On some models, the two outboard rear seats are equipped
with heated seats. The heated seat switches for these seats are
located on the rear of the center console.
Rear Heated Seat Switches
Page 51 of 607

GETTING TO KNOW YOUR VEHICLE 49
There are two heated seat switches that allow the rear
passengers to operate the seats independently. You can
choose from HI, MED, LO, or OFF heat settings. Amber indi-
cator lights in each switch indicate the level of heat in use.
• Push the heated seat button once to turn the HI setting on.
• Push the heated seat button a second time to turn the MED setting on.
• Push the heated seat button a third time to turn the LO setting on.
• Push the heated seat button a fourth time to turn the heating elements off.
NOTE:
• The level of heat selected will stay on until the operator changes it.
• Once a heat setting is selected, heat will be felt within two to five minutes.
• The engine must be running for the heated seats to operate.Ventilated Seats — If Equipped
Front Ventilated Seats
Located in the seat cushion are small fans that draw the air
from the passenger compartment and move air through fine
perforations in the seat cover to help keep the driver and
front passenger cooler in higher ambient temperatures. The
fans operate at three speeds, HI, MED and LO.
The front ventilated seats control buttons are located on the
center instrument panel below the touchscreen, and are also
located within the climate or controls screen of the touch -
screen.
• Press the ventilated seat button once to choose HI.
• Press the ventilated seat button a second time to choose MED.
• Press the ventilated seat button a third time to choose LO.
• Press the ventilated seat button a fourth time to turn the ventilation off.
NOTE:
The engine must be running for the ventilated seats to
operate.
2
Page 63 of 607

GETTING TO KNOW YOUR VEHICLE 61
Trailer Tow Power Convex Mirror
NOTE:
If the Power Convex Mirror Switch is not pushed a second
time, the switch will automatically default back to the larger
portion of the outside mirrors after a period of time.
Trailer Towing Mirrors — If Equipped
These mirrors are designed with an adjustable mirror head
to provide a greater vision range when towing extra-wide
loads. To change position inboard or outboard, the mirror
head should be rotated (flipped in or out).
Trailer Towing Position
NOTE:
Fold the trailer towing mirrors rearward prior to entering an
automated car wash.
2
Page 72 of 607

70 GETTING TO KNOW YOUR VEHICLE
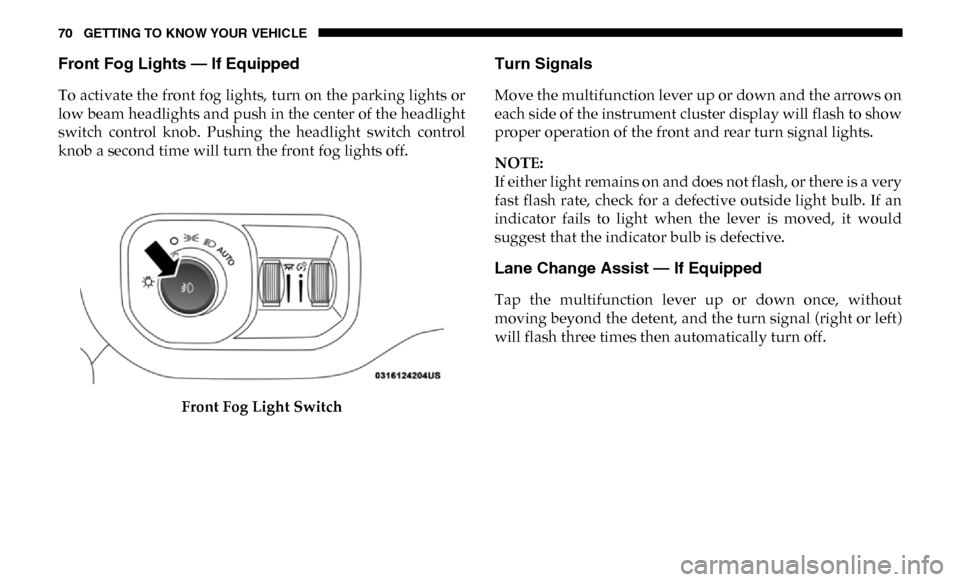
Front Fog Lights — If Equipped
To activate the front fog lights, turn on the parking lights or
low beam headlights and push in the center of the headlight
switch control knob. Pushing the headlight switch control
knob a second time will turn the front fog lights off.Front Fog Light Switch
Turn Signals
Move the multifunction lever up or down and the arrows on
each side of the instrument cluster display will flash to show
proper operation of the front and rear turn signal lights.
NOTE:
If either light remains on and does not flash, or there is a very
fast flash rate, check for a defective outside light bulb. If an
indicator fails to light when the lever is moved, it would
suggest that the indicator bulb is defective.
Lane Change Assist — If Equipped
Tap the multifunction lever up or down once, without
moving beyond the detent, and the turn signal (right or left)
will flash three times then automatically turn off.
Page 91 of 607

GETTING TO KNOW YOUR VEHICLE 89
Automatic Temperature Control (ATC)
Automatic Operation
1. Push the AUTO button on the faceplate, or the AUTObutton on the touchscreen on the Automatic Temperature
Control (ATC) Panel.
2. Next, adjust the temperature you would like the system to maintain by adjusting the driver and passenger
temperature control buttons. Once the desired tempera -
ture is displayed, the system will achieve and automati -
cally maintain that comfort level.
3. When the system is set up for your comfort level, it is not necessary to change the settings. You will experience the
greatest efficiency by simply allowing the system to func -
tion automatically.
NOTE:
• It is not necessary to move the temperature settings for cold or hot vehicles. The system automatically adjusts the
temperature, mode, and blower speed to provide comfort
as quickly as possible. • The temperature can be displayed in U.S. or Metric units
by selecting the US/Metric customer-programmable
feature. Refer to the “Uconnect Settings” in “Multimedia”
for further information.
To provide you with maximum comfort in the Automatic
mode during cold start-ups, the blower fan will remain on
low until the engine warms up. The blower will increase in
speed and transition into Auto mode.
Manual Operation Override
This system offers a full complement of manual override
features. The AUTO symbol in the front ATC display will be
turned off when the system is being used in the manual
mode.
Operating Tips
NOTE:
Refer to the chart at the end of this section for suggested
control settings for various weather conditions.
2